Alter Ego Docs
Welcome to the Alter Ego Docs! This documentation website serves as a knowledge hub for Alter Ego, a game engine to create immersive text adventure role playing games for Discord. It is an ongoing project maintained by Alter Ego Contributors since 2019.
Alter Ego is an open-source project licensed under the AGPL-3.0-or-later license that anyone can fork and modify to suit their own purposes. These docs aim to provide accurate, useful documentation and explanations for both casual users and developers.
If you are a new player, please head over to the Player Guide to get started!
License
These docs are licensed under the Creative Commons Attribution-ShareAlike 4.0 International license.
Alter Ego
Alter Ego facilitates a unique game with an original ruleset. It is a text adventure game using Discord as a medium.
Gameplay
The basis of the gameplay is moving between rooms. Each room is represented by a Discord channel. When a player moves from one room to another, they will be removed from the room channel they are currently in and added to the channel corresponding to the desired room. Upon entering the new room, they will receive a written description of the room, noting any interesting fixtures they find there. They may check who else is in the room with them by looking at the Discord member list. In any given room, a player may speak to other players in the room, inspect fixtures, take and discard items, solve puzzles, and do various other things.
The game is overseen by at least one moderator. The moderator(s) are responsible for creating the map, overseeing combat between players, facilitating role play between players, and much more. Players can reach out to a moderator to perform any actions that cannot be done using Alter Ego. For example, players can attempt to murder other players, use items in creative ways (such as spilling water on the floor to make other players slip and fall), restrain other players, and much more. The purpose of Alter Ego is to automate all tasks that can be automated so that the moderator(s) have more free time to assist players in their role play.
Installation and Setup
Note
These instructions are for installing Alter Ego using Docker. If you wish to not use Docker, please refer to the node installation instructions.
Installation of Alter Ego is rather complicated, but is made significantly easier with Docker. This page will explain the process in detail.
Caution
Do not host Alter Ego for anyone you don’t trust. For more information on why you shouldn’t, see the warning for Flag value scripts.
Step 0: System Requirements
Note
The requirements below are for Linux servers. For system requirements for Windows and Mac, refer to their respective Docker Desktop documentation.
| Minimum | Recommended | |
|---|---|---|
| Architecture | x86_64 / ARM64 | x86_64 / ARM64 |
| CPUs | 1 | 2 |
| Memory | 512 MB | 2 GB |
| OS | Linux | Linux |
| Storage | 10 GB HDD | 20 GB SSD |
Although Alter Ego can run on any system that can run Docker, running it on a Linux VPS is recommended, as performance on Windows and Mac are inferior and can be significantly slower. For instance, the Windows version of Docker relies on virtualization, and therefore suffers a large performance penalty. Some good VPS providers include Hetzner, DigitalOcean, and Linode.
Step 1: Download Alter Ego
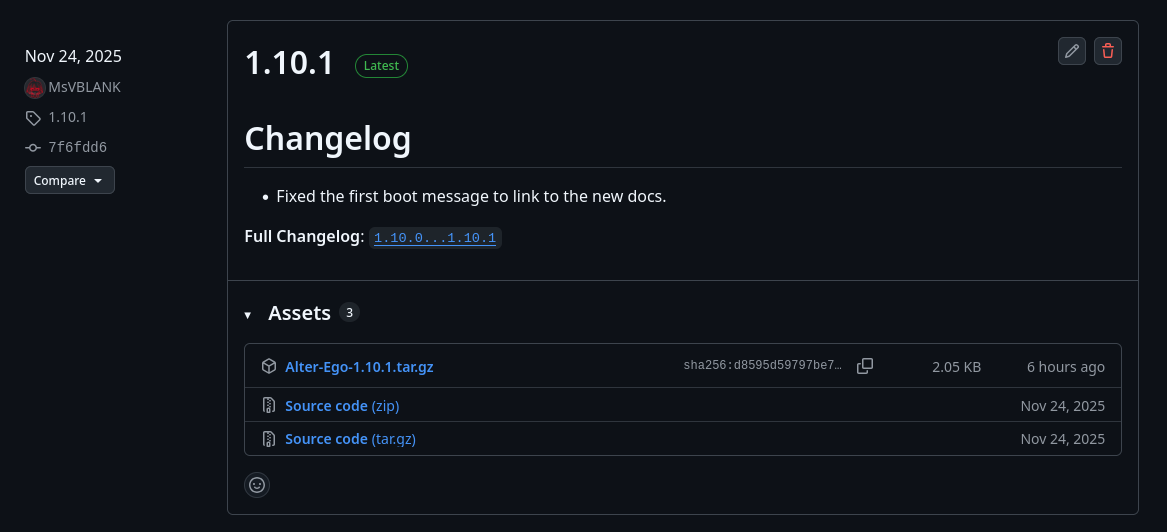
First, you need to download Alter Ego itself. Go to the GitHub Releases page and find the latest release.
There, you will see something like this.
Windows, Linux, Mac Desktop
From this page, download the archive Alter-Ego-[VERSION].tar.gz. Use your favorite archive utility to open the
archive (e.g. 7zip, GNOME Archive Manager, PeaZip), and extract the contents into your folder of choice.
Linux Terminal
Use wget to download the archive straight from the terminal. The following is an example (replace VERSION with the
version you want to download).
wget https://github.com/MsVBLANK/Alter-Ego/releases/download/[VERSION]/Alter-Ego-[VERSION].tar.gz
Unarchive the Alter-Ego folder by running this command (replace VERSION with the version number).
tar -xzvf Alter-Ego-[VERSION].tar.gz
Step 2: Install Docker
If you already have Docker installed, you can skip this step.
Docker is a container management platform that allows users to run applications on their machines regardless of operating system or dependencies. It has very low performance overhead, and provides isolation that improves security.
Although Alter Ego can be installed bare-metal (i.e. without Docker), this is not recommended unless you plan to work on the source code as a developer.
Linux
To install Docker on your Linux system, refer to the link below:
https://docs.docker.com/engine/install/
Most cloud/VPS providers offer a Docker installation image when you create your VM (e.g. Hetzner).
This saves you time and effort from installing Docker yourself, and is highly recommended for new users.
Windows
To install Docker on your Windows system, refer to the link below:
https://docs.docker.com/desktop/install/windows-install/
You can also consult this YouTube tutorial for a step-by-step guide.
Mac
To install Docker on your Mac system, refer to the link below:
https://docs.docker.com/desktop/install/mac-install/
You can also consult this YouTube tutorial for a step-by-step guide.
Step 3: Create a Discord bot
Now that you have Alter Ego installed, you’ll need to create a new Discord bot to bind its functionality to. Navigate to the Discord Developer Portal, and once you log in to your Discord account, create a new application. This example will use an application called “Alter Ego”, but you can call it whatever you like. Once you create the application, you’ll be taken to a page that looks like this:
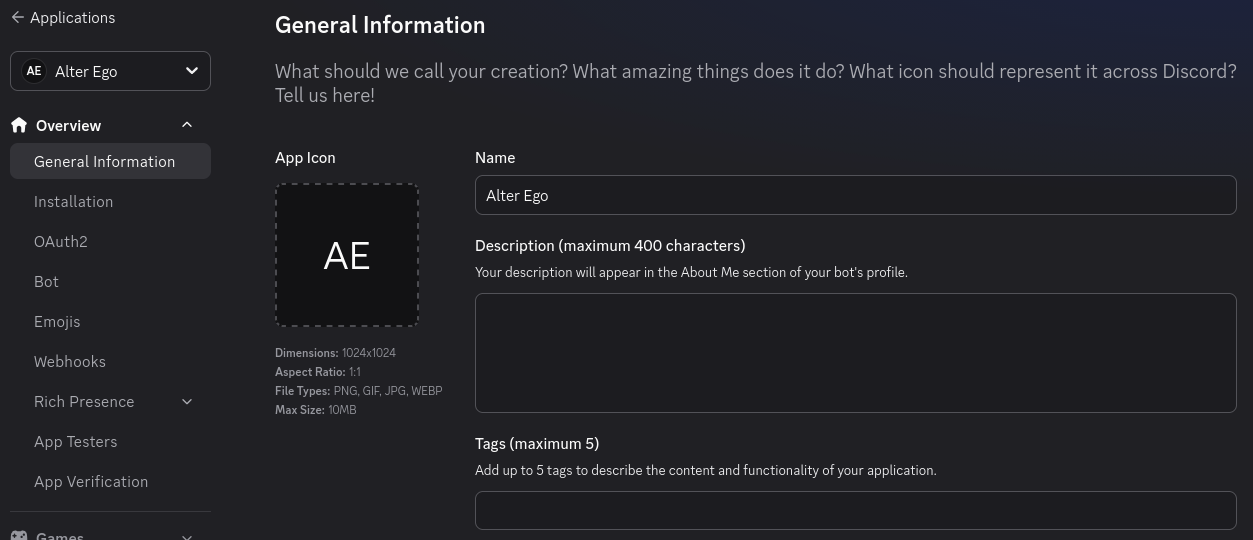
You can ignore this for now. Navigate to the Installation tab on the left-hand side. This will bring you to this page:
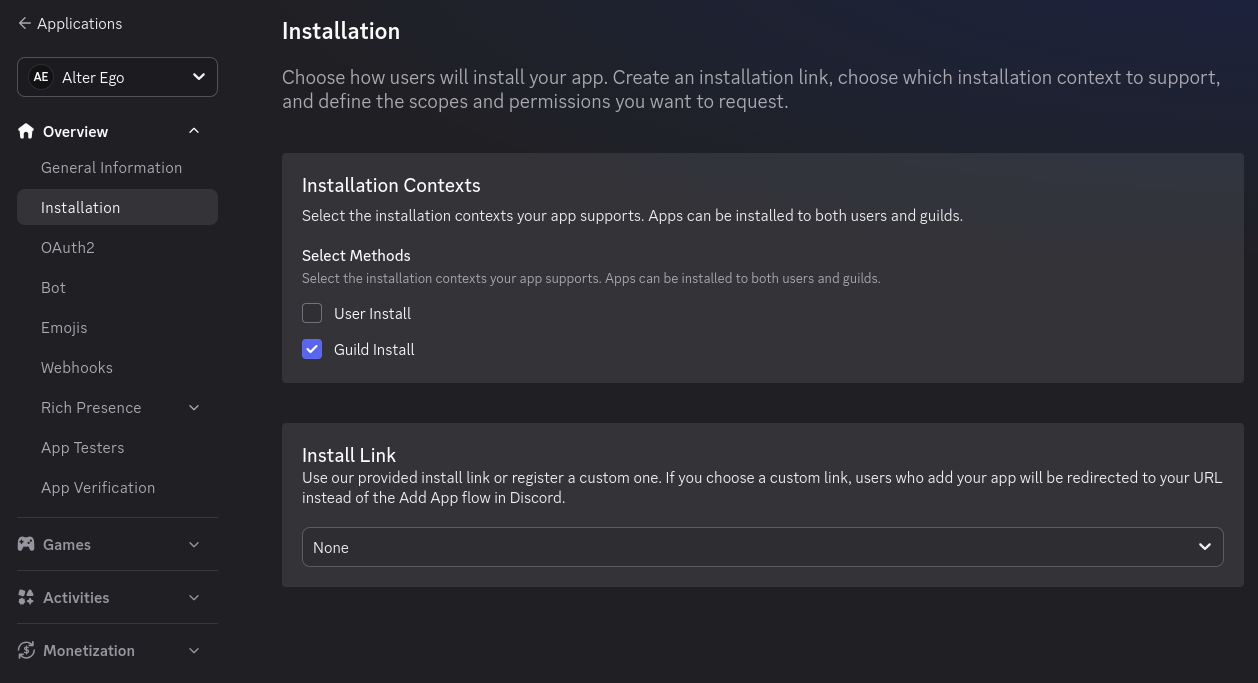
Under “Installation Contexts”, uncheck “User Install”, and make sure “Guild Install” is checked. In the dropdown under “Install Link”, select “None”. You don’t want other people to be able to install your bot to their servers, so there’s no need to create a public installation URL.
Now navigate over to the Bot tab on the left-hand side. This will bring you to this page:
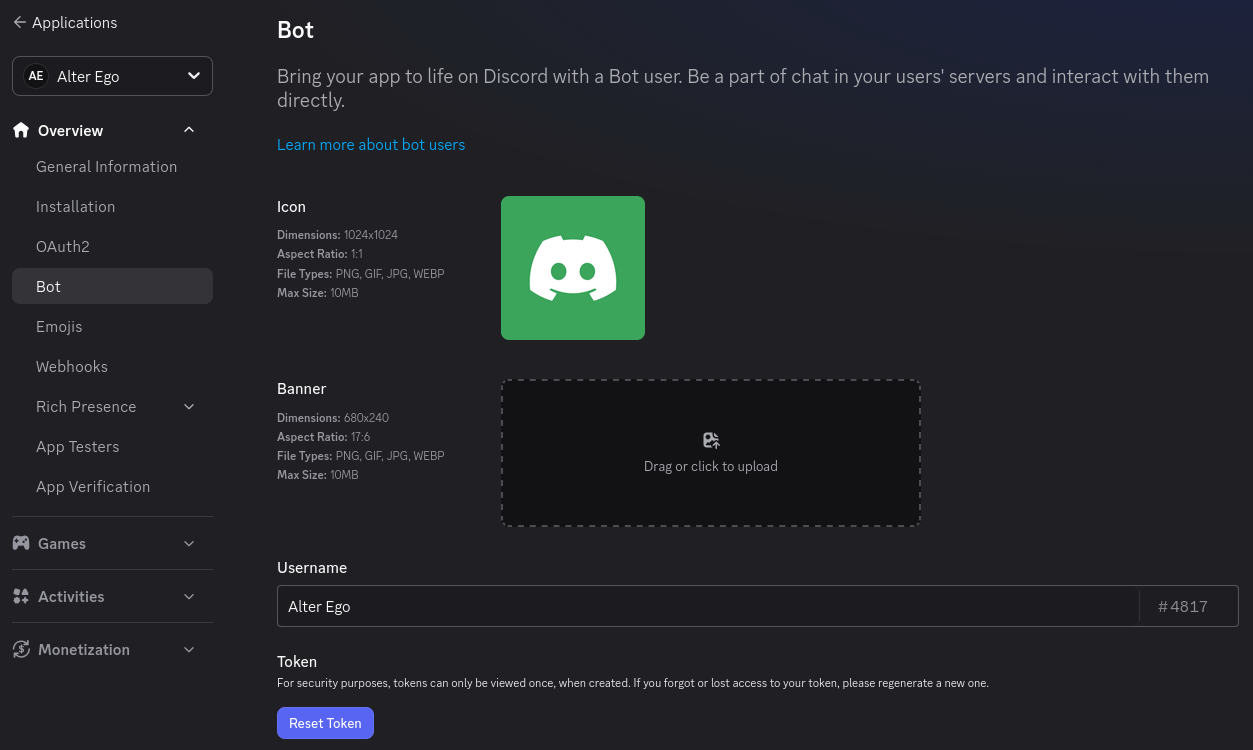
On this page, you can change the bot’s name, set its profile picture, upload its banner image, and a few other things. Take note of the “Reset Token” button; you’ll need to press it later, but you can ignore it for now.
Scroll down a bit, and you’ll find some settings. First, under “Authorization Flow”:
- Disable the “Public Bot” setting.
- Alter Ego can only be in one server, so this will prevent other people from inviting it to their servers.
- Disable the “Requires OAuth2 Code Grant” setting.
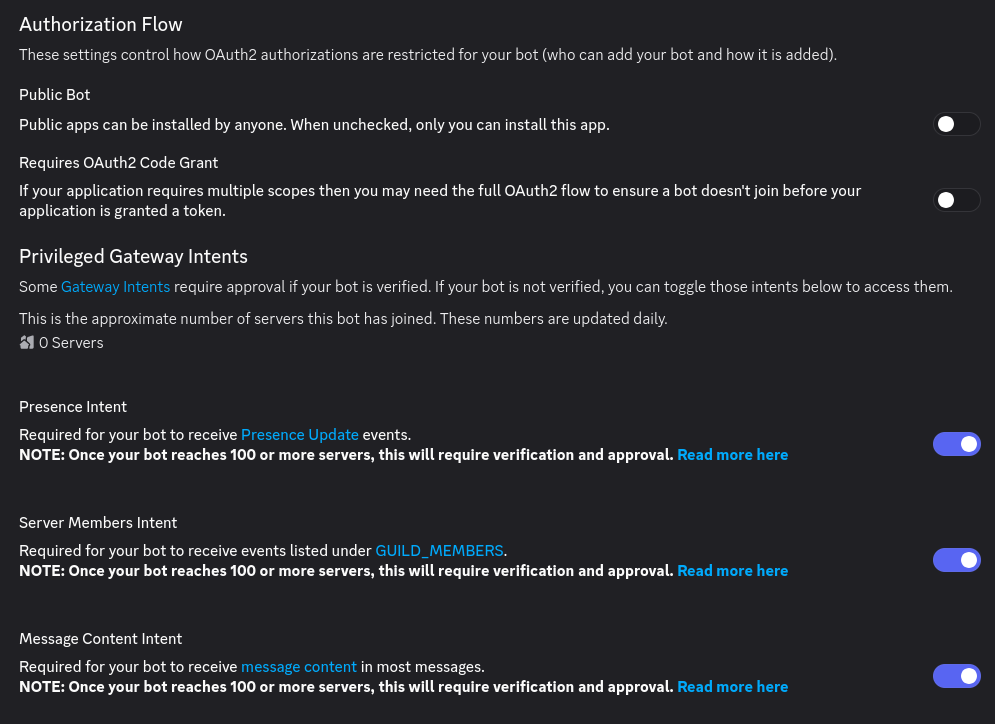
Next, you’ll find more settings under “Privileged Gateway Intents”:
- Enable the “Presence Intent” setting.
- Enable the “Server Members Intent” setting.
- Enable the “Message Content Intent” setting.
Without all of these set according to these instructions, Alter Ego will not function properly. If you’ve done everything right, your settings will look like this:
Step 4: Create a Discord server
Before you can get Alter Ego up and running, you’ll have to create a Discord server. You can call it whatever you like, but once it’s made, you’ll have to set a number of things up.
The easiest way to create a server is using this template, which will add all of the requisite roles and channels for you. If you want to set those up manually, refer to this page.
Enable Developer Mode
You’ll have to enable Developer Mode for your account for the next few steps. To do this, navigate to your User Settings in Discord. Open the Developer tab near the very bottom. You’ll see a switch labeled Developer Mode. Turn it on if it’s not already enabled.
Step 5: Invite your bot to the server
Back on the Discord Developer Portal, click on the OAuth2 tab on the left-hand side. Scroll down to the “OAuth2 URL Generator” section:
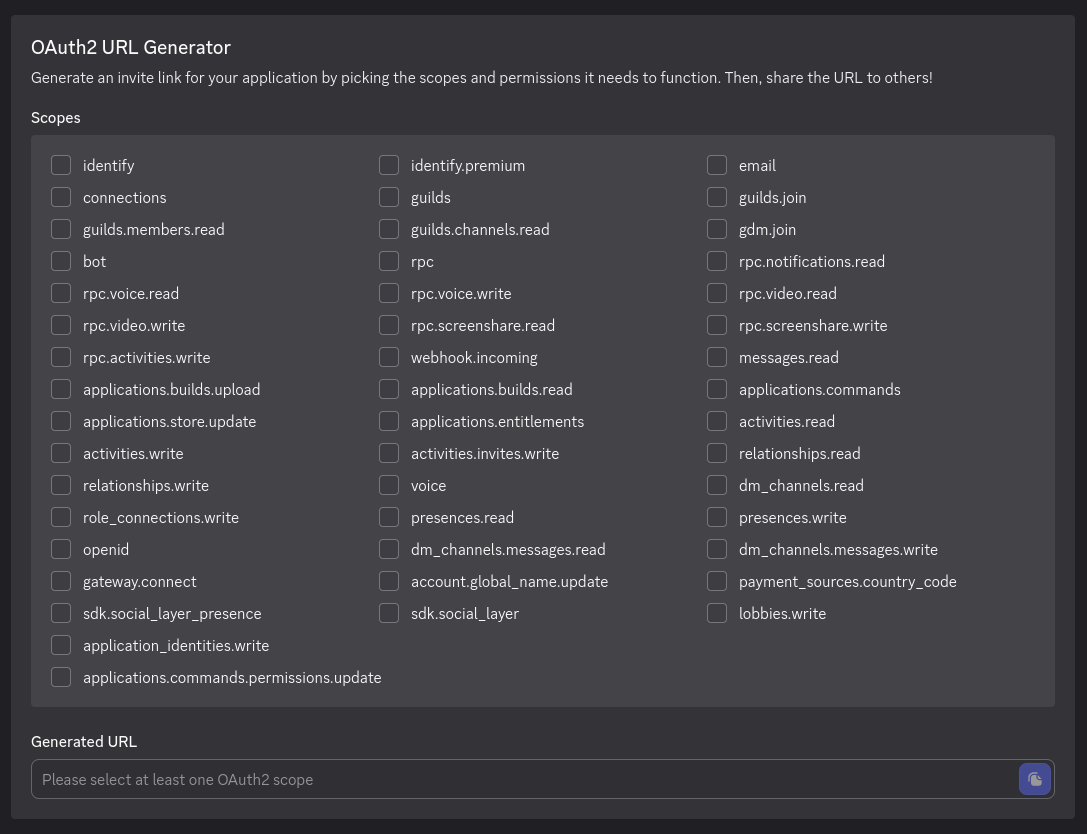
Under “Scopes”, Check bot, then in the “Bot Permissions” section that appears below it, check Administrator. You should have something that looks like this:

Finally, there will be two text boxes underneath the “Permissions” section:

Under the “Integration Type”, dropdown, select “Guild Install”. Then, copy the URL in the “Generated URL” box, send it to a Discord channel in the server you just made (ideally to a channel that only you have access to), and click on it. It should display a menu that looks like this:
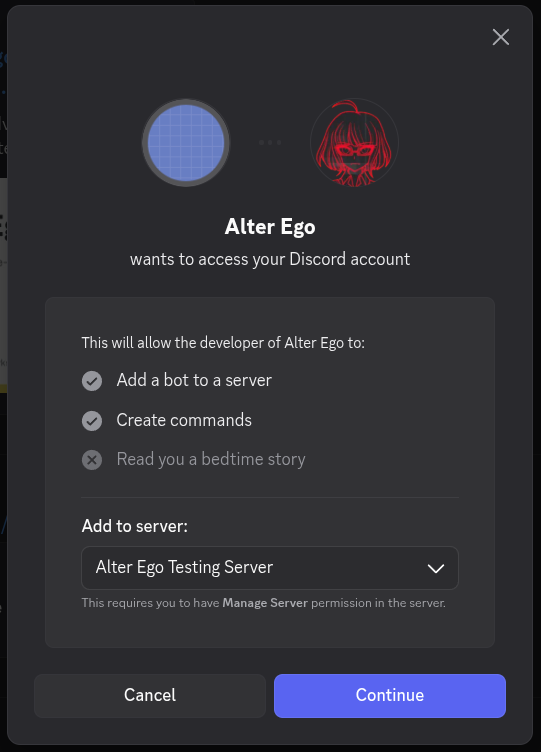
Make sure the server you just made is the one that’s selected in the drop down, then click Continue. Make sure Administrator is checked, and confirm by clicking Authorize.
With that, your bot will join your server! However, it doesn’t do anything at the moment. You still need to do a few things.
Step 6: Create a spreadsheet
Next, you will need to create a spreadsheet for Alter Ego to use. For more information, see the article on spreadsheets.
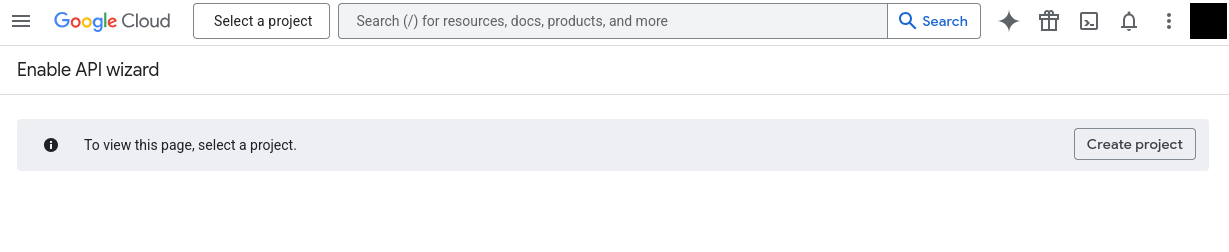
Step 7: Enable the Google Sheets API
In order for Alter Ego to work properly, you will need to create a new Google APIs project. The easiest way to do that is to navigate to the Enable Google Workspace APIs page and click the Enable Sheets API button near the bottom.
That should bring you to a page that looks like this:
Create a project. You can call it anything you want. In the prompts that follow, confirm that you want to enable the Google Sheets API. If you did it right, you’ll be shown a message that says “You have successfully enabled Google Sheets API.”
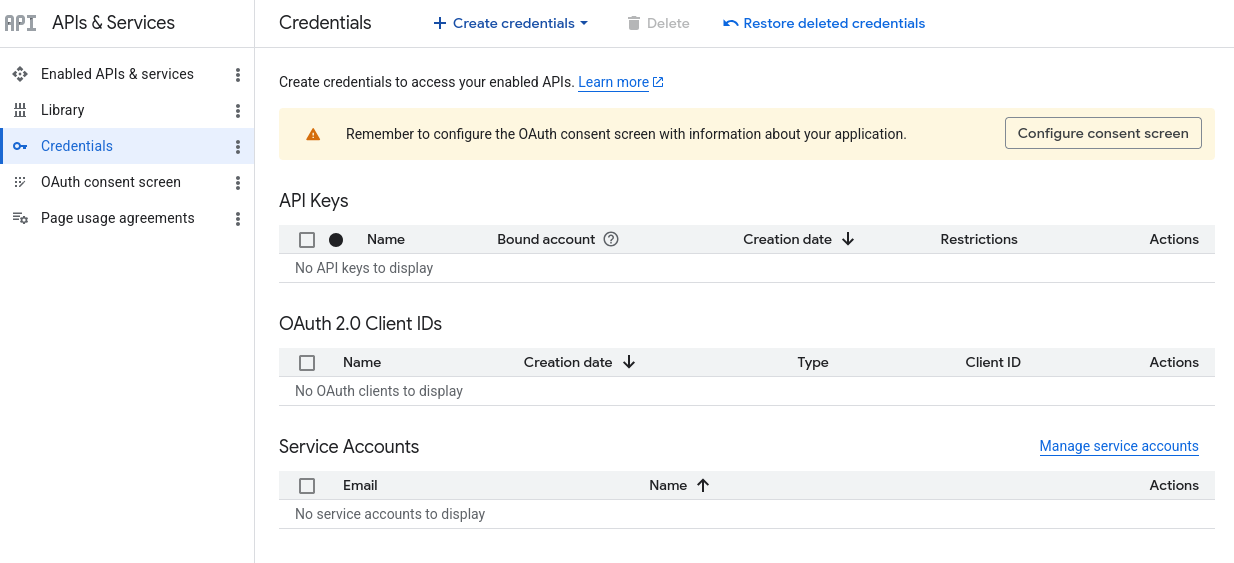
Step 8: Create a service account
In order to allow Alter Ego to read and write to the spreadsheet, you’ll need to create a service account for it to use. To do that, open the navigation menu in the top left corner and navigate to the Credentials tab under APIs & Services, like so:

On the next page, click the link that says Manage service accounts:
On the next page, click Create service account. You should be brought to a page like this:
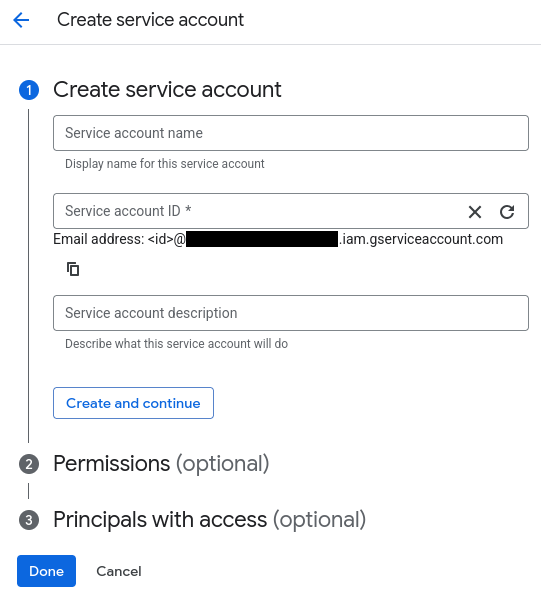
For the name, enter the bot’s name; in this case, it’s Alter Ego. You can set its ID if you want, or just accept the one it generates. For the description, enter whatever you like. Click Create and continue.
In the Permissions menu, grant it the “Owner” role. You can skip step 3. Once you’re done, you’ll be returned to the Service accounts page.
Once your service account is made, you should see it under the service accounts list. There will be a meatball menu under the Actions column for it. Click on that, and select Manage keys. You’ll be taken to this page:
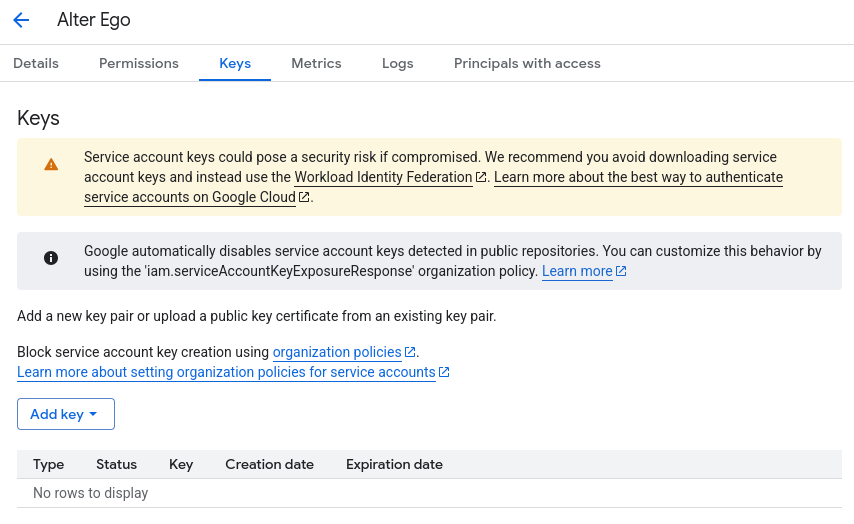
Click the Add Key button and select Create new key. Make sure the key type is JSON, then click Create. This will download a file to your computer. Don’t touch that just yet - there’s one thing to do first. Return to the Service Accounts page.
Step 9: Share the spreadsheet
On the Service Accounts page, you should now see the service account you just created. Copy its email address, then head over to the spreadsheet you made earlier.
On the spreadsheet, press the Share button. Paste the service account’s email address into the dialog box and make sure to give it permission to edit the spreadsheet. You can also do the same with any other moderators you have, if you haven’t done so already. Once you’ve done that, you nearly have everything you need.
Caution
Do not grant write access to the spreadsheet to any users that you don’t fully trust.
Step 10: Edit .env file
The .env file is used to change all settings for Alter Ego. Before running Alter Ego, you must change several values
here.
First, open the Alter-Ego folder that you downloaded. Then, make a copy of .env.example and name it .env (note you
may have to set your file browser to show hidden files). On Linux, use these commands.
cd Alter-Ego
cp .env.example .env
Open the .env file in a text editor. You should see something like this:
# This is an example of an environment file for docker compose.
#
# '#' has been used to comment out any variables that do not need
# to be changed from default. Remove '#' to set them if you want
# to use something other than the default value.
#
# Environment variables should be enclosed in single quotes, and
# should follow the data type next to it (e.g. String).
# For instance: DEBUG_MODE='true'

# Time Zone
# See https://en.wikipedia.org/wiki/List_of_tz_database_time_zones
# for a complete list of timezones.
TZ='America/New_York'

# Credentials
DISCORD_TOKEN=                                # String. Token of discord bot
G_PROJECT_ID=                                 # String. Google project ID
G_PRIVATE_KEY_ID=                             # String. Google private key ID
G_PRIVATE_KEY=                                # String. Google private key
G_CLIENT_EMAIL=                               # String. Google client email
G_CLIENT_ID=                                  # String. Google client id
G_CLIENT_X509_CERT_URL=                       # String. Google cert url

# Settings
SPREADSHEET_ID=                               # String. ID of spreadsheet
...
(file continues on)
Setting Time Zone
Before running Alter Ego, you should set the time zone for your container, so that events in the game sync up to your location.
Edit the TZ line so that it matches the time zone where the game occurs in. For instance, if you want to set the
timezone to London, you would change the line to TZ='Europe/London'. For a complete list of timezones, refer to
this Wikipedia article.
Setting Credentials
Navigate back to the Discord Developer Portal once again and find the application you created earlier. Open the Bot
tab. Under Token, click Reset Token. You may be asked to authenticate with 2FA before proceeding. Once the token
has been created, click Copy. Paste it inside the single quotes after DISCORD_TOKEN= in your .env file.
Caution
This token must not be shared with anyone, as it grants full access to your bot’s account.
Next, open the file you downloaded after creating the service account in any text editor. The file should look something like this:
{
    "type": "service_account",
    "project_id": "(CONFIDENTIAL)",
    "private_key_id": "(CONFIDENTIAL)",
    "private_key": "(CONFIDENTIAL)",
    "client_email": "(CONFIDENTIAL)",
    "client_id": "(CONFIDENTIAL)",
    "auth_uri": "https://accounts.google.com/o/oauth2/auth",
    "token_uri": "https://oauth2.googleapis.com/token",
    "auth_provider_x509_cert_url": "https://www.googleapis.com/oauth2/v1/certs",
    "client_x509_cert_url": "(CONFIDENTIAL)",
    "universe_domain": "googleapis.com"
}
Caution
Almost all of the data in this file is confidential. Don’t share it with a single person, and make absolutely sure not to put it online somehow.
Next, add the Google service account credentials to your .env file. Copy each corresponding value in the Google
credentials file into your .env file. For instance, copy project_id into PROJECT_ID=. Replace the double quotes in
the original file with single quotes. Don’t worry about any values that aren’t in the .env file, you won’t need them.
If you did everything right, the credentials section should look like this:
...
# Credentials
DISCORD_TOKEN='(CONFIDENTIAL)'                      # String. Token of discord bot
G_PROJECT_ID='(CONFIDENTIAL)'                       # String. Google project ID
G_PRIVATE_KEY_ID='(CONFIDENTIAL)'                   # String. Google private key ID
G_PRIVATE_KEY='(CONFIDENTIAL)'                      # String. Google private key
G_CLIENT_EMAIL='(CONFIDENTIAL)'                     # String. Google client email
G_CLIENT_ID='(CONFIDENTIAL)'                        # String. Google client id
G_CLIENT_X509_CERT_URL='(CONFIDENTIAL)'             # String. Google cert url
...
Setting Spreadsheet ID
Finally, you must set the spreadsheet ID. A Google Sheets URL contains two IDs. The first is the ID of the entire spreadsheet itself. The second is the ID of the individual sheet currently open in the spreadsheet. You can retrieve the ID of either by copying them from the URL. The format is as follows:
https://docs.google.com/spreadsheets/d/(entire spreadsheet ID)/edit#gid=(individual sheet ID)
Copy the ID for the entire spreadsheet and paste it in single quotes after SPREADSHEET_ID=. For instance.
SPREADSHEET_ID='1234567890'
(Optional) Fill out other settings
If you wish to change other settings other than the ones outlined above, you can edit their entries in the .env file.
Remember to uncomment (i.e. remove the # before the line) for them to go into effect. For more information, see the
article on settings.
Step 11: Run Alter Ego
Finally, you can run Alter Ego. First, make sure that you are in the directory where Alter Ego is installed.
In a terminal, run:
docker compose up -d
If you did everything right, you’ll see something like this:
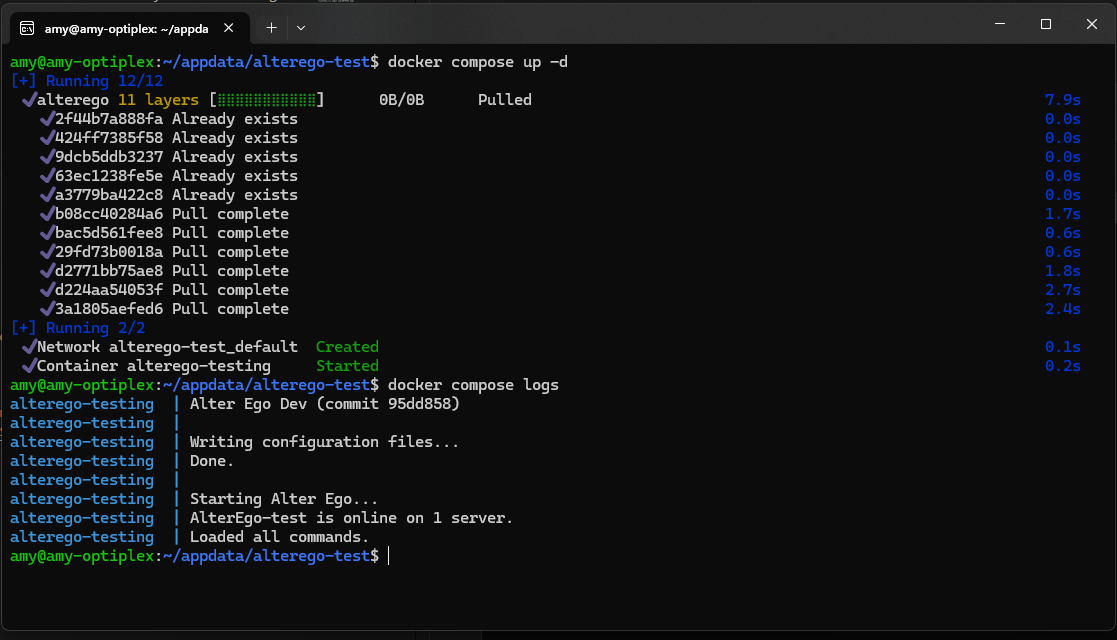
If you run the command docker compose logs, you should see this:
alterego  | Alter Ego (VERSION) (commit (COMMIT))
alterego  |
alterego  | Writing configuration files...
alterego  | Done.
alterego  |
alterego  | Starting Alter Ego...
alterego  | AlterEgo-test is online on 1 server.
alterego  | Loaded all commands.
Congratulations! If everything went well, you can now use Alter Ego. Good luck!
Updating Alter Ego
To update Alter Ego, first take the container down with this command.
docker compose down
Next, open docker-compose.yml. You should see something like this.
services:
    alterego:
        image: ghcr.io/msvblank/alter-ego:1.10.1
        container_name: alterego
        env_file:
            - .env
        volumes:
            - data:/home/node/app/Configs
        restart: unless-stopped

volumes:
    data:
Then, change the image: line so that it corresponds to the new version of Alter Ego. For instance, change 1.10.1 to
2.0.0. The line should now read something like this.
image: ghcr.io/msvblank/alter-ego:2.0.0
Save the file and quit your text editor.
Next, pull the new update using the following command:
docker compose pull
Finally, simply start the container again and Docker will automatically update Alter Ego for you.
docker compose up -d
Docker Commands
To view the status of your container, run:
docker ps
To view the logs of Alter Ego, run while in the same directory as Alter Ego:
docker compose logs
To stop the container, run:
docker compose stop
To start the container after stopping it, run:
docker compose start
To restart the container, run:
docker compose restart
For a full reference to Docker Compose, refer to the official documentation.
Moderating
Moderating is a difficult endeavor. Although Alter Ego was designed to make the process easier, it presents its own challenges. In this tutorial, the process will be explained.
Purpose
The purpose of a moderator is to facilitate gameplay. While Alter Ego does most of the heavy lifting, there are many things it cannot do. A moderator must draw the Map, program the game world on the spreadsheet, create and manage the server, host Alter Ego, respond to player inquiries, handle player actions that aren’t automated, handle combat, fix bugs, and much more.
A good moderator must remain calm even during the most tense situations. However, these responsibilities can and do take a toll on a moderator, and it is all too easy to become overwhelmed. For this reason, it is strongly recommended to have multiple moderators running a game so that the responsibilities are not all carried out by one person.
Motivation
Before you can become a moderator, you should think about whether it’s right for you. Moderating a game is not easy, and it takes a specific kind of person to excel at it. Consider why you want to do so before setting anything in stone. Do you have a story you want to tell that would be best told in a game using Alter Ego? Do you have experience in game design or an interest in learning about it? Do you easily grasp basic programming concepts? Do you find repetitive tasks enjoyable? Do you have enough free time to dedicate months of your life to programming, writing, and testing a game world? Will you have enough free time and energy to moderate game sessions for several hours every day? Will you be able to financially support yourself and tend to your physical needs during that time? If you can answer yes to all of these questions, then you’re a perfect fit to moderate a game with Alter Ego. If you answer no to any of them, consider whether this style of gameplay is right for you. If you simply want to host a role play, there are much simpler alternatives that you could use instead.
First steps
Once you’ve decided that you want to be a moderator, your first step should be to install and set up Alter Ego. To do that, see the following articles:
Once you’re able to use Alter Ego, you must learn how it works. Alter Ego is a complex tool with many intricate behaviors that you need to familiarize yourself with. The best way to get started is to read all of the articles in this book of documentation - most importantly, the Data Structures entries and the writing descriptions tutorial. After that, you can begin putting your knowledge into practice.
Familiarize yourself with all of the commands available to you as a moderator by utilizing the help command to read the details of each one. Memorize the syntax of each command and all of the ways it can be used. Create a small test game consisting of a few Rooms. Get a good understanding of how Alter Ego interprets data entered on the spreadsheet and what will make it return errors when you load data. Make use of the parse command to catch errors in your writing. Test your game using a separate Player account and observe what bugs Alter Ego is unable to detect. Implement fixes for them and test again. Develop a habit of loading, parsing, testing, and fixing your game until it’s second nature to you.
Planning a game
Once you’re intimately familiar with Alter Ego’s workings, you can begin planning a real game. Consider what kind of story you want to tell. The best kinds of stories told in this game environment have many moving pieces that are gradually revealed throughout the course of the game. This style of storytelling lends itself well to the nature of the Alter Ego’s gameplay style, where players are only aware of things they’ve personally seen. It allows each player to attempt to piece together the clues in order to shine light on the overarching mysteries. The specifics of what story you want to tell are up to you, but you should at least have a general plan before formally announcing your game.
Due to how much work it takes to develop a game for Alter Ego, it is strongly recommended that you select your players several months in advance. Having a cast of characters set in stone long before the game is held makes it significantly easier to tailor the game world to them.
Also during the planning phase, you should decide on a setting. A good setting effortlessly aids the story you want to tell. When you’ve decided on a setting, you can begin making a map to display how the various rooms connect to one another. However, you should keep in mind the scope of the game and how you’re going to make the map manageable. A map with hundreds of rooms is a gargantuan task to implement, so you should start small. Remember: what makes a map engaging to the players isn’t how many rooms it has, but how interesting those rooms are to explore.
Writing a game
By far the longest and most difficult part of a moderator’s job is writing the game. Writing takes place entirely on the spreadsheet. In this stage of development, your goal must be to write all of the Rooms on the map and fill them with Fixtures, Room Items, and Puzzles for Players to interact with. You’ll need to write Prefabs to provide functionality to Items, add Recipes for Players to carry out on those Items, and create Events to enhance the game world. Creating Status Effects can make Players feel more immersed in the game, and writing Gestures makes it easier for them to roleplay simple actions. You’ll need to personalize each Player’s data to suit their character and give them Inventory Items to start out with. You may even use Flags to store frequently accessed data and build more complex interactions. When all of these features work together in harmony, it can create an experience that makes it easy for the players on the other side of the screen to feel like they really are a part of the world.
Nevertheless, this is a very time-consuming process. It takes months of continuous work to create a functioning game. Remember that when the game occurs, it takes place in real-time; you will not have time to fix numerous bugs without severely disrupting gameplay. This is why you must get into the habit of loading, parsing, testing, and fixing your game during the writing process. This is game development - using Alter Ego is no different from using a game engine like RPG Maker. This means you have to test your game extensively. Just because Alter Ego loads everything without giving you error messages does not mean everything works as intended, or at all. It is your responsibility to ensure that your game functions properly before you start running it. The more bugs you catch and fix before the game begins, the fewer you’ll have to deal with during the game proper, and the less stressful the experience will be.
In order to write a fun game, your goal should be to make each room serve a purpose. When writing a room, ask yourself what it contributes to the game overall. Is it somewhere that Players would want to go? Are there things to do in that room when they first arrive? What about upon subsequent visits? Does this room suit the setting? Does it provide valuable insights into the world’s lore? Will this room be used to further the story? If your game is a killing game role play, can this room be used to create an interesting murder? Is there already a room that serves the same purpose that this one would? Remember, the ultimate purpose of a room is to provide players a setting in which to role play. If it doesn’t serve that purpose, why have that room at all? If there’s nothing interesting to do there, then nobody will go there, and you’ll have wasted your time creating that room.
If you’re conducting a killing game role play, new areas of the game world are generally expected to be made accessible to the players as they progress through the story. You don’t have to follow this procedure, but it does keep the game engaging if the players always have a new area to explore. You can plan for this by using Flags to mark the current point in the story—like chapters—that, when set with certain values, automatically unlock the corresponding section of the map. Then, when writing Room descriptions, you can use if conditionals to systematically change the descriptions to indicate the new state of the game world based on that Flag’s value. If you write your game with this procedure in mind, it allows you to pace the storytelling such that the players are always gaining new insights into the lore exactly when you want them to.
This procedure also allows you to make certain areas of the map more memorable. If each section of the map has its own unique theme, that allows you to tailor each room to suit that theme, as well as write the lore contained in that section to revolve around it. These things can all make your story more compelling and more memorable.
Making all of the Players NPCs during the writing process can be helpful. This way, you can write up and test all of their data in advance without loading them into the game world before the game begins, and without them even being in the server.
This section of this tutorial is a work in progress. There is always more to consider when writing your game. Writing is a learned skill in general, as it is for games using Alter Ego.
Preparing a game
When most or all of your game has been written, it comes time to prepare for the game to begin. This can be a stressful period in the development cycle.
The first step you should take in the preparation phase is to make your server presentable before inviting the players. If you have any moderator-controlled Player characters that you’d like to keep hidden, you should give their account the Hidden role and making sure there are no publicly accessible channels where they appear on the user list. Make sure to delete any messages in publicly accessible channels that spoil the game. If any of your room channels have message history enabled for players, make sure to delete any messages that have been sent in that channel. Create any supplementary channels that the players might need, such as RP rules, a guide to writing Alter Ego dialog, a guide to the basics of the RP universe, rules for the game, a list of players, maps, and so on. If you’re creating any new channel categories that are intended to be publicly accessible, remember to activate the read message history permission for everyone, and deny access to members with the Hidden role.
Once you’ve prepared the server, you can invite all of the players to join. When they do, you’ll need to change their nicknames to match the names of their Player characters and give each of them the Player role. Make sure to remind each player to check their privacy settings for the server to make sure that Direct Messages from server members are allowed; otherwise Alter Ego will be unable to send them messages. Your players will likely be excited that the game is about to begin - let yourself be excited with them.
If, during the writing process, you made all of the Players NPCs, you’ll need to make them regular Players now by
changing their title and assigning their Discord ID. Be warned that
once you do this, loading the game after this point will give them access to the channel associated with their
location. If you want to continue testing, give them all a Status Effect on the spreadsheet with the following
behavior attributes:
disable all, no speech, no channel, hidden, no hearing, no sight, unconscious. This will prevent them from gaining
access to any Room channels and from getting most messages related to the game, but be aware that they will still
receive Status Effect inflicted
and cured messages unless their other Status Effects
are manually removed from the sheet. For this reason, it’s recommended that if you’re not currently testing something,
you should keep Alter Ego running without having any game data loaded until it’s time to begin. Once you finish
testing, you can simply reboot Alter Ego to unload everything.
During this step, you should consult with all of the players and decide when the game sessions will be held. For a killing game role play, the Alter Ego works best with daily 8-hour sessions, with break days between chapters. This is a huge time commitment, and coordinating the schedules of 16 or more people is a difficult task. Try to find the time that consistently works for the most people possible. Of course, choosing the date that the role play begins on is hard, too - arguably even more so than selecting a time for the sessions to begin. The first day of the session is one of the most important - it’s one of the few times you want every player to participate. Just do the best you can to find a day that works for everyone.
When preparing a game, you should procure a Virtual Private Server (VPS) on which to host Alter Ego. Running it
continuously on a (Windows) personal computer is SEVERELY not recommended. Doing so will likely result in Alter Ego
being slow and unresponsive when dealing with more than a few Players, and it may even crash. Running it on a VPS will
drastically increase performance. If you have no experience operating a VPS, it can be challenging to learn, but it is
worth it. You will not find a VPS for free, and you should be suspicious of any that purport to be free. However, there
are affordable options, especially considering how little operating power Alter Ego requires, with options ranging
from $4 a month. Some good VPS providers
include Hetzner, DigitalOcean,
and Linode. Once you have a VPS, you’ll need to repeat steps 1-2 of
the installation and setup tutorial on it, but then you can copy your .env file over
to it and get Alter Ego up and running with ease.
You can write a custom spawn message for all of the Players to receive when the game begins for the first time. This can be an effective way of immediately immersing the Players into the game world. To accomplish this, all you need to do is make an Event which is ongoing at the start of the game. For the sake of example, this Event will be called SPAWN. Once it exists, you can modify the description of the first Exit in each Room that the Players spawn into to contain an if conditional tag that checks whether the SPAWN Event is ongoing or not. This message can be customized to suit each individual Player. You can then end the SPAWN Event immediately after everyone spawns in so that they don’t receive the spawn message again when they inspect or enter the Room through the first Exit. An example of a description that uses this tactic looks something like this:
<desc><if cond="findEvent('SPAWN').ongoing === true"><s>You wake up feeling disoriented.</s> <s>It doesn't take long for your eyes to adjust to the <if cond="findEvent('DAYTIME').ongoing === true">bright</if><if cond="findEvent('NIGHTTIME').ongoing === true">dim</if> light of the room, and you find yourself in bed in what appears to be a small dorm of sorts.</s> <s>You don't remember how you got here.</s><br /><br /><s>You look around.</s> <s>You're currently lying in a BED, which is pushed into the corner of the room.</s> <s>A NIGHTSTAND is just to your right.</s> <s>In the corner past it is a small CLOSET with a DRESSER beside it.</s> <s>A MONITOR is mounted on the wall to your right.</s> <s>Looking up at the ceiling, you notice a CAMERA between the dull fluorescent lights.</s> <s>On the wall to your left, past the foot of the bed, is a wall-mounted MIRROR.</s> <s>There is a DOOR on the wall across from you, with an electronic SWITCH just above the door handle.</s> <s>Beside it is a TRASH CAN.</s></if><if cond="findEvent('SPAWN').ongoing === false"><s>You enter dorm 1.</s> <s>In the back right corner is a BED, which has a NIGHTSTAND just to the left of it.</s> <s>A MIRROR is mounted on the wall to the right, past the foot of the bed.</s> <s>In the back left corner is a small CLOSET.</s> <s>Beside it, against the left wall, is a DRESSER.</s> <s>A MONITOR is mounted on the left wall as well.</s> <s>Looking up at the ceiling, you notice a CAMERA between the dull fluorescent lights.</s> <s>The DOOR behind you is fitted with an electronic SWITCH just above the door handle.</s> <s>There is a TRASH CAN just beside the door.</s></if></desc>
Once all of your preparations have been made and you have Alter Ego up and running, it’s officially time to start the
game. Note that if you have all of the Player data written on the spreadsheet already, you don’t have to use
the startgame command at all, and doing so will result in your
Player data being overwritten. To begin, all you need to do is send .load all start.
Running a game
If the entire game world has been written and thoroughly tested in advance, then the process of running the game can be surprisingly easy. In this situation, Alter Ego handles everything like a well-oiled machine. For the most part, you can take this time to sit back and watch the players interact with one another as they move through the game world. The first day will be busy, however. In a killing game role play, this is when you’ll have to have an NPC explain the situation and the rules of the game, usually with all players present in the same room.
Running the game can be stressful. For that reason, you should make sure that you have people to support you during this time - ideally, people who aren’t players in the game. You may get frustrated, but don’t take your anger out on the players. Don’t forget to eat, drink water, and use the restroom throughout the session, and try to get enough sleep at night. The game should not take priority over your physical, mental, and emotional needs, and giving it that priority will only make you more stressed.
Dealing with bugs
When the game is finally underway, this is when your game world will truly be tested. Players will act in ways that you may not have anticipated, which could reveal bugs that you didn’t catch during development. This is why the more testing you did beforehand, the better - the more bugs you caught in advance, the fewer you’ll have to fix during the game itself. When they do pop up, you can usually just turn on edit mode and fix them within a few minutes.
There will be some bugs whose cause you can’t quickly identify. If they’re not that severe, you can simply let them be
until the game session is over and you have time to study them without players getting in the way. Sometimes, all you
need to do is reboot Alter Ego and send .load all resume. If this resolves the issue, the bug can usually be
attributed to Alter Ego’s internal data structures getting out of sync with each other. If the bug is severe enough, it
can lead to a stressful situation. Having a moderator-controlled Player character in reserve can come in handy in these
scenarios, as it can allow you to experiment with the bug until you determine the cause so that you can fix it.
Managing time
You should try to limit the number of NPCs that you have to control as a moderator. It takes a lot of energy to write multiple characters at once, and players tend to want to interact with them. Don’t be afraid to let other people write NPCs, such as other moderators, dead players, or spectators. Just be sure to communicate adequately with them so that they know what the character is like, what their purpose is, and what they are and aren’t allowed to tell players.
It’s likely you’ll have planned events to carry out during each chapter. For example, you might have an important NPC speak with the players about a significant plot detail, or you may be planning a deadly combat encounter, or there might be an in-depth Puzzle that requires moderator assistance to solve. In order to prevent players from blazing through all of the chapter’s content on the first day, you can implement bottlenecks to prevent them from making progress too quickly. For example, you might lock the Exits to important areas, or you could implement a Puzzle that the players can’t solve until an Event makes the clues visible close to the end of the game session, or you could make an NPC refuse to let the players take on a combat encounter until they’re adequately prepared. Measures like these can make these planned events less stressful to conduct.
Conducting a murder case
Note
If you aren’t using Alter Ego to conduct a killing game role play, you can skip this section.
A high source of stress comes when you have to orchestrate a murder case. Sometimes, you’ll find that nobody wants to commit a murder. This can be troublesome, as the game can’t progress if no one is willing to kill a fellow player. To prevent this, you should provide motives that you know will be highly tempting for at least a few characters. You can even plan murders with certain players before the game even begins to circumvent this potential problem altogether.
Once a player has come to you with the intent to kill another player, you should help them select a victim, if they haven’t chosen one already. If you know of any players with time conflicts that may prevent them from participating, their characters can make for ideal victims, and you can suggest them to the culprit. You can ask those players if they’re willing to let their character die, but you’re not obligated to get permission—all players should be made aware that their characters may die throughout the course of the game, sometimes without warning.
If the prospective culprit wants to target a player whose writer doesn’t want them to die, this can create an
opportunity for combat if the chosen victim intends to fight back. During combat, you should give all involved Players
the heated Status Effect, which will slow down movement speed for all other Players. Then, you should take turns
gathering input from all involved players about what they intend to do during their next combat move. You can use the
roll command to roll a Die
to determine the success of each action and narrate the results. In this scenario, the chosen victim can actually come
out on top and kill the prospective killer, which can create an interesting murder case.
During a murder, you should take care to prevent the culprit from getting caught in the act of killing the victim. If the Room it occurs in is unlocked, keep an eye on the surrounding area to make sure that no Players are wandering around. Also be sure that the killer has an escape route that they can use without getting caught carrying a weapon or covered in blood. This can be difficult, as there are a lot of Players to keep track of and you’ll already be busy narrating the murder. This is where it can come in handy to have other moderators who can keep an eye on things and distract nearby Players.
You won’t have time to write in-depth clues for an investigation without turning on edit mode for an unusually long
time - this can tip players off out-of-character that something is going on, which can influence how they behave
in-character. If you need to, you can always just write the victim’s body into the Room description so that players can
discover it, and then save writing clues for after the session is over. There’s nothing wrong with preventing Players
from inspecting the body until the next day. When you do write clues, try to find ways to incorporate the
Players’ intelligence stat into the descriptions using if
conditionals. For example, Players with a high perception stat may notice details about the body that other Players
don’t. This can make players who created characters with high perception stats feel like the investment was worth it.
Once a murder has occurred, you’ll have to do a lot of writing. Aside from clues, you’ll have to write a case summary and execution, and these can be time-consuming processes. However, once everything has been written, you can largely sit back and relax while players investigate. You should give players ample time to investigate all the clues; although generally only a few hours are needed.
If there is going to be a trial, you should warn the players not to discuss the case while they investigate, as that can easily sour the trial by making the discussion seem redundant.
There may come a point during the trial when the players are stuck. If this is the case, you can help them. It can be anxiety-inducing for the players to vote for the wrong culprit, after all. Whether you want to handle that outcome and how you choose to do so is up to you. You might give the culprit a special victory scene before rewinding to earlier in the trial to give the other players another chance, or you might kill the character they voted for and let the real culprit go free, among other possibilities. When the trial is finally over, however, you can generally take the rest of the day easy.
After the trial, you should take a few break days before resuming the game. You and your players need time to rest and recharge.
Ending the game
As you approach the end of the game, the cast will inevitably feel more tight-knit than it started out with. They’ve worked together to overcome countless obstacles, and now it’s time for them to put an end to it all. Near the end of the game, the players should have a lot of information about the story - perhaps nearly enough to identify the mastermind behind everything, with only a few pieces missing. The last few days should give them an opportunity to obtain the missing pieces they need.
Pacing the last few days of a game can be difficult. You want to ensure that the players feel like they’re making progress without overwhelming them with too much information at once or too many dramatic reveals. Once they have all the tools they need, though, have confidence in them.
The final day is what all of your work has been building up to. Make sure that they’ll be able to do everything you have planned for them within the game session. The players should confront the mastermind in one final encounter. Since this is the finale, there’s no need to hold back any secrets - the players have worked hard to uncover the truth throughout the game, and they deserve to hear everything. The players absolutely must have agency in the finale. If all of the important choices are being made by NPCs, then it can be underwhelming for the players who have invested all of their time and energy into the game. They should have a say in how the game ends. You should account for the different choices they may want to make and give them set options to choose from so that you’re not blindsided by their decisions.
The final moments of the game will be filled with emotion as the players reflect on everything they’ve been through and
resolve to face the future they chose. Let yourself be emotional with them. Be proud of them for making it this far, and
be proud of yourself for everything you’ve accomplished, too. Running a game with Alter Ego is a difficult endeavor,
but if you’ve made it to this point, then you’ve succeeded. It feels immensely rewarding to reach the ending,
to say that you finished a game. Enjoy it. And when everyone is ready, end the game by issuing the command, .endgame.
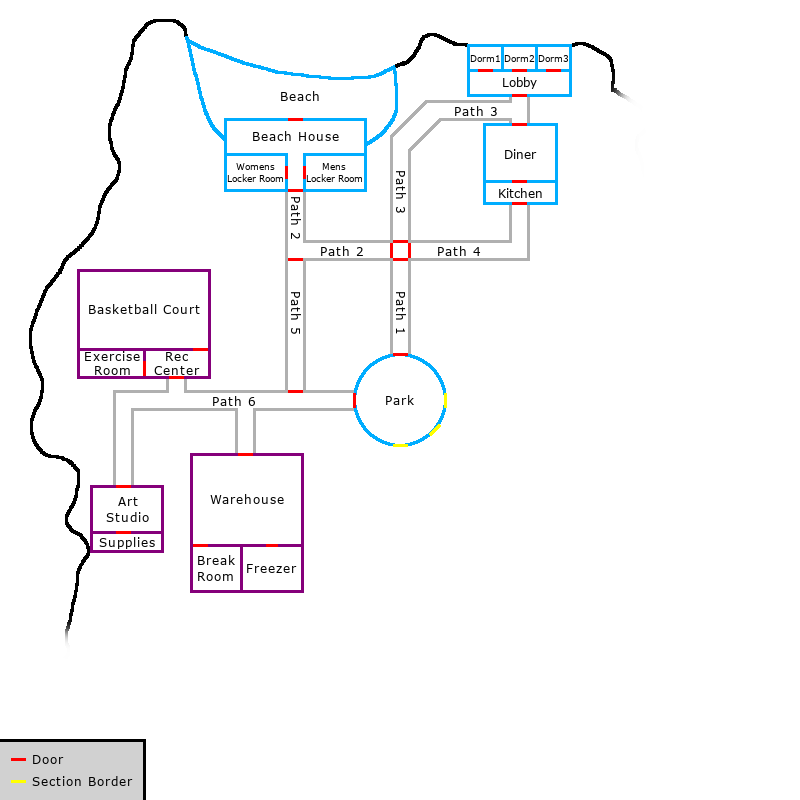
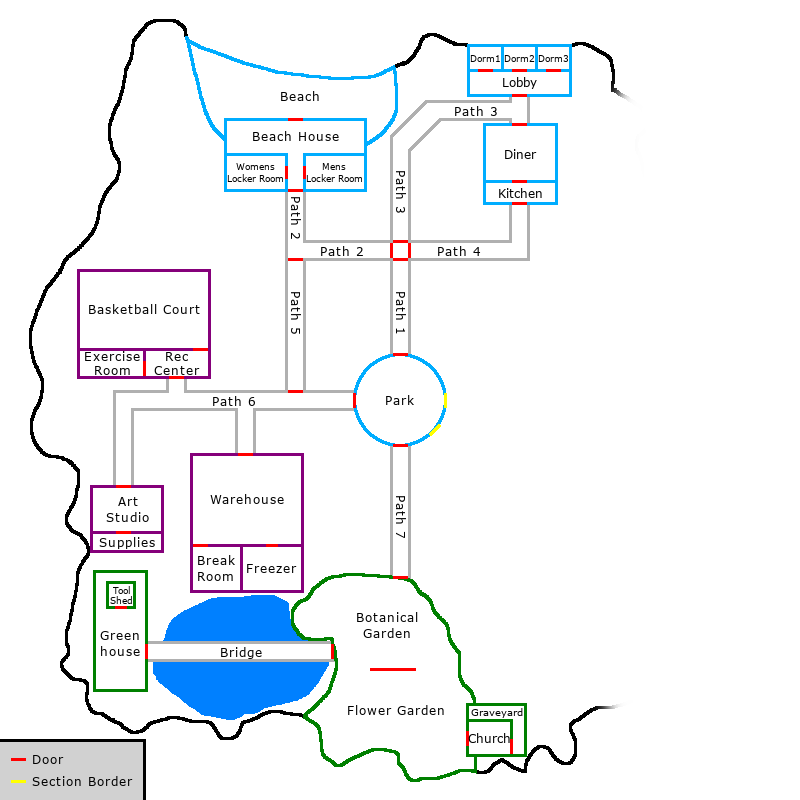
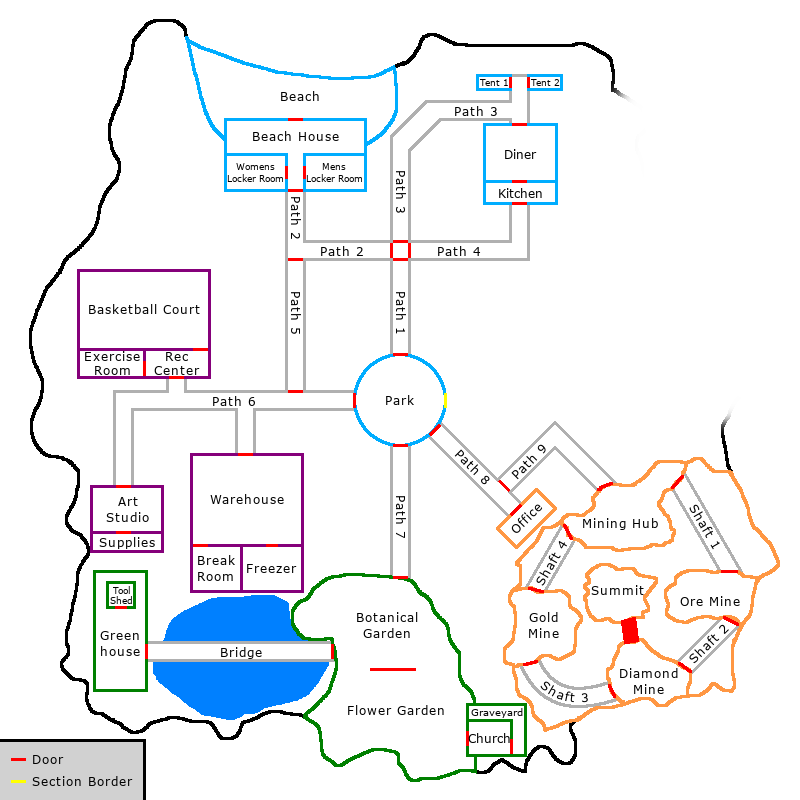
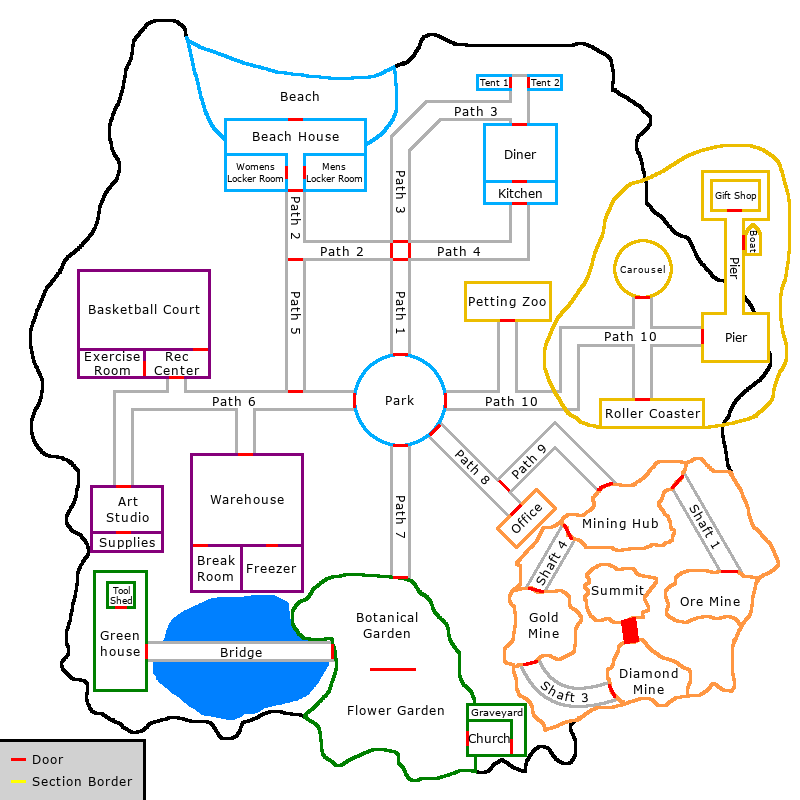
Mapmaking
As the Alter Ego facilitates gameplay in the style of a text adventure, it can be somewhat disorienting for players to navigate the game world. Although it is not technically required to use Alter Ego, creating a map is very beneficial, both for moderators and for players. There are three key advantages to drawing a map:
- It makes inputting Exit positions significantly easier,
- It makes it easier to visualize the perspective when entering a room from a given Exit, thus making writing its description less challenging, and
- It makes it easier for players to navigate the game world.
This tutorial will explain the process of making maps for Alter Ego. It will not teach you how to draw, or how to create a subjectively good map. Be aware that the information in this tutorial is only a set of guidelines, and not required by any means. You can make maps however you see fit.
Part 1: Installing GIMP
In order to make a map, you will need image editing software that:
- Allows you to draw,
- Allows you to edit raster graphics, and
- Displays the current coordinates of your cursor.
Shockingly few image editing programs meet all three of these criteria. The third requirement, in particular, is not a feature that most popular image editing programs have. Microsoft Paint does, but that program is too simplistic for the purposes of drawing a map, and it is only available on Windows. Software with more advanced features and wider compatibility is ideal. For the purposes of this tutorial, GIMP is recommended, as it satisfies all of these criteria. You can download it for your operating system using the link below:
https://www.gimp.org/downloads/
This tutorial will use version 3.2.4, as it is the latest version at the time of writing. However, you are free to use a later version, if one is available.
When you open it, it should look something like this:
Part 2: Configuring GIMP
There are a few steps that can make your experience using GIMP easier. Open the Edit menu and select Preferences. In the box to the left, select Default Grid. It should look something like this:
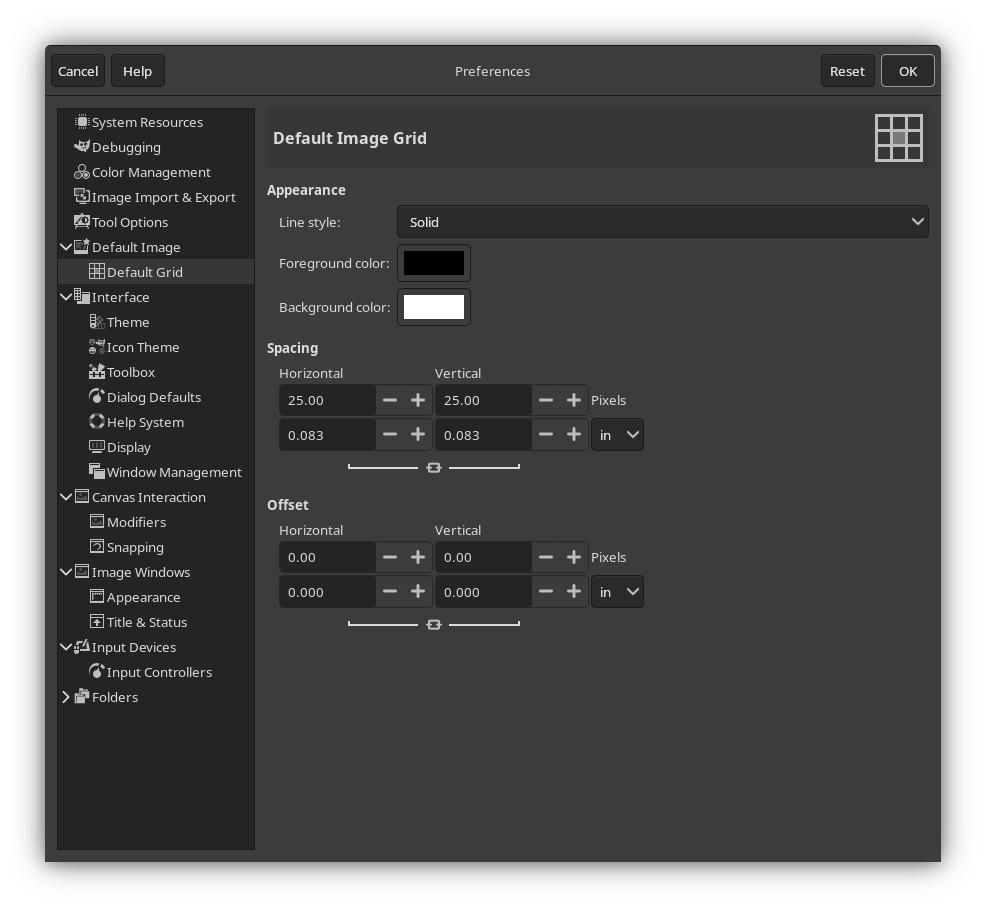
This is where you can change the default grid size whenever you create a new image. The grid makes it easy to draw more perfect geometrical shapes. It also makes it easier to create Rooms with a given dimension in meters.
If, when drawing your map, you follow a rule that 1 grid tile represents 1 square meter, then the dimensions of this
grid determine your PIXELS_PER_METER setting. By default, that setting
is 25. If you want to follow that, enter 25.00 into the Horizontal and Vertical inputs under the Spacing heading.
You can configure any other preferences to your liking, as well. When you’re done, press OK in the Preferences window to save your preferences.
Next, open the Edit menu and select Keyboard Shortcuts, then search for “grid”. Under “view” in the Action column, you should see two actions:
- Show Grid
- Snap to Grid
You will be using the grid a lot, so having shortcuts to toggle these settings on and off will be very helpful. You can set these to whatever you like, but for the sake of this tutorial, they will be set to Ctrl+G and Shift+Ctrl+G, respectively. It should look something like this:
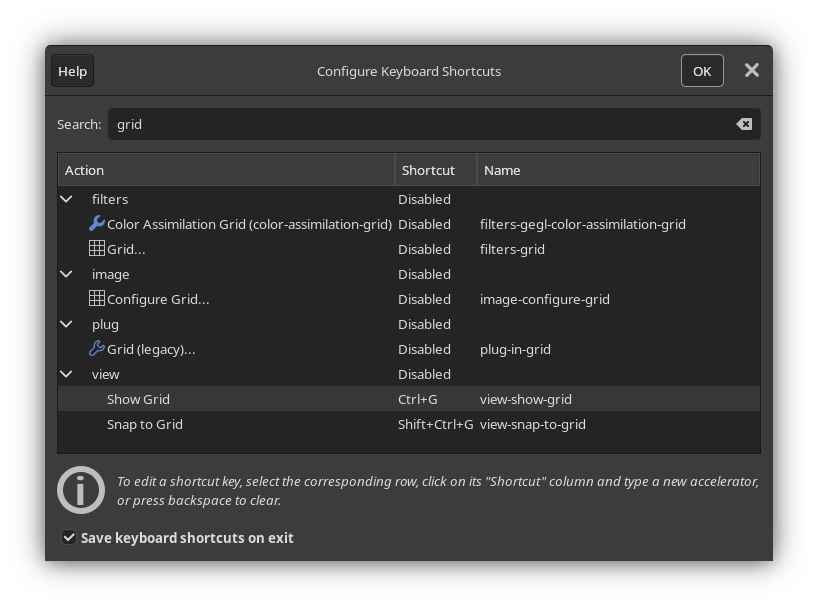
You can configure any other shortcuts you’d like, as well. When you’re done, press OK.
Part 3: Creating a new image
Open the File menu and select New… In the window that appears, you can select the image size. This is an important decision, as it determines the scale of your map. It may be tempting to create a very large image. However, keep in mind that the larger your image, the more space you have to fill up, and the longer it will take for a player to traverse your map.
To give you a sense of scale, assume that Players with three different
speed stats—1, 5, and 10—are traversing just the horizontal length
of your map. The width of your image in pixels will be displayed in the leftmost column. In the three other columns,
the amount of time it will take for each respective Player to walk that many pixels will be displayed, assuming
your PIXELS_PER_METER setting is set to the default value of 25.
| Image Width | Speed 1 travel time | Speed 5 travel time | Speed 10 travel time |
|---|---|---|---|
| 1000 pixels | 43s | 29s | 14s |
| 2000 pixels | 1m 25s | 57s | 29s |
| 3000 pixels | 2m 08s | 1m 26s | 43s |
| 4000 pixels | 2m 50s | 1m 54s | 57s |
| 5000 pixels | 3m 33s | 2m 23s | 1m 12s |
In all likelihood, since your map will be more complex than just a straight line—Players move in three dimensions, after all—the lengths of time shown here will be longer, depending on the size of your map.
It is better to start small and grow larger, if needed. For the sake of this tutorial, an image with the dimensions 1000x1000 will be created. After setting your dimensions, expand the Advanced Options menu, and from the Fill with dropdown, select Transparency. Then, press OK.
Part 4: Preparing your map file
Before you start drawing, you should make a few preparations.
First, you’ll want to set up the layers you’ll be working on. This is an important first step, as it will make the entire mapmaking process significantly easier. Open the Layers window (this may be docked, depending on your settings) and create a new layer group. A new layer will be created with an icon that looks like a folder, most likely called “Layer Group”. You can right click on it and select Edit Layer Attributes… to give it a name, assign it a color tag, and more. You can name it whatever you like.
Tip
It is often useful to give individual buildings and floors their own named layer groups. This allows you to more easily separate them from the main map and export them as standalone images, so that players can view a map for that specific building or floor.
Now, with your layer group selected, there are two layers you should create. It will help if you give every layer a unique name, so try to prefix these with the name of the layer group you just made:
- Rooms
- Exits
Next, make a new layer group within your layer group, again ideally with the same prefix:
- Labels
Your layers should be sorted like this:

Now, with your layers created, select the Background layer and fill it in with a solid color of your choice. This will make it easier to draw.
Next, open the View menu and make sure Show Grid and Snap to Grid are enabled.
Finally, open the File menu and press Save…. Save your map file somewhere that you won’t forget. You’re going to want to save regularly as you draw your map.
Part 5: Drawing preparations
You’re almost ready to begin drawing. But before that, there are few things to keep in mind.
GIMP shows you the current position of your cursor; this is why it is recommended for making maps over more popular drawing software such as Krita or Clip Studio Paint. As you move your cursor around the image in GIMP, its position relative to the top-left corner of the image will be displayed in the bottom-left corner of the program, like so:
It is important to remember that the top-left corner of your canvas is position 0, 0. If you plan on expanding your map after you’ve already begun entering Exit positions, it is going to be very challenging to do so if you change the position of 0, 0 relative to the rest of the map.
For that reason, it is always best to draw close to the center of the map—in this example, that’s position 500, 500— and expand the canvas down or to the right, if necessary. Expanding the canvas up or to the left after Exit positions have already been entered on the sheet is not recommended.
Lastly, it is important to choose a brush that you will use consistently, with the same settings every time. Once you’ve begun drawing, you will have a difficult time making edits to your map if you can’t remember what brush you used, or what its exact settings were. Once you’ve selected a brush that you like, write its settings down somewhere that you won’t forget.
Part 6: Drawing rooms
This is where the fun part of the mapmaking process begins. There are infinite possibilities for how you can draw rooms on a map, so this section will merely offer some guidelines on how to do that effectively.
First of all it is very helpful to draw with straight lines. There are two reasons for this:
- It makes it easier to draw your map and cleanly connect rooms to each other, and
- It makes it easier to add labels (more on that later).
To draw a straight line, make sure that Snap to Grid is enabled, and click on an intersection on the grid with your brush. Then, hold Shift, move your cursor to another intersection on the grid, and click on it. If you’d like to constrain your line to angles in increments of 15°, you can also hold Ctrl at the same time as Shift.
Before drawing a room, you should have a rough idea of what you’re going to put there. It may be tempting from an artistic point of view to create a very large map with lots of rooms, and many exits connecting them to each other. However, keep in mind that you are drawing a map for a game, and you will have to fill each room with things for your players to inspect and interact with. If your map has lots of rooms, but very little to do in each one, your players will most likely not find your map fun and engaging to explore.
It is also important to keep in mind the scale of each room, and how they will connect to each other. If a room appears very large on your map, it will be strange if its in-game description and layout do not match its size. Additionally, if the rooms have too many exits connecting them to each other, this means you will have more Exit descriptions to write, and this can be disorienting for players (although this can be used to great effect, if done intentionally).
You are free to add details to your rooms on the map, such as their layout, but remember that doing so makes it necessary to update your map if the layout changes when your write the room on the sheet. A simple map just showing the boundaries of all of the rooms will suffice, like so:
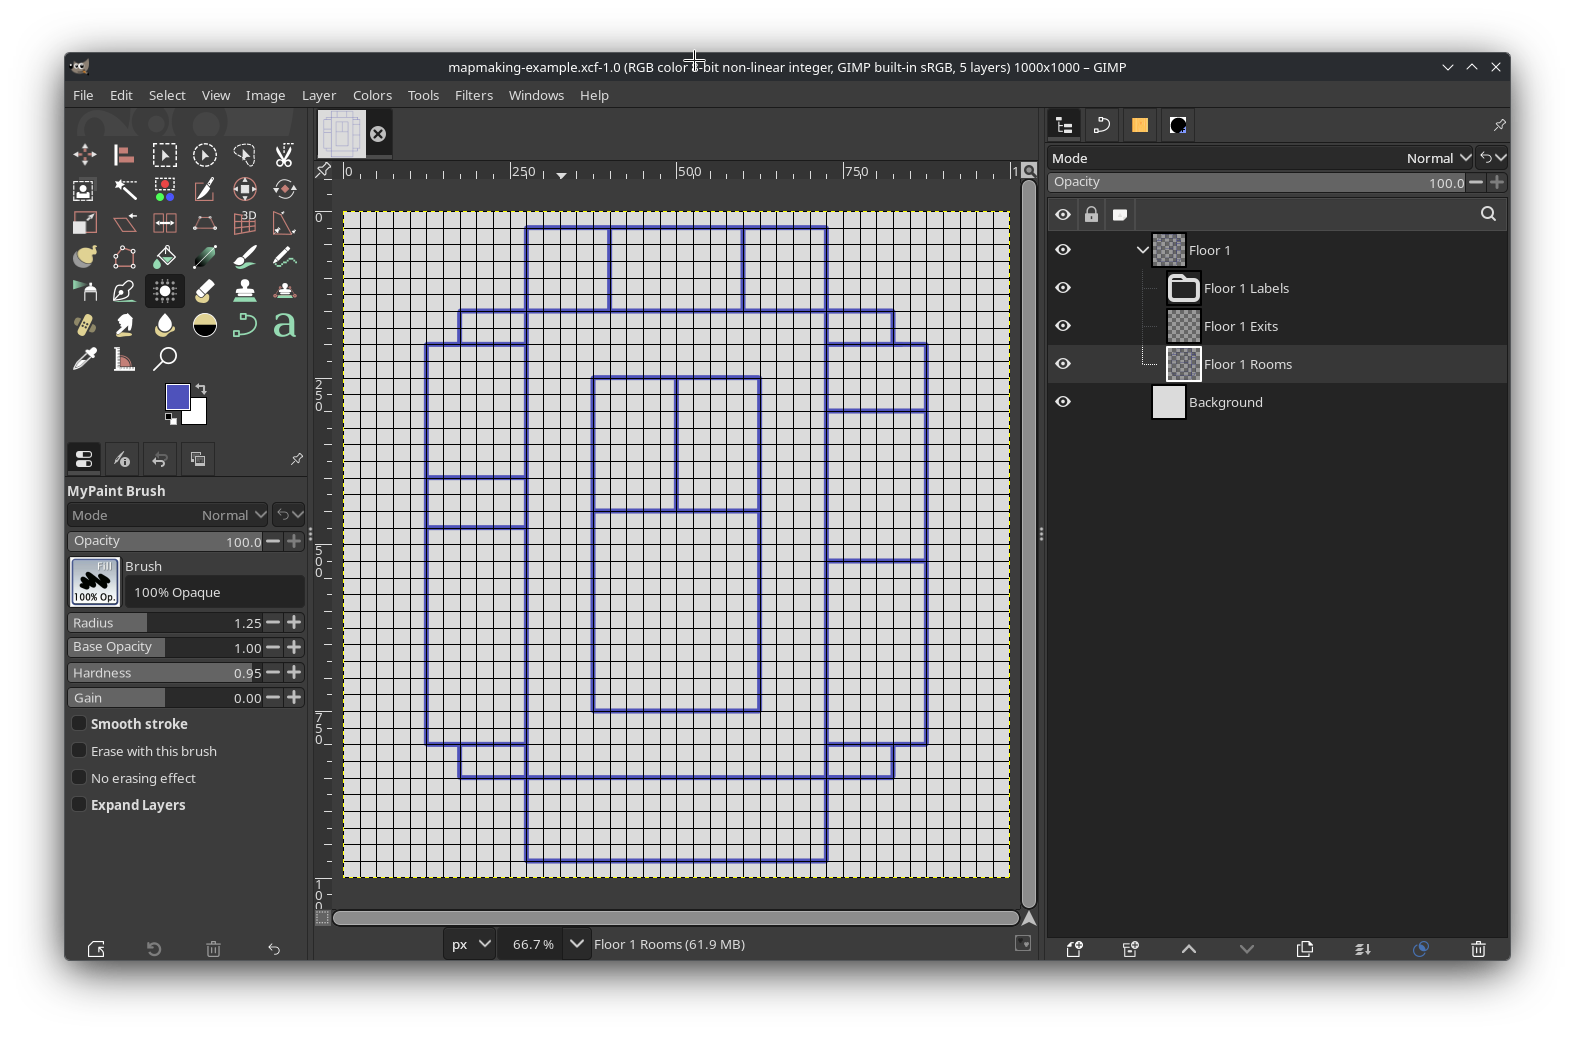
Part 7: Placing exits
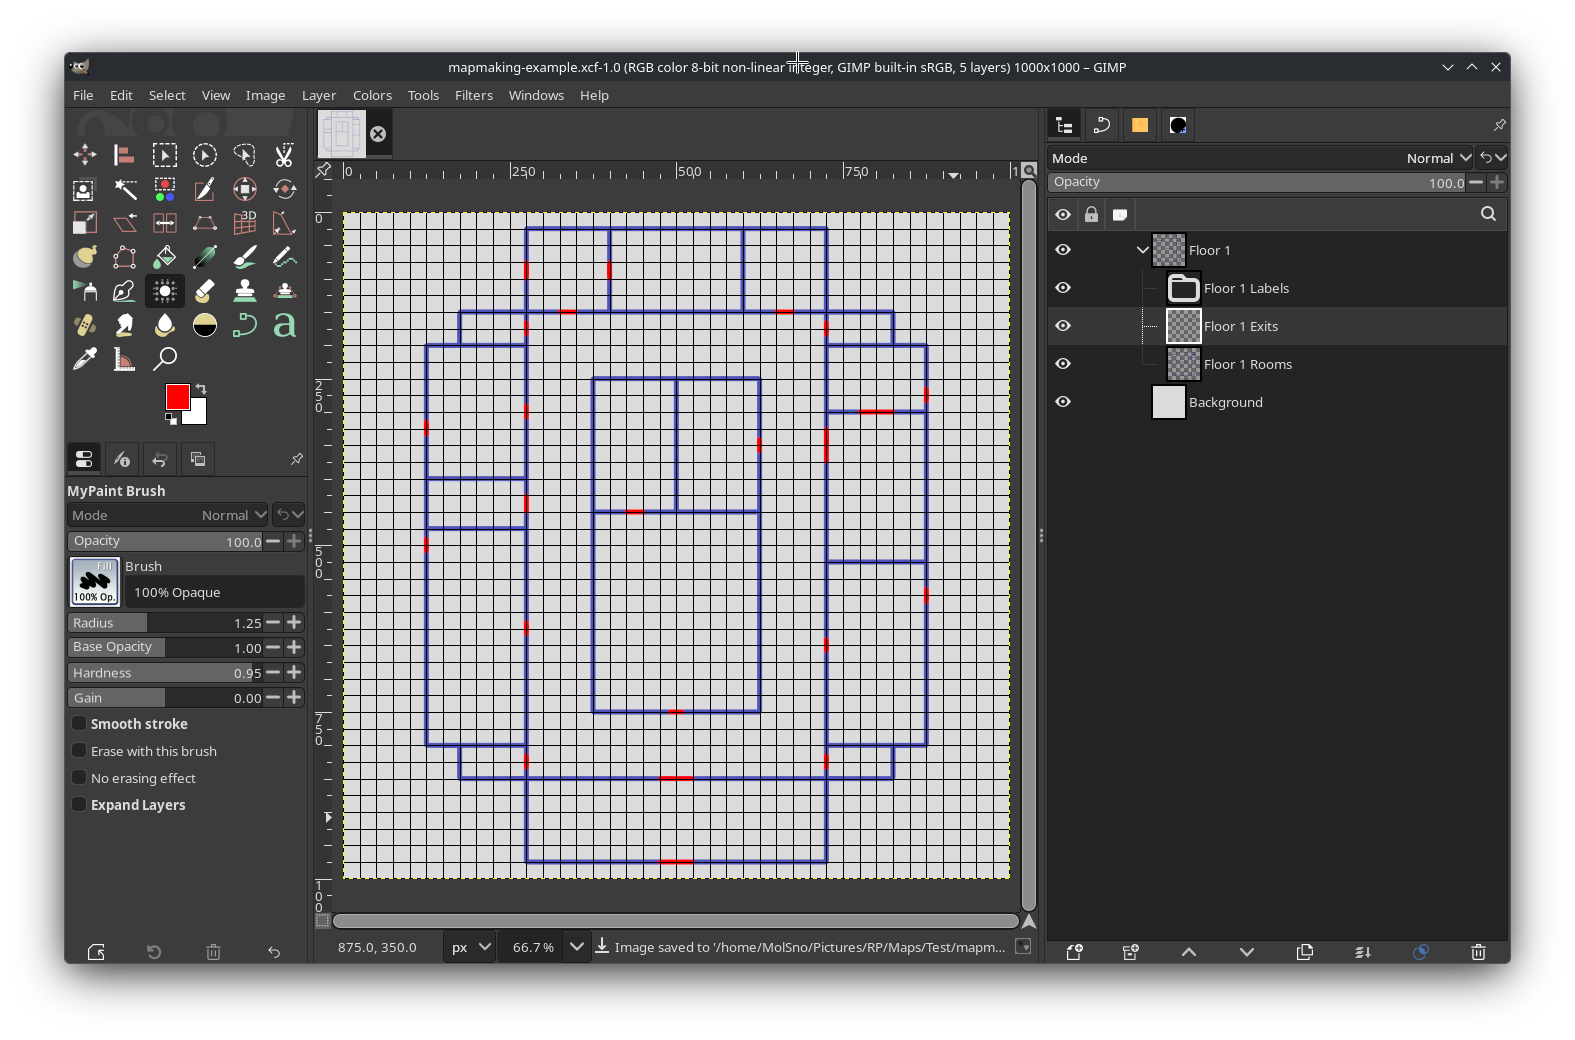
Next, it’s time to place markers for where the exits in all of the rooms are. This is a relatively straightforward process, and mostly consists of drawing straight lines on your Exits layer. Ideally, you should use a color that contrasts with every other color that you will use in your maps. You may draw different buildings or sections of your map with different colors, but the color of your exits should be consistent for all of them.
If you’re not sure what color to use, bright red (#FF0000) is usually a good option, but keep in mind that this, too,
can be difficult to contrast with other colors for people with
red-green color blindness. Whichever color you use to denote exits,
ensure that there is contrast not only in its hue, but also in its saturation and value. It may also help to have a key
somewhere in the image to denote what an exit is.
It is also helpful to align your exits with intersections on the grid. This will make it easier to enter their positions on the Rooms sheet later. If you have Snap to Grid enabled, you won’t need to be very precise in where you place your cursor; the position displayed in the bottom-left will snap to the grid, as well.
When you’re done, your exits may be placed something like this:
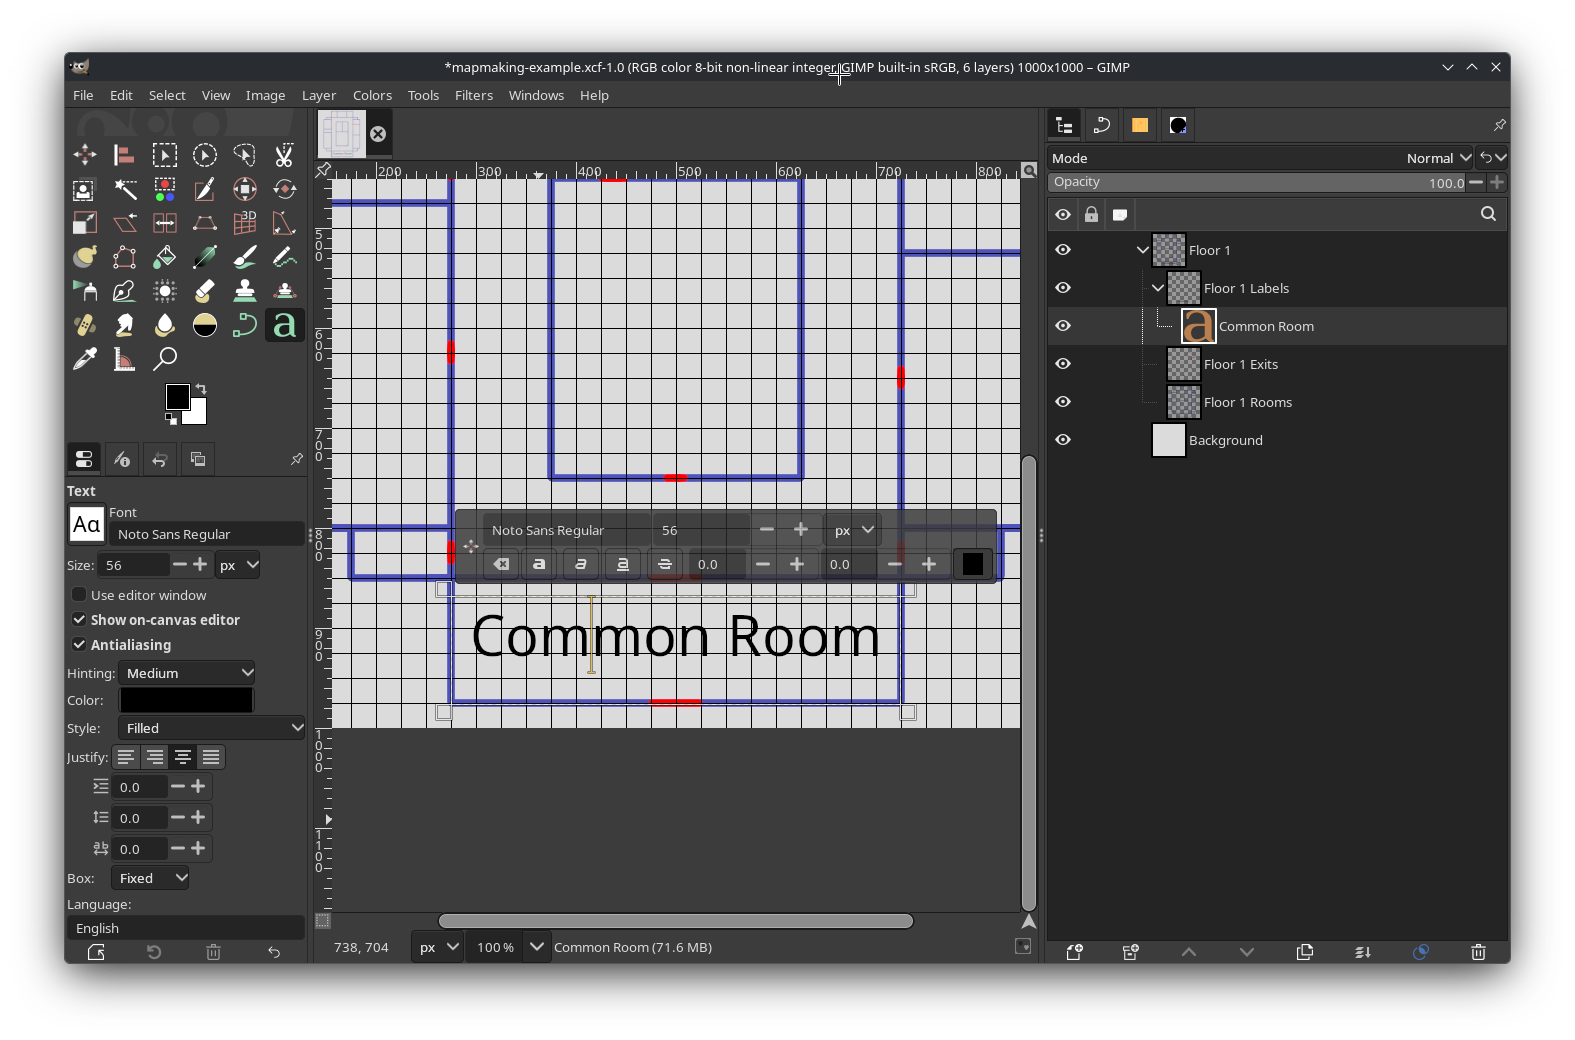
Part 8: Adding labels
Placing labels on your map can be challenging, for one simple reason: GIMP doesn’t offer a way to easily center text vertically. It’s easy to center text horizontally, but centering it vertically will require more work, and it usually comes down to approximation.
When labeling your map, it is important to use a consistent font and color. The size of your font can vary—ideally, it should be as large as it can be while fitting within the boundaries of the room—but the font itself should be consistent and easy to read, and the color should contrast well with the color of the background.
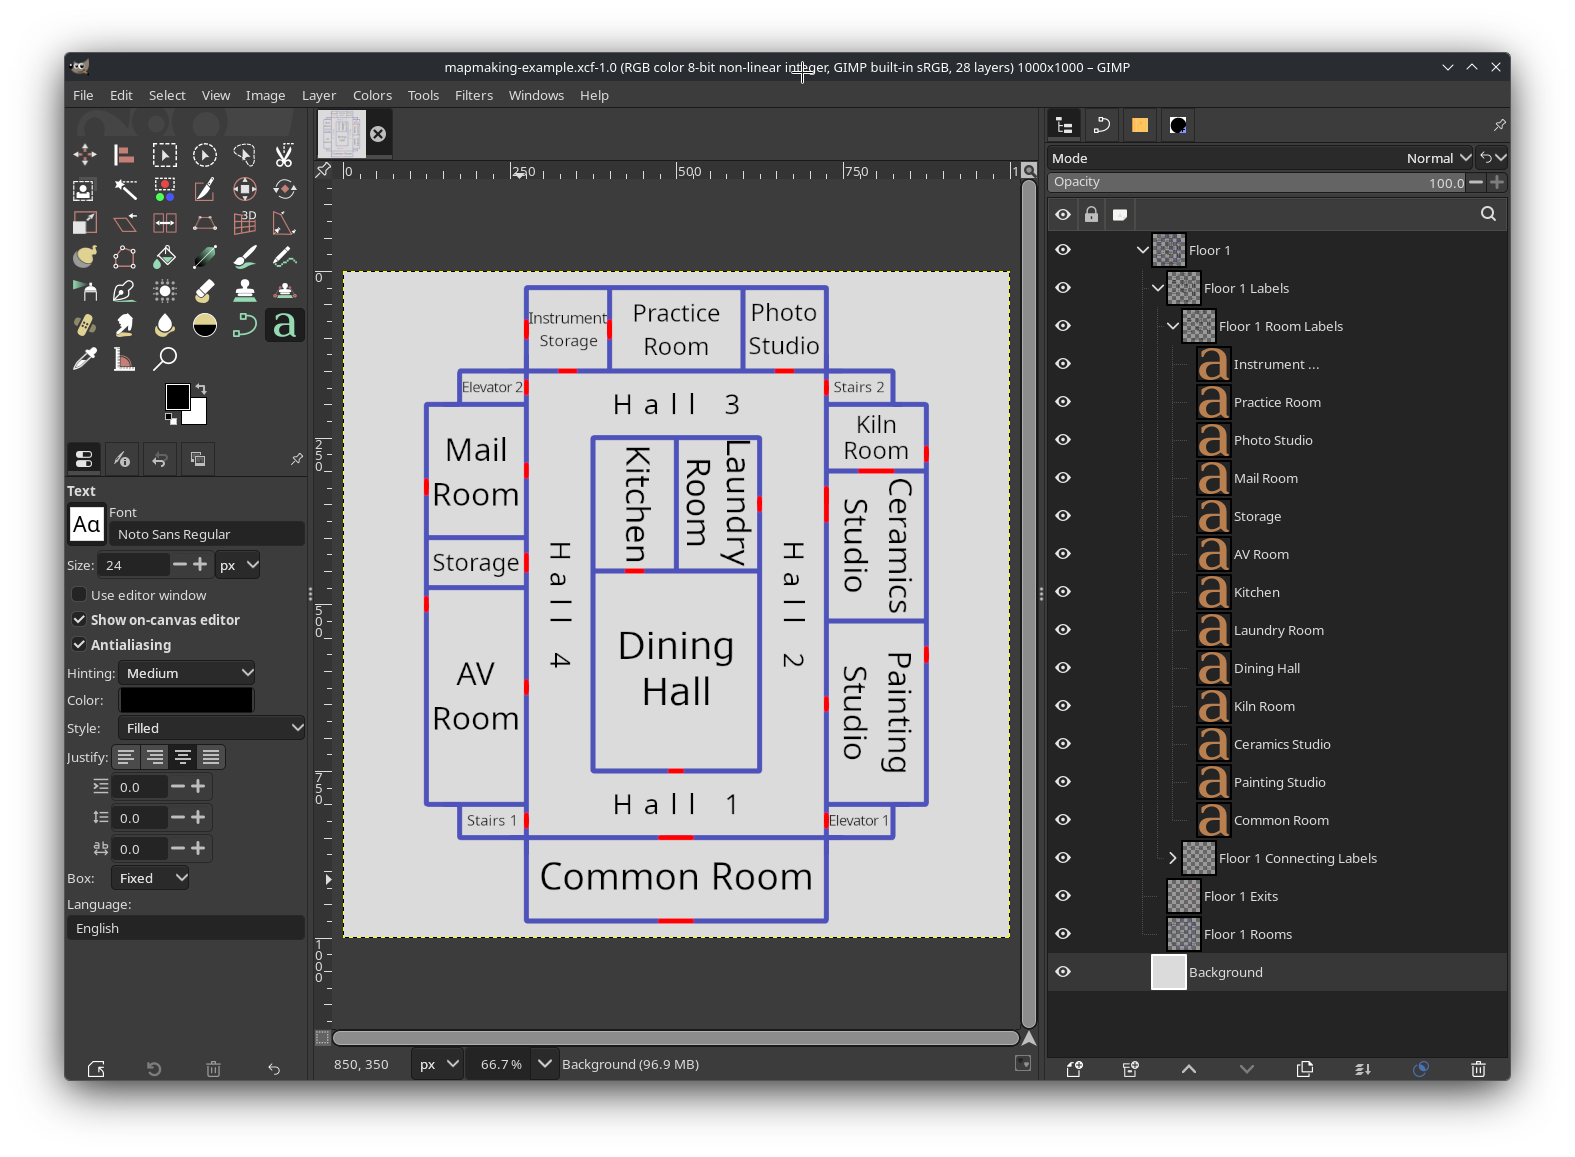
To add text to your image, select the Labels layer group you made earlier. You may want to create more layer groups within it, for the sake of better organization; for example, you may have a layer group specifically for room labels, and another for hall or path labels. Then, open the Text Tool and click somewhere in the room you want to label. Type the name of the room.
Now, to align it, open the Tool Options window (this may be docked, depending on your settings) for the Text Tool, and next to Justify, select the Centered option. Expand the boundaries of the text box so that they extend from one boundary of the room to the other, horizontally. Then, you can move the text vertically until it looks about centered— you may need to disable Snap to Grid for this. It should look something like this:
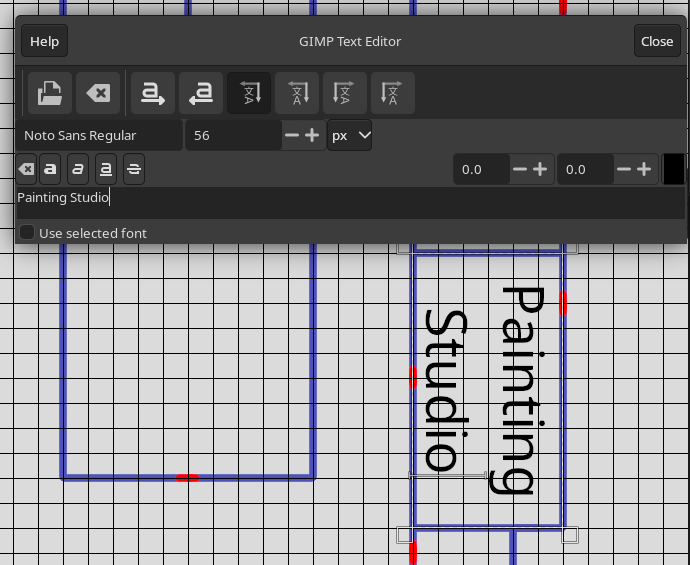
Despite not allowing you to easily center text vertically, GIMP’s text tools are quite flexible. For instance, you can enter text in a variety of orientations. To enter text with a vertical orientation, select the Use editor window option in the Text Tool’s options window. There are several orientations to choose from, but one that is most often useful is “Vertical, right to left (mixed orientation)”. This will allow you to enter text rotated at a 90° angle, which can be helpful for rooms that are taller than they are wide, like so:
As of version 3.0, GIMP also allows you to enter text at any angle, and along any path that you desire. However, this is more complicated, and beyond the scope of this tutorial. For more information, see GIMP’s official documentation.
When you’re done adding labels, your map is basically complete!
From here, you can add any additional details that you want, and then open the File menu, and select Export… to render it as a completed image.
Appendix: Examples
Although the map made in this tutorial was relatively simple, more complex maps are possible. Several examples will be presented here.
Example 1: Mountain interior
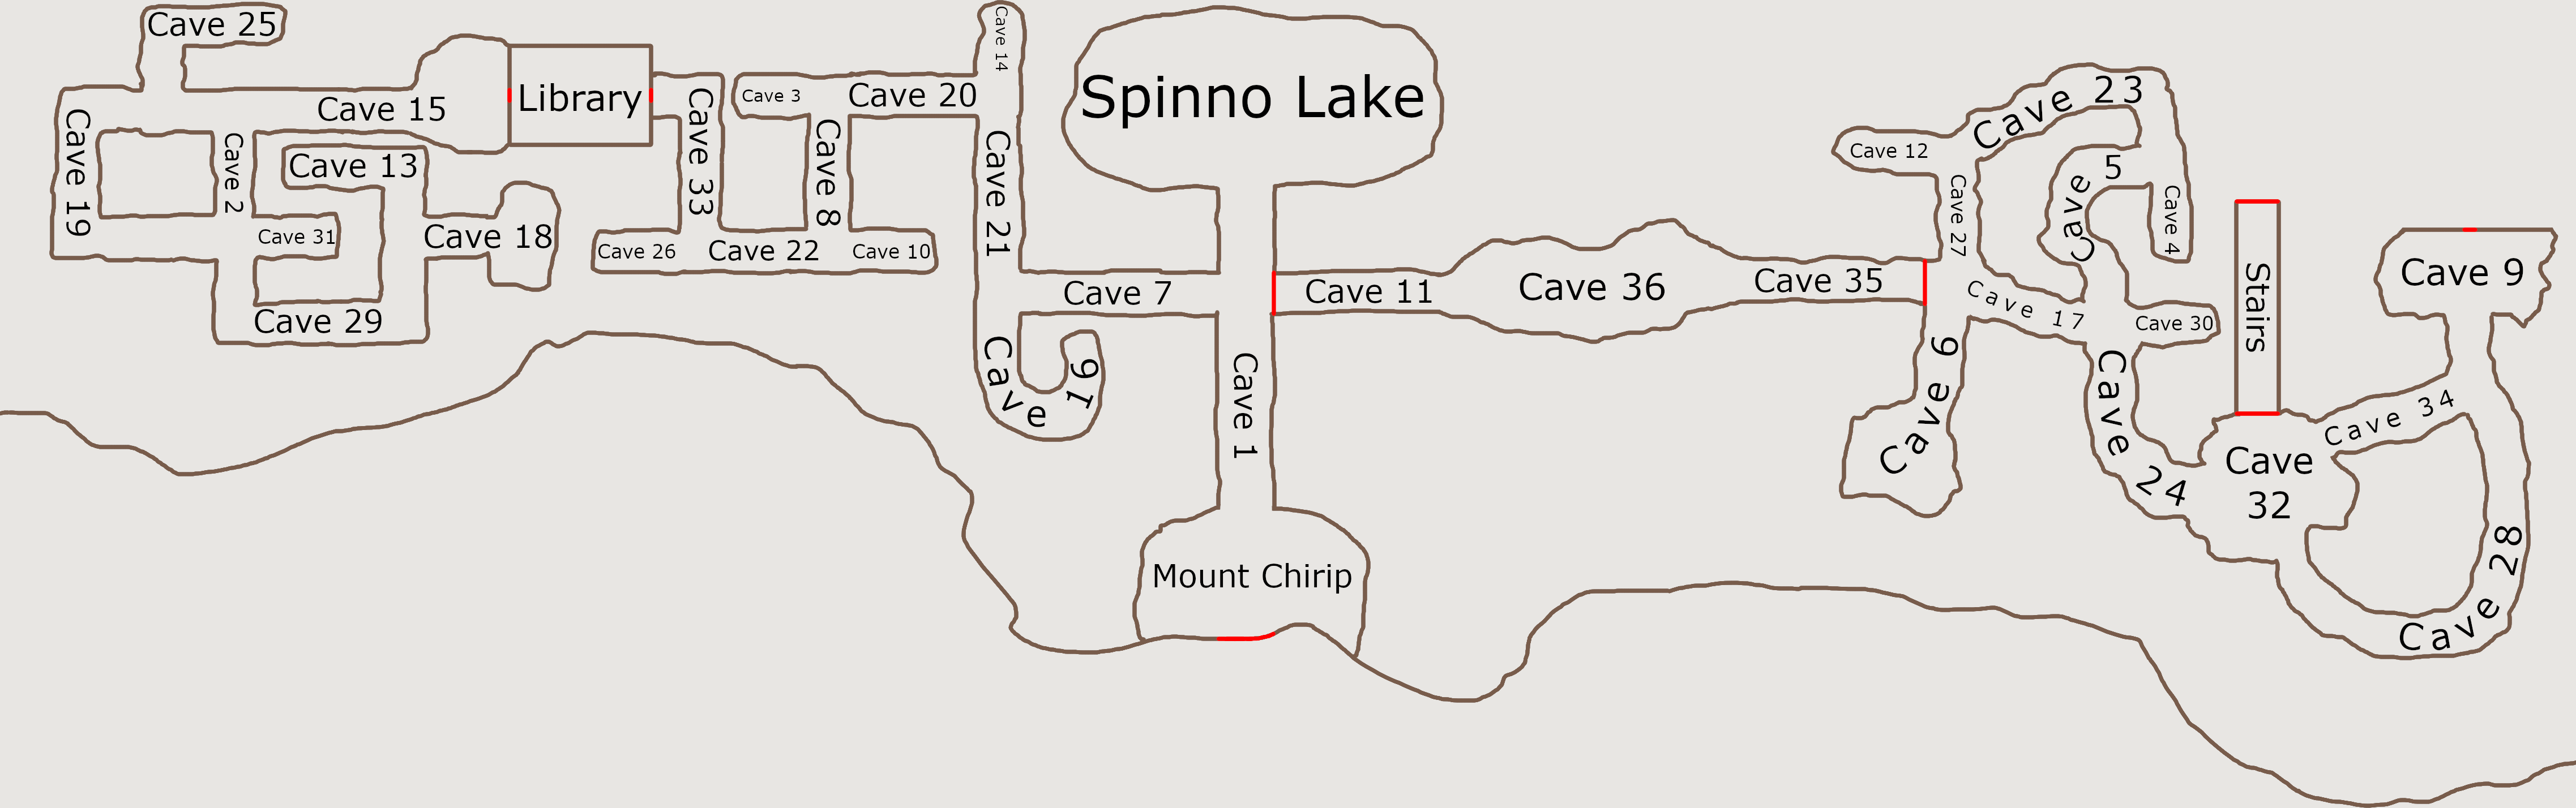
This map is for the interior of a mountain, with a cave system. Note how most of the rooms have rugged outlines. Despite that, some of the rooms (particularly those on the west side) are comprised of straight or right angles, implying they were constructed by humans. On the east side are caves with more curved, twisted paths, implying they formed naturally.
Note that for all of the curved paths, the text curves along with the path itself, and remains mostly centered. Although this is tedious to accomplish—it requires mastery over GIMP’s Path Tool—it can be done.
This map is clearly meant to be disorienting for players to navigate, while not being so large that it’s impossible to find one’s way around without getting lucky.
Example 2: Evolving map
 |  |
 |  |
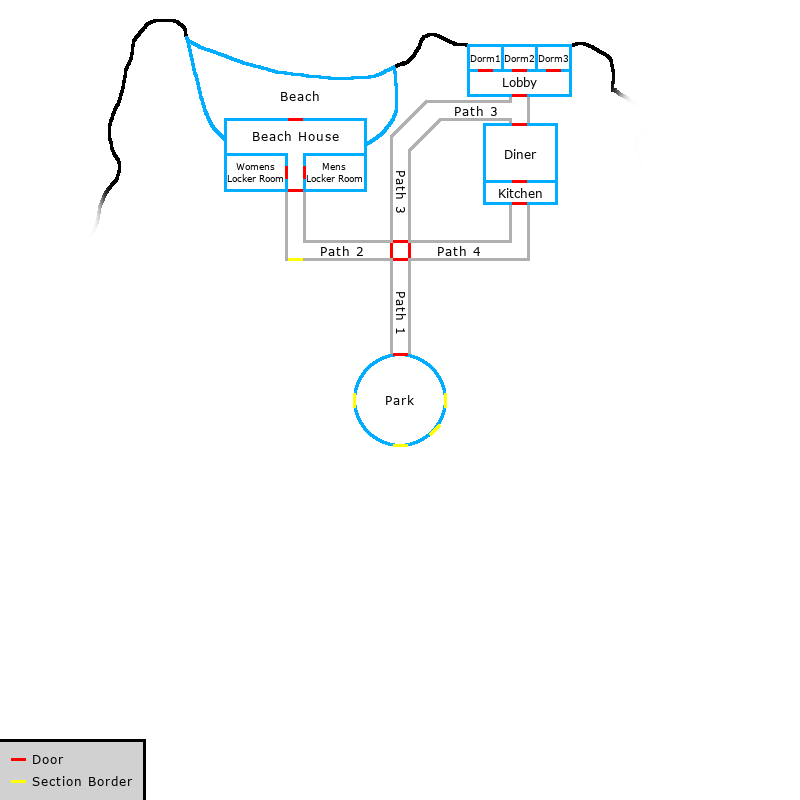
These demonstrate how a map can evolve over the course of a game. As each subsequent area unlocks, the fog of war obscuring the map is gradually lifted. Additionally, some rooms are replaced—such as the dorm building in the top right—or removed entirely—like Shaft 2 in the bottom right, to reflect the actions of players who destroyed or otherwise made these rooms inaccessible.
This map is also drawn at a different scale, and with a different style than any others that have been shown so far. There is also a key in the lower left-hand corner to indicate that red markers are for exits between rooms, while yellow markers are for boundaries that are not passable to players yet.
Example 3: Artificial biosphere
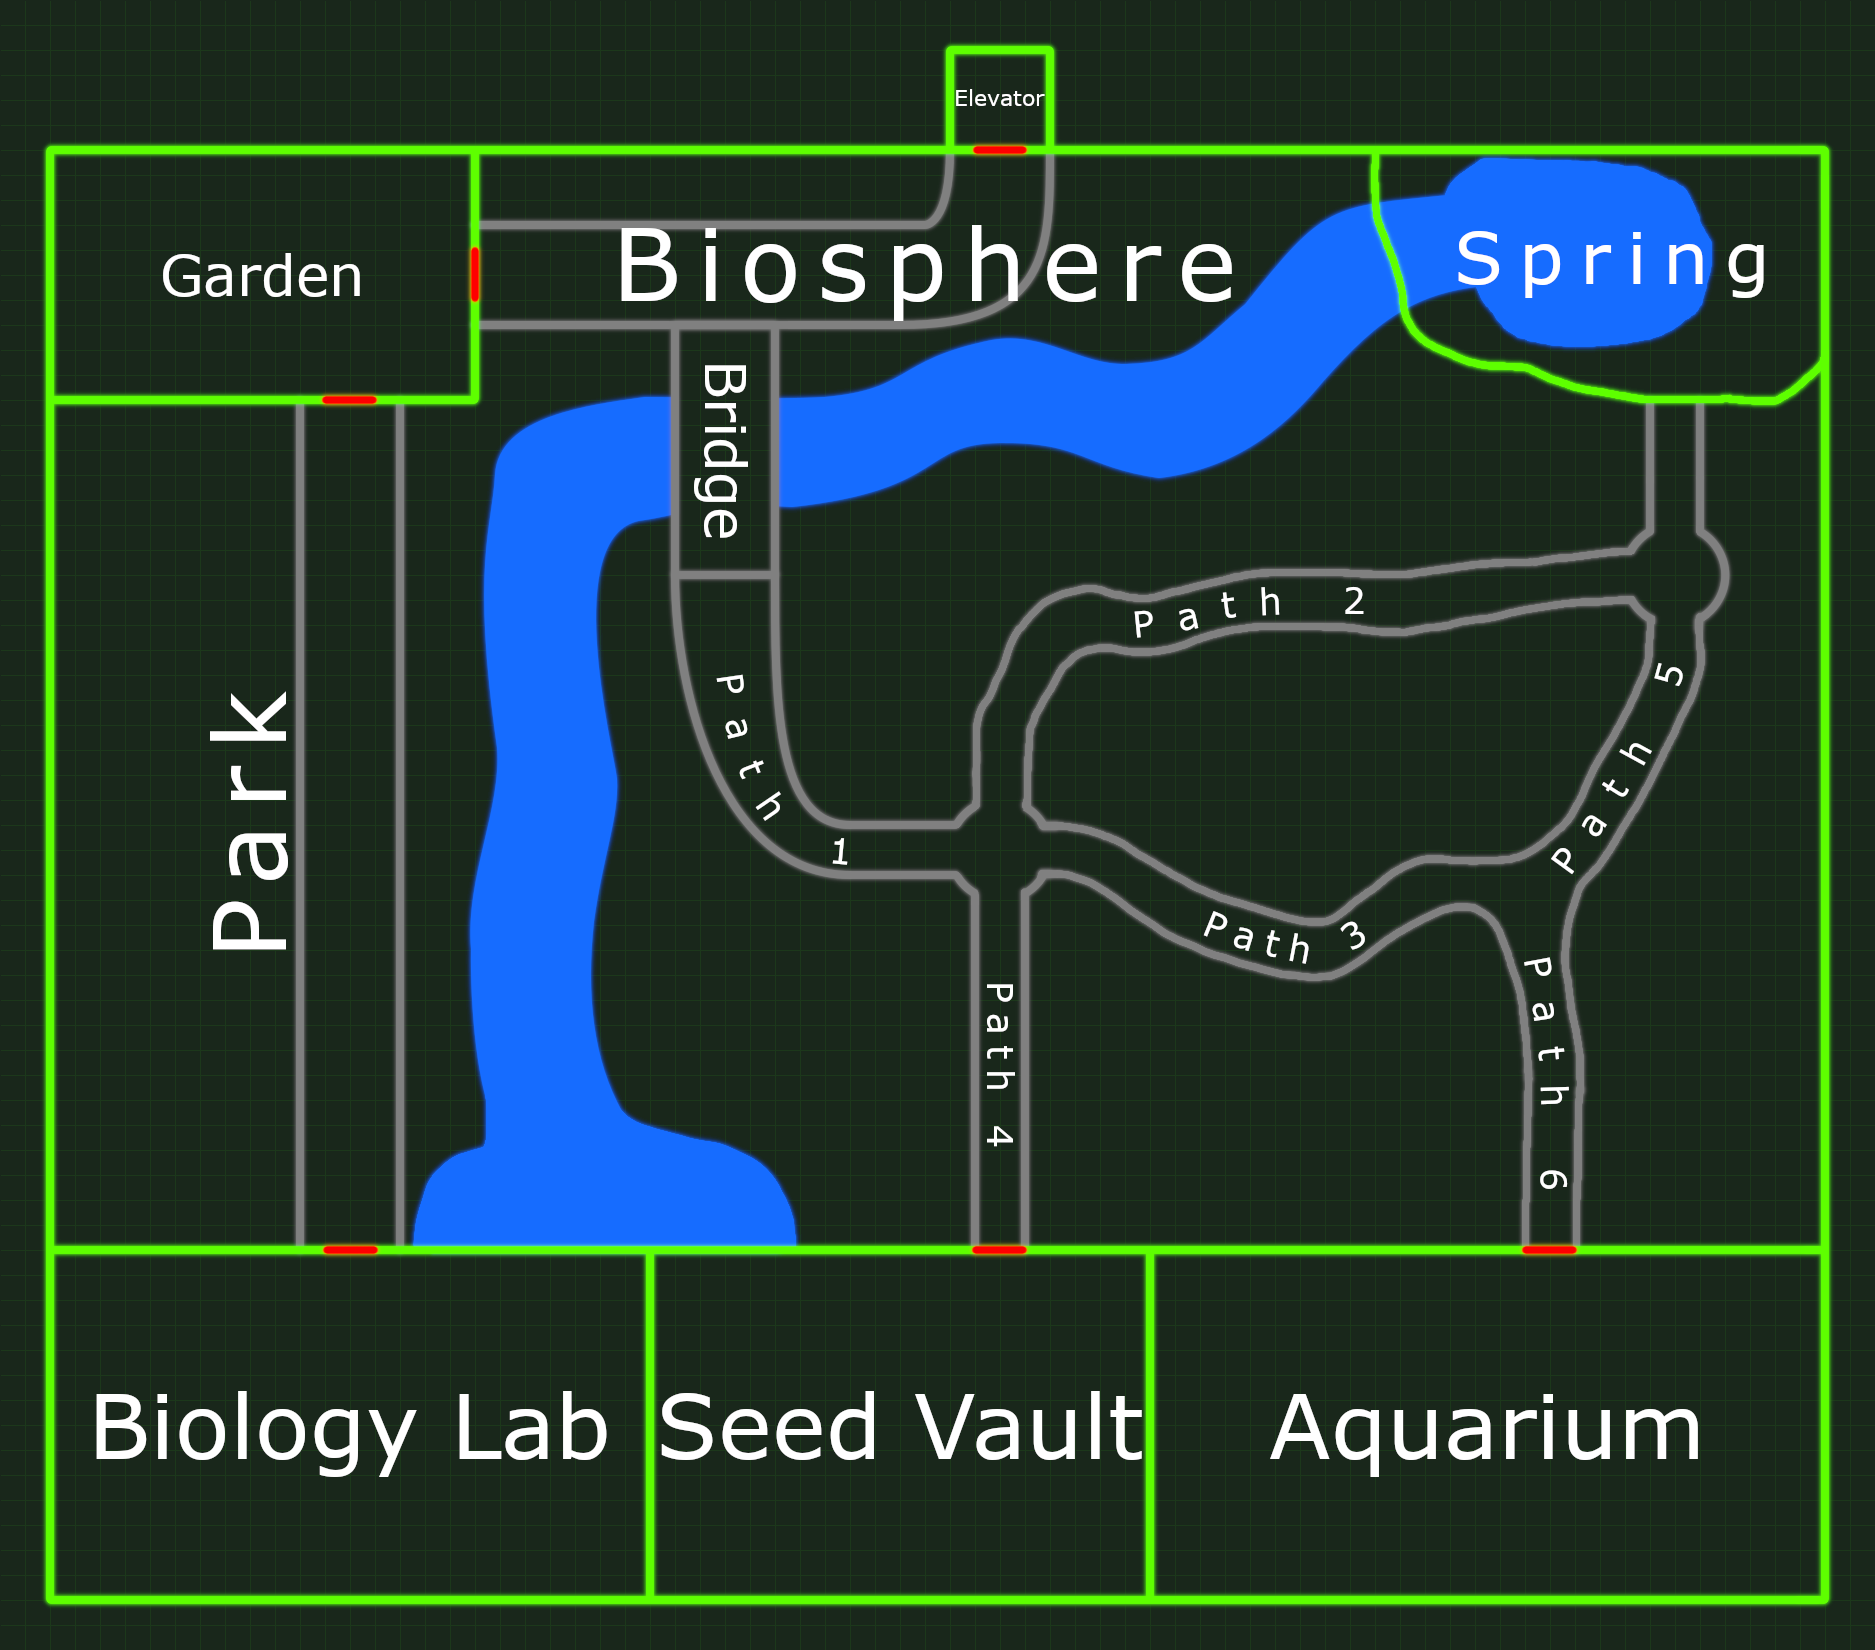
This map demonstrates how visual effects can be used to communicate more about the setting than simply where rooms are in relation to each other. This area, labeled “Biosphere”, has a number of natural-looking features, such as a spring, a river, and several twisted, natural-looking paths. Several of the boundaries of the different rooms are unclear; for example, it isn’t immediately obvious where, precisely, the different paths begin and end, implying they are interconnected, the way real paths in a forest would be.
Everything about this map indicates that it contains a “natural” environment, but it is clearly boxed into the confines of an artificial, human-constructed space. To add to this effect, there are grid lines in the background, and all of the map’s features emit a subtle glow, evoking a futuristic, science fiction vibe.
Writing Descriptions
Writing for Alter Ego is somewhat complex, but thanks to its custom parser module, it is incredibly flexible. Alter Ego makes use of XML formatting to understand what the moderator has written so that it can make changes as necessary.
Tip
Alter Ego Tools is a program that can make writing descriptions much easier. Although it can’t handle everything, it can save you a lot of time. It even has a very useful procedural generator. Try it out, if you’re able to!
Basic concepts of XML
XML, short for eXtensible Markup Language, was designed to store and transport data, and to be relatively simple to
understand. In XML, data is wrapped in tags, like so: <tag>data</tag>.
In XML, you can nest tags. For example, you can write:
<tag>
  <text>
    data
  </text>
</tag>
Note that when nesting tags, you must close them in the same order you opened them. Therefore, you cannot write something like this:
<tag>
  <text>
  data
</tag>
    </text>
Additionally, you can add attributes to tags to give them more information. In order to assign an attribute, use the
following format: <tag attribute="something">data</tag>.
XML is similar to HTML. However, the primary difference between the two is that
unlike HTML, XML doesn’t do anything. XML is used to carry data, but unless a program was designed to interpret that
specific data, the XML won’t do anything. HTML, on the other hand, is used to modify how data looks. Additionally, XML
tags are not predefined like HTML tags are. For example, entering <b>text</b> in an HTML document will display **text
** in a bold font. Entering that in an XML document, however, will have no effect because XML tags have no inherent
meaning.
How parsing works
When Alter Ego is instructed to parse a Description, the Description
object is passed to the parser module, along with the Game Entity it
belongs to (referred to as the container), and the Player the
parsed Description will be sent to.
An exact copy of the Description object is created, so that the original is not modified whatsoever. When this occurs, the text of the Description is converted to a Document.
Alter Ego then evaluates all if tag Elements in the
Document, populates any item lists and removes ones that are empty, evaluates all var tags, and
replaces all br tags with line breaks.
Finally, after all of these operations, it converts the Document into a plain-text String. This is what will be sent to the Player that the Description was parsed for.
It is important to note that most of the time, when a Description is sent to a Player with Interactables, those Interactables will be generated using only the text that exists in the final parsed Description. Any text contained inside of tags whose contents were removed during parsing will not be used to generate Interactables. This is to ensure that Interactables are generated based strictly on what the Player can see in the parsed Description.
How Interactables are generated is beyond the scope of this article. However, to give a brief overview, all strings in the parsed Description consisting entirely of non-lowercase letters are considered potential Game Entities. Alter Ego takes these uppercase strings and attempts to find the Game Entities that they are referring to, and generates Interactables for them if they are found.
Since this is done using the text exactly as it appears in the parsed Description, this means that you have to write
Descriptions to refer to Game Entities by name directly if you want Interactables to be generated for them. For example,
suppose you have three Fixtures named LOCKER 1, LOCKER 2, and LOCKER 3.
If, in a Description, you refer to them as: “LOCKERS 1 - 3”, Interactables will not be generated for them, as none of
their names will appear in the parsed Description. To generate Interactables for them, they must be referred to
individually by their names, like so: “LOCKER 1, LOCKER 2, and LOCKER 3”.
The remainder of this article will document every tag Alter Ego supports, and how to use it effectively.
<desc>
Example:
<desc>This is the simplest description you can write.</desc>
The desc tag is used to mark the beginning and ending of a description. It must be included in every single
description.
desc tags are capable of having attributes. There is one attribute with defined behavior, the type attribute.
This allows you to set the message display type that the
parsed description will be sent with. This will override the default message display type of the description.
Only five message display types can be set with the type attribute:
STANDARDWARNINGALERTMINORPLAIN_TEXT
<s>
Example:
<desc><s>After leaving the PARK, you come to a crossroads.</s> <s>To your left is PATH 2.</s> <s>Straight ahead is PATH 3.</s> <s>To your right is PATH 4.</s> <s>It seems all of these roads lead you to the north side of the island.</s></desc>
The s tag, short for sentence, is used to mark the beginning and ending of a sentence. The closing tag should
always go after the final punctuation mark of the sentence. There should generally be a space between the closing tag of
one sentence and the opening tag of another sentence. It isn’t technically required that every sentence be in its own
s tag. For the most part, unless a single sentence contains other tags, such as item lists, the s tag can go
around multiple sentences. For example, this would be perfectly acceptable:
<desc><s>You inspect the couches. They are soft and comfortable, and each is lined with a few pillows.</s> <s>Looking underneath the cushions, you find <il></il>.</s></desc>
<br>
Example:
<desc><s>You flip through the diary.</s> <s>Most of the pages are blacked out.</s> <s>A few things remain:</s><br /><s>-"my wife's birthday is on the 4th Monday of the month this year,"</s><br /><s>-"anniversary dinner went great, but my wife's birthday is in just 3 days and I don't know what to get her!"</s></desc>
The br tag, short for break, is used to divide text into multiple lines. In general, you should never split the
contents of a cell on the spreadsheet into multiple lines. Instead, use the br tag. Note that the br tag cannot
surround text, so it must be closed in the same tag that it is opened with, like so: <br />. If a Player inspects the
example description above, it will be divided into multiple lines, like this:
You flip through the diary. Most of the pages are blacked out. A few things remain:
-"my wife's birthday is on the 4th Monday of the month this year,"
-"anniversary dinner went great, but my wife's birthday is in just 3 days and I don't know what to get her!"
<il>
Example:
<desc><s>The floor beneath you is soft and earthy.</s> <s>You find <il></il> haphazardly placed on it.</s></desc>
The il tag, short for item list, is used to mark where items will be inserted into a description. Items are
inserted between the opening and closing il tags whenever a description is sent to a player. They are generated
on-demand by fetching the list of items that are currently contained in the game entity that the description belongs to.
If an item list is empty, the entire sentence containing the item list will be removed from the parsed description.
So, in the example above, if the item list is determined to be empty, the player will be sent:
The floor beneath you is soft and earthy.
If you want to prevent an item list sentence from being removed from the parsed description when the container it
belongs to contains no items, you can enter text between the opening and closing il tags, like so:
<desc><s>It's a long, white countertop.</s> <s>It's broken up only by a SINK in the middle.</s> <s>On it, you find <il>a BLENDER and a MIXER</il>.</s></desc>
Pay close attention to the above example, and ensure that sentence-ending punctuation is never placed inside of il tags.
il tags are capable of having attributes. There is one attribute with defined behavior, the name attribute. This
allows you to insert multiple item lists into a description, giving each a name. This looks like:
<desc><s>It's a plain pair of black jeans.</s> <s>It has four pockets in total.</s> <s>In the right pocket, you find <il name="RIGHT POCKET"></il>.</s> <s>In the left pocket, you find <il name="LEFT POCKET"></il>.</s> <s>In the right back pocket, you find <il name="RIGHT BACK POCKET"></il>.</s> <s>In the left back pocket, you find <il name="LEFT BACK POCKET"></il>.</s></desc>
Note that only Prefabs,
Room Items,
Inventory Items,
and Players support multiple il tags in a single description.
il tags can only be used in a certain number of places, and each one has its own limitations. They can be used
in:
- A Fixture’s description. A single Fixture can only have one item list in its description.
- A Prefab’s description. A single Prefab can have multiple item lists; however, there must be one for each Inventory Slot, with names to match each slot’s ID. Item lists in a Prefab’s description will never have items inserted into them, since players cannot directly inspect Prefabs. They simply serve as a base for instances of that Prefab.
- A Room Item or Inventory Item’s description. The same rules that Prefabs have apply, however these item lists can actually display items.
- A Puzzle’s Already Solved Description. A single Puzzle can only have one item list in its Already Solved Description.
- A Player’s description. A single Player can only have two item lists in
their description, and they must be named
equipmentandhands. Any other item lists will never be updated.
Lastly, every item list must be in its own sentence. That is, a single s tag can only have one il tag within it.
<item>
Example:
<desc><s>You open the locker.</s> <s>Inside, you find <il><item>a SWIMSUIT</item></il>.</s></desc>
The item tag is used to mark the beginning and ending of items. In previous versions of Alter Ego, it was necessary
to include these when writing item lists in descriptions. However, as of version 2.0, you should not enter these
manually.
item tags are generated on-demand whenever a description containing an item list is parsed and sent to a player.
They do not persist within the description after that. Additionally, if item tags are found to already be in a
description when it is created, Alter Ego will attempt to remove them in a grammatically correct manner. However,
it may not be able to do so completely perfectly. Therefore, if you already have item tags in your descriptions,
you should remove them manually.
When an item list is generated for a given il tag, the parser module retrieves all items currently contained inside
the game entity the item list corresponds with, and collates them so that any item with the same
Prefab ID and
containing
phrases are considered the same item. Then,
for each item in the list, it creates an item tag, whose contents are as follows:
- The item’s plural containing phrase, if it has an infinite quantity and isn’t already mentioned in the sentence,
- The item’s quantity and plural containing phrase if it has a quantity greater than 1, or
- The item’s single containing phrase, if it has a quantity of 1.
item tags are inserted into the description in the order they appear in on the sheet. They are inserted so as to
follow several grammatical rules:
- If there are two items, they will be separated by the word “and”, like so:
<il><item>ITEM 1</item> and <item>ITEM 2</item></il>
- If there are three or more items, the
itemtags will be comma-separated, and an Oxford comma will be inserted before the word “and” preceding the lastitemtag, like so:<il><item>ITEM 1</item>, <item>ITEM 2</item>, and <item>ITEM 3</item></il>
- If the word “is” or the word “are” is the last word in the clause just before an item list or the first word in the
clause just after an item list, it will be changed to the other word in order to properly reflect the plurality of
the referenced items. For example, if a sentence like
<s>There is <il></il> on the desk.</s>contains an item with a quantity greater than 1, or multiple items, it will be changed like so:<s>There are <il><item>2 PENCILS</item></il> on the desk.</s>, or<s>There are <il><item>a PENCIL</item> and <item>an ERASER</item></il> on the desk.</s>
- If an item list contains non-items, they will be updated according to the same rules that
itemtags follow. For example, in the sentence<s>The shelves are lined with <il>different ingredients for baking and dough mixes</il>.</s>, if the description’s container contains an item, an Oxford comma will be inserted before the final “and”, like so:<s>The shelves are lined with <il><item>2 bags of RICE</item>, different ingredients for baking, and dough mixes</il>.</s>
It is worth noting that item tags will always be inserted at the beginning of an item list, never at the end.
<if>
Caution
This tag has the ability to run code. In order to determine if the condition in the
condattribute is true, Alter Ego uses its scriptParser module, which evaluates code in a heavily restricted context. While it has been tested to prevent access to many functions which can cause severe damage, its security cannot be guaranteed, especially if Alter Ego is run outside of a Docker container. Given that the only way to insert code is to write it on the spreadsheet, write access should be given to as few people as possible. There may exist exploits that allow malicious users to do such things as:
- Sending Alter Ego’s authentication token to the server
- Killing a player in the game
- Shutting down Alter Ego
- Read, modify, and delete files on your computer
We, the Alter Ego developers, assume no responsibility for damage caused by malicious use of this feature. You have been warned.
Example:
<desc><s>It's a small, glossy red berry.</s> <s>It looks ripe.</s> <if cond="player.name === 'Nestor' || player.name === 'Jun'"><s>It's a holly berry.</s> <s>It can cause vomiting and diarrhea.</s> <s>It's best not to eat this.</s></if></desc>
The if tag is used to modify the contents of a description before it is sent to a player. If the condition in the
cond (condition) attribute is true, then the contents of the if tag will be kept in the description. If it is false,
the contents will be removed. In the above example, there are two outcomes:
- If the Player inspecting this Room Item has the name “Nestor” or “Jun”, the condition is true, and they will be sent
It's a small, glossy red berry. It looks ripe. It's a holly berry. It can cause vomiting and diarrhea. It's best not to eat this. - If the Player inspecting this Room Item doesn’t have the name “Nestor” or “Jun”, the condition is false, and they
will be sent
It's a small, glossy red berry. It looks ripe.
You can chain multiple if tags together for different outcomes. For example, in this Fixture description:
<desc><s>The window covers most of the wall, filling the room with <if cond="findEvent('NIGHT').ongoing === true">moonlight</if><if cond="findEvent('NIGHT').ongoing === false">sunlight</if>.</s></desc>
- If the
NIGHTEvent is ongoing, the Player inspecting this Fixture will be sent:The window covers most of the wall, filling the room with moonlight. - If the
NIGHTEvent is not ongoing, the Player inspecting this Fixture will be sent:The window covers most of the wall, filling the room with sunlight.
Since there is no else tag, if you want to chain if tags together to display different text for different outcomes,
you must ensure that the conditions described in the cond attribute are mutually exclusive, and cannot overlap. If
you wanted to expand the example above to have text for when it’s inspected by a Player whose name isn’t Jun or Nestor,
you would express the condition as:
<desc><s>It's a small, glossy red berry.</s> <s>It looks ripe.</s> <if cond="player.name === 'Nestor' || player.name === 'Jun'"><s>It's a holly berry.</s> <s>It can cause vomiting and diarrhea.</s> <s>It's best not to eat this.</s></if><if cond="player.name !== 'Nestor' && player.name !== 'Jun'"><s>You're not sure what this is.</s> <s>Would it really be so bad to eat just one?</s></if></desc>
Knowledge of JavaScript and
Boolean algebra will help significantly in writing good if conditions.
There are several loosely-defined categories of if conditions that are used frequently when writing descriptions:
Player conditionals
The function which parses descriptions (and thus, if tags) has access to the Player inspecting it. As a result, you
can easily write descriptions that change based on a number of the Player’s attributes. Here are a few examples:
- Based on the Player’s name:
<if cond="player.name === 'Astrid'">Your name is Astrid.</if> - Based on the Player’s title:
<if cond="player.title === 'Mortician'">You are a Mortician.</if> - Based on the Player’s perception stat:
<if cond="player.perception > 7">Something about a portion of the wall behind the curtain seems off. It's almost as if... you could push right past it and walk through.</if> - Based on whether a Player has a given Status Effect:
<if cond="player.hasStatus('hungry')">This food looks delicious.</if> - Based on whether a Player has a given behavior attribute:
<if cond="player.hasBehaviorAttribute('acute hearing')">It produces an extremely faint noise that you should be able to make out if you listen closely.</if> - Based on whether a Player has an Inventory Item with a specific Prefab ID:
<if cond="player.hasItem('MAGNIFYING GLASS') === true">You use your MAGNIFYING GLASS to read the text, which is as follows: "HBD KKZ RDD ZKK".</if>
Container conditionals
The function which parses descriptions also has access to the entire container of the description, which is accessible
with the this keyword. That is, if the description belongs to a Room, you can
write descriptions that change:
- Based on the number of Players in the room:
<if cond="this.occupants.length > 6">It's a little cramped with so many people in a room this small.</if> - Based on whether a given Exit is unlocked:
<s>You step out of the TRUCK into a <if cond="this.getExit('BLAST DOOR').unlocked === false">dark cave, which is illuminated only by flashlight</if><if cond="this.getExit('BLAST DOOR').unlocked === true">dimly lit cave, with the only light coming from outside</if>.</s>
If the description belongs to a Fixture, you can write descriptions that change:
- Based on whether the Fixture’s child Puzzle has been solved:
<desc><if cond="this.childPuzzle.solved === true"><s>You examine the poster.</s> <s>It looks like this: https://i.imgur.com/wtUujam.png</s></if><if cond="this.childPuzzle.solved === false"><s>It is too dark to see anything.</s></if></desc> - Based on whether the Fixture is currently activated:
<desc><s>It's a stovetop burner.</s> <s>It's gas-powered, which means you'll be cooking with actual fire.</s> <if cond="this.activated"><s>It's currently burning.</s></if> <s>On it, you find <il></il>.</s></desc> - Based on whether the Fixture contains a Room Item with the given Prefab ID:
<desc><s>It's a queen bed with perfectly white sheets<if cond="this.containsItem('COMFORTER') === true"> and a thick, black comforter tucked neatly under the mattress</if>.</s> <s>On it, you find <il></il>.</s></desc>
If the description belongs to a Room Item or Inventory Item, you can write descriptions that change:
- Based on the number of uses the Item has left:
<desc><s>This is a fresh cucumber.</s> <if cond="this.uses < 2"><s>Only half of it remains.</s></if></desc> - Based on whether the Item contains no Items inside of it:
<desc><s>It's a blue box of medical masks.</s> <s>In it are <il></il>.</s> <if cond="this.containsNoItems() === true"><s>Or at least it's supposed to be, but it's empty.</s></if></desc> - Based on whether the Item has a container with a given name:
<desc><s>This is a pot made of white clay.</s> <s>It was made on a pottery wheel.</s> <s>The craftsmanship is fairly decent. It has a flat, sturdy bottom that sits perfectly level. The sides are mostly even, but it has a bit of a rough texture, with a few small divots and bumps here and there.</s> <s>It's unglazed, and it still needs to be fired in a kiln.</s> <if cond="this.container && this.container.name === 'POTTERY BAT'"><s>Be sure to take it off of the POTTERY BAT before putting it in the kiln!</s></if></desc>
Note that the examples given above are not the only things you can do with the description’s container; they are simply the most helpful and commonly used.
Finder conditionals
The function which evaluates scripts also has access to the finder module, which allows you to find almost any game entity. The finder module includes the following functions (parameters listed in parentheses are optional):
findRoom('room-id')findFixture('FIXTURE NAME', ('location-name'))findPrefab('PREFAB ID')findRoomItem('ITEM IDENTIFIER OR PREFAB ID', ('location-name'), (Type of Container: 'Fixture' || 'Puzzle' || 'RoomItem'), ('CONTAINER NAME(/INVENTORY SLOT ID)'))findPuzzle('PUZZLE NAME', ('location-name'))findEvent('EVENT ID')findStatusEffect('status effect ID')findPlayer('Player name')findLivingPlayer('Player name')findDeadPlayer('Player name')findInventoryItem('ITEM IDENTIFIER OR PREFAB ID', ('Player name'), ('CONTAINER NAME(/INVENTORY SLOT ID)'), ('EQUIPMENT SLOT ID'))findGesture('gesture ID')findFlag('FLAG ID', (evaluate: true || false))- Fetches a Flag’s value. If the second argument is
true, the Flag’s value script will be evaluated first. Defaults tofalse. Even if this istrue, the Flag’s set commands will not be executed when the Flag is set.
- Fetches a Flag’s value. If the second argument is
There are also the following functions, which return an Array of entities that match the given criteria. Every
parameter is optional, and can be used to filter the results. If you wish to omit one, simply enter
undefined in its place. Omitting all arguments will fetch all of the given type of entity.
findRooms('id', 'tag', occupied: true || false)- id - Filter the Rooms to only those whose ID matches the given ID.
- tag - Filter the Rooms to only those with the given tag.
- occupied - Filter the Rooms to only those who have at least one occupant. If this is
true, includes NPCs as occupants. If this isfalse, NPCs are not counted.
findFixtures('name', 'location', accessible: true || false, 'recipeTag')- name - Filter the Fixtures to only those whose name matches the given name.
- location - Filter the Fixtures to only those whose location ID matches the given location ID.
- accessible - Filter the Fixtures to only those who are accessible or not.
- recipeTag - Filter the Fixtures to only those with the given Recipe tag.
findPrefabs('id', 'effectsString', 'curesString', 'equipmentSlotsString')- id - Filter the Prefabs to only those whose ID matches the given ID.
- effectsString - Filter the Prefabs to only those who inflict the given comma-separated Status Effects.
- curesString - Filter the Prefabs to only those who cure the given comma-separated Status Effects.
- equipmentSlotsString - Filter the Prefabs to only those who are equippable to the given comma-separated Equipment Slots.
findRecipes('type', 'fixtureTag', 'ingredientsString', 'productsString')- type - Filter the Recipes to only those of the given type.
- fixtureTag - Filter the Recipes to only those with the given Fixture tag.
- ingredientsString - Filter the Recipes to only those with the given comma-separated ingredients.
- productsString - Filter the Recipes to only those with the given comma-separated products.
findRoomItems('identifier', 'location', accessible: true || false, 'containerType', 'containerName', 'slotId', 'proceduralSelections')- identifier - Filter the Room Items to only those whose identifier or Prefab ID matches the given identifier.
- location - Filter the Room Items to only those whose location ID matches the given location ID.
- accessible - Filter the Room Items to only those who are accessible or not.
- containerType - Filter the Room Items to only those with the given container type.
- containerName - Filter the Room Items to only those with the given container name. Does not include slot.
- slotId - Filter the Room Items to only those in the Inventory Slot with the given ID.
- proceduralSelections - Filter the Room Items to only those with the given procedural selections.
findPuzzles('name', 'location', 'type', accessible: true || false)- name - Filter the Puzzles to only those whose name matches the given name.
- location - Filter the Puzzles to only those whose location ID matches the given location ID.
- type - Filter the Puzzles to only those of the given type.
findEvents('id', ongoing: true || false, 'roomTag', 'effectsString', 'refreshesString')- id - Filter the Events to only those whose ID matches the given ID.
- ongoing - Filter the Events to only those that are ongoing or not.
- roomTag - Filter the Events to only those with the given Room tag.
- effectsString - Filter the Events to only those who inflict the given comma-separated Status Effects.
- refreshesString - Filter the Events to only those who refresh the given comma-separated Status Effects.
findStatusEffects('id', 'modifiedStatsString', 'attributesString')- id - Filter the Status Effects to only those whose ID matches the given ID.
- modifiedStatsString - Filter the Status Effects to only those who modify the given stats.
- attributesString - Filter the Status Effects to only those with the given comma-separated behavior attributes.
findLivingPlayers('name', isNPC: true || false, 'location', 'hidingSpot', 'statusString')- name - Filter the Players to only those whose name or display name matches the given name.
- isNPC - Filter the Players to only those who are NPCs or not.
- location - Filter the Players to only those whose location ID matches the given location ID.
- hidingSpot - Filter the Players to only those whose hiding spot matches the given hiding spot.
- statusString - Filter the Players to only those inflicted with all of the given comma-separated Status Effects.
findDeadPlayers('name', isNPC: true || false)- name - Filter the Players to only those whose name or display name matches the given name.
- isNPC - Filter the Players to only those who are NPCs or not.
findInventoryItems('identifier', 'player', 'containerName', 'slotId', 'equipmentSlotId', 'proceduralSelections')- identifier - Filter the Inventory Items to only those whose identifier or Prefab ID matches the given identifier.
- player - Filter the Inventory Items to only those belonging to the given player.
- containerName - Filter the Inventory Items to only those with the given container name. Does not include slot.
- slotId - Filter the Inventory Items to only those in the Inventory Slot with the given ID.
- equipmentSlotId - Filter the Inventory Items to only those belonging to the Equipment Slot with the given ID.
- proceduralSelections - Filter the Inventory Items to only those with the given procedural selections.
findGestures('id')- id - Filters the Gestures to only those whose ID matches the given ID.
findFlags('id')- id - Filters the Flags to only those whose ID matches the given ID.
Here are just a few examples of ways to use the finder module in if tags:
-
Indicate if a Puzzle is solved or not:
<desc><s>This is a table for praying.</s> <s>On it there are two CANDLES.</s> <if cond="findPuzzle('CANDLES').solved === true"><s>They are currently lit.</s></if><if cond="findPuzzle('CANDLES').solved === false"><s>If you lit them, maybe you'd be able to pray for something.</s></if></desc> -
Indicate if a Puzzle is solved or not when there are several Puzzles with the desired name in different Rooms:
<desc><s>You step onto the bridge from the BOTANICAL GARDEN.</s> <if cond="findPuzzle('LOCK', 'bridge').solved === true"><s>A mysterious CAVE is behind where the waterfall used to be.</s></if><if cond="findPuzzle('LOCK', 'bridge').solved === false"><s>A WATERFALL roars right next to the bridge as you enter, spraying you with a cool mist.</s></if> <s>The bridge arches up slightly over a beautiful lake, and in the middle of the bridge is a GAZEBO.</s> <s>The other end leads to a GREENHOUSE.</s></desc> -
Indicate which Puzzle of a pair is currently solved:
<desc><s>The terminal appears to control the heat sensor for the freezer.</s> <s>It has two buttons: the OFF BUTTON and the ON BUTTON.</s> <if cond="findPuzzle('OFF BUTTON').solved === true"><s>The sensor is already off.</s></if><if cond="findPuzzle('ON BUTTON').solved === true"><s>The sensor is currently on.</s></if></desc> -
Indicate if there are Players in a given Room:
<desc><s>You look through the peephole.</s> <if cond="findRoom('hall-1').occupants.length > 0"><s>There's someone in the hall outside.</s></if><if cond="findRoom('hall-1').occupants.length === 0"><s>You don't see anyone in the hall.</s></if></desc> -
Add additional details to a description based on the presence of an Item:
<desc><s>You step through the DOUBLE DOORS into a spacious warehouse.</s> <s>The CEILING in this room is rather high, and a CAMERA is hung from it.</s> <s>Many SHELVES line the room, forming aisles in the space between them.</s> <s>There are also several CRATES <if cond="findRoomItem('OIL DRUM', 'warehouse', 'Fixture', 'FLOOR') !== undefined">and an OIL DRUM </if>lined up against the wall near the doors you just came from.</s> <s>To your right is a door to the CONFERENCE ROOM.</s> <s>In the back right corner is the door to the OFFICE.</s> <s>The conference room and the office create a fairly wide hallway leading to the SIDE DOOR.</s> <s>Above the doors you just came from is a MONITOR on the wall.</s></desc> -
Indicate if another Fixture is activated or not:
<desc><s>It’s a life-sized iron bull made out of metal, with a chamber so you can climb inside.</s> <var v="this.childPuzzle.alreadySolvedDescription.parseFor(player)" /> <s>Underneath it is <if cond="findFixture('BUTTON', 'torture-chamber').activated === false">what looks like a pit for a campfire</if><if cond="findFixture('BUTTON', 'torture-chamber').activated === true">a roaring fire</if>.</s> <s>There is a BUTTON on its nose.</s> <s>Do you dare push it?</s></desc> -
Indicate whether an Event is ongoing or not:
<desc><s>It's a high-powered ceiling fan.</s> <if cond="findEvent('FAN OFF').ongoing === false"><s>It's humming away, circulating air through the vault and helping the dehumidifying system suck up any excess moisture.</s></if><if cond="findEvent('FAN OFF').ongoing === true"><s>It isn't on right now.</s></if></desc> -
Display different text depending on the values of multiple Flags:
<desc><s>It's an old balancing scale.</s> <s>It has a LEFT PLATE and a RIGHT PLATE.</s> <s>The idea is that by putting different items in each plate, you can tell their relative masses based on how far the scale tips in either direction.</s> <if cond="player.perception > 5"><s>If you had an item with a known mass, you could potentially determine the exact mass of multiple other items by testing various combinations of them in each plate.</s></if> <if cond="findFlag('LEFT PLATE WEIGHT', true) > findFlag('RIGHT PLATE WEIGHT', true)"><s>The scale is currently tipped to the left.</s></if><if cond="findFlag('LEFT PLATE WEIGHT') === findFlag('RIGHT PLATE WEIGHT')"><s>The scale is currently balanced.</s></if><if cond="findFlag('LEFT PLATE WEIGHT') < findFlag('RIGHT PLATE WEIGHT')"><s>The scale is currently tipped to the right.</s></if></desc>- In this example, the first time the
findFlagfunction is called on each Flag, theevaluateparameter is set totrue, so that the Flag’s value script will be evaluated before the condition is checked. Subsequent calls tofindFlagomit theevaluateparameter, because it can’t be changed in the middle of parsing a description, so you can assume it is the same since it was last evaluated.
- In this example, the first time the
Helper conditionals
The function which evaluates scripts also has access to a few helper functions, which can be useful when
writing if conditionals. The following functions are available:
getRandomNumber(min: number, max: number)- Gets a random number between
minandmax, inclusive.
- Gets a random number between
getRandomString(['string1', 'string2', ...])- Outputs one of the given strings, chosen at random.
doWithChance(chance: number)- Returns
trueonly \( \frac{1}{chance} \) of the time. - If no
chanceis given, returnstrueonly \( \frac{1}{100} \) of the time.
- Returns
doWithChanceModifiedByPlayerStatus(baseChance: number, player: Player, statusId: 'string', statusDivisor: number)- Does the same thing as
doWithChance, butbaseChanceis first divided bystatusDivisorif the Player has the Status Effect with the given ID. - Effectively, this makes it more likely to be
trueif the Player has the given Status Effect.
- Does the same thing as
divide(numerator: number, denominator: number)- Divides two numbers. This is especially useful when setting [Flag value scripts] in
Bot commands, as the character normally used to do division (
/) is used as a delimiter in command sets, making it otherwise impossible to do division in Bot commands.
- Divides two numbers. This is especially useful when setting [Flag value scripts] in
Bot commands, as the character normally used to do division (
clamp(value: number, min: number, max: number)- Clamps a number between a minimum and maximum value, inclusive.
generateListString(['string1', 'string2', ...])- Generates a grammatically correct list with the given strings.
- If there are two strings, outputs “string1 and string2”.
- If there are three or more strings, outputs “string1, string2, …, and stringN”.
makeCopyable('string')- Inserts the given string into Discord’s code block Markdown, making it easier to copy for the reader.
capitalizeFirstLetter('string')- Capitalizes the first letter of the given string.
endsWithPunctuation('string')- Returns
trueif the given string ends with a sentence-ending punctuation mark. - Ignores Discord Markdown characters at the end of the string.
- Returns
Here are a few examples of ways to use the helper functions in if tags:
- Display a string of text with a probability of 1/20:
<desc><s>You step up to the right viewing platform, which is quite short.</s> <s>Here, you can look down at the ground through the window.</s> <s>You aren't terribly high up, but you still have quite a nice view of the ocean.</s> <s>You can look through binoculars to see even further.</s> <s>There isn't much to see aside from more ocean.</s> <if cond="doWithChance(20) === true"><s>Wait, no!</s> <s>You see a few dolphins jumping out of the water in the distance!</s></if></desc> - Display a hallucination with a probability that increases if the inspecting Player has the
exhaustedStatus Effect:<desc><s>You examine the rope.</s> <s>It looks fairly strong, and it's very long.</s> <s>You could use it for so many things.</s> <if cond="player.hasStatus('delirious') || doWithChanceModifiedByPlayerStatus(500, player, 'exhausted', 50) === true"><s>It feels like a giant worm in your hands.</s> <s>...Because it has transformed into a giant worm.</s></if></desc>- If the Player has the
deliriousStatus, the hallucination will appear 100% of the time. - If the Player has the
exhaustedStatus, the base probability (500) will be divided by the divisor (50) for an effective probability of1/10. - Otherwise, the hallucination will randomly appear with the base probability of
1/500.
- If the Player has the
<var>
Caution
This tag has the ability to run code. In order to display the output of the script in the
vattribute, Alter Ego uses its scriptParser module, which evaluates code in a heavily restricted context. While it has been tested to prevent access to many functions which can cause severe damage, its security cannot be guaranteed, especially if Alter Ego is run outside of a Docker container. Given that the only way to insert code is to write it on the spreadsheet, write access should be given to as few people as possible. There may exist exploits that allow malicious users to do such things as:
- Sending Alter Ego’s authentication token to the server
- Killing a player in the game
- Shutting down Alter Ego
- Read, modify, and delete files on your computer
We, the Alter Ego developers, assume no responsibility for damage caused by malicious use of this feature. You have been warned.
Example:
<desc><if cond="this.childPuzzle.solved === true"><s>The locker can be locked with a combination LOCK, but it's currently unlocked.</s> <var v="this.childPuzzle.alreadySolvedDescription.parseFor(player)" /></if><if cond="this.childPuzzle.solved === false"><s>The locker is locked with a combination LOCK.</s> <s>It seems someone scribbled on the front with marker: xyz.</s> <s>What's that supposed to mean?</s></if></desc>
The var tag is used to insert data from the game into the text of a description. The data in question is accessed
with a script written in the v (variable) attribute. In the above example, the
parseFor function of
this.childPuzzle.alreadySolvedDescription is called using the Player currently inspecting this Fixture. The
Already Solved Description of this Fixture’s child Puzzle is:
<desc><s>You open the locker.</s> <s>Inside, you find <il></il>.</s></desc>
Thus, if the child Puzzle is solved, it will be parsed, and the output will be inserted in place of the var tag.
So, the Player will be sent:
The locker can be locked with a combination LOCK, but it's currently unlocked. You open the locker. Inside, you find a FIRST AID KIT, a bottle of PAINKILLERS, a PILL BOTTLE, and an OLD KEY.
Note that the var tag cannot surround text, so it must be closed in the same tag that it is opened with, like so:
<var v="some variable" />.
The var tag is incredibly useful due to its flexibility for writing dynamic descriptions. Here are just a few common
uses for it:
Indicating Puzzle status
One of the var tag’s most common uses is changing the description of a Fixture or something else based on the solved
status of a Puzzle. Here are a few examples:
- Indicating what items are inside the Fixture’s child Puzzle:
<desc><s>You examine the table.</s> <s>Looking closely, you can see that it's not a table at all, but a chest!</s> <if cond="this.childPuzzle.solved === true"><s>It looks like it requires an old key to open, but it seems to be unlocked.</s> <var v="this.childPuzzle.alreadySolvedDescription.parseFor(player)" /></if><if cond="this.childPuzzle.solved === false"><s>It looks like it requires an old key to open.</s></if></desc>this.childPuzzle.alreadySolvedDescription:<desc><s>You open the chest.</s> <s>Inside, you find <il></il>.</s></desc>- Parsed description if
this.childPuzzle.solved === true:You examine the table. Looking closely, you can see that it's not a table at all, but a chest! It looks like it requires an old key to open, but it seems to be unlocked. You open the chest. Inside, you find a bottle of PEPSI, a ROPE, and a KNIFE. - Parsed description if
this.childPuzzle.solved === false:You examine the table. Looking closely, you can see that it's not a table at all, but a chest! It looks like it requires an old key to open.
- Replace the entire description with
childPuzzle.alreadySolvedDescription:<desc><if cond="this.childPuzzle.solved === true"><var v="this.childPuzzle.alreadySolvedDescription.parseFor(player)" /></if><if cond="this.childPuzzle.solved === false"><s>The computer is asking for a password.</s></if></desc>this.childPuzzle.alreadySolvedDescription:<desc><s>The computer is logged in.</s> <s>There's no Internet connection, but it seems whoever was using this computer left a saved EMAIL open.</s> <if cond="findPuzzle('DETONATOR').solved === false"><s>There's also a program called DETONATOR open.</s></if></desc>- Parsed description if
this.childPuzzle.solved === true:The computer is logged in. There's no Internet connection, but it seems whoever was using this computer left a saved EMAIL open. There's also a program called DETONATOR open. - Parsed description if
this.childPuzzle.solved === false:The computer is asking for a password.
- Indicate which outcome a Puzzle was solved with:
<desc><s>It's a TV input switcher that seems to be primarily for very old consoles, as all of the inputs are old formats such as coaxial and composite.</s> <s>There are eight inputs, all on the back.</s> <s>The output comes out from the side, and you can set which system to output by pressing one of the numbered buttons on the front.</s> <s>It's currently set to button <var v="this.childPuzzle.outcome" />.</s></desc>- Output if
this.childPuzzle.outcomeis3:It's a TV input switcher that seems to be primarily for very old consoles, as all of the inputs are old formats such as coaxial and composite. There are eight inputs, all on the back. The output comes out from the side, and you can set which system to output by pressing one of the numbered buttons on the front. It's currently set to button 3.
- Output if
- Indicate how many remaining attempts a Puzzle has:
<desc><s>You enter a password, but the computer tells you that it's incorrect.</s> <s>You have <var v="this.remainingAttempts" /> attempt<if cond="this.remainingAttempts !== 1">s</if> left.</s></desc>
Indicate Item uses
Another very useful feature of the var tag is indicating how many uses a particular Item has left. Here are a few
examples:
<desc><if cond="this.uses === 6"><s>It's a whole watermelon.</s> <s>It feels perfectly ripe.</s></if><if cond="this.uses > 1 && this.uses < 6"><s>It's a partially sliced watermelon.</s> <s>You could get about <var v="this.uses" /> more slices out of it.</s></if><if cond="this.uses === 1"><s>It's a single slice of watermelon.</s> <s>You should eat it before it goes bad.</s></if></desc>
- Parsed description if this Item has 6 uses left:
It's a whole watermelon. It feels perfectly ripe. - Parsed description if this Item has (for example) 4 uses left:
It's a partially sliced watermelon. You could get about 4 more slices out of it. - Parsed description if this Item has 1 use left:
It's a single slice of watermelon. You should eat it before it goes bad.
<desc><s>It's a family-sized box of salted crackers.</s> <s>The box says it contains 6 packs.</s> <s>Looking inside, you find <var v="this.uses / 2.0" /> pack<if cond="this.uses / 2.0 !== 1.0">s</if>.</s></desc>
- Parsed description if this Item has (for example) 8 uses left:
It's a family-sized box of salted crackers. The box says it contains 6 packs. Looking inside, you find 4 packs. - Parsed description if this Item has (for example) 2 uses left:
It's a family-sized box of salted crackers. The box says it contains 6 packs. Looking inside, you find 1 pack. - Parsed description if this Item has (for example) 1 use left:
It's a family-sized box of salted crackers. The box says it contains 6 packs. Looking inside, you find 0.5 packs.
Other uses
Because the var tag is able to access all of the game’s data, it has many more uses. Here are just a few:
- Indicate which players are in another Room:
<desc><s>You look through the window into the pool room below.</s> <s>On the right side of the room you see an Olympic-size swimming pool and on the left is a larger recreational pool, surrounded by a number of beach chairs.</s> <if cond="findRoom('rec-pool').occupantsString !== ''"><s>You think you see <var v="findRoom('rec-pool').occupantsString" /> down there.</s></if></desc> - Show the inspecting Player’s description:
<desc><s>You look in the mirror.</s> <s>It shows you your reflection.</s> <var v="player.description.parseFor(player)" /></desc> - Indicate how many seconds remain in a Fixture’s current process:
<desc><s>It's the patented Empire Electronics Smart Cooker!</s> <s>It's capable of cooking almost anything in one minute.</s> <s>It looks kind of like a microwave, as a red box with a door that opens from the side.</s> <s>How exactly it cooks is a closely guarded trade secret, but it's truly an amazing piece of technology.</s> <if cond="this.activated === true"><s>It's currently powered on, with <var v="Math.floor(this.process.duration / 1000)"/> second<if cond="this.process.duration >= 2000">s</if> remaining.</s></if> <s>Inside, you find <il></il>.</s></desc> - Display the current time:
<desc><s>It's a brass gold pocket watch with a gold chain attached to the handle.</s> <s>The time is <var v="new Date().toLocaleTimeString([], { hour: '2-digit', minute: '2-digit' })" />.</s></desc> - Display a randomly chosen string of text:
<desc><s>Entering through GATE 1, you step into a lush and well-tended garden surrounded by a tall FENCE.</s> <s>It's rectangular in shape, and from where you enter, you can see GATE 2 on the wall to your left.</s> <s><var v="getRandomString(['', 'You see a butterfly gently flutter by. ', 'You hear the buzz of a bumblebee as it flies by. '])" /></s><s>A neat cobblestone path winds through the garden, which has plots for FRUITS, VEGETABLES, and HERBS, with FLOWERS spread liberally all around them.</s> <s>HANGING PLANTS are suspended from the ceiling by transparent wire, giving the eerie impression that they're floating.</s> <s>Just to your left, a thin HOSE hangs in loops from the side of the fence, stored neatly alongside other GARDENING EQUIPMENT.</s> <s>There's also a small wooden BENCH beside the path in an especially floral section of the garden.</s> <s>A small CAMERA stares down at you from the corner post, and there's a MONITOR on the north fence wall.</s></desc> - Display the current value of a Flag:
<desc><s>You can't use the POTTERY WHEEL right now, because <var v="findFlag('POTTERY WHEEL USER')" /> is already using it.</s></desc>
<procedural>
Example:
<desc><s>It's a trading card from the hugely popular card game, Capsulebeasts.</s> <s>This one features the ocean-type fan-favorite, Tortide.</s> <procedural chance="5"><s>This card has a holographic finish, making it extra rare!</s></procedural></desc>
The procedural tag allows Prefabs to be instantiated as Room Items and Inventory Items with procedurally-generated
descriptions. This can allow you to add some variation in instances of Prefabs without having to create entirely new
Prefabs or manually edit the descriptions of instances of those Prefabs. Keep in mind that procedural tags only affect
instantiated Prefabs aesthetically. They cannot affect an Item’s functionality. For more information on what properties
procedural tags can affect, see the Prefab article’s section on
procedural options.
Note that when a Prefab is instantiated as a Room Item or Inventory Item, the parser module evaluates all of the
procedural tags in the description and algorithmically decides which ones to keep. The description it generates
contains only the the procedural and poss tags that were selected. However, any attributes those tags had,
except for name, will be removed. All procedural and poss tags that weren’t selected are completely removed,
along with the text that was inside them. All other tags remain unaffected.
Procedural attributes
procedural tags can have attributes. There are three attributes with defined behavior:
Procedural attribute: name
name allows you to give each procedural tag its own identifier. This allows you to manually select procedurals
and the possibilities contained within them when using the
instantiate
command.
Giving procedural and poss tags name attributes also allow them to be retained and transferred whenever an
Item is transformed into another Item by any means.
Procedural attribute: chance
chance takes a percent chance for the contents of a given procedural tag to appear in instances of a Prefab. This
chance is independent of other procedural tags. If the chance attribute is omitted from the tag, or its value is not
a number between 0 and 100, it is assigned a chance of 100, meaning that it will always appear.
However, if a procedural tag is nested inside of another procedural tag, then it will not appear in the generated
description if the parent procedural tag failed to generate, even if its chance is 100.
For example, given the description:
<desc><s>Sentence.</s> <procedural chance="50" name="A1"><s>A1.</s> <procedural chance="100" name="A2"><s>A2.</s></procedural></procedural></desc>
Because procedural A2 is contained inside procedural A1, which has a chance of 50, it will not appear if A1
did not generate. If A1 did generate, then A2 will always generate, since it has a chance of 100. In other words,
the parser module’s generated output will be:
- 50% of the time:
<desc><s>Sentence.</s></desc> - 50% of the time:
<desc><s>Sentence.</s> <procedural name="A1"><s>A1.</s> <procedural name="A2"><s>A2.</s></procedural></procedural></desc>
For another example, given the description:
<desc><s>Sentence.</s> <procedural name="A1" chance="50"><s>A1.</s> <procedural name="A2" chance="50"><s>A2.</s> <procedural name="A3" chance="50"><s>A3.</s></procedural></procedural></procedural></desc>
Because procedural A3 is nested inside procedural A2 — which is itself nested inside procedural A1 — the
probability of A3 generating will be dependent on A2 generating, which is dependent on A1 generating. In other
words, the parser module’s generated output will be:
- 50% of the time:
<desc><s>Sentence.</s></desc> - 25% of the time:
<desc><s>Sentence.</s> <procedural name="A1"><s>A1.</s></procedural></procedural></desc> - 12.5% of the time:
<desc><s>Sentence.</s> <procedural name="A1"><s>A1.</s> <procedural name="A2"><s>A2.</s></procedural></procedural></desc> - 12.5% of the time:
<desc><s>Sentence.</s> <procedural name="A1"><s>A1.</s> <procedural name="A2"><s>A2.</s> <procedural name="A3"><s>A3.</s></procedural></procedural></procedural></desc>
Procedural attribute: stat
stat takes the name of one of the Player’s five stats: strength,
perception, dexterity, speed, stamina, or their abbreviations: str, per, dex, spd, sta. If a Player
is supplied when the output is generated, then the chosen stat will affect the chances of all of the poss tags
contained within this procedural tag.
- When instantiating a Prefab as an Inventory Item, the Player will always be the Player who the Inventory Item belongs to.
- When instantiating a Prefab as a Room Item, the Player will be the one who activated the Fixture processing the Recipe in which the Prefab is a product, as long as they’re still alive and in the same Room as the Fixture. Otherwise, it is only possible to supply a Player in the bot version of the instantiate command; this is the Player who caused the command to be executed.
When a Player’s stat is provided, a percent modifier, \(M\), is calculated for each poss tag within the
procedural. The formula for \(M\) is as follows:
\[ M = (f + \frac{c - f}{p - 1}) * i * 10\]
In this formula there are several variables:
- \(c\) is the maximum modifier value, where \(c = x - 5\), with \(x\) being the stat value.
- \(f\) is the minimum modifier value, where \(f = -1 * c\).
- \(p\) is the number of
posstags inside thisprocedural. - \(i\) is the numbered position of the
posstag that \(M\) is being calculated for. The firstposstag in the list has an \(i\) value of \(0\).
After M is calculated for a poss tag, it is added to that tag’s chance, before moving onto the next poss tag.
In effect, this means that a higher stat value is more likely to result in poss tags near the end of the list being
generated, while a lower stat value is more likely to result in poss tags near the beginning of the list being
generated. A Player with a stat value of 10 may have a percent modifier of -50% for the first listed poss tag and +50%
for the final listed poss tag. Meanwhile, a Player with a stat value of 1 may have a percent modifier of +40% for the
first listed poss tag and a -40% for the final listed poss tag. This may very well make it impossible for some
poss tags in the procedural to generate at all, as it is unlikely that all of the poss chances will still be
between 0 and 100.
For example, given the description:
<desc><s>This is a red clay pot.</s> <procedural stat="dexterity"><poss chance="50"><s>Judging by the abysmal craftsmanship, it looks like it was made by a total rookie.</s></poss><poss chance="35"><s>It looks decently made, but there are some noticeable mistakes.</s></poss><poss chance="15"><s>It's very well made, with perfectly smooth edges.</s></poss></procedural></desc>
Suppose the provided Player’s dexterity stat is 3. Using the formula listed above, the percent modifiers for each poss
tag would be +20%, ±0%, and -20%, respectively. On the other hand, if the provided Player’s dexterity stat is 9, the
percent modifiers would instead be -40%, ±0%, and +40%, respectively. As a result, the parser module’s generated output
would be:
-
<desc><s>This is a red clay pot.</s> <procedural><poss><s>Judging by the abysmal craftsmanship, it looks like it was made by a total rookie.</s></poss></procedural></desc>- 70% of the time if the Player’s dexterity stat is 3.
- 10% of the time if the Player’s dexterity stat is 9.
-
<desc><s>This is a red clay pot.</s> <procedural><poss><s>It looks decently made, but there are some noticeable mistakes.</s></poss></procedural></desc>- 30% of the time if the Player’s dexterity stat is 3. This is because 70% + 35% exceeds 100%, so the extra 5% doesn’t matter.
- 35% of the time if the Player’s dexterity stat is 9.
-
<desc><s>This is a red clay pot.</s> <procedural><poss><s>It's very well made, with perfectly smooth edges.</s></poss></procedural></desc>- 0% of the time if the Player’s dexterity stat is 3. The actual calculated probability is -5%, but because 70% + 35% exceeds 100%, this makes no difference.
- 55% of the time if the Player’s dexterity stat is 9.
Note that if the stat attribute is set, but there is no Player provided, or the Player’s stat value is 5, the chances
of all of the poss tags contained within the procedural will not be changed.
<poss>
Example:
<desc><s>It's a capsule from your favorite game, Capsulebeasts!</s> <s>This is a <procedural name="color"><poss name="red" chance="25">red</poss><poss name="blue" chance="25">blue</poss><poss name="green" chance="25">green</poss><poss name="black" chance="12.5">black</poss><poss name="white" chance="12.5">white</poss></procedural> <procedural name="species"><poss name="lavazard">Lavazard</poss><poss name="loamander">Loamander</poss><poss name="tortide">Tortide</poss></procedural>.</s> <s><procedural name="finish" chance="25"><poss name="glass" chance="50">This one has a glassy finish.</poss><poss name="metal" chance="50">This one has a metallic finish.</poss><poss name="standard" chance="0"></poss></procedural></s></desc>
The poss tag, short for possibility, is used to add pre-defined variations to the descriptions of Prefabs. It must
go inside a procedural tag. If it is placed outside of a procedural tag, it has no functionality. As
with the procedural tag, poss tags only affect instantiated Prefabs aesthetically. They cannot affect an Item’s
functionality. For more information on what properties poss tags can affect, see the Prefab article’s section on
procedural options.
When a Prefab is instantiated into a Room Item or Inventory Item, the parser module uses a random number generator to
pick one poss tag to keep in the final description. After one is selected, all of the others within the same
procedural tag are removed. The poss tag itself is retained, but all attributes it contains, with the exception
of name will be removed from the description.
Poss attributes
poss tags can have attributes. There are two attributes with defined behavior:
Poss attribute: name
name allows you to give each poss tag its own identifier. This allows you to manually select procedurals and the
possibilities contained within them when using the
instantiate
command.
In order to make use of the name attribute in a poss tag, the procedural tag that contains it must also have a
name. When using the instantiate command, it is possible to provide
procedural
selections with the syntax
(procedural name=poss name). For instance, in the above example, if you wanted to manually instantiate an Item with
the standard finish, which normally has no possibility of generating, your command would start with:
.instantiate GACHA CAPSULE (finish=standard). This syntax is not case-sensitive, and extra spaces are ignored. The
effect of doing this would result in the final s tag consisting of
<s><procedural name="finish"><poss name="standard"/></procedural></s>, which would be removed when the description
is inspected by a player, because the poss that was selected contained no text, and as a result, the procedural
and thus s tag contained no text. The poss tags within the other procedural tags in the description would still
be randomly chosen.
It is possible to chain manual procedural selections together with a + character. For example, if your command began
with .instantiate GACHA CAPSULE (color=black + species=tortide + finish=metal), then the generated Item would always
have the description:
<desc><s>It's a capsule from your favorite game, Capsulebeasts!</s> <s>This is a <procedural name="color"><poss name="black">black</poss></procedural> <procedural name="species"><poss name="tortide">Tortide</poss></procedural>.</s> <s><procedural name="finish"><poss name="metal">This one has a metallic finish.</poss></procedural></s></desc>
It is important to note that that when a named poss tag contained inside of a named procedural tag is selected
during procedural generation, then if there is another procedural tag with the same name in the same description, it
will match the poss that was selected. So, given the description:
<desc><s><procedural name="P1"><poss name="A1">A1.</poss><poss name="B1">B1.</poss></procedural> <procedural name="P1"><poss name="B1">B1.</poss></procedural></s></desc>
If the poss tag that was selected in the procedural P1 is B1, then in the second procedural P1, the poss
that is selected will also be B1. Conversely, if A1 is selected first, then the second procedural cannot be
satisfied, as it does not have a poss tag named A1. So, it will be removed in the generated description. This is to
ensure that procedural selections don’t ever conflict within the same description.
Poss attribute: chance
chance takes a percent chance for the contents of a given poss tag to be chosen in instances of a Prefab. This
chance is independent of the chance attribute of the procedural tag which contains it. The chance given for the
procedural tag determines how likely it is that any of the poss tags contained inside it will be generated. That
is, even if the containing procedural tag has a chance under 100, all of the chances of the poss tags contained
inside it should ideally add up to 100 (and not the chance of the procedural, as one might assume).
When the parser module has to select a poss tag in a given procedural tag to keep, it first adds together the
chances assigned to each poss tag in the procedural. If a poss tag does not have a chance attribute, or its
value is not a number between 0 and 100, it is considered chanceless, and thus not included in this sum. If there are
any chanceless possibilities, the sum calculated earlier is subtracted from 100, and then divided by the number of
chanceless possibilities. This makes it so that all chanceless possibilities are equally likely to generate, and all of
the chances will add up to 100.
For example, given the description:
<desc><s><procedural><poss name="A1" chance="50">A1.</poss><poss name="A2">A2.</poss><poss name="A3">A3.</poss></procedural></s></desc>
Because A1 has a chance of 50, and A2 and A3 are chanceless, the remainder that it would take for all of the
poss chances to add up to 100 — 50 — is divided by the number of chanceless possibilities — 2 — and assigned equally
to them. As a result, A2 and A3 have an effective chance of 25 each.
If none of the poss tags in a procedural have assigned chances, then they will all be equally likely to be
selected. If the sum of all of the chances already adds up to 100 and there are also chanceless possibilities, then the
chanceless possibilities will never be selected.
After all of the possibilities have been assigned chances, if the procedural has a stat attribute and a Player’s
stat has been provided, these chances will have percent modifiers applied to them.
Then, all of the possibilities are sorted from highest to lowest chance. A random number between 0 and 100 is generated,
and an accumulator value that starts at 0 is created. The possibilities are iterated through, with each one adding to
the accumulator value. If at any point during this iteration, the randomly-generated number is less than the
accumulator’s current value, that possibility is selected. Finally, all other possibilities in the current procedural
are removed from the description.
Default possibilities
Before reading this section, please read the section on Room Item and Inventory Item procedural selections.
Because procedural selections are carried over when an Item is transformed, it can be useful to have procedurals and
possibilities that never have a chance of generating when an Item is instantiated, and can only appear in instances
of that Item that were created by passing procedural selections down through repeated transformations
(for instance, in a chain of Recipes). In this case, it can be useful to create default procedural and poss tags.
Take this CLEAN TEAPOT Prefab, for example:
<desc><s>This is <procedural name="base color" chance="100"><poss name="default" chance="100">a plain, white</poss><poss name="obscured" chance="0"></poss><poss name="red" chance="0">a red</poss><poss name="white" chance="0">a white</poss></procedural><procedural name="glaze color" chance="0"><poss name="clear" chance="100"></poss><poss name="red">a red</poss><poss name="orange">an orange</poss><poss name="brown">a brown</poss><poss name="yellow">a yellow</poss><poss name="green">a green</poss><poss name="teal">a teal</poss><poss name="light blue">a light blue</poss><poss name="indigo">an indigo</poss><poss name="violet">a violet</poss><poss name="pink">a pink</poss><poss name="white">a white</poss><poss name="gray">a gray</poss><poss name="black">a black</poss></procedural> teapot.</s> <procedural name="quality"><s><poss name="default" chance="100"></poss><poss name="terrible" chance="0">It appears to have been handmade. It's of *terrible* quality. It's lumpy and misshapen, with a wildly uneven circumference. The handle is thin and flimsy, and feels like it might break off. The angle of the spout is too shallow, and the mouth is almost completely vertical. Also, the lid is shaped and sized all wrong, so it doesn't securely cover the top. Worse yet, the bottom is crooked, which makes it impossible for it to sit level on a flat surface. It should theoretically be safe to use, but you'd be sure to spill whatever you try to pour from this. </poss><poss name="poor" chance="0">It appears to have been handmade. It's of poor quality. The bottom is fairly sturdy, but it's not perfectly flat, preventing it from sitting level on a flat surface. The body of the pot is lumpy and oblong, giving it an uneven circumference. The lid kind of fits in the indentation on top, but it rocks back and forth, and the knob is difficult to grip. The spout is angled well, but the handle is a little small, making it somewhat difficult to hold. You should be able to pour tea out of this, but you'll have to be careful, or you'll make a mess. </poss><poss name="decent" chance="0">It appears to have been handmade. The craftsmanship is fairly decent. It has a sturdy bottom that sits perfectly level on a flat surface. The body is mostly symmetrical, but it has a few small divots and bumps here and there, giving it a slightly uneven circumference. The lid fits in the indentation on top quite well, but the knob is a little shallow, making it somewhat difficult to grip. The handle is firmly attached and has a good thickness, with just enough room for your fingers. The spout has a nice curve, and it's angled well, making it ideal for pouring. </poss><poss name="excellent" chance="0">It appears to have been handmade. The craftsmanship is *excellent*. It has a sturdy bottom that sits level on any surface. The body has perfect radial symmetry, and a very smooth texture. The lid fits securely in the indentation on top, and has a sturdy, round knob that's easy to grip. The handle is attached seamlessly to the body, and has good thickness and stability, with plenty of room for your fingers. The spout also attaches seamlessly, and has an elegant curvature with a mouth at just the right angle for pouring. </poss></s></procedural><s>It has a smooth, glassy finish<procedural name="pattern" chance="0">, and it's patterned with <procedural name="pattern quality" stat="per"><poss name="crude" chance="30">crude</poss><poss name="simple" chance="30">simple</poss><poss name="detailed" chance="30">detailed</poss><poss name="ornate" chance="10">ornate</poss></procedural> <procedural name="pattern color"><poss name="red">red</poss><poss name="orange">orange</poss><poss name="brown">brown</poss><poss name="yellow">yellow</poss><poss name="green">green</poss><poss name="teal">teal</poss><poss name="light blue">light blue</poss><poss name="indigo">indigo</poss><poss name="violet">violet</poss><poss name="pink">pink</poss><poss name="white">white</poss><poss name="gray">gray</poss><poss name="black">black</poss></procedural> <poss name="stripes">stripes</poss><poss name="lines">lines</poss><poss name="rings">rings</poss><poss name="spots">spots</poss><poss name="stars">stars</poss><poss name="zigzagging lines">zigzagging lines</poss><poss name="hearts">hearts</poss><poss name="broken hearts">broken hearts</poss><poss name="flames">flames</poss><poss name="webs">webs</poss><poss name="drip lines">drip lines</poss><poss name="flowers">flowers</poss><poss name="trees">trees</poss><poss name="clouds">clouds</poss><poss name="waves">waves</poss><poss name="bubbles">bubbles</poss><poss name="fish">fish</poss><poss name="turtles">turtles</poss><poss name="sea creatures">sea creatures</poss><poss name="rabbits">rabbits</poss><poss name="horses">horses</poss><poss name="farm animals">farm animals</poss><poss name="cats">cats</poss><poss name="dogs">dogs</poss><poss name="birds">birds</poss><poss name="spiders">spiders</poss><poss name="ants">ants</poss><poss name="beetles">beetles</poss></procedural>.</s> <s>If you want to fill this with tea, scoop one teaspoon of tea leaves in here for every cup you want to make, then fill it with hot water from a kettle.</s> <s>When you take off the lid, you find <il></il> inside.</s></desc>
This is quite a complicated description, but it can be broken down into several procedural tags, many of which
have a “default” poss tag:
base color, which has a 100% chance of generating.defaultis the default possibility, as it has achanceof 100. All other possibilities are manually assigned a chance of 0.
glaze colorhas a 0% chance of generating. It will only appear if it is transferred during a transformation.qualityis not explicitly assigned a chance, which means it has a 100% chance of generating.defaultis the default possibility, as it has achanceof 100. All other possibilities are manually assigned a chance of 0.- Since the
defaultpossibility contains no text, nothing will appear in the parsed version of the description, but thedefaultposstag will still be carried over in transformations.
patternhas a 0% chance of generating. It will only appear if it is transferred during a transformation.patternhas several possibilities, and even contains nested procedurals, but they will never appear unless they were transferred during a transformation.
In effect, if you were to instantiate this CLEAN TEAPOT as an Item without manually selecting any possibilities, the final result would be a much simpler:
<desc><s>This is <procedural name="base color"><poss name="default">a plain, white</poss></procedural> teapot.</s> <procedural name="quality"><s><poss name="default"></poss></procedural><s>It has a smooth, glassy finish.</s> <s>If you want to fill this with tea, scoop one teaspoon of tea leaves in here for every cup you want to make, then fill it with hot water from a kettle.</s> <s>When you take off the lid, you find <il></il> inside.</s></desc>
When a Player inspects it, it would be parsed as:
This is a plain, white teapot. It has a smooth, glassy finish. If you want to fill this with tea, scoop one teaspoon of tea leaves in here for every cup you want to make, then fill it with hot water from a kettle.
Default possibilities allow you to provide the scaffolding for more complex Prefab descriptions while still having a simple version that can be instantiated in large numbers without variation, if desired.
As a note, the default possibility does not need to have the name default. It can be named anything.
Nested procedurals
There have been several examples of nested procedurals in this article already, but there exists a vital use case for them that has not yet been covered.
Consider a Prefab with the ID CLEAN TEACUP, which has all of the same procedural options as the CLEAN TEAPOT in the section above. One might expect to be able to craft a FILLED TEAPOT with the CLEAN TEACUP to produce a FILLED TEACUP. However, because the procedural selections of all ingredients in a Recipe are combined and applied to all products, and a procedural can only be assigned to possibility, this would cause a collision. When the two Items were crafted together, one of them would have their procedural selections overwritten, which would most likely be undesirable.
It is possible to avoid this issue by including nested procedurals in a description, and transferring those
over during Recipe chains. For example, suppose the CLEAN TEAPOT and CLEAN TEACUP both inherit their
base color procedural selections from a WET CLAY Prefab at the very beginning of the Recipe chain with the
following description:
<desc><s>This is a lump of wet <procedural name="base color"><poss name="red"><procedural name="secondary base color"><poss name="red">red</poss></procedural></poss><poss name="white"><procedural name="secondary base color"><poss name="white">white</poss></procedural></poss></procedural> clay.</s> <s>You can mold it however you want at one of the WORK STATIONS, or on the POTTERY WHEEL.</s> <s>Once you're happy with your work, you'll have to wait for it to dry, and then fire it in the KILN.</s></desc>
Because the secondary base color procedural is nested inside of both poss tags inside of the main
base color procedural, and the secondary base color procedural has only one poss tag that
matches the poss it’s nested in, each base color possibility can carry over an additional procedural
selection.
Suppose the WET CLAY Prefab can be processed into either a WET CLAY TEAPOT or WET CLAY TEACUP Prefab. If it is processed into a WET CLAY TEAPOT with the following description:
<desc><s>This is a teapot made of <procedural name="base color"><poss name="red" chance="50">red</poss><poss name="white" chance="50">white</poss></procedural> clay.</s> <s>It was made on a pottery wheel.</s> <procedural name="quality" stat="dex"><s><poss name="terrible" chance="40">It's of *terrible* quality. It's lumpy and misshapen, with a wildly uneven circumference. The handle is thin and flimsy, and feels like it might break off. The angle of the spout is too shallow, and the mouth is almost completely vertical. Also, the lid is shaped and sized all wrong, so it doesn't securely cover the top. Worse yet, the bottom is crooked, which makes it impossible for it to sit level on a flat surface. You'd be sure to spill whatever you put in this.</poss><poss name="poor" chance="35">It's of poor quality. The bottom is fairly sturdy, but it's not perfectly flat, preventing it from sitting level on a flat surface. The body of the pot is lumpy and oblong, giving it an uneven circumference. The lid kind of fits in the indentation on top, but it rocks back and forth, and the knob is difficult to grip. The spout is angled well, but the handle is a little small, making it somewhat difficult to hold. You could probably pour tea out of this, but you'd have to be careful, or you'd make a mess.</poss><poss name="decent" chance="20">The craftsmanship is fairly decent. It has a sturdy bottom that sits perfectly level on a flat surface. The body is mostly symmetrical, but it has a few small divots and bumps here and there, giving it a slightly uneven circumference. The lid fits in the indentation on top quite well, but the knob is a little shallow, making it somewhat difficult to grip. The handle is firmly attached and has a good thickness, with just enough room for your fingers. The spout has a nice curve, and it's angled well, making it ideal for pouring.</poss><poss name="excellent" chance="5">The craftsmanship is *excellent*. It has a sturdy bottom that sits level on any surface. The body has perfect radial symmetry, and a very smooth texture. The lid fits securely in the indentation on top, and has a sturdy, round knob that's easy to grip. The handle is attached seamlessly to the body, and has good thickness and stability, with plenty of room for your fingers. The spout also attaches seamlessly, and has an elegant curvature with a mouth at just the right angle for pouring.</poss></s></procedural> <s>The clay is still wet.</s> <s>It needs time to dry before it can be put in the kiln.</s></desc>
Then the secondary base color procedural selection that the WET CLAY Prefab transferred over will
be discarded, because there is no procedural tag in the WET CLAY TEAPOT’s description with that name.
The quality procedural will be evaluated independently, since it was not inherited from the
WET CLAY.
On the other hand, if the WET CLAY is processed into a WET CLAY TEACUP with the following description:
<desc><s>This is a teacup and saucer set made of <procedural name="secondary base color"><poss name="red" chance="50">red</poss><poss name="white" chance="50">white</poss></procedural> clay.</s> <s>They were made on a pottery wheel.</s> <procedural name="secondary quality" stat="dex"><s><poss name="terrible" chance="30">They're of *terrible* quality. They're both lumpy and misshapen, with wildly uneven circumferences. The cup's handle is thin and flimsy, and feels like it might break off. Worse yet, the bottom of the cup is crooked, which makes it impossible for it to sit level on a flat surface; not that it matters, since the saucer has a rugged, bumpy surface itself. You'd be sure to spill whatever you put in this cup.</poss><poss name="poor" chance="30">They're of poor quality. The bottom of the saucer is decently sturdy, but it's not perfectly flat, preventing it from sitting completely level. It has a fairly flat surface, but the bottom of the cup is also a bit uneven, making it rock back and forth slightly. The saucer has a mostly even circumference at least, but the same cannot be said of the cup, which is lumpy all around. The handle is attached alright, but it's a little small, making it somewhat difficult to hold. You could probably drink out of this, but you'd have to be careful, or you'd make a mess.</poss><poss name="decent" chance="30">The craftsmanship is fairly decent. The cup and saucer both have sturdy bottoms that sit perfectly level on a flat surface. The saucer has a nice, even circumference with a concave rim. The sides and lip of the teacup are *mostly* even, but there are a few small divots and bumps here and there. The handle has a good thickness, with just enough room for your fingers. You could probably drink out of this just fine.</poss><poss name="excellent" chance="10">The craftsmanship is *excellent*. The cup and saucer both have sturdy bottoms that sit level on any surface. The rim of the saucer is perfectly circular, and flares out to give it a concave shape, but its surface still has a completely flat indentation, in which the cup fits snugly. The body of the cup itself has perfect radial symmetry, and a very smooth texture. The handle is attached seamlessly, with the ideal shape to be held with just one finger. The cup's rim flares out to meet your lips, making it easy to sip from.</poss></s></procedural> <s>The clay is still wet.</s> <s>It needs time to dry before it can be put in the kiln.</s></desc>
Then the base color procedural selection that the WET CLAY Prefab transferred over will be
discarded instead, since no procedural with that tag exists in this description. The
secondary quality procedural will also be evaluated independently.
If, when creating Prefabs with procedurals, you take care to ensure that collisions will not occur, then it is possible to create Recipes that use Prefabs with procedurals as ingredients, without running the risk of procedural selections being overwritten.
Edit Mode
Edit mode is a special mode of Alter Ego that drastically limits gameplay. It can be toggled on and off by a moderator at will using the editmode command.
Purpose
Most of the game world data is stored on a Google Sheets spreadsheet. However, this data is useless by itself. Alter Ego uses this data to facilitate gameplay, but reading it directly from the spreadsheet would be inefficient, as doing so would necessitate making frequent requests to the Google Sheets API, which would introduce additional latency and increase the potential for data asynchrony due to the inherent unpredictability of making requests over the Internet, thus making gameplay significantly slower and more prone to bugs.
In order to combat this, Alter Ego must load data from the spreadsheet into its internal memory, which can be triggered by a moderator with the load command. By keeping an internal copy of the game data, it is able to more efficiently access and modify that data, thus allowing for a much faster and smoother gameplay experience. However, at any given time, Alter Ego has more data than actually appears on the spreadsheet (typically to allow for faster access to data it needs - many of the internal attributes found on the Data Structures pages in this documentation serve this purpose), and more importantly, that data is out of sync with the data on the spreadsheet.
During gameplay, this is typically not a problem. However, in the event of an error, or a crash, or a power outage, or
some other incident which causes Alter Ego to shut down during gameplay, its internal data will be lost. In order to
combat this, Alter Ego regularly updates the spreadsheet with the most recent copy of its internal data using
the GameEntitySaver class; the interval
at which this occurs can be set with the AUTOSAVE_INTERVAL setting.
While this still guarantees that at least some data will be lost if Alter Ego goes offline, there will always be a
fairly recent backup to load from in order to minimize the amount of data loss.
However, because Alter Ego updates the entire spreadsheet at once (only the Prefab, Recipe, Status Effect, and Gesture sheets remain unaffected by the saving process), this can make it difficult for a moderator to edit the spreadsheet during gameplay, both because their changes will be overwritten if they’re not fast enough, and because attempting to edit the spreadsheet during gameplay can result in outdated game data being stored during the next load. The solution to this problem is edit mode.
Functionality
When edit mode is activated, Alter Ego will manually save the current game state to the spreadsheet. It is one of two ways (the other being the save command) of forcibly saving the game. After the spreadsheet is updated, Alter Ego will pause its autosave functionality until edit mode is disabled. This allows a moderator to manually edit the spreadsheet without worrying about their work being overwritten by the next autosave.
In addition, Players are unable to use commands during edit mode. They are
still able to speak (and thus use the say command), since that almost
never changes the game state, but the vast majority of their actions are restricted during edit mode. All Players will
be notified that edit mode has been enabled or disabled, unless they have the
unconscious behavior attribute. As Players are normally able to
act autonomously, their restriction during edit mode drastically reduces the amount of changes that can occur to the
game state without the moderator’s awareness.
To be clear, edit mode does not prevent Alter Ego’s copy of the game data stored in its internal memory from changing. Status Effects inflicted on Players will have their timers paused, but any other timers, such as those on Events and Fixtures will continue to count down, for example, and any consequences that result from those changes will still be present when edit mode is disabled. Edit mode simply temporarily reduces the amount of unpredictable changes caused by Player actions.
Edit mode is not a perfect solution to this problem. Data asynchrony can still occur when edit mode is used, and the amount of asynchrony within the game data will accumulate the more frequently edit mode is used in conjunction with the load command (especially when only specific data structures are loaded, as is generally good practice). Edit mode is a useful tool for modifying the spreadsheet during gameplay, but care must be taken in order to prevent bugs from accumulating; it can sometimes lead to exceptionally strange behavior when not used responsibly. Some tips to keep the game data consistent are:
- Use edit mode sparingly - only when needed.
- Only load the manually edited data structures before disabling edit mode in order to avoid reloading old game data.
- When applicable, load related data structures. For example, if manually editing Room Items, load the Fixtures and Puzzles which contain them.
- Avoid loading Players unless absolutely necessary.
- Every so often, load all game data to get everything back in sync.
- Every once in a while, reboot Alter Ego entirely in order to clear out its internal memory.
How to Use This Guide
Note
This Player Guide is a work in progress. Further chapters will added as they are written.
This guide is designed to help you get started with Alter Ego as a player. We wrote this guide in a casual, conversational tone to ease new players like you into Alter Ego. It contains many images and examples to make it easy for you to follow along. We hope that you will find this guide helpful as you embark on your journey in mastering how to play Alter Ego!
As Alter Ego is a game that is entirely played on Discord, this guide assumes that you are familiar with using it. If you are unfamiliar with Discord, please refer to the Beginner’s Guide to Discord first before proceeding.
Navigating This Guide
We designed this guide to be read from start to finish, with new concepts being introduced gradually as you progress.
To go to the next chapter, either click / tap the > button on the side (or the bottom on mobile) or use the left and right arrow keys on your keyboard.
If you want to skip ahead or go back to a page, there is a table of contents on the side of the page (or under the hamburger menu on the top left on mobile). This guide is listed under the Player Guide heading there.
If you clicked on a link and don’t know where you are, press the back button on your browser to return to the page you were just on.
We recommend reading this guide first before delving into the rest of the documentation.
For Moderators
If you are introducing your players to Alter Ego for the first time, please link them to this page instead of the home page, as the home page leads directly into moderator documentation.
It would also be useful to read this guide yourself to get on the same page as your players.
Typographic Conventions
For clarity, we use the following typographic conventions in this guide to make different concepts in this guide more distinct and easier to understand.
Admonitions
Admonitions are used when presenting concepts that require your attention. They come in several forms in order of ascending importance:
Tip
This denotes useful tips and tricks that can help you.
Note
This denotes things you should pay attention to.
Important
This denotes important things you should not miss.
Warning
This denotes things that may cause harm if not handled properly.
Caution
This denotes things that will cause harm if ignored.
Commands
When a command is shown for demonstrative purposes, they are presented enclosed in code blocks:
.inspect armchair

A screenshot of the output of the command (what you see in Discord after a command is received by Alter Ego) is included immediately following its invocation. This is so that you can see what the command does as if you sent it yourself.
Footnotes
Footnotes are used to provide additional context or information about a term or concept.1
Key Words and Emphasis
Key words are important terms and concepts that we will go over in this guide. The first time they’re used, they are presented in bold. Some important concepts are also put in bold for emphasis.
Literals
Literals are text that is quoted from somewhere else unmodified. This is to show that the text is situated in its own
context and not meant to be read as just part of the sentence. They are presented enclosed by inline code blocks.
For instance, a name of an in-game item such as COFFEE TABLE or a command with its prefix such as .use are
presented as literals.
Names
When the name of a data structure2 that has an ordinary meaning is mentioned, it is presented in italics. This is to distinguish it from the word’s meaning in everyday language.
For instance, this is the inspect command and this is a puzzle. We inspect things to help us solve puzzles.
It’s not necessary to go to one of those pages as they can get really technical, but a link to it is provided for it the first time it is mentioned in a chapter for your curiosity.
-
Not reading them will not significantly impact your understanding of this guide. ↩
-
A data structure is something that exists in the internal workings of Alter Ego. ↩
Getting Started
Important
This guide assumes that you know how to use Discord. If you are unfamiliar with Discord, please first refer to the Beginner’s Guide to Discord.
Congratulations! If you are reading this, it probably means that you have been invited to play in an Alter Ego game. Learning to play Alter Ego may seem intimidating at first, but once you get the hang of it, you’ll be able to explore and interact in a rich game world like it’s your second nature.
This guide will teach you the basics for playing Alter Ego. The following chapters will teach you how to look around, move around, interact with objects, solve puzzles, talk to others, and more.
Creating Your Character
To play an Alter Ego game, you must have a character. Your character represents your persona in the game world and everything you do in the game will be done through your character.
Your moderator may have already given you guidelines on how to create your character. If that is the case, follow their instructions. Typically, your moderator will ask you several questions, or ask you to complete a questionnaire, outlining your preferences for your character. An Alter Ego character has several attributes, of which can be broadly broken down into basic information, appearance, inventory, and stats. The questions that your moderator will ask should cover most of these.
When creating a character, you will need to decide on their basic information. This consists of their name and pronouns. When choosing a name, it would be wise to consider their nationality and the language they speak. Having a name that fits with their background can help a character feel lifelike. Your character can have any set of pronouns that you wish. Alter Ego supports masculine (he/him), feminine (she/her), and neutral (they/them) pronouns out-of-the-box. If your character has neo-pronouns, provide your moderator with all of its forms. See the player reference for more details.
For your character’s appearance, you will typically need to decide on their height, complexion, hair length and style, physique, and voice quality. Keep in mind that these can change depending on your moderator, so consult with them for more details. Having a drawing of your character will help you visualize them. It will also serve as your Discord profile picture to help others identify you. Many players make theirs on character generation sites such as Picrew or Charat. Of course, you can draw your own or even commission art for your character!
Your character’s inventory includes the clothes that they’re wearing and what they’re carrying. It’s a good idea to first consult your moderator on what clothing is appropriate for the setting, and what items your character can have. For instance, it may not be appropriate for your character to be wearing swimwear in the dead of winter or for them to carry a rocket launcher. A good inventory should both fit with the world and express your character’s personality. Instead of thinking about how certain clothing or items may benefit your character (a form of metagaming), think of what your character would choose to wear or carry in the game’s setting. Your moderator always has the final say on what your character is allowed to wear or have.
Finally, your character will have statistics, which are numerical attributes that define your character’s abilities in game. They affect things such as how fast your character can move, what they notice in-game, and how they do in skill check rolls. Unlike the previous aspects, these are determined by your moderator based on your character’s description and personality. You shouldn’t worry too much about these and should avoid trying to create a character that optimizes for the highest stats possible. A character’s stats helps to situate a character in a game world, and a character that only has high numbers and no personality will feel lifeless to play and spectate.
Remember, when you are playing a game with Alter Ego, you are playing in a world created by your moderator and it is important to create a character that fits with the setting. For instance, it would probably be disrespectful to insist on playing a character with neon hair and quirky clothes when your moderator had envisioned a dark and gritty setting. Therefore, instead of bringing a fully completed character to your moderator and asking for them to be included in the game, it’s better to work with your moderator to craft a character that feels natural to be living in the game world.
Joining a Game
Before you are able to play Alter Ego, you must join the game. You have probably already been invited to the Discord server where the game will be taking place. If you haven’t already, ask your moderator about being invited into the server.
Once you are in the game server, your moderator may give you the
eligible role. When your moderator is ready to start the
player registration process, an announcement with instructions on how to join the game will be posted
in the #general channel of the server.

To join the game, send the play command to the #general
channel within the time limit.
.play

If everything went well, another message confirming your registration will be posted in the same channel. Now that you have been registered, all you have to do is wait for the game to begin! Before doing that though, make sure to continue reading to learn about how to play a game with Alter Ego.
Getting to Know Alter Ego
Now that you’ve joined an Alter Ego game, it would be a good idea to familiarize yourself with the user interface of Alter Ego before the game starts. After all, you don’t want to be panicking and trying to hunt down channels and commands when you are trying to role play!
Getting Situated
You play Alter Ego by interacting in room channels and direct messages. When a game of Alter Ego starts, you will get a direct message (DM) from the Alter Ego bot, which will be a description of the current room that you are in.

This DM will be the primary way for you to interact with Alter Ego. It is here that you will send commands to Alter Ego and receive their outputs. It is also where most of the system messages that Alter Ego will send you will be.
Warning
If Alter Ego can’t send you direct messages, you won’t be able to play! Before the game begins, open the settings menu for the game server, and select
Privacy Settings. Check ifDirect Messagesfrom members of the server are enabled. If they’re disabled, you’ll have to enable them before the game begins.
Switching to the game server itself, you might notice that a channel with the name of the room your character is in has become accessible.
This is the room channel, the primary way you interact with other players. In this channel, you can talk to other players and also send commands. One important thing to note is that your room channel changes every time you move to a new location, so remember to switch to the new room channel! You don’t want to miss the conversation every time you switch rooms!
Tip
To make your life easier, try having two instances of Discord open at the same time while playing Alter Ego. To do this, open the Discord app on your computer while being logged in to Discord on your web browser. Alternatively, you can have the Discord app open on both your computer or your smart device. One of them will be open to the Alter Ego bot’s DMs while the other will be open to the current room channel. This makes it a lot easier to interact with others and send commands simultaneously.
Using Commands
Commands are the primary way you interact with Alter Ego. You can use commands in both in DMs and in room channels.
To use a command, enter the command prefix (by default .)1 and append it with the command you wish to use.
For instance, if we want to use the inspect command, we send
the following in Discord:
.inspect
We should now see that Alter Ego has sent a response to our command.
Whoops! It seems like we have to actually specify what we are trying to look at for the inspect command to work. Let’s try again. How about we try inspecting the room we’re in? To do this, append “room” as an argument after the command.
.inspect room
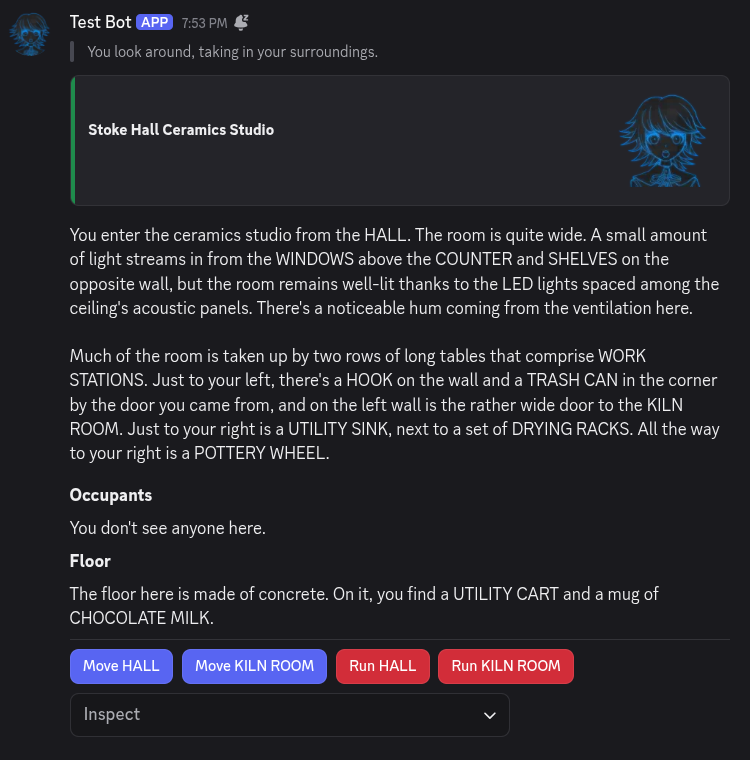
Awesome! It seems that we’re in the ceramics studio, maybe we can make a vase for our flowers…
The inspect command is one of the many commands you can use to interact with Alter Ego. While all of them are different, they all work in essentially the same way:
- Enter the command prefix2 (
.). - Enter the command (e.g.
inspect,give). - Enter one or more arguments (e.g.
room,kyra bottle). - Send the command string in either the bot DM or a room channel.
If you wish to learn about what other commands are available, refer to the commands reference.
Clicking on Interactables
Have you noticed those blue and red buttons in the screenshot above? How about the dropdown menu? These are interactables and they allow you to perform common actions in Alter Ego with your mouse or touch screen, all without using any commands! Let’s try them out.
If we click on the Inspect dropdown, we see a list of items in the room that we can have a look at.
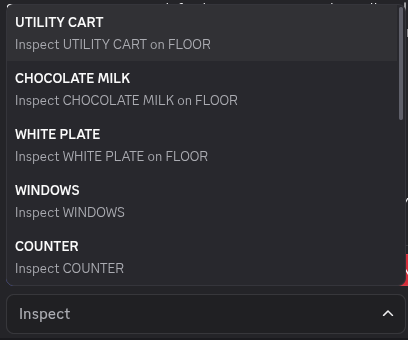
Let’s try and have a look at the UTILITY CART by clicking on the dropdown menu item.

Nice, we know what the UTILITY CART looks like now! Ignore the Drop dropdown for now, we will cover that in a later
chapter.
Now let’s try clicking on one of the buttons in the original message. We will click on the blue Move HALL button and
see what happens.
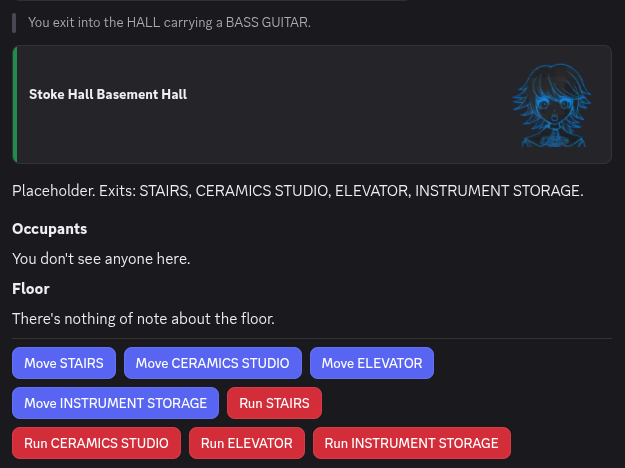
Awesome! We’ve moved to the basement hall—all without sending a single command. Convenient right?
At the moment, interactables allow you to inspect things, move to rooms, pick up items, craft held items, and more. This means that most of what you will do in Alter Ego can be replaced with interactables.
Seeking Help
Important
Not all functions can be replaced by interactables. Just because something isn’t possible to do with interactables, doesn’t mean it’s not possible. Always see if there is a command for what you’re trying to do before giving up.
Even though interactables can do a lot, not all functions can be replaced by interactables (such as using items or solving puzzles), so there are still some commands that you will have to learn. Alter Ego has many commands and it’s not always clear to a beginner on how to use them. That’s where the help command comes in handy. Let’s try it out for ourselves. We’ll type the help command in our Bot DMs.
.help
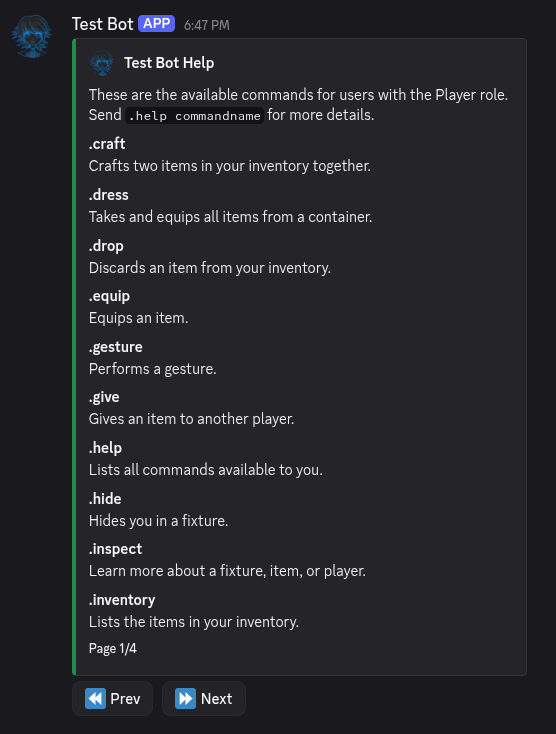
Wow! Isn’t that neat? The help command gives us the entire list of commands that we can use! There are even interactable buttons on the bottom so we can go to the next page of commands.
We see on the list that there is a command named inventory that let’s us see what we are carrying. Let’s see how we can use that command. To do that, we append the name of the command as an argument after the help command.
.help inventory

Looking at this help entry, we can see that it includes something called aliases. Aliases are other ways you can
invoke a command. In this case, we can see that the inventory command only has one: .i, whereas other commands may
have multiple aliases. These aliases let you use commands easier, especially when you are using multiple of the same
command.
The help entry also includes examples on how to use the command. In this case, there is only one way to use it, but other commands may have more complex example usages.
Finally, each help entry has details about the command. In this case, it explains what the inventory command does and the specifics on using it. With this information, we can list our character’s inventory no problem!
-
The command prefix is customizable by the moderator. If your moderator uses another prefix, use that instead. ↩
-
This is not strictly necessary in bot DMs. They are still required in room channels. ↩
Interacting with Things
Before you can interact with something in the game world, you must inspect it.
Why inspect things? That’s because it would be almost impossible to interact with something if you don’t know that it exists in the first place! This chapter will teach you how to inspect things in the world and how to interact with them.
Inspecting Things
One of the things you will do most in Alter Ego is inspect things. Whether it be an item, a fixture, or another player, inspecting allows you to get an idea of how you can interact with them.
Remember when we learned how to use commands earlier? If you do, then you already know the basics of inspecting. We will dive deeper on how to use the command and more importantly how to interpret its output here.
The Inspect Command
To inspect something, you use the inspect command. The first thing you should do when you’re not sure what to do is to inspect the room that you’re in. This is done automatically for you when you first enter a room, giving you information on what you can interact with.
Tip
Many commands have short form aliases! This can save you a lot of time when using commands repeatedly. Try using the help command to see if your favorite command also has one!
Let’s try inspecting a room together. We will use the short form alias this time for brevity.
.x room
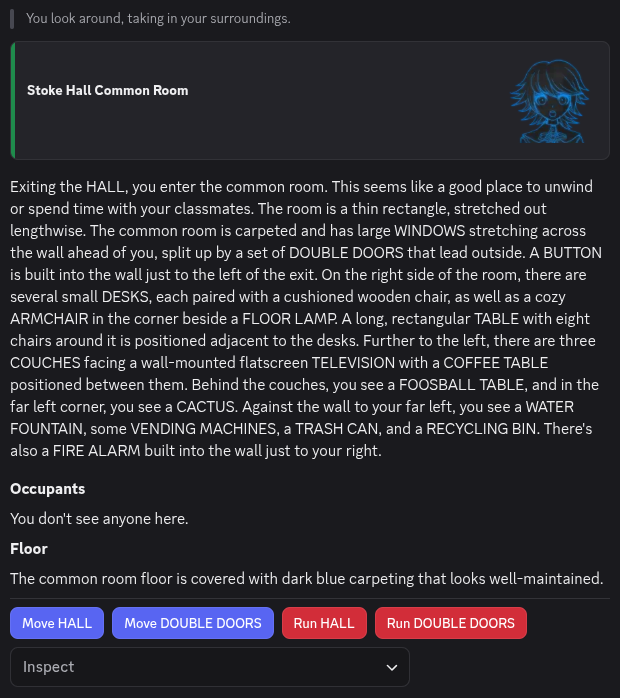
It seems that we’re in the Stoke Hall Common Room. The first section of this output we see is a banner showing the name of the room. The next section a written description of what the room looks like and what is in the room. We then see a section on the occupants of the room. There is then a section about the floor of the room. Finally, there are a number of interactables at the bottom of the output.
Let’s have a look at the description of the room. If you’re wondering how we can tell what we can inspect, most things
that can be inspected will be in ALL CAPS (except for exits). For instance, we can see that we can inspect the
ARMCHAIR in the room.
.x armchair
Now that we know how to use the inspect command, we can have a good look at everything in Alter Ego!
Inspecting with Interactables
Important
Not all things can be inspected with interactables. When in doubt, use the command instead.
See the Inspect dropdown menu in the image above? That is the interactable used for inspecting things.
We’ll click on the dropdown and select something else in the room and see what happens.
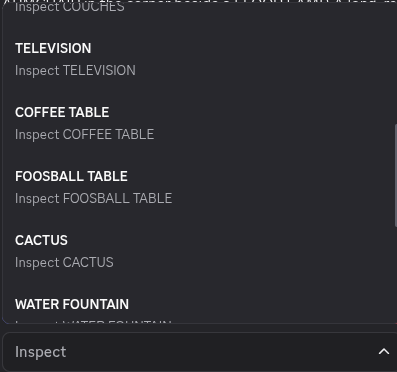
Let’s see, how about we have a look at the COFFEE TABLE? Let’s click on it.
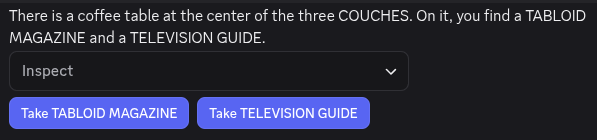
Not only do we know how to inspect things using a command, we can also just click on them! Bet that makes inspecting a heck of a lot faster doesn’t it?
Picking Items Up
Did you notice that there aren’t just furniture around the room, but also things around we can take?
For instance, the coffee table that we inspected has a TABLOID MAGAZINE and a TELEVISION GUIDE on it.
The Take Command
Tip
If there are multiple items with the same name in a room. You can specify which one by using the container it is from. For instance, if there are many spoons in a dining room, we can take only the spoon in front of us:
.take spoon from table 4
To take something, you use the take command. The take command allows you to take something from the room and put it in an open inventory slot. Keep in mind that we must have a free hand to take something, but since we’re not carrying anything in our hands right now, we can take anything we want.
To use the take command we send .take followed with the item we want to take. Let’s take the TABLOID MAGAZINE
from the coffee table.
.take tabloid magazine

Nice, we now have a tabloid magazine in our possession. Wonder what kind of gossip it has? Turns out that we can also inspect the items in our hand!
Tip
If an item in a room has the same name as an item in your inventory, you can inspect your item by putting
mybefore it. For instance, if there are a bunch of sandwiches on the counter and you wish to inspect the one you’re holding:.inspect my sandwich
.x tabloid magazine
Taking with Interactables
Just like with inspecting, we can take items from around the room with interactables. Let’s inspect the coffee table again.
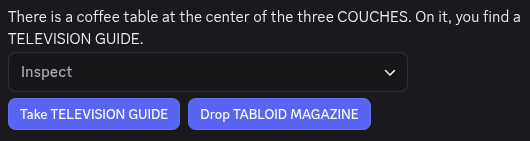
We have the TABLOID MAGAZINE in one hand, so our other hand is free, so if we press the Take TELEVISION GUIDE
button, we can take that too!

Now that we have the television guide, we can find the airing times for any show we want! Although… who even uses TV guides these days? Or even watches live TV?
Your Inventory and You
After raiding the coffee table, our hands are now full with reading material. Since we can’t go around all day holding those, how do we put things in pocket (or bag)? This is where your inventory comes in. Each player has an inventory where they can put the items they are carrying. Your inventory also includes the clothes that you are wearing.
The Inventory Command
To look at your inventory, you use the inventory command. The inventory command lists everything that we have equipped and also items that we have stashed.
Let’s see what we are carrying with us by sending the .inventory command.
.inventory
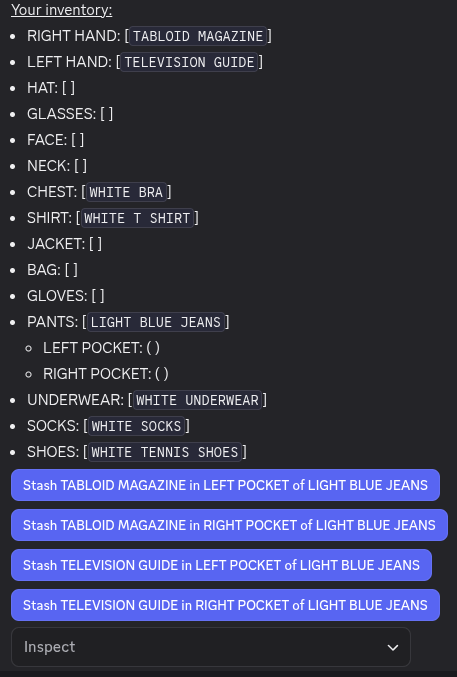
Important
Remember, we equip items in equipment slots and stash items in inventory slots.
Nice! We can see that we’re carrying the magazine and the TV guide in each of our hands. We also see that we have a number of equipment slots and inventory slots.1
Inventory entries with square brackets [] are equipment slots whereas those with round brackets () are inventory
slots.
For instance, we have a BAG equipment slot with nothing [] equipped, whereas our RIGHT HAND and LEFT HAND have
a [TABLOID MAGAZINE] and a [TELEVISION GUIDE] equipped respectively.
Pieces of equipment can have inventory slots that we can stash items into. For instance, our PANTS have two
inventory slots: LEFT POCKET and RIGHT POCKET.
The Stash Command
Now let’s say we want to take the magazine with us to read later. We can do this by stashing it in one of our inventory slots.
The stash command allows you to stash an item in one of your hands
to one of your inventory slots. To use the stash command, you send .stash followed by an item in your hands then
the inventory slot you want to stash it in.
Let’s stash our magazine in our left pocket.
.stash tabloid magazine in left pocket of light blue jeans

If we check our inventory again, we can see that the magazine has indeed been stashed in our left pocket.
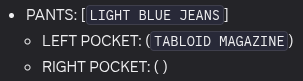
Stashing with Interactables
Using the stash command can get tedious, given the length of the arguments. That’s why you can also stash with interactables!
If we have a look at our inventory again, we can see that there are buttons that let us stash items with a single click.

Let’s try stashing our TV guide in our right pocket this time with the STASH TELEVISION GUIDE in RIGHT POCKET of LIGHT BLUE JEANS button.

Nice! We put that guide in our pocket without needing to type the full command.
Getting Rid of Stuff
It’s all well and good that we can put stuff in our inventory, but how can we get rid of it? It would be pretty rude to just take the magazine and the guide from the common room right? So let’s try to put them back where they were on the coffee table.
First, we have to unstash them from our inventory and return it to our hands before we can drop them.
The Unstash Command
Note
While you can specify the container to unstash an item from (i.e.
.unstash television guide from right pocket of light blue jeans), this is only necessary when you have multiple of the same item in your inventory.
The unstash command lets you remove an item from one of your
inventory slots and place it in your hand. To use it, send .unstash followed by the item you want to unstash.
Let’s try unstashing the TV guide.
.unstash television guide

If we look at our inventory, we can see that the TV guide has been returned to one of our hands.

Unstashing with Interactables
As with the stash command, we can unstash items by clicking on the corresponding button in our inventory.
We will also unstash our TABLOID MAGAZINE, but we will leave that out of the guide for brevity.
The Drop Command
Important
If you use the drop command without specifying where, you’ll end up dropping it on the floor!
Now that we have our TV guide and tabloid magazine back in our hands, we can put it back on the coffee table with the
drop command. To use the drop command, type the .drop command
followed by where you want to drop the item.
Let’s try dropping the TV guide on on the coffee table.
.drop television guide on coffee table

Now all we have to do is to put the magazine back as well.
Dropping with Interactables
As with picking up items, we can use interactables to drop them as well. To do this, we first have to inspect the place we want to drop the item on.
.x coffee table
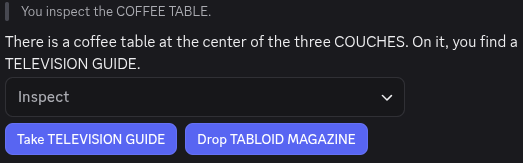
If we click on the Drop TABLOID MAGAZINE button, we can drop that as well.

Now everything is back where it should be!
Using Items
While just looking at and taking items can be interesting, you can use some items as well!
Not all items can be used, but using items is very important! For instance, to not starve, you have to eat regularly. To do that, you must eat (use) food. Alter Ego games often contain puzzles, some of which might involve using certain items such as a remote control. Some doors might also be unlocked by pressing (using) a button on the wall.
Not only can you use items that are in your inventory, you can use items around the game world too regardless of if they can be picked up. So go around, explore, and try and use stuff!
The Use Command
To use an item, you use the use command. As there are many ways to
use something, this is a command that has many aliases. Some of them include .eat, .drink, and .activate.
It usually doesn’t matter which one you use,2 so don’t worry about which alias to use!
Have you ever been in a situation where you find yourself holding a bass guitar? Well if you do, perhaps your first
instinct is to use it. To use an item, type the .use command followed by the item or fixture (something in a
room that can’t be moved by a player e.g. a piano) you want to use.
Let’s try and use our BASS GUITAR and see what happens.
.use BASS GUITAR
Now we’re ready to jam!
Using with Interactables
We can also use interactables to use things. Let’s have a look at our inventory.
.i
As we have the BASS GUITAR in our hands, we see that a Use dropdown menu3 has appeared at the bottom of our
inventory!
Let’s open that dropdown by clicking on it.
Looks like the only thing we can use is our BASS GUITAR. Let’s click on it.
Nice! Now we’re really making a name for ourselves in history or rock n’ roll!
-
Inventory slots can be configured by your moderator, so don’t worry if this inventory looks different from yours! ↩
-
This is true except for a few edge cases. For instance, it’s not possible to
.lockor.unlocka sandwich. In general, if the sentence makes sense, it should be possible! ↩ -
Wondering why it’s a dropdown when you can only hold up to two items? Sometimes using an item can have dangerous, irreversible effects. You wouldn’t want to poison yourself by using a
CYANIDE PILLbecause you accidentally pressed a button. Since it’s a dropdown, you have to perform two clicks or taps to use it, making it less likely that you’ll use something by accident. ↩
Moving Around
Using Alter Ego, you can explore detailed game worlds and role play in them. To do that, we must be able to move around the world. Earlier, we briefly touched on moving to another room with interactables, but this chapter will go into the details about how to move around like a champ.
The Move Command
The move command lets you move between rooms in Alter Ego.
To use it, type the .move command followed by the exit you want to go to.
Before we can go somewhere, we need to find out where we can go. Let’s do that by inspecting the room.
.x room
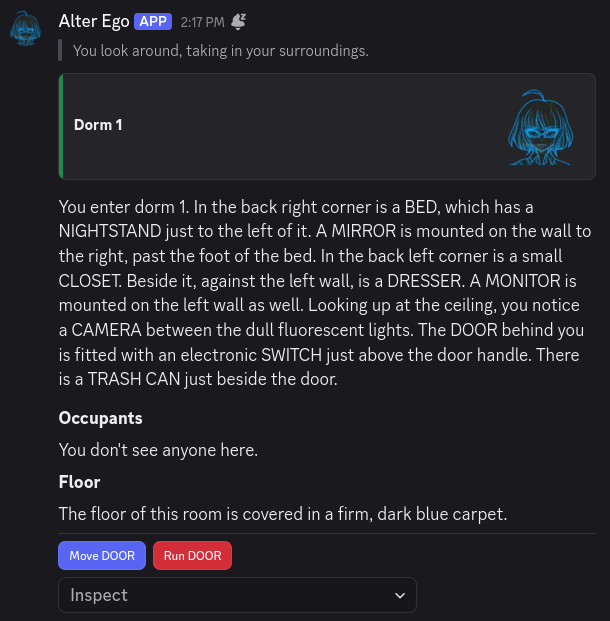
The interactables give it away, but it seems like the only exit in this room is the DOOR. Without interactables,
though, it should usually be pretty clear what is an exit, and what is a fixture. Exits will usually
(but not always) have a word such as DOOR, HALL, or PATH in their name. In some cases, they might even be a
proper noun. There can sometimes be fixtures with the same name as an exit in a room (meaning you can inspect them),
but this is rarely the case.
In any case, let’s try using the move command.
.move door
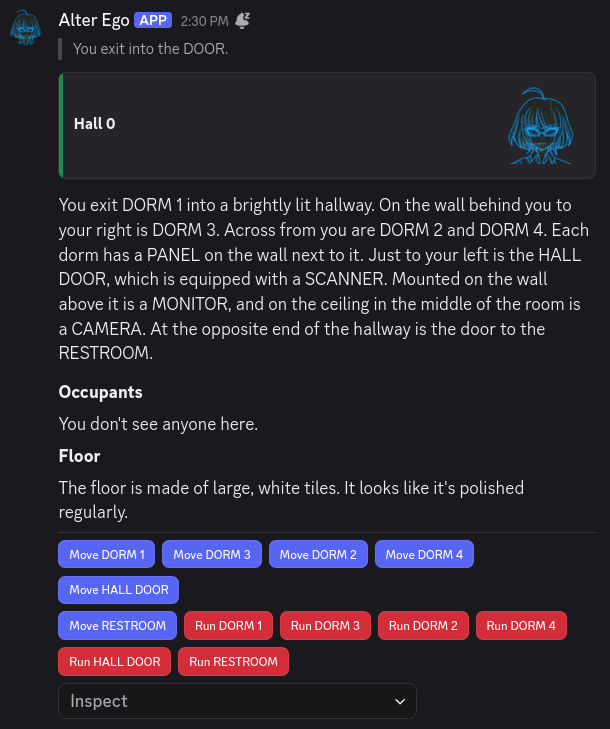
We’ve moved to a new room! If you navigate over from your DMs with Alter Ego to the game’s server, you’ll find that the single room channel you have access to has changed.
The occupants list said You don't see anyone here., and sure enough, on the member list in the channel for this room,
it’s just us, Alter Ego, and the moderator. We also don’t have permission to view the message history in this channel;
this is normal. If we did, we would be able to see everything that happened in this room before we got here, which
could really break our immersion!
Tip
When you enter a new room, the first thing you should do is navigate to the server and open the channel for it. That way, the slice of message history that you have access to will begin immediately when you enter the room. If you wait until later, you might not be able to see that someone has been trying to talk to you, or that someone was doing something suspicious when you entered.
If you head back to your DMs with Alter Ego, you’ll notice that the description of Hall 0 specifically described the
room from the perspective of someone entering from DORM 1. Every exit in a room can have a unique description for
when a player enters from it. If someone had entered from DORM 2, DORM 3, DORM 4, or any of the other exits in
this room, they would have been sent a slightly different perspective of the room!
Note
When you inspect a room by sending
.inspect room, you will be sent the description of the room from the perspective of the first exit it has. This may not be the exit you originally entered from, so the perspective can vary slightly. Try your best to visualize the layout of the room so you don’t get disoriented!
Before we proceed to the next room, let’s go back to our dorm for a moment. We’ll use the shortest alias for the move command this time:
.m dorm 1
Now that we’re back in Dorm 1, we can move back to the hall in a different way. We know from experience that the
DOOR in Dorm 1 leads to a room named Hall 0. If we know the name of a room that’s connected to the room we’re
currently in, we can also use its name, instead of the name of the exit leading to it. So, for example, if we type:
.m hall 0
It worked! If you know the name of a room, you can always use that in your move command. This can make it much easier
to get around, especially if the game has a lot of exits with vague names like DOOR 1, DOOR 2, and so on.
There’s one last thing to keep in mind. When you want to move to another room, you can only move to ones that are directly connected to the room you’re currently in by at least one exit. Even if you know the name of a room, you won’t be able to move there if it isn’t connected to your current room. If you have the Free Movement role, though, you can move to any room you want.
Moving with Interactables
Now that we are in a different room, let’s try using interactables. See those blue buttons below the room description?
Let’s click on Move HALL DOOR.
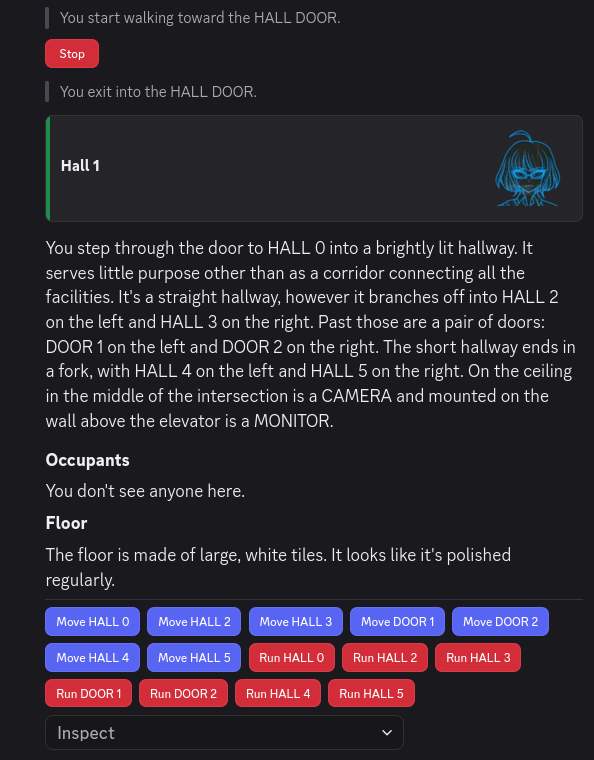
How convenient! We can move to different rooms without having to type a single command! The only downside is that we have to remember which exit leads to which room, as the buttons use the names of the exits, instead of the names of the rooms they lead to.
The Run Command
Did you notice how when we pressed the Move HALL DOOR button, there was a message that said
You start walking toward the HALL DOOR.? This is because it takes time to move from room to room. If a room only has
one exit (like the room we started off in, Dorm 1), it will take no time at all, but for rooms with multiple exits,
the amount of time it takes to move from one room to another can vary.
While it may seem simple at first glance, when you move in Alter Ego, you are actually moving around in a 3D space. How this works is quite complicated, but most of it is hidden from view; if you want to learn all of the technical details, see this section.
However, to give a brief overview, every exit has a set of coordinates in 3D space, and when you enter a room, your position matches the coordinates of the exit you entered from. When you move to another exit, Alter Ego calculates the amount of time it will take for you to move from your current position to that exit’s coordinates based on your character’s speed stat. Once that amount of time has elapsed, you will finally move to the desired exit.
So, what if the exit you want to move to is quite far from your current position? You might be in a hurry; maybe you’re short on time, or maybe someone is chasing you around with a weapon. This is where the run command comes in handy.
The run command works exactly the same as the move command, with a few key differences. Let’s try it out.
.run hall 5
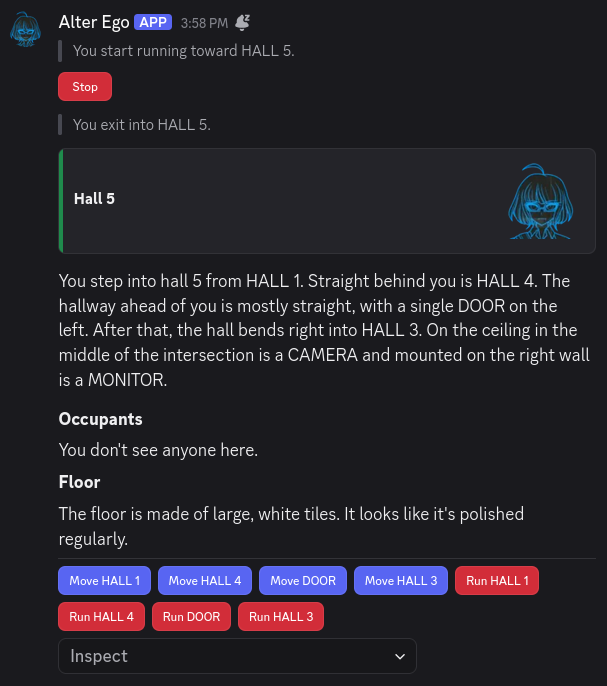
Nice! We got here much faster than if we had used the regular move command. Alter Ego even specified
You start running toward HALL 5. instead of the usual message.
Now that we’ve used the run command, what are the differences between it and the move command?
- You will move at double your usual speed, and
- You will consume three times as much stamina while moving.
Stamina is another one of your character’s stats. It determines how long you can move around continuously before getting tired. Whenever you are moving, you are consuming stamina; whenever you are not moving, your stamina is recovering. If you run out of stamina, you will become weary, and you will be completely unable to move for a set period of time while your stamina recovers.
So, as you can see, while the run command is useful for getting around quickly, it should be used sparingly. The last thing you want is to become completely immobilized when you’re trying to get somewhere; that would be totally counterproductive.
How do you know if you’re getting low on stamina? Alter Ego will give you a warning when you’ve depleted half of it—if you see this, that’s your sign to take a break soon!
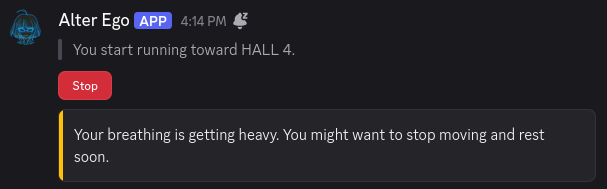
Running with Interactables
As you’ve no doubt already noticed, you can also run using interactables. Continuing from Hall 5, let’s press the red
button labeled Run HALL 3.
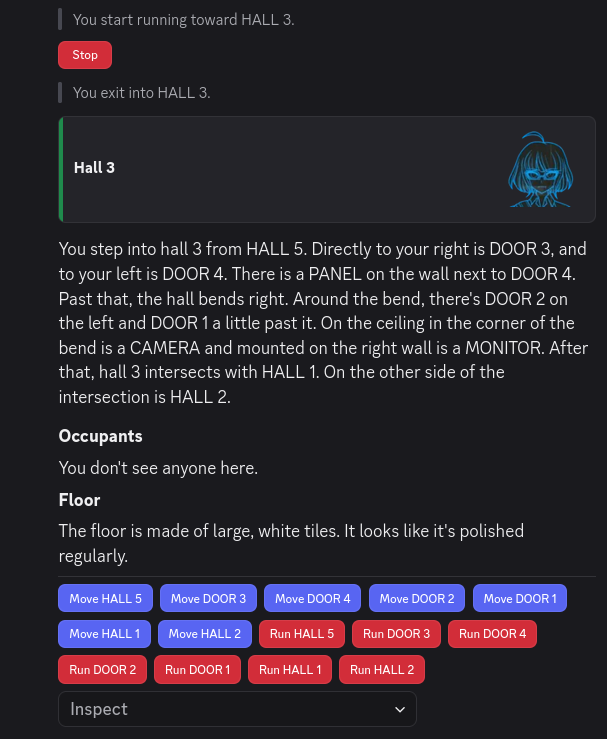
Nice! Being able to run with just the click of a button will definitely help us get around faster.
Stopping
By now, you’ve probably noticed that when you start moving or running to another room, Alter Ego will send an
interactable that says Stop. If you are currently moving, you can cancel your movement by pressing this button, or by
using the stop command, like so:
.stop
Whichever method you choose, Alter Ego will confirm that you’ve stopped moving.

One thing to keep in mind that when you’re in the process of moving, your position is constantly being updated as you get closer to your destination. When you stop, your latest position will be preserved, and that will be your new starting position if you decide to move again.
Locked Doors
Since we’re still in Hall 3, let’s try moving to DOOR 4.
.m door 4
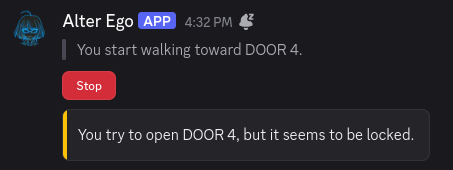
Shoot! It’s locked! We can’t go inside. According to the room description, there is a PANEL on the wall next to
DOOR 4, so let’s try inspecting it.
.x panel

Since there is a fixture mentioned next to DOOR 4, that means there is probably a puzzle attached to it that might
be able to unlock the door. Let’s try using the PANEL and see what happens.
.use panel

There is a puzzle! This means we might be able to unlock DOOR 4, but we probably need a key of some sort. If we
don’t have the key, though, we’ll just have to try again later. It’s not worth wasting our time trying to open it if
we don’t have what we need.
Queuing Movement
In addition to being able to enter the names of rooms, the move and run commands offer one additional advantage over
interactables: the ability to queue future movements. If, after writing the name of an exit or room in your move or
run command, you enter the greater-than character (>), you can then enter the name of another exit or room in the
destination to move to. Let’s give it a try.
.m hall 5 > hall 4
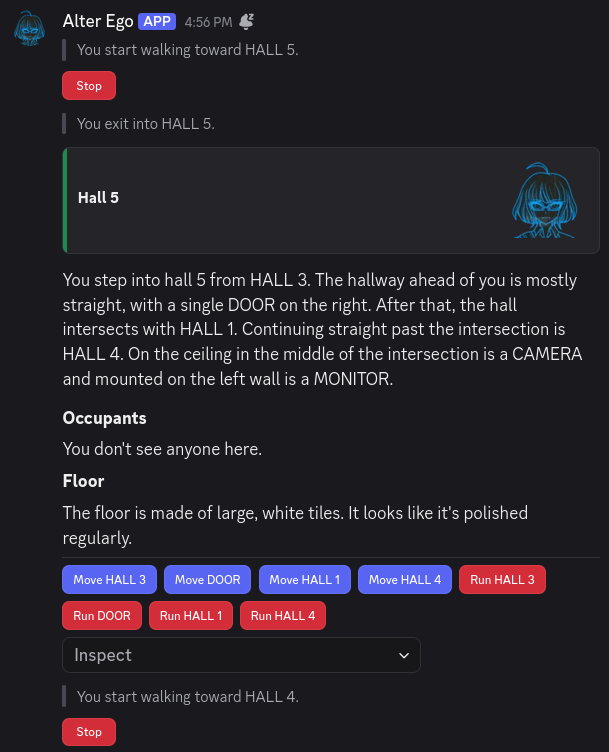
Wow! Immediately after entering Hall 5, we started moving to Hall 4 without having to do a thing. Of course, we had
to know that you could get to Hall 4 from Hall 5, so this isn’t something we could have done if we didn’t remember
it. If we had tried to move to Hall 0 from Hall 5 instead, Alter Ego would have told us there was no such
destination once we arrived in Hall 5. So, queuing your movements is something you can only do effectively if you are
already very familiar with the map. Once you are, though, you can get around much more efficiently.
Important
When queuing your movements, Alter Ego will only parse the next destination in the queue after you finish moving to the previous one. If one of the destinations in your queue is invalid, or the exit is locked, you won’t find out until you’ve progressed up to that point in the queue.
You can queue as many movements as you like, and you can even mix together exit names and room names. Movement queues
are very flexible. Let’s try a roundabout way to get to the Kitchen from Hall 4:
.m hall 5 > hall 1 > hall 2 > kitchen
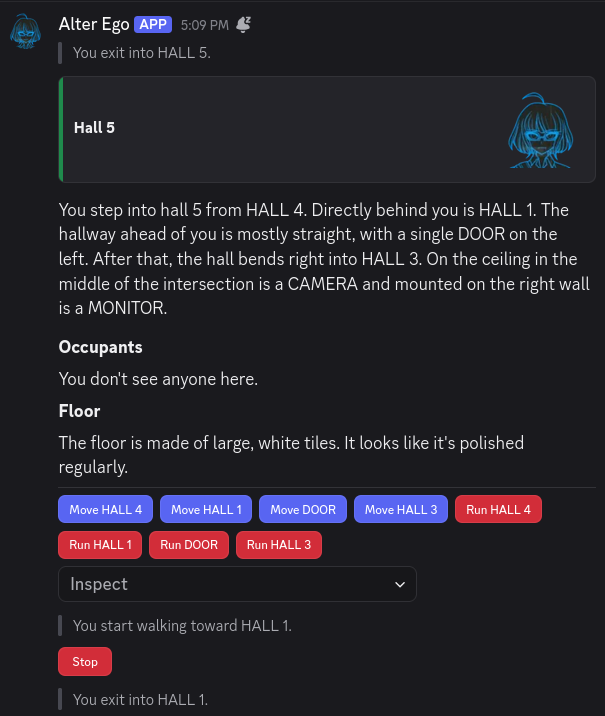
Now that our movements are queued, now’s a good time to take a break. Maybe we can get up to use the restroom, or switch to another tab to respond to the friend that sent us a DM.
When we come back, we’ve arrived in the Kitchen! Hooray!

Let’s step back outside for a moment. Have you ever wanted to run around in circles? Well, Alter Ego allows you to do just that. If you find a set of rooms that you can travel around in a loop, you can queue your movements like so:
.run hall 4 > hall 5 > hall 3 > hall 2 > hall 4 > hall 5 > hall 3 > hall 2 > hall 4 > hall 5 > hall 3 > hall 2
And then, you’ll run around the loop three times. Just be sure to keep an eye on your stamina!
If you decide to stop while you’re moving through your queue—whether by using the stop command or by pressing the
Stop interactable—not only will you immediately stop moving, but your movement queue will be cleared.
Expressing Yourself
Alter Ego is a game about role-playing with others. So what is a role-playing game without talking? This chapter will teach you how to express yourself using words (and more!) in-game.
Talking with Others
Talking in Alter Ego is simple; it doesn’t even involve any commands! To talk, navigate to your room channel and start sending messages. That’s it! Now everyone in the room can read what your character is speaking.
Let’s try that out.
Hello, everyone.
Simple, right? In Alter Ego, dialog is done in a script style, where spoken words are sent by themselves, without any sort of quotation marks. It’s just like sending a regular Discord message!
This might be somewhat jarring for role players who are more familiar with a paragraph style, but there are good reasons for this! The most obvious one is that Alter Ego gameplay is much more fast-paced, and writing quotation marks and sentences like “She said.” takes time that could be better spent elsewhere. If you like the expressiveness and introspection of paragraph-style role play, don’t worry. Alter Ego has several tools you might like—we’ll get to those in a little bit.
Shouting
Aren’t there times when you’re angry, or frightened, or just want to LET IT ALL OUT?! That’s when you shout so loudly that everyone in the house can hear you right? Good news is that you can do that too in Alter Ego. Bad news is that it’s just as embarrassing for everyone involved.
To shout in Alter Ego, you have two options:
- Type your message in
ALL CAPS. Watch out, though! If there are any lowercase letters, it won’t count as shouting. SoHELLO EVERYONE!will count as shouting, butHELLO everyone!won’t. - Begin your message with Discord’s heading Markdown characters.
You can type between one to three hash/pound sign characters (
#) and then a space, followed by the words you want to say, and it will count as shouting—you don’t need to write in all uppercase this way. Although the size of the text can vary depending on how many hash characters you enter, they all function exactly the same.
Shouting in Alter Ego works in just about the same way as real life; characters that are in adjacent rooms can hear you shout. This is one example of where your character’s voice descriptor comes into play.
Let’s try it out together. We will shout loudly a few times and see if others notice.
HELLO? CAN ANYONE HEAR ME?
# I am shouting very loudly!
## I am shouting a little less loudly, but I am still shouting!
### This, too, counts as shouting! Can you still hear me?
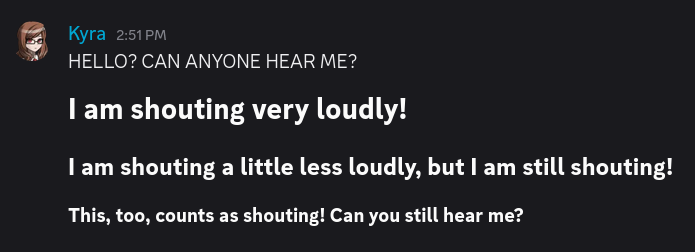
So, did anyone hear us? Let’s check on a nearby room to find out:

Yes they did! It even used our character’s voice descriptor instead of her name, since not everyone will be able to recognize her by her voice.1
Speaking Quietly
Do you ever get sad or frightened, and start to speak quietly? Maybe you’re too shy to speak up, or you always find yourself muttering quietly to yourself. You can do that in Alter Ego, too!
To speak quietly, start your message with Discord’s subtext Markdown characters.
You can type a hyphen followed by a hash/pound sign and then a space (-# ) before the words you want to say, and it
will be considered quiet dialog.
Let’s try it out:
-# I see... nobody is here...
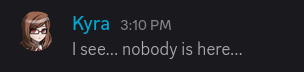
So, what does this do? Not much! If your dialog is written in ALL CAPS, this will cancel it out, and it won’t be
considered shouting. Other than that, speaking this way doesn’t have any special effects for the time being.
Speaking Out-of-Character
There are times when we must speak out-of-character (OOC). For instance, when we want to tell others that we’re stepping away from the keyboard, or if we want to comment on something funny.
Important
Any message that starts with a
(is considered to be OOC. So don’t include any dialog in them! Keep in mind, though, that even if you begin your message with Discord’s Markdown formatting characters, if the first character after them is(, it will still count as an OOC message.
To speak OOC in Alter Ego, we start our message with an opening parenthesis (. This tells Alter Ego that our message
is OOC and that it shouldn’t be shown in spectate channels.2
Think of these messages as being off-the-record, as people spectating you won’t see them.
Let’s try this out by saying that we’re going to the restroom.
(brb girls bio break
There, now everyone won’t think we just disappeared into thin air.
The Say Command
If you’ve looked through the list of commands, you may have noticed that there’s a say command. Maybe you’ve even tried it yourself, only for Alter Ego to tell you that you have no reason to use it. What’s the deal with that?
It’s pretty simple. Sometimes, you won’t have access to the room channel, but you’d still be able to speak. For
example, maybe you’ve found an ONNA MASK lying around, and you decided to put it on. Now your identity has been
concealed. Now you can use the say command to speak.
How do you do that? Simple! Just type the command, and then enter whatever it is you want to say. Let’s try it out.
.say I've found this strange mask... do any of you know anything about it?
You won’t get any message from Alter Ego, but it will send a webhook message in the room channel communicating the dialog you said, like so:

For the most part, you won’t be using the say command except in rare situations. But it comes in handy when you do need it!
Sharing Secrets
While it’s all well and good to talk to everyone in the room (or everyone in adjacent rooms if we’re shouting), there are times when subtlety is warranted. This is where whispering comes in handy.
The Whisper Command
If you wish to talk to other players in secret, you can whisper
to them. This is done through the use of the whisper command.
To whisper to one or more players, send .whisper [player] [player2]... while you are in the same room as the
other player(s).
Let’s say we want to whisper to our friend Huiyu.
.whisper huiyu
This opens a whisper channel between us and Huiyu where we can share secrets!
Now let’s try and say something to Huiyu in the whisper channel. Hmm… how about telling her about our secret plan to achieve world domination through the use of bunnies?
Huiyu, it's very important that you keep this between us. I've just come into possession of a *very large rabbit,* and I'd like your help using it to conquer the world.
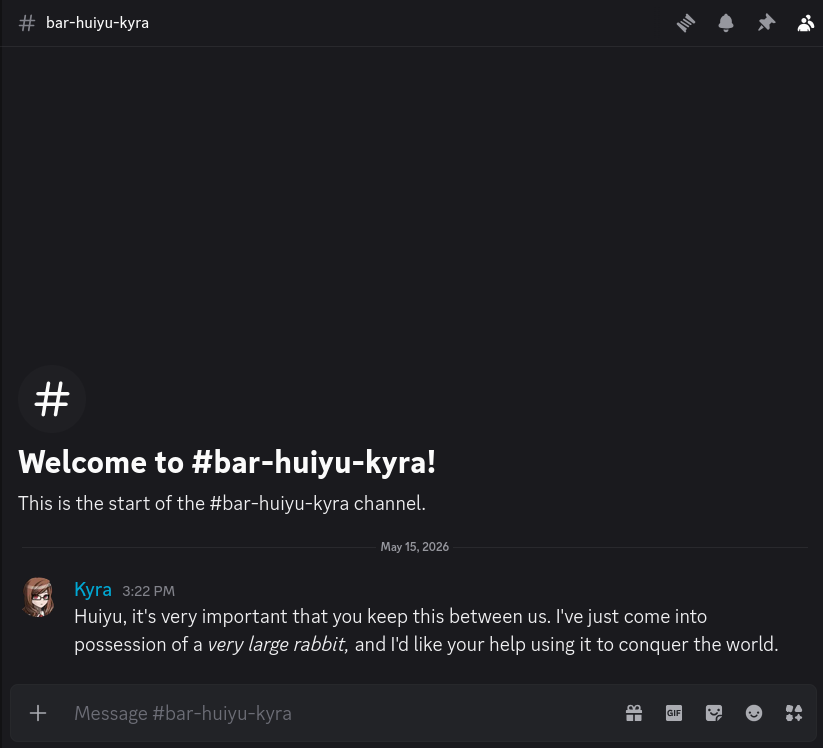
Others in the room can see that we are whispering, but can’t actually hear what we’re saying.3
Group Whispers
Note
You can’t add someone to a whisper channel that already exists, but if a person leaves the room or becomes otherwise incapacitated, they will be removed from the whisper channel.
Let’s try starting a whisper circle with more people. I think our friends Jenny and Aisha would like to join our secret plan as well so let’s bring them into the fold.
We’re going to start a new whisper channel with all three of them.
.whisper huiyu jenny aisha
Performing Gestures
Do you ever want to do something non-verbal, like smile, shrug your shoulders, or point at something? Great news! Alter Ego has a whole system to do exactly that. These are called gestures. This allows you to communicate with other players non-verbally, without having to think too much about how to convey what you want to do in words.
The Gesture Command
If you wish to perform a gesture, you can use the gesture command. Before we can do any gestures, though, we need to know which ones are available to us. Let’s take a look by sending this command:
.gesture list
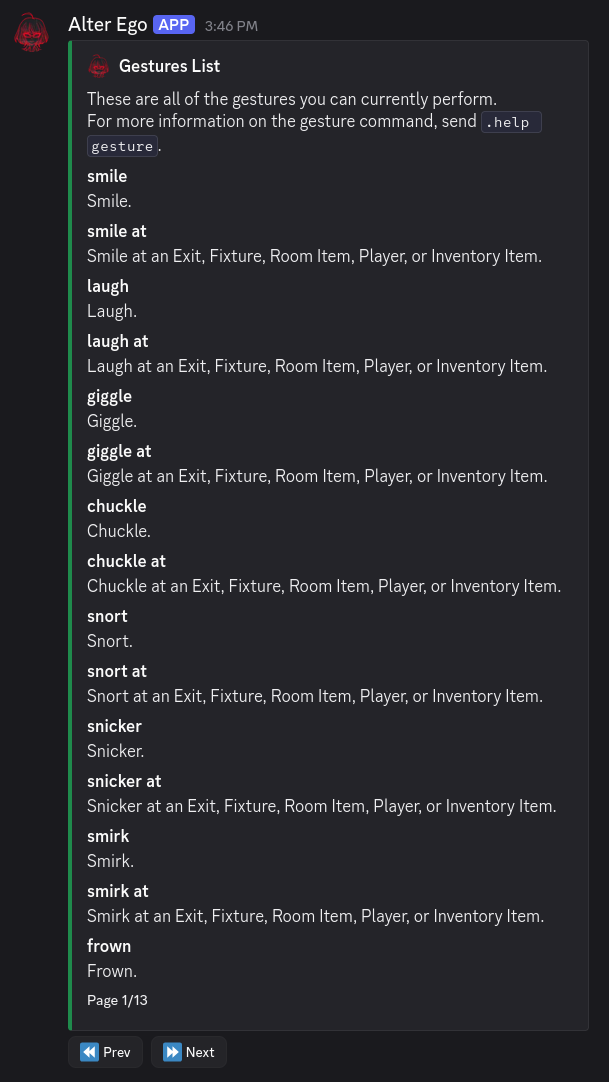
Wow! There are thirteen pages to look through!4 This is helpful if you want to discover gestures you didn’t know existed, or if you’re confused what a certain gesture does—the brief description explains that. But for the most part, you can usually perform a gesture just by guessing its name. Let’s try it out, shall we?
.gesture smile
Simple enough, right? It looks almost as if we sent this message ourselves, but the text of the gesture is contained in a block that makes it clear that this isn’t spoken dialog.
What if we want to shrug, though? Should we enter shrug shoulders, or just shrug? Most gestures have the shortest
name they can have, so that they can be done without too much effort. So in this case, let’s go with shrug. And for
even more convenience, let’s use the short-form alias of the gesture command:
.g shrug
That’s easy, but what if we want to point at something? Thankfully, gestures can be made to require a target. Did
you notice that in the gesture list, there were several gestures that seemed to have duplicates, where the only
difference was that the name ended with at? Gestures that require targets usually have names with prepositions at
the end. That way, after you type the name of the gesture, all you need to do is type the name of the target.
So, you’re usually typing something that makes grammatical sense. For example, let’s try pointing at our friend Huiyu:
.g point at huiyu
It worked! If you’re ever confused about a gesture, remember that you can always check its description in the list.
Narrating Your Actions
What if you want to communicate non-verbally, but gestures just aren’t cutting it? Maybe there isn’t a gesture for what you want to communicate, or maybe the action you want to do is just too complex to be described in a simple gesture. Or perhaps, you just want to sprinkle some movement into what is otherwise a standard dialog message? You can do all of those things, with narrations!
Important
All of Alter Ego’s built-in narrations are written in third-person present tense. You should do your best to write your narrations in this form.
Code Block Narrations
For many years, Alter Ego offered no way to narrate your actions aside from gestures. As a result, a pattern of using code blocks as narrations emerged. While this is largely no longer necessary (we will see why in a moment), they can still offer some utility, especially if all you want to do is sprinkle a narration into your regular dialog.
Discord allows you to type inline code blocks by surrounding text with tics (`). You can send these in any
message to denote that something is not part of the usual dialog. Let’s give it a try:
I have been busy with... `She pauses, bringing a finger to her chin.` Several things. What about you?

See how the text we surrounded in tics looks different from the rest of the message? That’s a code block. It looks clearly distinct, which makes it useful for writing short narrations like this. The main downside is that it doesn’t allow you to use formatting characters within it, so you can’t write anything in bold, italics, or any other forms of emphasis.
Warning
Alter Ego doesn’t treat narrations sprinkled into dialog with code blocks as distinct from the rest of the dialog. They will be treated as spoken dialog so don’t type anything in them that you don’t want other people hearing.
The Narrate Command
As of Alter Ego version 2.0, there’s a new way of narrating your character’s actions that offers a lot more flexibility: the narrate command.
To use the narrate command, type the command itself, followed by whatever it is you want to narrate. Let’s try a simple example:
.narrate She nervously rubs her arm and turns her head away, averting her eyes.

It looks just like a gesture, doesn’t it? They work very similarly! The narrate command allows you to write much more complex narrations than gestures can provide, making it perfect for expressing your character non-verbally.
The other advantage of the narrate command that makes it significantly better than using code block narrations is that it allows you to use Discord’s Markdown characters to emphasis and style to your narrations. Let’s try another example, this time using the short-form alias for the narrate command:
.n Kyra crosses her arms, brows furrowed. She looks absolutely **furious** as she glares intently at the person across from her. The fact that she can maintain her dignity and composure even when her anger is *this* palpable makes the daggers in her eyes feel that much sharper.

She huffs indignantly, and then begins to speak with a low, steady tone of voice, every word feeling deliberate and calculated.
You can even include code blocks in the narrate command! This can be helpful in showing people what you’ve found, if you have an item in-game that you would be able to take notes on.
.n She shows TABLET 9 to Ava. On the screen is the notes app with her final calculations.
```
Sloth:      Computer  1:   1 x  7 =   7 -> ??
Shrimp:     Computer  2:   2 x 15 =  30 -> ??
Fox:        Computer  3:   3 x 18 =  54 -> ??
Leopard:    Computer  4:   4 x  4 =  16 -> ??
Tortoise:   Computer  5:   5 x  3 =  15 -> ??
Shark:      Computer  6:   6 x 11 =  66 -> ??
Dog:        Computer  7:   7 x 14 =  98 -> ??
Owl:        Computer  8:   8 x 13 = 104 -> ??
Cow:        Computer  9:   9 x  2 =  18 -> ??
Dolphin:    Computer 10:  10 x 17 = 170 -> ??
Raven:      Computer 11:  11 x  6 =  66 -> ??
Duck:       Computer 12:  12 x  5 =  60 -> ??
Boa:        Computer 13:  13 x 10 = 130 -> ??
Beaver:     Computer 14:  14 x  1 =  14 -> ??
Eel:        Computer 15:  15 x 16 = 240 -> ??
Sheep:      Computer 16:  16 x  8 = 128 -> ??
Cat:        Computer 17:  17 x  9 = 153 -> ??
Frog:       Computer 18:  18 x 12 = 216 -> ??
```
Pretty cool! As you can see, the narrate command offers a lot of flexibility.
Spectate Channels
Did you know? Alter Ego has a feature called spectate channels. There’s a channel for every player in the game—including you!—in which everything that player says, hears, sees, and does is mirrored in real-time. These are a powerful feature of Alter Ego’s, as they can easily make spectating a game almost as fun as playing in it yourself.
Spectate channels may be hidden from you while you’re playing, but when the game is over, you should be given access to them automatically. Since everything is logged there in real time, they offer a means of reading back on old Alter Ego role plays from the perspective of any character, in chronological order.
So, what does a spectate channel look like? Let’s open up Kyra’s channel, shall we?
It looks just like a normal Discord channel, but everything—room descriptions, narrations, dialog, whispers, and more—is stored in one place, sent in chronological order. It makes keeping track of a given player’s perspective very easy, as you see everything that they see. Player dialog and narrations are even mirrored here using webhook messages, similar to the say command!
Important
If you edit dialog messages quickly after you send them, those edits will be reflected in spectate channels. However, the avatar you had when you sent the message will be immortalized in the webhook message; it can’t be changed once it’s been sent. For that reason, it is highly recommended you set your avatar to an image of your character. If you have Discord Nitro, you can set your avatar for just the server, and leave your main avatar untouched; your server avatar will take priority when your messages are mirrored in spectate channels. This is true of every situation where Alter Ego uses webhooks, including gestures and narrations.
Monologuing
Do you ever wish you could write down your character’s inner thoughts, but you don’t want other players to be able to read them? That’s where monologs come in handy!
The Monolog Command
Note
Although the American form of the word monologue—monolog—is rarely used, it has been chosen for the sake of symmetry with Alter Ego’s use of the form dialog. However, the more common monologue is an accepted alias of the command.
The monolog command works similarly to the narrate command. The key difference is that when you use the monolog command, the output will only be sent to you, and to your spectate channel. This not only allows you to keep track of what your character is thinking, but also makes it clear to spectators.
Let’s give it a try!
.monolog Why is all of this alcohol here...?
Alter Ego will send us a copy of our monolog:
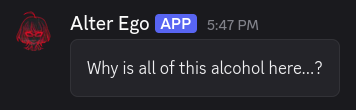
But if we look in Kyra’s spectate channel, it looks different:
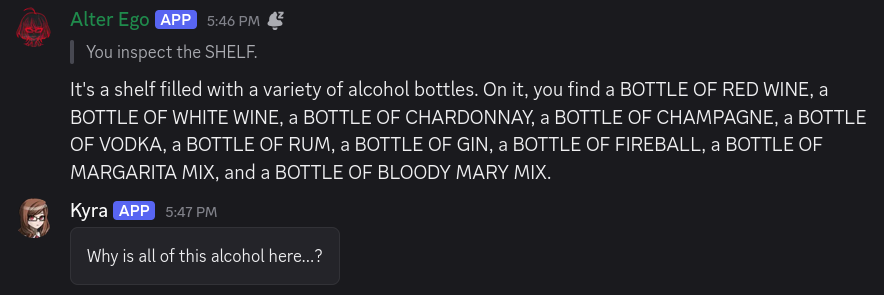
As you can see, it looks similar to a narration, but the container block doesn’t have an accent color, indicating that it’s not exactly the same. And sure enough, if you look in the room channel or the spectate channels of other players, you won’t see a thing.
Tip
Whether you want to write monologs in first or third person is a matter of personal preference. Just try to be consistent!
Just like with the narrate command, you can format monologs however you like. Let’s try it out, this time using one of the short-form aliases for the command:
.mn An asteroid...

> *"Axiom two: This facility is a nuclear bunker.*
>
> *Designed to withstand the end of life as we know it upon the surface of the Earth. Namely, nuclear warfare. But probably useful for climate collapse, too."*

Stephanie... she was right, then? Is that this facility's true purpose?
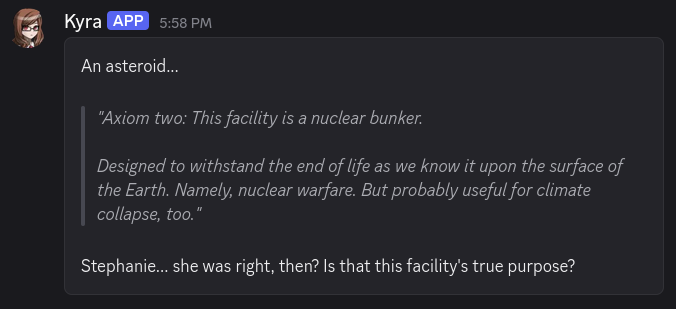
Wow, that was dark! But hopefully you get the idea by now. Monologs are another powerful tool Alter Ego offers you to enhance your role playing experience.
Now that you know how to express yourself, have fun role playing to your heart’s content!
-
It’s possible for players to recognize each other by the sounds of their voice. If someone who recognized Kyra’s voice was in the room, they would receive a private message saying
Kyra shouts "HELLO? CAN ANYONE HEAR ME?" in a nearby room.and the like, every time she shouted. If you’re curious how that works, see this section. ↩ -
Don’t worry about knowing what spectate channels are yet, we’ll be going into them later. ↩
-
Technically it is possible for other players to hear our whispers, but this has historically been rare. To learn more, check out this section. ↩
-
There may be more or fewer pages depending on if your Moderator has added or removed gestures from the game. There may also be fewer pages if you are inflicted with certain status effects that prevent you from performing specific gestures. ↩
Discord
Discord is a free voice and text chat program that’s designed for gamers. Due to many of its features, Alter Ego was designed specifically to use it via the discord.js API.
Features
Discord members congregate in servers. Servers may be publicly accessible or open only to members who are sent an invite link to that server. Further, text and voice chat can take place in different channels in a server. Within a server, different members may be granted specific permissions. These permissions can be given to specific roles or assigned to members on a channel by channel basis. Permissions exist to give members the ability do several different things, including:
- Create and delete channels.
- Grant and revoke permissions to specific members.
- Kick and ban members from the server.
- Change a member’s nickname within the server.
- See a channel on the channel list and read messages within it.
- Delete and pin messages within a channel.
- Read the message history of a channel.
- And many more.
In every channel, a member list is displayed on the right-hand side which displays all of the members that can read that channel. Members can be in a server without having a Discord account using the Discord browser app, however these members will cease to exist after they exit the app. With a Discord account, members can be in a server indefinitely, even when they’re offline.
Discord members can also direct message each other outside of a server. They can create group DMs as well.
Gameplay Implementation
This section lists how Discord is used to facilitate the game.
A game is contained in one and only one Discord server. It is run by Alter Ego.
Every Player is represented by a Discord server member, aside from NPCs. Each Player must have their own Discord account, unless they are an NPC. A single account cannot be used for multiple Players.
Every Room is represented by a Discord text channel. When a Player moves to a given Room, they will be granted permission to read that channel, and their permission to read the channel of the Room they were previously in will be revoked. This creates the effect of only being in one Room at a time. In a Room, a Player can see all of the other Players that are in the Room on the user list on the right side of the screen. Messages sent by a Player to a Room channel act as dialog from that Player, enabling communication between Players in a Room.
Every Whisper is also represented by a Discord text channel. When a Whisper
is created between two or more Players, a new channel will be created in the Whisper category, and only the Players in
the Whisper will be granted read access to that channel. When a Player leaves the Room or is otherwise removed from the
Room’s channel, their read access to all Whispers they were in will be revoked. Their name will also be removed from the
Whisper name, whose channel name will be edited accordingly. When all Players in a Whisper leave the Room, the Whisper
channel will either be archived or immediately deleted, depending on the
AUTO_DELETE_WHISPER_CHANNELS setting.
Every spectate channel also has a Discord text channel. When Player data is loaded from the spreadsheet, Alter Ego will check to see if that Player already has a spectate channel in the Spectate category. If not, it will create one with that Player’s name. It will not do this if there are already 50 spectate channels in the category.
When a Player enters a Room, inspects a Fixture or Room Item, or otherwise does something that requires text from the Spreadsheet be sent, Alter Ego will send the text to that Player via DM. Any Narration regarding a Player action will generally be sent to the channel of the Room that Player is in.
Displaying Content
Discord offers many ways to display content. Alter Ego makes use of several of these.
Markdown
Discord has its own implementation of Markdown. This allows users to style text in various ways. Alter Ego interacts with Discord Markdown in the following ways:
- When a Player sends a message to a Room channel as a Header of any size, Alter Ego considers this to be shouted dialog, and communicates it to neighboring Rooms.
- When a Player sends a message to a Room channel as Subtext, Alter Ego considers this to be quiet dialog, and will not communicate it to neighboring Rooms, even if it is in all uppercase letters.
Display Components
Discord has a variety of Display Components, which allow bots to send messages with highly customizable appearances.
Alter Ego has its own system of message display types. These are pre-defined sets of Display Components that can be sent by Alter Ego with ease. They are detailed here.
STANDARD
The STANDARD message display type is used in standard Narrations. It
consists of text inside of a Container Component.
The accent color used is set by the
STANDARD_MESSAGE_DISPLAY_ACCENT_COLOR setting.

WARNING
The WARNING message display type is used in Narrations meant to warn Players. It
consists of text inside of a Container Component. The accent color used is set by the
WARNING_MESSAGE_DISPLAY_ACCENT_COLOR setting.

ALERT
The ALERT message display type is used in Narrations meant to convey a sense of danger or urgency. It
consists of text inside of a Container Component. The accent color used is set by the
ALERT_MESSAGE_DISPLAY_ACCENT_COLOR setting.

MINOR
The MINOR message display type is used in Narrations meant to communicate information that isn’t important. It uses
Markdown, consisting of Subtext in a Block Quote. Messages sent with the MINOR message display type are sent with the
SUPPRESS_NOTIFICATIONS Flag,
so that they will not trigger a notification for users.

PLAIN_TEXT
The PLAIN_TEXT message display type is used to send a message as plain text, with no Display Components.

PLAYER
The PLAYER message display type is used to send Narrations on behalf of a Player. They are used when a Player performs
a Gesture or sends a Narration with the
narrate command.
It consists of a Webhook message
in which the username is the Player’s display name, and the
avatar is their current display icon or Discord avatar. The
content of the Narration consists of text inside of a Container Component. It uses the same accent color as a
message sent with the STANDARD message display type.

MONOLOG
The MONOLOG message display type is used to send Monologs on
behalf of a Player. It consists of a Webhook message that functions identically to the PLAYER message display type.
However, the Container Component does not have an accent color.

Interactive Components
Discord has several Interactive Components that Alter Ego uses to simplify many common tasks. The two main categories that Alter Ego uses are Action Rows and Modals.
For more information, see the article on Interactables.
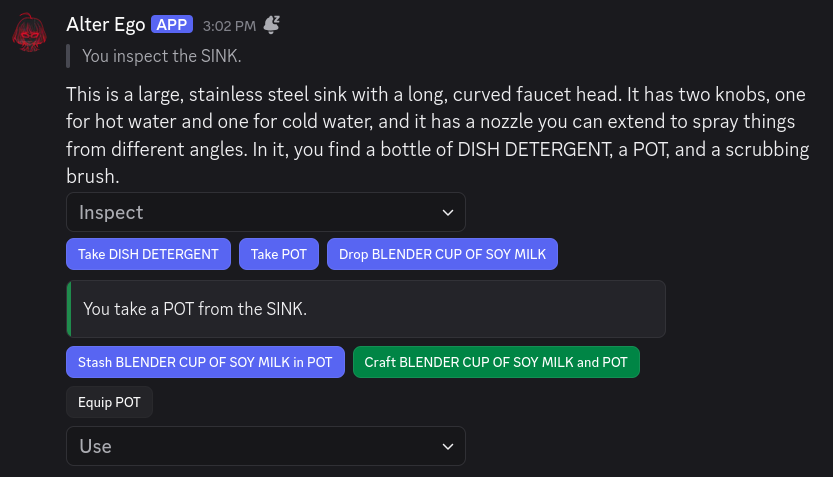
Limitations
Discord servers have a number of limits. The following limitations are relevant to Alter Ego and the game:
- A server can have at most 500 channels - text, voice, and categories combined. Once 500 channels are reached, no
more channels can be created.
- Because each Room is represented by its own channel, and because there are 10 channels (including categories) minimum that Alter Ego requires outside of Room and Whisper channels, a single game can have at most about 440 Rooms. This number would consist of 8 categories for Rooms, each containing 50 channels, as well as a 9th category containing only 31 channels. This number does not account for spectate channels. Theoretically, a single game could have up to 491 Rooms, but only if Whispers are disabled, no Players have spectate channels, and the Whisper and Spectator categories are deleted.
- A channel category can have at most 50 channels - text and voice combined. Once 50 channels are reached, no more
channels can be created in the category.
- If a game has more than 50 Rooms, additional Room categories will have to be created.
- Message limit: 2,000 characters. Nitro users have a message limit of 4,000 characters. (note:
user/channel/role mentions and emojis contain more characters than are shown)
- If a description (without formatting characters) is longer than 2,000 characters, Alter Ego will not be able to send it to a Player.
- If a Player with Discord Nitro sends a message in a Room or Whisper channel that is longer than 2,000 characters, it will not be sent to spectate channels. Players should be discouraged from doing this.
- Username/nickname: 32 characters.
- A Player’s name must be 32 characters or fewer.
Discord also allows users to forward messages to almost any channel. Currently, Discord does not offer any way to restrict permission to do this, and these messages are considered to have no content of their own. As such, Alter Ego cannot handle these. Any forwarded messages sent to a Room channel, a Whisper channel, or the Announcements channel will be automatically deleted.
Another limit involves the Read Message History permission. When a member doesn’t have this permission (which is recommended for gameplay purposes), they will not be able to see messages sent any time they didn’t have permission to read a channel during their current Discord session. A Discord session can loosely be defined as the period of time starting when a member opens the Discord application and ending when they close it. This can mean different things depending on what version of the Discord application the user is using:
- On the Discord desktop app, a session ends when the user logs out, closes the app, refreshes the app, puts their computer into sleep mode, or turns off their computer.
- On the Discord browser app, a session ends when the user logs out, closes the tab, refreshes the page, closes their browser, or puts their computer into sleep mode.
- On the Discord mobile app, a session ends when the user logs out, closes the app, locks their device, or turns off their device. The session may also end when the user switches to a different app, though this depends on what operating system the device uses and how long the Discord app is inactive.
When a session ends, all messages that a user without the Read Message History permission was previously able to read will disappear when the user opens Discord again. For this reason, the Discord desktop app provides the best experience when playing the game because it most easily retains a session. The Discord browser app also works somewhat well for this purpose. However, using the Discord mobile app to play is severely not recommended. Unless the user keeps the app open constantly, never switches to another app, and never locks their device, a continuous session cannot be guaranteed, and thus the message history they have access to will clear very frequently. If you would like to see this issue resolved, upvote this thread in the Discord Feedback forums.
Known bugs
- Occasionally, when a Player moves to a new Room, the member list for that Room will appear blank. This can usually be fixed by the user opening a channel in a different category and then opening the Room channel again.
- Occasionally, when a Player leaves a Room, their read permission for all of the Whispers they were in will not be revoked. Additionally, the channel name may not be updated.
Commands
Commands are messages sent to Alter Ego in order to interface with the game. In general, they allow a Discord user to influence the game world in some way.
Commands are loaded from the commands directory when Alter Ego is booted up. Each command is a JavaScript file with a
.js extension. This file contains all of the command’s logic which Alter Ego uses to interpret the content of the
message which sent the command and carry out the desired behavior.
All commands are passed through the commandHandler module before being executed. The purpose ouf this module is to determine who is sending the command, and if they have permission to do so. All commands are restricted to a single permission level based on the sender’s Discord roles in the game server.
Player commands
Player commands are usable by users with the Player role. These commands allow Players to interact with the game world of their own volition.
Player commands can only be used when a game is in progress. They can be sent to Alter Ego through DM or in the channel corresponding with the Room that the Player is in. The Player must be alive to use commands, and they must not be inflicted with a Status Effect which disables the command they’re trying to use. With few exceptions, Players cannot use commands when edit mode is enabled. If Alter Ego accepts the Player’s command and it was sent in a Room channel, the message in which the command was issued will be deleted.
If a command is issued in DMs, the message does not need to begin with the
command prefix (. by default). However, if it is sent in a Room channel, then the
command prefix is required.
craft
Crafts two items in your inventory together.
Aliases
.craft .combine .mix .c
Examples
.craft DRAIN CLEANER and PLASTIC BOTTLE
.combine BREAD and CHEESE
.mix RED VIAL with BLUE VIAL
.craft SOAP with KNIFE
Details
Creates a new item using the two items in your hands. The names of the items must be separated by “with” or “and”. If no recipe for those two items exists, the items cannot be crafted together. If any of the resulting items is particularly large, this will be narrated in the room, so other players will see you craft them.
You can view a list of all recipes that you can craft with the items in your inventory using the recipes command. Some
crafting recipes can be reversed once performed using the uncraft command. For more information on both of these
commands, use the help command.
dress
Takes and equips all items from a container.
Aliases
.dress .redress
Examples
.dress WARDROBE
.dress LAUNDRY BASKET
.redress MAIN POCKET of BLUE BACKPACK
Details
Takes all items from a container of your choosing and equips them, if possible. You must have a free hand to take items with. This will be narrated, so any other players in the room will see you dress.
Items will be equipped in the order in which they appear in the game’s data, which should be the order they appear in the container’s description. If an item is equippable to an equipment slot, but you already have something equipped to that slot, it will not be equipped, and you will not be notified when this happens. If the container you choose has multiple inventory slots (for example, a backpack with several pockets), you can specify which slot to dress from. Otherwise, you will dress from all slots.
drop
Discards an item from your inventory.
Aliases
.drop .discard .put .place .d
Examples
.drop FIRST AID KIT
.discard BASKETBALL
.put KNIFE in SINK
.d TOWEL on BENCHES
.drop KEY in RIGHT POCKET of PLAID SKIRT
.d WRENCH on TOP RACK of TOOL BOX
Details
Discards an item from your inventory and leaves it in the room you’re currently in. The item you want to drop must be in one of your hands. If you discard a very large item (a sword, for example), this will be narrated in the room, so other players will see you drop it.
If you want to put the item in a specific fixture or item in the room, add a preposition after the name of the item, followed by the container’s name. Every container has a set preposition which should be fairly obvious. For example, a fixture called “DESK” is likely to have the preposition “on”. However, if the preposition is unclear, “in” will always work. Keep in mind that not all fixtures and items can be item containers. If you don’t specify a container, you will simply leave the item on the floor.
If the container has multiple inventory slots (for example, a backpack with several pockets), you can also specify which slot you want to put the item in. To do this, enter the name of the inventory slot followed by “of” before the name of the container. If you don’t specify an inventory slot, you will put it in the first slot it has.
You can only put items in containers in the room that you’re in. If you want to put an item in one of your inventory
items, use the stash command.
equip
Equips an item.
Aliases
.equip .wear .e
Examples
.equip PLAGUE DOCTOR MASK
.wear WHITE PARKA
.e KNIT WOOL SWEATER to SHIRT
Details
Equips an item to one of your equipment slots. The item you want to equip must be in one of your hands. When you equip an item, it will be narrated in the room, so other people can see you equip it, regardless of its size. It will then appear in your description, unless it’s covered by another equipped item. For example, something equipped to your PANTS slot is likely to cover something equipped to your UNDERWEAR slot.
Each item can only be equipped to certain equipment slots, if they’re equippable at all. For example, a mask is likely
to only be equippable to the FACE slot. If you are unable to equip an item to its default equipment slot, you can
specify which slot you want to equip it to. To do this, enter “to” after the name of the item, followed by the name of
one of your equipment slots. You can view a list of all of your equipment slots with the inventory command.
To equip many items at once, use the dress command. If you wish to remove one of your equipped items, use the
unequip command.
gesture
Performs a gesture.
Aliases
.gesture .g
Examples
.gesture smile
.g point at DOOR 1
.gesture wave Johnny
.g sit CHAIR
.gesture list
Details
Performs one of a set of pre-defined gestures. Everybody in the room with you will see you do this gesture. This allows
you to communicate non-verbally, though some gestures cannot be performed if you have certain status effects. For
example, if your face is concealed with a mask, you cannot use gestures like “smile” or “frown”, as nobody would be able
to see it. To see a list of all of the gestures you can currently perform, send the gesture command followed by
“list”.
Certain gestures may require a target to perform them. For example, a gesture might require you specify an exit, a fixture, another player, etc. To specify a target, enter the name of the target directly after the name of the gesture. Note that a gesture can only be performed with one target at a time.
give
Gives an item to another player.
Aliases
.give
Examples
.give Astrid EMBALMING FLUID
.g Flint BIRTHDAY PRESENT
Details
Transfers an item from your inventory to another player in the room. The item selected must be in one of your hands. The receiving player must also have a free hand, or else they will not be able to receive the item. If a particularly large item is given (a chainsaw, for example), it will be narrated in the room, so other players in the room will see you giving it to the recipient.
help
Lists all commands available to you.
Aliases
.help
Examples
.help
.help move
Details
Lists all commands available to the user. If a command is specified, displays the help menu for that command.
hide
Hides you in a fixture.
Aliases
.hide .unhide
Examples
.hide DESK
.hide SHOWER 1
.unhide
Details
Allows you to use a fixture in a room as a hiding spot. When hidden, you will be removed from the room’s channel so that when other players enter the room, they won’t see you on the user list. They will also not see you listed as an occupant when they enter the room. When players speak in the room that you’re hiding in, you will hear what they say. While hidden, many of your actions will be restricted. For example, you will only be able to inspect and take items that are in the fixture you’re hiding in.
Under normal circumstances, a whisper channel will be created for you to speak in. Most players will be unable to hear
what you say in this channel. However, if you want to speak so that everyone can hear you (while having your identity
remain a secret), use the say command. If someone hides in the same hiding spot as you, you will be placed in a
whisper channel together. If someone inspects or tries to hide in the fixture that you’re hiding in, your position will
be revealed.
If you wish to come out of hiding, use the unhide command.
inspect
Learn more about a fixture, item, or player.
Aliases
.inspect .investigate .examine .look .x
Examples
.inspect DESK
.examine KNIFE
.look JUG OF ORANGE JUICE in REFRIGERATOR
.x WOOLEN MITTENS in MAIN POUCH of RED BACKPACK
.investigate my PISTOL
.look Kiara
.examine an individual wearing a PLAGUE DOCTOR MASK
.look Marielle's CIRCLE GLASSES
.x an individual wearing a PLAGUE DOCTOR MASK's BLACK CLOAK
.inspect room
Details
Tells you about a fixture, item, or player in the room you’re in. A fixture is something in the room that you can interact with but not take with you. An item is something that you can both interact with and take with you. If you inspect a fixture, everyone in the room will see you inspect it. The same goes for very large items.
If there are multiple items with the same name in the room, you can specify which one you want to inspect using the name of the container it’s in. To do this, you must enter the container’s preposition before its name. If you don’t know its preposition, “in” will always work. If you are inspecting an item contained inside another item that has multiple inventory slots (for example, a backpack with several pockets), you can specify which of the container’s slots you want to search in, by entering the name of the slot followed by “of” before the container item’s name.
You can also inspect items in your inventory. If you have an item with the same name as an item in the room you’re currently in, you can specify that you want to inspect your item by adding “my” before the item name.
To inspect a player, enter their display name as it appears when you enter the room or when they perform an action. You can even inspect visible items in their inventory by adding ’s to the end of their name, followed by the name of the item you want to inspect. No one will see you do this, but you will receive slightly less info when inspecting another player’s items.
To see the description of the room you’re in without having to leave and come back, you can enter “room”.
inventory
Lists the items in your inventory.
Aliases
.inventory
.i
Examples
.inventory
.i
Details
Lists all of the equipment slots you have available, and any items that are equipped to each one. Your “RIGHT HAND”
and “LEFT HAND” equipment slots are your hands, which are your main ways of interacting with inventory items. You can
manage the items in these equipment slots primarily with the take and drop commands. For all other equipment slots,
you can equip items to them with the equip command, and remove items from them with the unequip command.
If any of your equipped items have inventory slots, then you can store other items inside of them. These inventory slots
will be listed underneath the equipped item, and any items they contain will be listed in parentheses. To store an item
in one of these inventory slots, use the stash command. To retrieve one and put it in your hand, use the unstash
command. Be warned that items that you have stashed in inventory slots can be stolen by other players, sometimes without
you noticing.
In your inventory, the names of all items will be contained in code blocks. This makes it easier to copy them so that you can paste them into other commands.
knock
Knocks on a door.
Aliases
.knock
Examples
.knock DOOR 1
Details
Knocks on a door in the room that you’re in. This will be narrated in the room you’re in, and in the room that the exit leads to. You can knock on a door even if it’s locked. However, some exits don’t have doors. If they don’t, you will be unable to knock on them.
monolog
Narrates your inner thoughts.
Aliases
.monolog .monologue .mo .mn
Examples
.monolog Kyra stares intently at the screen. What could this jumble of text mean, exactly?
.monologue I can't believe this. How did this even happen?
.monolog No matter what happens, there won't be anything she can do to help anyone after she dies here. That's what hurts most of all.
.monologue He could have forgotten about her. Honestly, he seemed to be pretty close to it just now, right? But this photo album... He suddenly remembers so much more than he thought he would.
Details
Narrates your inner thoughts privately. You will receive a copy of your monolog in DMs, and it will be sent to your spectate channel. Other players in the room will not be able to see or hear your private thoughts, so you can enter anything you like. However, keep in mind that if you send the command in the room channel, it will still appear there before being deleted. For that reason, this command works best when it is sent in DMs. Please note that you cannot send a monolog that exceeds Discord’s character limit, which is 2000 characters.
move
Moves you to another room.
Aliases
.move .go .exit .enter .walk .m
Examples
.move DOOR 1
.enter Kitchen
.go locker-room
.exit DOOR
.move DOOR 1>DOOR 1>DOOR 1
.walk HALL 1 > HALL 2 > HALL 3 > HALL 4
.m Lobby>Path 3>Path 1>Park>Path 7>Botanical garden
Details
Moves you to another room. You must specify an exit in the room you’re currently in, or the name of the desired room, if you know it. Unless you have the free movement role, you can only move to a room directly connected to the one you’re currently in. It will take time for you to move to your destination. How much time it takes depends on its distance from your current position, and your speed. While you are moving, you will use stamina. If you are close to running out of stamina, you will receive a warning. If you run out of stamina entirely, you will become weary, and you will be unable to move for some time. You can recover lost stamina by staying in one place for a while.
Once you reach the destination, you will be removed from your current room channel and put into the channel corresponding to the room you specify, as long as the exit leading to it isn’t locked.
When you enter a new room, its description will be sent to you via DMs. However, it is recommended that you open the new channel immediately so that you can start seeing messages as soon as you’re added.
You can also create a queue of movements to perform such that upon entering one room, you will immediately start moving
to the next one. To do this, separate each destination with >.
Note that if you are carrying any large items in your hands (for example, a sword), they will be mentioned when you exit or enter a room.
narrate
Narrates your non-verbal actions.
Aliases
.narrate .n
Examples
.narrate She slowly sinks behind the podium.
.n 06 shakes his head, as if he's clearing a thought from his mind.
.narrate Their eyes widen and they cross their arms, looking down. They'd clearly never considered this before.
.n He coughs a little, blood trickling down his face. His smile doesn't waver, though.
Details
Narrates non-verbal actions. This narration will be sent to the room or hiding spot you’re currently in. This behaves
similarly to the gesture command, but it allows you to write more complex narrations. Please note that you cannot send
a narration that exceeds Discord’s character limit, which is 2000 characters.
recipes
Lists all recipes available to you.
Aliases
.recipes
Examples
.recipes
.recipes GLASS
.recipes POT OF RICE
Details
Lists all recipes you can carry out with the items in your inventory and items in the room. Even if all of the ingredients necessary for a recipe are in the room you’re in, if you don’t have at least one of them in your inventory, there will be no results. However, if you supply the name of an item in your inventory, you will receive a list of all recipes that use that item as an ingredient, even if the remaining ingredients are not available.
There are two types of recipes: crafting recipes and processing recipes.
To carry out a crafting recipe, you must have both of the ingredients in your hands and combine them with the craft
command. These recipes take no time. Some crafting recipes are reversible. If they are, you can use the uncraft
command to get the ingredients again.
To carry out a processing recipe, use the drop command to place all the ingredients in a fixture, and then activate
the fixture with the use command. These recipes take a set amount of time to complete. If you did it correctly, you’ll
receive a message indicating that the process has begun, and then another message when it finishes, as long as you’re
still in the same room as the fixture you used to process it. If the fixture was already activated when all of the
ingredients were put in, you won’t receive a message when it’s initiated or completed, but the recipe will still be
carried out so long as all of the ingredients are in place.
run
Runs to another room.
Aliases
.run
Examples
.run DOOR 1
.run Kitchen
.run locker-room
.run DOOR
.run DOOR 1>DOOR 1>DOOR 1
.run HALL 1 > HALL 2 > HALL 3 > HALL 4
.run Lobby>Path 3>Path 1>Park>Path 7>Botanical garden
Details
Moves you to another room by running. This functions identically to the move command, however you will move twice as
quickly and lose stamina at three times the normal rate.
You must specify an exit in the room you’re currently in, or the name of the desired room, if you know it. Unless you have the free movement role, you can only move to a room directly connected to the one you’re currently in. It will take time for you to move to your destination. How much time it takes depends on its distance from your current position, and your speed. Once you reach the destination, you will be removed from your current room channel and put into the channel corresponding to the room you specify, as long as the exit leading to it isn’t locked.
When you enter a new room, its description will be sent to you via DMs. However, it is recommended that you open the new channel immediately so that you can start seeing messages as soon as you’re added.
You can also create a queue of movements to perform such that upon entering one room, you will immediately start moving
to the next one. To do this, separate each destination with >.
Note that if you are carrying any large items in your hands (for example, a sword), they will be mentioned when you exit or enter a room.
say
Sends your message to the room you’re in.
Aliases
.say .speak
Examples
.say What happened?
.speak Did someone turn out the lights?
Details
Sends your message to the channel of the room you’re currently in as dialog. It will appear in the channel with a webhook, meaning it will use the display name and display avatar that you have in-game. By default, your display name is your character’s name, and your display avatar is the avatar you have in the game server, or your account’s avatar. However, if something has changed your display name or avatar (for example, if you are wearing a mask), then those will be used instead.
This command is only available to players with certain status effects. In most situations, you should send your message to the room channel directly.
sleep
Puts you to sleep.
Aliases
.sleep
Examples
.sleep
Details
Puts you to sleep by inflicting you with the asleep status effect. In most situations, you will not be able to wake back up again without moderator assistance. This should be used at the end of the day before the game pauses to ensure you wake up feeling well rested.
If you are able to wake back up of your own volition, you can do so with the wake command.
stash
Stores an inventory item inside another inventory item.
Aliases
.stash .store .s
Examples
.stash LAPTOP in BEIGE SATCHEL
.store SWORD in SHEATH
.stash OLD KEY in RIGHT POCKET of BLACK DRESS PANTS
.s WATER BOTTLE in SIDE POUCH of GREEN BACKPACK
Details
Moves an item from your hand to another item in your inventory. You can specify any item in your inventory that has the capacity to hold items by entering the container item’s preposition followed by its name. If you don’t know its preposition, “in” will always work.
If the container has multiple inventory slots (for example, a backpack with several pockets), you can also specify which slot you want to put the item in. To do this, enter the name of the inventory slot followed by “of” before the name of the container. If you don’t specify an inventory slot, you will put it in the first slot it has. Note that each slot has a maximum capacity that it can hold, so if it’s too full or too small to contain the item you’re trying to stash, you won’t be able to stash it there.
If you stash a very large item (a sword, for example), this will be narrated in the room, so other players will see you stash it.
To retrieve a stashed item and put it in your hand, use the unstash command.
status
Shows your status.
Aliases
.status
Examples
.status
Details
Shows you what status effects you’re currently afflicted with. Note that some status effects may not be visible to you. You will also be unable to see their durations.
steal
Steals an item from another player.
Aliases
.steal .pickpocket
Examples
.steal from Vivian's BEIGE SATCHEL
.pickpocket from Kyra's LAB COAT
.steal Michio's RIGHT SLEEVE of PASTEL HAORI
.pickpocket Olavi's LEFT POCKET of BLUE TRENCH COAT
.steal from an individual wearing a PLAGUE DOCTOR MASK's BLACK CLOAK
.pickpocket an individual wearing a BUCKET's SIDE POUCH of BLUE BACKPACK
Details
Attempts to steal an item from another player in the room. You must specify one of the player’s equipped items to steal
from. You can see a list of their equipped items by inspecting them with the inspect command. Then, you can steal from
it by entering their name followed by ’s and the name of the equipped item.
If you inspect their equipped items, you may also learn what inventory slots each one has, if any. You can specify which inventory slot to steal from by entering the name of the slot followed by “of” before the equipped item’s name. If no inventory slot is specified, but the equipped item has multiple slots (for example, a pair of pants with several pockets), one slot will be randomly chosen. If the inventory slot contains multiple items, you will attempt to steal one at random.
There are three possible outcomes that can result from attempting to steal an item: you steal the item without them noticing, you steal the item but they notice, and you fail to steal the item because they notice in time. If you happen to steal a very large item, the other player will notice you taking it regardless of whether you were successful or not, and so will everyone else in the room.
Your dexterity stat has a significant impact on how successful you are at stealing an item. If you have a high dexterity stat, you are more likely to succeed. Various status effects affect the outcome as well. For example, if the player you’re stealing from is asleep or unconscious, they won’t notice you stealing their items no matter what.
stop
Stops your movement.
Aliases
.stop .st
Examples
.stop
Details
Stops you in your tracks while moving to another room. Your distance to that room will be preserved, so if you decide to move to that room again, it will not take as long. This command will also cancel any queued movements.
take
Takes an item and puts it in your inventory.
Aliases
.take .get .grab .t
Examples
.take BUTCHERS KNIFE
.get FIRST AID KIT
.t BOTTLE OF MIDAZOLAM from MEDICINE CABINET
.take TOWEL from BENCHES
.grab HAMMER from TOP RACK of TOOLBOX
.t KEY from RIGHT POCKET of PLAID SKIRT
Details
Takes an item from the room you’re in and puts it in your inventory. You must have a free hand to take an item. If you take a very large item (a sword, for example), this will be narrated in the room, so other players will see you take it.
If there are multiple items with the same name in a room, you can specify which container you want to take it from. To do this, you must enter the container’s preposition before its name. If you don’t know its preposition, “in” will always work. If you want to take an item from another item that has multiple inventory slots (for example, a backpack with several pockets), you can specify which of the container’s slots you want to take it from, by entering the name of the slot followed by “of” before the container item’s name.
text
Sends a text message to another player.
Aliases
.text
Examples
.text Elijah Hello. I understand that you have come into possession of some illicit substances, and I would like to partake.
.text Astrid i often paint cityscapes, urban scenes, and portraits of people - but today i decided to experiment with something a bit more abstract. (attached image)
.text Vivian (attached image)
Details
Sends a text message to the player you specify. If an image is attached, it will be sent as well. This command works best when sent via direct message, rather than in a room channel. This command is only available to players with certain status effects. Additionally, even if you have a status effect that enables the use of the command, if the recipient you choose does not, you will not be able to send text messages to them.
time
Shows the current in-game time.
Aliases
.time
Examples
.time
Details
Shows the current in-game time and date. This will show you the time in the timezone that the bot is currently operating in. This may differ from your local time.
uncraft
Separates an item in your inventory into its component parts.
Aliases
.uncraft .dismantle .disassemble .uc
Examples
.uncraft SHOVEL
.dismantle CROSSBOW
.disassemble PISTOL
.uc RING STAND
Details
Separates an item in one of your hands into its component parts. This allows you to reverse a crafting recipe, turning a single product into its two ingredients. Because it produces two items, you will need a free hand in order to use this command. If the item being uncrafted or its components are particularly large, this will be narrated in the room, so other players will see you uncraft it.
If there is no crafting recipe that produces the item you want to uncraft that also allows it to be reversed, then the item cannot be uncrafted.
To see all of the items in your inventory that can be uncrafted, use the recipes command.
undress
Unequips and drops all items.
Aliases
.undress
Examples
.undress
.undress WARDROBE
.undress LAUNDRY BASKET
.undress MAIN POCKET of BLUE BACKPACK
Details
Unequips all items you have equipped and drops them in the room you’re currently in. You will undress completely, including any items in your hands. This will be narrated, so any other players in the room will see you undress.
If you want to put your items in a specific fixture or item in the room, add the container’s name. No preposition is necessary. If you don’t specify a container, you will simply leave the items on the floor.
If the container has multiple inventory slots (for example, a backpack with several pockets), you can also specify which slot you want to put the items in. To do this, enter the name of the inventory slot followed by “of” before the name of the container. If you don’t specify an inventory slot, you will put the items in the first slot it has. Keep in mind that the specified container must have a large enough capacity to hold all of the items in your inventory.
unequip
Unequips an item.
Aliases
.unequip .remove .u
Examples
.unequip PLAGUE DOCTOR MASK
.remove WHITE PARKA
.u KNIT WOOL SWEATER from SHIRT
Details
Unequips an item you currently have equipped. The item will be placed in your hand, so you must have a free hand. When you unequip an item, it will be narrated in the room, so other people can see you unequip it, regardless of its size. It will then be removed from your description, and any equipped items that it was covering will become visible. For example, if you unequip something from your PANTS slot, it is likely that whatever is equipped to your UNDERWEAR slot will then appear in your description.
You can specify which equipment slot you want to unequip the item from, if you want. This can be useful if you have
multiple items with the same name equipped to different equipment slots. To do this, enter “from” after the name of the
item you want to unequip, followed by the name of the equipment slot you want to unequip it from. You can view a list of
all of your equipment slots with the inventory command.
To unequip many items at once, use the undress command. If you wish to equip an item again, use the equip command.
unstash
Moves an inventory item into your hand.
Aliases
.unstash .retrieve .r
Examples
.unstash LAPTOP
.retrieve SWORD from SHEATH
.unstash OLD KEY from RIGHT POCKET of BLACK DRESS PANTS
.r WATER BOTTLE from SIDE POUCH of GREEN BACKPACK
Details
Moves an inventory item from another item in your inventory into your hand. You must have a free hand to unstash an item. If you unstash a very large item (a sword, for example), this will be narrated in the room, so other players will see you unstash it.
If you have multiple inventory items with the same name as the one you want to unstash, you can specify which item to retrieve it from. To do this, you must enter “from” before the container’s name. If the container has multiple inventory slots (for example, a backpack with several pockets), you can specify which of the container’s slots you want to unstash the item from, by entering the name of the inventory slot followed by “of” before the container item’s name.
To store an item in one of your inventory items, use the stash command.
use
Uses an item in your inventory or a fixture in a room.
Aliases
.use .unlock .lock .type .activate .deactivate .flip .push .press .ingest .consume .swallow
.eat .drink
Examples
.use FIRST AID KIT
.eat CHICKEN FRIED RICE
.drink COFFEE
.swallow ORANGE CAPSULE
.use OLD KEY CHEST
.use LIGHTER CANDLE
.lock LOCKER 1
.type KEYPAD Proboscis Monkey
.unlock LOCKER 1 12-22-11
.press RED BUTTON
.flip LEVER
.activate BLENDER
Details
Uses an item from your inventory. Not all items have programmed uses. Those that do will inflict you with or cure you of a status effect of some kind. Status effects can be good, bad, or neutral, but it should be fairly predictable what kind of effect a particular item will have on you.
Some items can be used on fixtures in the room. For example, using a key on a locker will unlock the locker, using a crowbar on a crate will open the crate, etc.
Some fixtures are capable of turning items into other items. This is known as processing a recipe. For example, an oven
can turn raw food into cooked food. In order to use fixtures to process recipes, drop the items in the fixture and use
it. For more information, see the help details for the recipes command.
You can even use fixtures in the room without using an item at all. However, not all fixtures are usable in this way.
Those that are usable without an item have puzzles attached, which can result in many different outcomes depending on
how they’re used. When interacting with a puzzle, anything entered after the name of the fixture will be treated as a
password, combination, or selection. These inputs are almost always case-sensitive. If the fixture is a lock of some
kind, you can re-lock it using the lock command. Other fixtures may require a puzzle to be solved before they do
anything special.
wake
Wakes you up.
Aliases
.wake
.awaken
.wakeup
Examples
.wake
.awaken
.wakeup
Details
Wakes you up when you’re asleep. However, you may not be able to use this command without moderator assistance.
whisper
Allows you to speak privately with the selected player(s).
Aliases
.whisper .w
Examples
.whisper Jun
.w Florian Michio Ava
Details
Creates a channel for you to whisper to the selected recipients. Only you and the people you select will be able to read messages posted in the new channel, but everyone in the room will be notified that you’ve begun whispering to each other. You can select as many players as you want as long as they’re in the same room as you. When one of you leaves the room, they will be removed from the channel. If everyone leaves the room, the whisper channel will be deleted.
Eligible commands
Eligible commands are usable by users with the Eligible role (or the Tester role if Alter Ego is in debug mode). These commands have extremely limited use, only usable by Players before they’ve been given the Player role.
Aside from the help command, Eligible commands can only be used when a game is in progress. They can only be sent in the user’s DMs, or in the general channel (or the testing channel if debug mode is on). If Alter Ego accepts the user’s command and it was sent in the server, the message in which the command was issued will be deleted.
If a command is issued in DMs, the message does not need to begin with the
command prefix (. by default). However, if it is sent in a channel in the server,
then the command prefix is required.
Below is a list of all eligible commands, as well as information about each one.
help
Lists all commands available to you.
Aliases
.help
Examples
.help
.help play
Details
Lists all commands available to the user. If a command is specified, displays the help menu for that command.
play
Joins a game.
Aliases
.play
Examples
.play
Details
Adds you to the list of players for the current game.
Moderator commands
Moderator commands are usable by users with the Moderator role. These commands allow moderators to control the game world and Players. They allow many built-in restrictions placed on Players’ actions to be bypassed.
Most moderator commands can only be used when a game is in progress, but some can be used when this isn’t the case. With the exception of the delete command (which can be used in any channel), all moderator commands must either be sent to the bot commands channel or in a Room channel.
If a command is issued in the bot commands channel, the message does not need to begin with the
command prefix (. by default). However, if it is sent in a Room channel, then the
command prefix is required.
addplayer
Adds a player to the game.
Aliases
.addplayer
Examples
.addplayer @cella
Details
Adds a user to the list of players for the current game. This command will give the specified user the Player role and
add their data to the Players and Inventory Items spreadsheets. This will be generated using the data in the
Player Defaults section of your .env file. However, their name will be set as whatever their current nickname is in
the server. So, you should set their nickname to their character’s name before using this command. Note that edit mode
must be turned on in order to use this command. After using this command, you may edit the new player’s data. Then, the
Players sheet must be loaded, otherwise the new player will not be created correctly, and their data may be overwritten.
clean
Cleans the room items and inventory items sheets.
Aliases
.clean
.autoclean
Examples
.clean
.autoclean
Details
Combs through all room items and inventory items and deletes any whose quantity is 0. All game data will then be saved to the spreadsheet, not just room items and inventory items. This process will effectively clean the spreadsheet of room items and inventory items that no longer exist, reducing the size of both sheets. Note that edit mode must be turned on in order to use this command. The room items and inventory items sheets must be loaded after this command finishes executing, otherwise data may be overwritten on the sheet during gameplay.
craft
Crafts two items in a player’s inventory together.
Aliases
.craft .combine .mix .c
Examples
.craft Kris DRAIN CLEANER and PLASTIC BOTTLE
.combine Colette's SLICE OF BREAD and SLICE OF CHEESE
.mix Flint RED VIAL with BLUE VIAL
.c Sid's BAR OF SOAP with CARVING KNIFE
Details
Creates a new item using the two items in the given player’s hands. The prefab IDs or container identifiers of the items must be separated by “with” or “and”. If no recipe for those two items exists, the items cannot be crafted together. If any of the resulting items is non-discreet, this will be narrated in the room, so other players will see the player craft them.
This command supports NPC latching. For more information, see the help details for the latch command.
createroomcategory
Creates a room category.
Aliases
.createroomcategory .register
Examples
.createroomcategory Floor 1
.register Floor 2
Details
Creates a room category channel with the given name. The ID of the new category channel will automatically be added to
the roomCategories setting in your serverconfig.json file. If a room category with the given name already exists,
but its ID hasn’t been registered in the roomCategories setting, it will automatically be added.
Keep in mind that if ROOM_CATEGORIES is set in your .env file, room categories registered with this command will not
persist when the bot is rebooted. For that reason, the ROOM_CATEGORIES setting should not be set unless you plan to
manage room category IDs manually. To do this, you will have to create a category channel in Discord without using this
command, and add its ID to the ROOM_CATEGORIES setting manually, then reboot the bot.
dead
Lists all dead players.
Aliases
.dead
.died
Examples
.dead
.died
Details
Lists all dead players.
delete
Deletes multiple messages at once.
Aliases
.delete
Examples
.delete 3
.delete 100
.delete @Alter Ego 5
.delete @tobyp4904 75
Details
Deletes multiple messages at once. You can delete up to 100 messages at a time. Only messages from the past 2 weeks can be deleted. You can also choose to only delete messages from a certain user. Note that if you specify a user and for example, 5 messages, it will not delete that user’s last 5 messages. Rather, it will search through the past 5 messages, and if any of those 5 messages were sent by the given user, they wil be deleted.
This command can be used in any channel in the server.
destroy
Destroys an item.
Aliases
.destroy .ds
Examples
.destroy VOLLEYBALL at beach
.ds CAN OF GASOLINE on SHELVES at Warehouse
.destroy NOTE in LOCKER 1 at Men's Locker Room
.ds WRENCH in TOOL BOX 1 at beach-house
.destroy WHITE GLOVES in BREAST POCKET of TUXEDO 3 at dressing room
.ds all in TRASH CAN at lounge
.destroy Nero's KATANA
.ds Yuda's RIGHT HAND
.destroy Vivian's VIVIANS LAPTOP in VIVIANS SATCHEL
.ds SHOTPUT BALL in Cassie's MAIN POCKET of LARGE BACKPACK 1
.destroy all in Hitoshi's HITOSHIS TROUSERS
.ds all in Evad's FRONT POCKET of DENIM OVERALLS 6
Details
Destroys an item in the specified location or in the player’s inventory. The prefab ID or container identifier of the item must be given.
To destroy a room item, the display name or ID of the room it’s in must be given at the end of the command, following
“at”. To destroy an inventory item, the name of the player must be given followed by 's before the item’s identifier.
It is possible to specify the container from which to destroy the item. To do so, add the container’s preposition or “in” after the item’s identifier, followed by the container’s name. If the container is another item, its identifier or prefab ID must be used. The ID of the inventory slot to destroy the item from can also be specified, followed by “of”. If you enter “all” in place of an item’s identifier and specify a container, all items in that container will be destroyed.
It is also possible to destroy an inventory item by specifying only the ID of the equipment slot it’s equipped to instead of the item’s identifier. This will destroy whatever is equipped to that equipment slot.
Note that if you destroy an inventory item, the player will be notified if it is an item they have equipped, and its unequipped commands will be executed. The player will not be notified if it is an item they have stashed.
dress
Takes and equips all items from a container for a player.
Aliases
.dress .redress
Examples
.dress Ezekiel WARDROBE
.dress Kelly LAUNDRY BASKET 7
.redress Luna MAIN POCKET of BLUE BACKPACK
Details
Takes all room items from the given container and equips them for the given player, if possible. The container’s name must be given, or its container identifier if it is a room item. The specified player must have a free hand to take an item. The player dressing will be narrated in the room they’re in.
Items will be equipped in the order in which they appear on the spreadsheet. If an item is equippable to an equipment slot, but the player already has something equipped to that slot, it will not be equipped, and they will not be notified when this happens. If the container has multiple inventory slots, you can specify which slot to dress from by entering the ID of the inventory slot followed by “of” before the container. Otherwise, the player will dress from all slots.
This command supports NPC latching. For more information, see the help details for the latch command.
drop
Drops the given item from a player’s inventory.
Aliases
.drop .discard .put .place .d
Examples
.drop Fable's LARGE KNIFE
.discard Fable LARGE KNIFE on COUNTER
.put Kyra's COOKIE SHEET 3 in OVEN
.place Kanda's WATERMELON in CRATE 1
.d Ava WRENCH on TOP RACK of TOOL BOX
Details
Discards an item from the given player’s inventory and leaves it in the room they’re in. The item must be in one of the player’s hands. The item’s prefab ID or container identifier must be used. If the player discards a non-discreet item, this will be narrated in the room, so other players will see them drop it.
A container to drop the item into can be specified. To do so, add the container’s preposition or “in” after the item’s
identifier, followed by the container’s name. If the container is a room item, its prefab ID or container identifier
must be used. If you don’t specify a container, the player will leave the item on the DEFAULT_DROP_FIXTURE defined in
the game’s settings.
If the container has multiple inventory slots, you can also specify which slot to put the item in. To do this, enter the ID of the inventory slot followed by “of” before the container’s identifier. If an inventory slot is not specified, the player will put the item in the container’s first inventory slot.
This command supports NPC latching. For more information, see the help details for the latch command.
dumplog
Dump current game state to file.
Aliases
.dumplog
Examples
.dumplog
Details
Dumps a log of the most recently used commands, as well as current internal game state. This will generate two files. The data_commands file will contain all successfully-issued commands that have been used recently, but keep in mind that the bot only stores up to 10,000 commands at a time. The data_game file will contain the entirety of the bot’s internal memory relating to the game, with certain data types being truncated when nested. Because these files can be quite large, and Discord has a maximum file size limit of 10 MiB, they will be compressed into a .gz file before being sent. If the file size exceeds this, they will instead be saved to disk.
This command is for debugging purposes, and has no use during regular gameplay. If you discover a bug that was not caused by moderator error, please use this command and attach these files to a new Issue on the Alter Ego GitHub page.
editmode
Toggles edit mode for editing the spreadsheet.
Aliases
.editmode .em
Examples
.editmode
.em
.editmode on
.em on
.editmode off
.em off
Details
Toggles edit mode on or off, allowing you to make edits to the spreadsheet. When edit mode is turned on, Alter Ego will
no longer save the game to the spreadsheet automatically. Additionally, all player activity, aside from speaking in room
channels or in whispers, will be disabled. Players who don’t have the unconscious behavior attribute will be notified
when edit mode is enabled, so use it sparingly. Data will be saved to the spreadsheet before edit mode is enabled, so
you must wait until the confirmation message has been sent before making any edits, or your edits will be overwritten.
When you are finished making edits, be sure to load the updated spreadsheet data before disabling edit mode.
endgame
Ends the game.
Aliases
.endgame
Examples
.endgame
Details
Ends the game. All players will be removed from whatever room and whisper channels they were in. The Player and Dead roles will be removed from all players, and they will be given the Spectator role.
This command will clear all game data in memory. While it is possible to load all data from the spreadsheet again after using this command, players will need to have their roles reassigned manually.
equip
Equips an item for a player.
Aliases
.equip .wear .e
Examples
.equip Kyra's PLAGUE DOCTOR MASK
.wear Lain WHITE PARKA
.e Dexter KNIT WOOL SWEATER to SHIRT
Details
Equips an item to one of the given player’s equipment slots. The item to equip must be in one of the player’s hands. When an item is equipped, it will be narrated in the room, regardless of whether it is discreet or not. If the item’s prefab has any equipped commands, they will be executed when it is equipped.
Any item can be equipped to any equipment slot with this command, regardless of whether its prefab is equippable or what equipment slots it is restricted to. To specify which equipment slot to equip the item to, enter “to” after the prefab ID or container identifier of the item, followed by the ID of the equipment slot. If no equipment slot is specified, the player will equip it to the first equipment slot its prefab is restricted to.
This command supports NPC latching. For more information, see the help details for the latch command.
event
Triggers or ends an event.
Aliases
.event .trigger .end
Examples
.event trigger RAIN
.event end EXPLOSION
.trigger INTRUDER LOOSE ALERT
.end BLACKOUT
Details
Triggers or ends the specified event.
If trigger is used, the event must not already be ongoing. Its triggered commands will be executed. If end is used,
the event must be ongoing. Its ended commands will be executed.
exit
Locks or unlocks an exit.
Aliases
.exit .room .lock .unlock
Examples
.exit lock Carousel DOOR
.exit unlock Chancellor's Quarters DOOR
.lock warehouse DOOR 3
.unlock floor-b1-hall-3 ELEVATOR
Details
Locks or unlocks an exit in the specified room. The corresponding entrance in the room the exit leads to will also be locked/unlocked. When an exit is locked, players will be unable to move through that exit.
If the exit can also be locked or unlocked using the bot commands of a puzzle, you should not lock/unlock it with this
command. Instead, use the puzzle command to solve/unsolve it, so that the exit remains in sync with the puzzle that
controls it.
find
Search in-game data.
Aliases
.find .search .f
Examples
.find room dorm 201
.search rooms stoke-hall
.f fixture DESK
.find fixtures at Chancellor's Office
.search prefab FRIED RICE
.f items THIGH HIGH
.find room item LIFE PRESERVER at beach
.search items in TRASH CAN
.f room items on PREP STATIONS at dining-hall-kitchen
.find roomitems COLORED PENCILS in MAIN POUCH of BACKPACK at school store
.search recipes uncraftable
.f recipes crafting producing GLASS OF ORANGE JUICE
.find recipes processing using MILK, RAW EGG producing PANCAKE BATTER, EGGSHELL
.search puzzles LOCK
.f puzzle COMPUTER at infirmary
.find events snow
.search status effects medicated
.f players an individual wearing a
.find inventory items on JACKET
.search inventoryitems in RIGHT POCKET of DEFAULT PANTS
.f inventoryitem in Phoebe's RIGHT HAND
.find inventory item in julie's MAIN POCKET of LUNA PURSE
.search inventoryitem Lillie's BLUE FLANNEL
.f gestures smile
.find flag SEASON FLAG
Details
Search in-game data and display results with row numbers. You can search for any entry on the spreadsheet, but you must specify which kind of data to find. With no arguments, all entries of that data type will be displayed. Results will be divided into pages, with no more than 15 entries per page, or however many will fit in one Discord message. To narrow down the results, you can add a search query. Queries are case-insensitive, and any entries which contain the search query will be displayed. To examine an entry in more detail, use the view command.
It is also possible to add specifiers to your search for certain data types. Fixtures, Room Items, and Puzzles can be filtered by location by ending your search query with “at” followed by the name of a Room. Recipes can be filtered by type by starting your search with “crafting”, “uncraftable”, or “processing”. It is also possible to filter Recipes by comma-separated lists of ingredients and products. To filter by ingredients, prefix the list with “using”; to filter by products, prefix the list with “producing”. When using specifiers, it is not actually necessary to provide a search query; the results will simply be all entries that match the specified criteria.
Room Items and Inventory Items can be filtered by container name and slot, by entering “[preposition] ([slot name]
of) [container name]”. The container name is also a search query, so any container whose name, plural name, Prefab ID,
or container identifier contains the given string will be displayed; the same is not true for the slot, however. It is
also possible to filter Inventory Items by Equipment Slot and Player. To filter by Equipment Slot, enter “in” or “on”,
followed by the name of an Equipment Slot. To filter by Player, enter their name followed by 's, directly after the
preposition, if there is one. Keep in mind that it is not possible to filter by Equipment Slot and container at the same
time.
To view search results in more detail, use the view command.
fixture
Activates or deactivates a fixture, or sets its recipe tag.
Aliases
.fixture .object .activate .deactivate
Examples
.fixture activate BLENDER
.fixture deactivate MICROWAVE
.fixture tag BLENDER puree
.activate KEURIG Kyra
.deactivate OVEN Noko
.fixture activate FIREPLACE Log Cabin
.fixture deactivate FOUNTAIN flower-garden
.fixture tag BLENDER puree kitchen
.activate FREEZER gabriella "Gabriella plugs in the FREEZER."
.deactivate WASHER 1 laundry-room "WASHER 1 turns off"
Details
This command has three sub-commands:
- activate: Activates the specified fixture. When a fixture is activated, it will begin processing the recipe with the highest count of ingredients satisfied by the room items contained inside of it. If no recipe is found, it will look for one that it can process every second while it is activated.
- deactivate: Deactivates the specified fixture. It will stop processing and looking for recipes.
- tag: Sets the fixture’s recipe tag. This will immediately stop any ongoing recipe processes. If it is currently activated, it will begin looking for recipes it can process that satisfy the new tag. The spreadsheet will be updated with the new tag on the next save.
Keep in mind that a fixture can only be activated/deactivated if it has a recipe tag. If there is a puzzle whose state
is supposed to match that of the fixture’s, you must use the puzzle command to update it separately.
If there are multiple fixtures with the same name, you can specify the room the fixture is in.
Alternatively, you may specify a player to activate/deactivate the fixture. In this case, only fixtures in the same room as the player can be activated/deactivated. When a player is supplied, a narration will be sent.
It is possible to supply a custom narration for the fixture being activated/deactivated. Simply add a string of text surrounded by quotation marks at the end of the command. This can be done even without supplying a player.
The activate and deactivate sub-commands support NPC latching. For more information, see the help details for
the latch command.
flag
Set and clear flags.
Aliases
.flag .setflag .clearflag
Examples
.flag set COLD SEASON FLAG true
.setflag HOT SEASON FLAG False
.flag set TV PROGRAMMING 4
.setflag INDOOR TEMPERATURE 25.3
.flag set TV PROGRAMMING += 1
.setflag INDOOR TEMPERATURE -= 4.1
.flag set SOUP OF THE DAY "French Onion"
.setflag BLOOD SPLATTER “TWO MILKMEN GO COMEDY”
.flag set PRECIPITATION `findEvent('RAIN').ongoing === true || findEvent('SNOW').ongoing === true`
.setflag RANDOM ANIMAL `getRandomString(['dog', 'cat', 'mouse', 'owl', 'bear'])`
.flag clear BLOOD SPLATTER
.clearflag TV PROGRAMMING
Details
Set and clear flags.
-
set: Sets the flag value as the specified input. If the flag does not already exist, then a new one will be created with the specified name. The specified value must be a boolean, number, or string. String values must be surrounded by quotation marks. To add or subtract from the flag’s current number value, prefix the number to add or subtract with
+=or-=. If you want to set the flag’s value script, surround your input with`tics`. This script will immediately be evaluated, and the flag’s value will be set accordingly. Whether the flag’s value or value script is set, the flag’s set commands will be executed, unless the flag was set by another flag. -
clear: Clears the flag value. This will replace the flag’s current value with
null. When this is cleared, the flag’s cleared commands will be executed unless the flag was cleared by another flag.
gesture
Performs a gesture for the given player.
Aliases
.gesture .g
Examples
.gesture Astrid smile
.g Ezekiel point at DOOR 1
.gesture Holly wave Johnny
.g Dexter sit CHAIR
.gesture list
.g list Kyra
Details
Makes the given player perform one of a set of pre-defined gestures. Everybody in the room with them will see them do
this gesture. This allows them to communicate non-verbally, though they cannot perform a gesture if they have one of the
gesture’s disabled statuses. To see a list of all of the gestures they can currently perform, send the gesture command
followed by “list” and the name of the player. Omitting the name of a player after “list” will simply list all gestures
on the sheet.
Certain gestures may require a target to perform them. To specify a target, enter the identifier of the target directly after the ID of the gesture. For a room item or inventory item, this must be its container identifier or prefab ID. For any other type of target, it should be its name. Note that a gesture can only be performed with one target at a time.
This command supports NPC latching. For more information, see the help details for the latch command.
give
Gives a player’s item to another player.
Aliases
.give
Examples
.give Kanda's EMBALMING FLUID to Astrid
.give Lucia BIRTHDAY PRESENT BOX 9 to Flint
Details
Transfers an item from the first player’s inventory to the second player’s inventory. Both players must be in the same room. The item selected must be in one of the first player’s hands. The receiving player must also have a free hand, or else they will not be able to receive the item. If the giving player gives a non-discreet item to the receiving player, it will be narrated in the room.
This command supports NPC latching. For more information, see the help details for the latch command.
help
Lists all commands available to you.
Aliases
.help
Examples
.help
.help status
Details
Lists all commands available to the user. If a command is specified, displays the help menu for that command.
hide
Hides a player in the given fixture.
Aliases
.hide .unhide
Examples
.hide Xenia DESK
.hide Kiara SHOWER 1
.unhide Aisha
Details
Forcibly hides a player in the specified fixture. They will be able to hide in the specified fixture even if it is
attached to a lock-type puzzle that is unsolved, and even if the hiding spot is beyond its capacity. To force them out
of hiding, use the unhide command.
This command supports NPC latching. For more information, see the help details for the latch command.
inspect
Inspects something for a player.
Aliases
.inspect .investigate .examine .look .x
Examples
.inspect Michio DESK
.examine Fable LARGE KNIFE
.look Ava JUG OF ORANGE JUICE in REFRIGERATOR
.x Florian WOOLEN MITTENS in MAIN POUCH of RED BACKPACK 1
.investigate Ai AIS PISTOL
.look Jun Amadeus
.examine Kanda Huiyu
.look Jackie Kyra's KYRAS GLASSES
.x Unit_026 Jackie's JACKIES NECKLACE
.inspect Aisha room
Details
Inspect something for the given player. The target must be the “room” argument, a fixture, a room item, a player, or an inventory item, and it must be in the same room as the given player. The description will be parsed and sent to the player. If the target is a fixture, or a non-discreet room item or inventory item belonging to the player, a narration will be sent in the room.
When inspecting a room item or inventory item, the prefab ID or container identifier must be used. If the target is a room item, you can specify which one to inspect by appending its container’s preposition or “in” after the item’s identifier, followed by the container’s name (if the container is a fixture or puzzle) or prefab ID or container identifier (if the container is a room item).
If the target is an inventory item, you can specify the player that the inventory item belongs to by preceding the
item’s identifier with the player’s name followed by 's. The player can even inspect their own inventory items this
way. However, a player cannot inspect another player’s non-discreet or stashed inventory items. Note that if a player
inspects a different player’s inventory items, a narration will not be sent.
This command supports NPC latching. For more information, see the help details for the latch command.
instantiate
Generates an item.
Aliases
.instantiate .create .generate .is .gn
Examples
.instantiate RAW FISH on FLOOR at Beach
.create PICKAXE in LOCKER 1 at mining-hub
.generate 3 EMPTY DRAIN CLEANER in CUPBOARDS at Kitchen
.instantiate GREEN BOOK in MAIN POCKET of LARGE BACKPACK 1 at dorm-library
.is 4 SCREWDRIVER in TOOL BOX at Beach House
.gn WET CLAY POT (quality = excellent) on POTTERY WHEEL at Art Studio
.instantiate KATANA in Nero's RIGHT HAND
.create GORILLA MASK on Evad's FACE
.generate VIVIANS LAPTOP in Vivian's VIVIANS SATCHEL
.is 2 SHOTPUT BALL in Cassie's MAIN POCKET of LARGE BACKPACK
.gn 3 GACHA CAPSULE (color=metal + character=upa) in Asuka's LEFT POCKET of GAMER HOODIE
Details
Generates a room item or inventory item in the specified location. The prefab ID must be used. A quantity can also be set by supplying a number before the prefab ID. If no quantity is given, the item will be instantiated with a quantity of 1.
If the prefab has procedural options, they can be manually selected in parentheses. To do this, write the name of the
procedural tag and the poss tag to select within it, separated by an equal sign (=). Multiple procedural selections
can be made, separated by a plus sign (+).
To instantiate a room item, the display name or ID of the room must be given at the end, following “at”. The container to put it in must also be specified after the prefab’s ID, preceded by the container’s preposition or “in”. If the container is a fixture with a child puzzle, the puzzle will be its container. If the container is another room item, the container’s identifier, prefab ID, or name can be used.
To instantiate an inventory item, the name of the player must be given followed by 's. It is possible to instantiate
an inventory item directly to a player’s equipment slot by specifying the equipment slot’s ID. In this case, the player
will be notified that they equipped the item, and the prefab’s equipped commands will be executed. However, a container
item can be specified instead by entering its preposition or “in” followed by its identifier, prefab ID, or name. The
player will not be notified when the item is instantiated this way.
If the container to instantiate the item into is a room item or inventory item, the ID of the inventory slot to instantiate the item into can be specified, followed by “of” before the container’s identifier.
inventory
Lists a given player’s inventory.
Aliases
.inventory .i
Examples
.inventory Nero
.i Aisha
Details
Lists all of the given player’s equipment slots, and any items equipped to each one. The player’s stashed items will be listed underneath the container they’re inside of, in parentheses. They will be preceded by the ID of the inventory slot they’re in.
In the player’s inventory, the identifiers of all items will be contained in code blocks. This makes it easier to copy them and paste them into other commands.
This command supports NPC latching. For more information, see the help details for the latch command.
kill
Kills a player.
Aliases
.kill .die
Examples
.kill Platt
.die Strickland Wu Obi Katou
Details
Kills the listed players. Player names must be separated by a space.
When a player is killed, they are removed from the list of living players and added to the list of dead players. This prevents them from using any player commands, thus making them unable to interact with the game world. When a player dies, they are dead permanently. To bring them back to life, they must be manually edited on the spreadsheet. Only use this command if you are absolutely sure.
Upon death, the player will be removed from whatever room and whisper channels they were in. The player will be notified, and a narration will be sent indicating that they have died. All status effects the player had will be cleared. They will retain any items they had in their inventory, but they will not be accessible in any way. In order to make the player’s corpse inspectable, it must be manually added to the appropriate location as a fixture, and their inventory items must be manually added as room items.
A dead player will retain the Player role. To remove the Player role and give them the Dead role, use the reveal
command.
knock
Knocks on a door for a player.
Aliases
.knock
Examples
.knock Kanda DORM 2
Details
Knocks on an exit for the given player. This will be narrated in the room they’re in, and in the room that the exit
leads to. If an exit has the not knockable exit tag, it cannot be knocked on.
This command supports NPC latching. For more information, see the help details for the latch command.
latch
Latches onto an NPC.
Aliases
.latch .unlatch
Examples
.latch unit_050
.latch Haru
.latch
.unlatch
Details
Latches onto an NPC player. If you issue a player-controlling command in a channel that the selected NPC is in while you are latched, you do not have to specify which player to control. However, if you wish to control a different player in that channel, you must still specify their name.
While latched, you can also speak for that NPC without using the say command. However, keep in mind that this prevents
you from sending narrations as a moderator in that channel.
Note that you cannot latch onto any player that is not an NPC.
To clear your latch, send the latch command without specifying an NPC, or use the unlatch alias.
living
Lists all living players.
Aliases
.living
.alive
Examples
.living
.alive
Details
Lists all living players.
load
Loads game data.
Aliases
.load .reload .las .lar
Examples
.load all start
.las
.load all resume
.lar
.load all
.load rooms
.load fixtures
.load prefabs
.load recipes
.load room items
.load roomitems
.load puzzles
.load events
.load status effects
.load players
.load inventory items
.load inventories
.load gestures
.load flags
Details
Loads game data from the spreadsheet and stores it in memory. You must specify what spreadsheet tab to load from. When data from a particular tab is loaded, all data that was previously in memory for that tab will be cleared and replaced with the newly-loaded data.
If there are any errors with the loaded game data, you will be warned, and the game cannot progress until they are fixed
and reloaded. However, some game data cannot be checked for errors with the load command. To check for errors in your
descriptions, use the parse command. At this time, it is not possible to check for errors in bot commands that appear
on the spreadsheet, until they are executed.
If game entities referenced data that has been reloaded (for example, fixtures reference the room they’re located in), the references will be updated to point to the new data, if possible. However, references can be broken, if newly-loaded data does not contain the entities that other entities reference, and you will not be warned when this occurs. So, it is good practice to load all game data together periodically.
To start the game, load all data and append “start” or “resume”. When “start” is used, each living player will be sent
the description of the room they load into. When “resume” is used, the game is still started, but room descriptions will
not be sent to players. In general, “start” should be used when starting a game for the first time, and “resume” should
be used whenever the bot is rebooted. However, you do not have to do this if the AUTO_LOAD setting in your .env file
is set to true.
If you are loading data while a game is in progress, you should use the editmode command first.
location
Tells you a player’s location.
Aliases
.location .l
Examples
.location Gabriella
.l Amy
Details
Tells you the given player’s location, with a link to the channel.
move
Moves the given player to the specified room or exit.
Aliases
.move .go .enter .walk .m
Examples
.move Kiki DOOR 2
.enter Kiki Lingling Maple Wally biosphere-garden
.go living Dining Hall
.m all ELEVATOR
Details
Forcibly moves the given players to the specified room or exit. When a player is moved, they will be removed from the room channel they were already in and added to the destination room channel. They will move to the given destination immediately, without consuming any stamina, and with no regard for whether the room is adjacent to their current room or the exit leading to it is locked.
You can select multiple players by separating their names with a space. If instead of providing the names of players, you enter “living” or “all”, all living players will be moved to the specified room, except for players who are already in that room, NPCs, and players with the Free Movement role.
When this command is used to move a player to a room that is not adjacent to their current room, the narration in the destination room will not specify which exit they entered from.
This command supports NPC latching. For more information, see the help details for the latch command.
narrate
Narrates an NPC’s non-verbal actions.
Aliases
.narrate .n
Examples
.narrate Ai She lands with a curtsy while balancing a tray with a tall stack of tablets on it in one hand.
.n Unit_050 It sits up straight on the piano bench and prepares to play.
.narrate Sid She is utterly perplexed by the $100 bill that's suddenly in the tip jar.
.n Haru He walks over to the plushie rack and takes the used dog plushie. He puts it under the counter for safekeeping. Definitely not for easy access.
Details
Narrates non-verbal actions for an NPC. The name of an NPC must be specified. This narration will be sent to the room or
hiding spot the NPC is currently in. This behaves similarly to the gesture command, but it allows you to write more
complex narrations. Please note that you cannot send a narration that exceeds Discord’s character limit, which is 2000
characters.
This command cannot be used to narrate actions for a non-NPC player. To do that, send a message in the room or whisper channel they’re currently in. This will be treated as a narration, but it will be clearly indicated as having been written by you.
This command supports NPC latching. For more information, see the help details for the latch command.
occupants
Lists all occupants in a room.
Aliases
.occupants .o
Examples
.occupants floor-b1-hall-1
.o Ultimate Conference Hall
Details
Lists all occupants currently in the given room. If an occupant is in the process of moving, their move queue will be
included, along with the time remaining until they reach the next room in their queue. Note that the displayed time
remaining will not be adjusted according to the HEATED_SLOWDOWN_RATE setting. If a player in the game has the heated
status effect, movement times for all players will be displayed as shorter than they actually are. Occupants with the
hidden behavior attribute will also be listed alongside their hiding spots.
ongoing
Lists all ongoing events.
Aliases
.ongoing
.events
Examples
.ongoing
.events
Details
Lists all events which are currently ongoing, along with the time remaining on each one, if applicable.
online
Lists all online players.
Aliases
.online
Examples
.online
Details
Lists all players who are currently online.
parse
Checks your descriptions for errors.
Aliases
.parse .testparser
Examples
.parse
.parse Kyra
.parse plaintext
.parse Ezekiel plain
.testparser
Details
Runs all of your descriptions through the parser module. It will parse every single one and output the plain-text results to a text file that will be sent to the command channel. If there are any errors with your descriptions, they will be listed alongside the resulting file. It is important to fix all errors and warnings, or undesired behavior may occur during gameplay.
You can input a player name to parse the text as if that player is reading it. This is useful if you want to see how descriptions will appear to a given player. If you do not supply one, descriptions will be parsed as if they are being read by a player named Cella.
You can specify “plain” or “plaintext” to output a file which consists only of plain text, with no XML. If you do, a dictionary file will be generated and sent with the results. This dictionary will consist of all words that comprise the IDs and names of in-game entities. Alter Ego will not run spellchecking for you, but you can use these files in your preferred spellchecking program to look for errors. You will likely still need to add more words to the dictionary yourself in order to avoid false flags in your preferred spellchecker; the dictionary Alter Ego generates will simply act as a useful base.
puzzle
Solves or unsolves a puzzle.
Aliases
.puzzle .solve .unsolve .attempt
Examples
.puzzle solve TERMINAL
.puzzle unsolve SEARCH QUERY
.solve AISHA PROGRAM Ava
.unsolve BURIED TREASURE Jackie
.solve USERNAME jl
.solve USERNAME doublehelix
.puzzle solve CALL BUTTON Floor B2 Hall 1
.puzzle unsolve SWITCH dorm-6
.solve IRONWOOD TREES Jackie "Jackie takes a sturdy stance, holding her ax with confidence. With one-! two-! *three-!* swings, she chops through an IRONWOOD TREE, and it falls out of the way."
.unsolve LOGIN infirmary "The COMPUTER automatically logs out"
.puzzle attempt AISHA PROGRAM 05 4C 91 F1 04 1F AB F0 Ava
.attempt 3D PRINTER rabbit Huiyu
Details
Solves or unsolves a puzzle. You may specify an outcome, if the puzzle has more than one solution. When a puzzle is
solved, it will execute the solved commands for the outcome it was solved with. When a puzzle is unsolved, it will
execute the unsolved commands for the outcome it currently has. If there is a fixture whose state is supposed to match
that of the puzzle’s, you must use the fixture command to update it separately.
If there are multiple puzzles with the same name, you can specify the room the puzzle is in.
Alternatively, you may specify a player to solve/unsolve the puzzle. In this case, only puzzles in the same room as the player can be solved/unsolved. When a player is supplied, a narration will be sent.
It is possible to supply a custom narration for the puzzle being solved/unsolved. Simply add a string of text surrounded by quotation marks at the end of the command. This can be done even without supplying a player.
Additionally, if you specify a player, you can make them attempt the puzzle with the attempt option. This makes it
possible to force the player to fail the puzzle because they didn’t provide a correct solution or they didn’t satisfy
the requirements for the puzzle to be solved/unsolved.
This command supports NPC latching. For more information, see the help details for the latch command.
restore
Restores a player’s stamina.
Aliases
.restore
Examples
.restore Flint
Details
Sets the given player’s stamina to its maximum value. This is based on their current max stamina, not their default
stamina. Note that this does not automatically cure the weary status effect.
reveal
Gives a player the Dead role.
Aliases
.reveal
Examples
.reveal Platt
.reveal Strickland Wu Obi Katou
Details
Removes the Player role from the listed players and gives them the Dead role. All listed players must be dead.
roll
Rolls a die.
Aliases
.roll
Examples
.roll
.roll Sadie
.roll Christopher Nero
.roll str Ai
.roll strength Aisha Huiyu
.roll perception Kanda
.roll per Kyra Amadeus
.roll dexterity Flint
.roll dex Elijah Lucia
.roll spd Luna
.roll speed Xenia Fury
.roll stamina Danica
.roll sta Ezekiel Kelly
Details
Rolls a die. You can set the minimum and maximum possible values in your .env file with the DICE_MIN and DICE_MAX
settings, respectively.
If a stat and a player are specified, the result will have the modifier of the player’s specified stat added to it. If two players are specified, any status effects the second player has which affect the first player will be applied to the first player, whose stats will be recalculated before their stat modifier is applied. Additionally, if a strength roll is performed using two players, the second player’s dexterity modifier will be inverted and applied to the first player’ s roll. Any modifiers will be mentioned in the result, but please note that the result sent has already had the modifiers applied.
Valid stat inputs are: str, strength, per, perception, dex, dexterity, spd, speed, sta, stamina.
save
Saves the game data to the spreadsheet.
Aliases
.save
Examples
.save
Details
Manually saves the game data to the spreadsheet. Ordinarily, game data is automatically saved to the spreadsheet
periodically, as defined by the AUTOSAVE_INTERVAL in your .env file. However, this command allows you to save at any
time, even when edit mode is enabled.
say
Sends a message.
Aliases
.say
Examples
.say #general Hello. My name is Alter Ego.
.say #park Haru taps the left part of the wall in certain locations in order, and it begins descending, revealing the entrance to PATH 10.
.say amy One appletini, coming right up.
Details
Sends a message. A channel or player must be specified. Messages can be sent to any channel in the server, but if it is sent to a room channel, it will be treated as a narration.
If the name of a player is specified and that player is an NPC, the player will speak in the channel of the room they’re in. Their dialog will be treated just like that of any normal player’s. The image URL set in the player’s Discord ID will be used for the player’s avatar. It is not possible to use this command on a non-NPC player.
It is possible to speak for an NPC without using this command. For more information, see the help details for the
latch command.
set
Sets a fixture, puzzle, or group of room items as accessible or inaccessible.
Aliases
.set
Examples
.set accessible puzzle ROCK CLIMBING WALL
.set inaccessible puzzle LOGIN Infirmary
.set accessible fixture BUNSEN BURNER
.set inaccessible fixture UNDERBRUSH path-2
.set accessible puzzle items LOCK robotics-lab
.set inaccessible puzzle items LOOSE CRATE
.set accessible fixture items DOLLHOUSE
.set inaccessible fixture items TOP OF THE SHELVES Library
Details
Sets a fixture, puzzle, or group of room items as accessible or inaccessible. You have to specify whether to set a fixture or puzzle, even if you want to set a group of room items. When you use the optional “items” argument, it will set all of the items contained in that fixture or puzzle as accessible/inaccessible at once. This will also update the accessibility of all child items contained inside of those room items. It is not possible to set the accessibility of individual room items.
You can also specify a room display name or ID at the end of the command. If you do, only fixtures/puzzles/room items in the room you specify can be set as accessible/inaccessible. This is useful if you have multiple fixtures or puzzles with the same name in different locations.
setdefaultroomicon
Sets the default room icon.
Aliases
.setdefaultroomicon
Examples
.setdefaultroomicon https://media.discordapp.net/attachments/1290826220367249489/1441259427411001455/sLPkDhP.png
.setdefaultroomicon
Details
Sets the icon that will display by default when the given room’s information is sent to a player, if there exists no specific icon for that room. The icon given must be a URL with a .jpg, .jpeg, .png, .gif, .webp, or .avif extension. To reset the default icon, simply do not specify a new icon.
Note that this will not persist across bot reboots. When the bot is rebooted, the default room icon will be reverted to
whatever is set for the DEFAULT_ROOM_ICON_URL setting in your .env file.
setdest
Updates an exit’s destination.
Aliases
.setdest
Examples
.setdest Truck DOOR Mountain Cave TRUCK
.setdest Mountain Entrance TRUCK Mountain Entrance TRUCK
.setdest motor-boat PORT docks BOAT
.setdest wharf MOTOR BOAT wharf MOTOR BOAT
Details
Replaces the destination for the specified room’s exit. Given the following initial room setup:
| Room ID | Exits | Leads To | From |
|---|---|---|---|
| room-1 | EXIT A | room-2 | EXIT B |
| room-2 | EXIT B | room-1 | EXIT A |
| EXIT C | room-3 | EXIT D | |
| room-3 | EXIT D | room-2 | EXIT C |
If the destination for room-1’s EXIT A is set to room-3’s EXIT D, players passing through EXIT A would emerge from EXIT D from that point onward. The Rooms sheet will be updated to reflect the updated destination, like so:
| Room ID | Exits | Leads To | From |
|---|---|---|---|
| room-1 | EXIT A | room-3 | EXIT D <- updated |
| room-2 | EXIT B | room-1 | EXIT A |
| EXIT C | room-3 | EXIT D | |
| room-3 | EXIT D | room-1 | EXIT A <- updated |
Note that this will leave room-2’s EXIT B and EXIT C without exits that lead back to them, which will result in errors next time rooms are loaded. To prevent this, this command should be used sparingly, and all affected exits should have their destinations reassigned.
setdisplayicon
Sets a player’s display icon.
Aliases
.setdisplayicon .sdi
Examples
.setdisplayicon kyra https://cdn.discordapp.com/attachments/697623260736651335/912103115241697301/mm.png
.setdisplayicon kyra
Details
Sets the icon that will appear as the given player’s avatar when their communications are mirrored as webhook messages.
Webhook messages are primarily sent in spectate channels to reflect a player’s dialog, narrations, and monologs.
However, webhook messages are also sent in room and whisper channels when a player uses the say, gesture, and
narrate commands. Because NPCs don’t have Discord accounts, all of their communications are sent as webhook
messages.
To set a player’s display icon, you must provide an image URL with an extension of .jpg, .jpeg, .png, .webp, or .avif. To reset a player’s display icon to their default display icon, simply specify the player without providing an image URL.
When player data is reloaded, all players will have their display icon reverted to their default display icon. For standard players, this is their server avatar, or their account avatar if they don’t have one set. For NPCs, this is the display icon given for them on the sheet in lieu of a Discord user ID.
Note that if the player is inflicted with a status effect with the concealed behavior attribute, their display icon
will be updated to the image URL set in the DEFAULT_CONCEALED_ICON_URL setting in your .env file, thus overwriting
one that was set manually. However, this command can be used to update their display icon again afterwards. When the
status is cured, it will be reset to their default display icon.
This command will not change the player’s avatar when they send messages to room channels normally.
setdisplayname
Sets a player’s display name.
Aliases
.setdisplayname .sdn
Examples
.setdisplayname Sadie Zinnia
.sdn Kyra an individual wearing a PLAGUE DOCTOR MASK
.setdisplayname Sadie Sadie
Details
Sets the name that will be used to refer to a player in narrations in lieu of their actual name. It will also be set as
their username when their communications are reflected with webhook messages. Webhook messages are primarily sent in
spectate channels to reflect a player’s dialog, narrations, and monologs. However, webhook messages are also sent in
room and whisper channels when a player uses the say, gesture, and narrate commands. Because NPCs don’t have
Discord accounts, all of their communications are sent as webhook messages.
To set a player’s display name, enter their actual name, followed by the new display name. Display names can contain spaces, but they have a maximum length of 32 characters. If the display name does not begin with a proper noun, the first letter should not be capitalized.
Setting a player’s display name will not change their name on the spreadsheet, and when player data is reloaded, their display name will be reverted to their actual name.
Note that if the player is inflicted with a status effect with the concealed behavior attribute, their display name
will be updated, thus overwriting one that was set manually. However, this command can be used to update their display
name again afterwards. When the status is cured, their display name will be reset.
This command will not change the player’s nickname in the server.
setpronouns
Sets a player’s pronouns.
Aliases
.setpronouns
Examples
.setpronouns Lain female
.setpronouns Amadeus neutral
.setpronouns Platt male
.setpronouns Unit_050 it/it/its/its/itself/false
.setpronouns Asuka she/it/her/its/herself/false
.setpronouns Hollow ey/em/eir/eirs/emself/true
.setpronouns Aeries xey/xem/xeir/xeirs/xemself/true
Details
Sets the pronouns that will be used in the given player’s description and other places where pronouns are used. This will not change their pronouns on the spreadsheet, and when player data is reloaded, their pronouns will be reverted to their original pronouns.
To set a player’s pronouns, enter their name, followed by a set of pronouns. Pronoun sets must be given in the form:
subjective/objective/dependent possessive/independent possessive/reflexive/plural.
However, you can use shorthand for the most common pronoun sets:
- “female” (
she/her/her/hers/herself/false), - “male” (
he/him/his/his/himself/false), and - “neutral” (
they/them/their/theirs/themself/true).
Note that if the player is inflicted with a status effect with the concealed behavior attribute, their pronouns will
be set to “neutral”, thus overwriting any that were set manually. However, this command can be used to update their
pronouns again afterwards. When the status is cured, their pronouns will be reset.
setroomicon
Sets a room’s icon.
Aliases
.setroomicon
Examples
.setroomicon Living Room https://media.discordapp.net/attachments/1290826220367249489/1441259427411001455/sLPkDhP.png
.setroomicon kitchen
Details
Sets the icon that will display when the given room’s information is sent to a player. This will override whatever is
set as the DEFAULT_ROOM_ICON_URL setting in your .env file, but only for the given room. The icon given must be an
attachment or URL with a .jpg, .jpeg, .png, .gif, .webp, or .avif extension. To reset a room’s icon, simply do not
specify a new icon. When this command is used, the new icon will be saved to the sheet in place of the old one.
setupdemo
Sets up a demo game.
Aliases
.setupdemo
Examples
.setupdemo
Details
Populates an empty spreadsheet with default game data as defined in the demodata.json config file. This will create a
game environment to demonstrate most of the basic game mechanics.
If the channels for the demo game’s rooms don’t exist, they will be created automatically. This command will not create
any players for you. Once the demo data has been saved to the spreadsheet, you can use the startgame or addplayer
commands to add players, or manually add them to the spreadsheet. It is recommended that you have at least one other
Discord account to use as a player. Once the spreadsheet has been fully populated, you can use the load command with
the arguments all start to begin the demo.
If there is already data on the spreadsheet, it will be overwritten. Only use this command if the spreadsheet is currently blank.
setvoice
Sets a player’s voice.
Aliases
.setvoice
Examples
.setvoice Kyra a deep modulated voice
.setvoice Spektrum a high digitized voice
.setvoice Persephone multiple overlapping voices
.setvoice Ghost a disembodied voice
.setvoice Typhos Diego
.setvoice Nero Haru
.setvoice Kyra
Details
Sets a player’s voice descriptor that will be used when the player’s dialog is heard by someone who can’t see their face.
To set a player’s voice, enter their name, followed by a voice descriptor. It is assumed that voice descriptors will be written in the form “a(n) [adjective] voice”. It is also possible to enter the name of another player (living or dead) instead of a voice descriptor. In this case, the first player’s voice will sound exactly like the second player’s, which they can use to deceive other players.
Setting a player’s voice will not change their voice descriptor on the spreadsheet, and when player data is reloaded, their voice will be reverted to their original voice descriptor.
Note that unlike other commands which change a player’s characteristics, the player’s voice will not be changed by
being inflicted or cured of a status effect with the concealed behavior attribute. If this command is used to change a
character’s voice, it must be used again to change it back to normal. It can be reset to their original voice descriptor
by specifying the player without providing a voice descriptor.
startgame
Starts a game.
Aliases
.startgame .start
Examples
.startgame 24h
.start 1h
.startgame 30m
.start 0.25m
Details
Starts a new game with a timed delay. You must specify an amount of time as a number followed by a unit, either hours
(h) or minutes (m). During this time, server members with the Eligible role will be able to voluntarily add
themselves to the game as players using the play command in the general channel. If debug mode is on, they must have
the Tester role, and send the command in the testing channel. When this occurs, they will be given the Player role, and
they will be added to the game’s data as players with default player data as defined in the Player Defaults section
of your .env file.
When the timer you set reaches 0, all of the player data will be saved to the Players sheet. After that, you can edit
their data to accurately reflect their characters. If you edit their data before the timer expires, it will be
overwritten. When you are ready to begin the game, use the load command with the all start arguments.
Only use this command if you are not planning to add players to the sheet yourself. Any data already on the Players
and Inventory Items sheets will be overwritten by this command. If you just want an easier way to populate those sheets
without having to fill them out manually, use the addplayer command.
stash
Stores a player’s inventory item inside another inventory item.
Aliases
.stash .store .s
Examples
.stash Vivian VIVIANS LAPTOP in VIVIANS SATCHEL
.store Nero's KATANA in KATANA SHEATH
.s Kyra's MASTER KEY in RIGHT POCKET of KYRAS LAB COAT 5
.s Haru WATER BOTTLE in SIDE POUCH of GREEN BACKPACK 1
Details
Moves an item from the given player’s hand into an inventory slot of one of their container items. The held item and container item’s prefab ID or container identifier must be used. If the player stashes a non-discreet item, this will be narrated in the room.
The container item’s identifier must be preceded by its preposition or “in”. If the container item has multiple inventory slots, you can also specify which slot to stash the item in. To do so, enter the ID of the inventory slot followed by “of” before the container’s identifier. If an inventory slot is not specified, the player will stash the item in the container’s first inventory slot. Note that it is not possible to stash an item in an inventory slot if doing so would make it exceed its capacity.
This command supports NPC latching. For more information, see the help details for the latch command.
stats
Lists a given player’s stats.
Aliases
.stats
Examples
.stats Lucia
Details
Lists the given player’s default and current stats, as well as the roll modifiers they have based on each of their current stats, in square brackets. The maximum weight the player can currently carry will be listed, as well as how much weight they are currently carrying. Additionally, the player’s current stamina will be listed as a numerator over their current maximum stamina. This shows how much stamina they have remaining.
status
Inflict, cure, or view status effects on players.
Aliases
.status .inflict .cure
Examples
.status add Ava Huiyu Kyra heated
.inflict Xenia heated
.status add Florian Michio Kanda Jackie asleep
.inflict all deafened
.status remove Flint injured
.cure Elijah injured
.status remove Astrid Kiara drunk
.cure living asleep
.status view Amadeus
.status Mara
Details
This command has three sub-commands:
- add/inflict: Inflicts the specified players with the given status effect. Those players will receive the “Description When Inflicted” message for the specified status effect. If they already have that status effect and there is a status listed in the “When Duplicated” column, they will be cured of the given status effect and inflicted with that instead. If the inflicted status has a timer, the players will be cured and then inflicted with the status effect in the “Develops Into” column when the timer reaches 0, if there is one. If the status effect is fatal, they will simply die when the timer reaches 0 instead.
- remove/cure: Cures the specified players of the given status effect. Those players will receive the “Description When Cured” message for the specified status effect. If there is a status listed in the “When Cured” column, they will then be inflicted with that status effect.
- view/status: Views all of the status effects that one player currently has, along with the time remaining on
each one, if applicable. This sub-command supports NPC latching. For more information, see the help details for the
latchcommand.
If, when using the inflict or cure sub-commands, you enter “living” or all“ instead of providing the names of players, all living players will be inflicted/cured of the given status effect, except for NPCs and players with the Free Movement role.
tag
Adds, removes, or lists a room’s tags.
Aliases
.tag .addtag .removetag .tags
Examples
.tag add Kitchen video surveilled
.tag remove Kitchen audio surveilled
.addtag vault soundproof
.removetag freezer cold
.addtag Command Center video monitoring, audio monitoring
.removetag command-center video monitoring, audio monitoring
.tag list Kitchen
.tags Kitchen
Details
This command has three sub-commands:
- add/addtag: Adds a comma-separated list of tags to the given room. Events that affect rooms with that tag will immediately apply to the given room, and any tags that give a room special behavior will immediately activate those functions. The new tags will be added to the spreadsheet on the next save.
- remove/removetag: Removes a comma-separated list of tags from the given room. Events that affect rooms with that tag will immediately stop applying to the given room, and any tags that give a room special behavior will immediately stop functioning. The tags will be removed from the spreadsheet on the next save.
- list/tags: Displays the list of tags currently applied to the given room.
take
Takes the given item for a player.
Aliases
.take .get .grab .t
Examples
.take Nero BUTCHERS KNIFE
.get Unit_039 FIRST AID KIT
.t Olavi BOTTLE OF MIDAZOLAM from MEDICINE CABINET
.take Sadie TOWEL from BENCHES
.grab Evad HAMMER from TOP RACK OF TOOLBOX 1
.t Vivian CHEST KEY from RIGHT POCKET of VIVIANS SKIRT 4
Details
Takes an item from the room the given player is in and puts it in their inventory. They must have a free hand to take an item. The item’s prefab ID or container identifier must be used. If the player takes a non-discreet item, this will be narrated in the room.
You can specify a container to take the item from. To do so, enter “from” after the item’s identifier, followed by the container’s name. If the container is a room item, its prefab ID or container identifier must be used. If the container item has multiple inventory slots, you can also specify which slot to take the item from. To do so, enter the ID of the inventory slot followed by “of” before the container’s identifier.
This command supports NPC latching. For more information, see the help details for the latch command.
testspeeds
Checks the move times between each exit.
Aliases
.testspeeds
Examples
.testspeeds players
.testspeeds stats
Details
Calculates the amount of time it takes to move between every exit in the game. Sends the results as a text file to the command channel. An argument must be provided. If the “players” argument is given, then the move times will be calculated for each player in the game. Note that the weight of any items the players are carrying will affect their calculated speed. If the “stats” argument is given, then the move times will be calculated for hypothetical players with speed from 1-10.
text
Sends a text message from an NPC to a player.
Aliases
.text
Examples
.text Amy Florian I work at the bar.
.text Amy Florian Here's a picture of me at work. (attached image)
.text ??? Sadie This is a message about your car's extended warranty.
.text ??? Lisa (attached image)
Details
Sends a text message from the given NPC to a player. If an image is attached, it will be sent as well. It is possible to
send a text message to any player, even those that don’t have a status effect with the receive text
behavior attribute.
This command supports NPC latching. For more information, see the help details for the latch command. However, keep in
mind that if you send a text with an attached image in the NPC’s room channel, the message will be deleted, and the
attachment may not send properly.
uncraft
Uncrafts an item for a player.
Aliases
.uncraft .dismantle .disassemble .uc
Examples
.uncraft Olavi SHOVEL
.dismantle Avani ASSEMBLED CROSSBOW
.disassemble Juno LOADED PISTOL
.uc Ray RING STAND WITH SUPPORT RING
Details
Separates an item in one of the given player’s hands into its component parts. This reverses the process of a crafting recipe, using the product of the recipe as an ingredient, and creating its ingredients as products. This will produce two items, so they will need a free hand in order for this command to be usable. If there is no crafting recipe that produces the given item which allows it to be uncrafted again, this command cannot be used.
This command supports NPC latching. For more information, see the help details for the latch command.
undress
Unequips and drops all items for a player.
Aliases
.undress
Examples
.undress Haru
.undress Aisha LOCKER 1
.undress Astrid LAUNDRY BASKET 17
.undress Xenia MAIN POCKET of XENIAS BACKPACK
Details
Unequips all of the player’s equipped items and drops them in the room they’re currently in. They will undress
completely, including any items in their hands. However, any items whose prefab is not equippable will not be removed
with this command. They can be forcibly removed with the unequip command. When the player undresses, it will narrated
in the room.
A container to drop the items into can be specified. To do so, enter the container’s name. No preposition is necessary.
If the container is a room item, its prefab ID or container identifier must be used. If you don’t specify a container,
they will leave the items on the DEFAULT_DROP_FIXTURE defined in the game’s settings.
If the container has multiple inventory slots, you can also specify which slot to put the items in. To do this, enter the ID of the inventory slot followed by “of” before the container’s identifier. If an inventory slot is not specified, the player will put the items in the container’s first inventory slot. However, they will not be able to undress into an inventory slot if the combined size of their items would overfill it.
This command supports NPC latching. For more information, see the help details for the latch command.
unequip
Unequips an item for a player.
Aliases
.unequip .remove .u
Examples
.unequip Kyra's PLAGUE DOCTOR MASK
.remove Lain WHITE PARKA
.u Dexter KNIT WOOL SWEATER from SHIRT
Details
Unequips an item from one of the given player’s equipment slots. The item will be placed in their hand, so they must have a free hand. When an item is unequipped, it will be narrated in the room, regardless of whether it is discreet or not. If the item’s prefab has any unequipped commands, they will be executed when it is unequipped.
You can unequip any item with this command, even if its prefab is not equippable. You can also specify which equipment slot to unequip the item from. To do so, enter “from” after the prefab ID or container identifier of the item, followed by the ID of the equipment slot.
This command supports NPC latching. For more information, see the help details for the latch command.
unstash
Moves an inventory item into a player’s hand.
Aliases
.unstash .retrieve .r
Examples
.unstash Vivian's VIVIANS LAPTOP
.retrieve Nero KATANA from KATANA SHEATH
.r Kyra's MASTER KEY from RIGHT POCKET of KYRAS LAB COAT 5
.r Haru WATER BOTTLE from SIDE POUCH of GREEN BACKPACK 1
Details
Moves an inventory item from a container item in the given player’s inventory into their hand. They must have a free hand to unstash an item. The item’s prefab ID or container identifier must be used. If the player unstashes a non-discreet item, this will be narrated in the room.
It is possible to specify a container to unstash an item from. To do so, enter “from” after the item’s identifier, followed by the container item’s prefab ID or container identifier. If the container item has multiple inventory slots, you can also specify which slot to unstash the item from. To do so, enter the ID of the inventory slot followed by “of” before the container’s identifier.
This command supports NPC latching. For more information, see the help details for the latch command.
use
Uses an item in the given player’s inventory.
Aliases
.use
Examples
.use Princeton FIRST AID KIT
.use Michio TOOTHBRUSH WITH TOOTHPASTE
.use Unit_039 ADHESIVE BANDAGE Huiyu "It applies an ADHESIVE BANDAGE over the wound, to prevent it from becoming infected again."
.use Kanda's SYRINGE OF ESTRADIOL on Florian "Count Kanda quickly pushes the needle the rest of the way, injecting all of the fluid into Florian's body."
Details
Uses an item in one of the given player’s hands. You can specify a second player for the first player to use the item on. Both players must be in the same room. If no second player is given, the first player will use the item on themself.
When an item is used, it will inflict or cure the targeted player of any status effects listed under the “Gives Status Effect(s)” and “Cures Status Effect(s)” columns for its prefab. If it has a limited number of uses, its uses will be decremented by 1. If it reaches 0, the item will transform into its next stage prefab, or be destroyed if it doesn’t have one.
When a player uses an item, a narration will be sent in the room. It is possible to supply a custom narration for the item being used. Simply add a string of text surrounded by quotation marks at the end of the command.
Note that you cannot solve puzzles using this command. To do that, use the puzzle command.
This command supports NPC latching. For more information, see the help details for the latch command.
view
View a game entity.
Aliases
.view .v
Examples
.view room 496
.v room chancellors-office
.view exit 497
.v fixture 21
.view prefab 75
.v prefab COMBAT BOOTS
.view recipe 43
.v room item 1173
.view item 692
.v puzzle 81
.view event 16
.v event SUNRISE
.view status effect 92
.v status refreshed
.view player 4
.v player Sid
.view inventory item 70
.v inventoryitem 381
.view gesture 102
.v gesture point at
.view flag 7
.v flag AUTO LIGHTS
Details
View in-game data. You can view any entry on the spreadsheet, but you must specify which kind of data to find, as well as its row number. If the entity has a unique ID, you can also view it using that. You will be shown most of the data visible on the spreadsheet for that entity. To avoid exceeding Discord’s character limit, some fields may be omitted. These can be viewed with the interactables that are sent alongside the result.
To view a game entity that doesn’t have a unique ID with this command, you must know its row number, which can be found
on the spreadsheet. Alternatively, you can obtain it with the find command.
whisper
Initiates a whisper between the given players.
Aliases
.whisper .w
Examples
.whisper Nestor Jun
.w Sadie Elijah Flint
.whisper Amy Asuka Clean it up.
.w Amy Asuka The mess you made. Clean it up now.
Details
Creates a channel for the given players to whisper in. Only the selected players will be able to read messages posted in the new channel, but a narration will be sent in the room indicating that they’ve begun whispering to each other. You can select as many players as you want as long as they’re all in the same room.
When a player in the whisper leaves the room, they will be removed from the channel. If everyone leaves the room, the
whisper channel will be deleted or archived, depending on the AUTO_DELETE_WHISPER_CHANNELS setting in your .env
file.
If one of the players listed is an NPC, any text that remains after the list of players will be sent to the new whisper channel as dialog from that NPC. After the channel has been created, sending the command again with a different string of text at the end will make the NPC whisper that text as dialog in the channel.
This command supports NPC latching. For more information, see the help details for the latch command.
Bot Commands
Bot commands are not usable by any Discord user. These commands are passed into the commandHandler module directly by Alter Ego. Their purpose is to allow greater flexibility in behavior for Prefabs, Events, Puzzles, and Flags. They allow many built-in restrictions placed on Players’ actions to be bypassed.
Bot commands can only be used when a game is in progress. They can only be entered on the spreadsheet. Unlike other commands, bot commands must not start with the command prefix.
Bot commands which act upon Players generally have three different arguments that can be used in place of a Player’s name, but this isn’t always the case.
These arguments are:
player- The command will act on the Player who caused the command to be executed. For Prefabs, this is the Player who equipped/unequipped the Inventory Item. For Puzzles, this is the Player who solved/unsolved the Puzzle.
room- The command will act on all Players in the same Room as the Player who caused the command to be executed. Alternatively, for Events, this is all Players in all Rooms affected by the Event.
all- The command will act on all living Players, except for NPCs and Players with the Free Movement role.
destroy
Destroys an item.
Aliases
destroy ds
Examples
destroy VOLLEYBALL at beach
ds CAN OF GASOLINE on SHELVES at Warehouse
destroy NOTE in LOCKER 1 at Men's Locker Room
ds WRENCH in TOOL BOX 1 at beach-house
destroy WHITE GLOVES in BREAST POCKET of TUXEDO at dressing room
ds all in TRASH CAN at lounge
destroy player BLUE BIRD MUSIC BOX
ds all FACE
destroy room NUMBERED BRACELETds Vivian's VIVIANS LAPTOP in VIVIANS SATCHEL
destroy SHOTPUT BALL in Cassie's MAIN POCKET of LARGE BACKPACK 1
ds all in Hitoshi's HITOSHIS TROUSERS
destroy all in Evad's FRONT POCKET of DENIM OVERALLS 6
Details
Destroys an item in the specified location or in the player’s inventory. The prefab ID or container identifier of the item must be given.
To destroy a room item, the display name or ID of the room it’s in must be given at the end of the command, following “
at“. To destroy an inventory item, the name of the player must be given followed by 's before the item’s identifier.
If, when destroying an inventory item, “player” is supplied instead of a player’s name, then the given item will be destroyed from the inventory of the player who caused this command to be executed. If “room” is supplied instead, then the command will be executed on all players in the room as the initiating player. If “all” is supplied instead, then the command will be executed on all living players, including NPCs and players with the Free Movement role.
It is possible to specify the container from which to destroy the item. To do so, add the container’s preposition or “ in“ after the item’s identifier, followed by the container’s name. If the container is another item, its identifier or prefab ID must be used. The ID of the inventory slot to destroy the item from can also be specified, followed by “of”. If you enter “all” in place of an item’s identifier and specify a container, all items in that container will be destroyed.
It is also possible to destroy an inventory item by specifying only the ID of the equipment slot it’s equipped to instead of the item’s identifier. This will destroy whatever is equipped to that equipment slot.
Note that if you destroy an inventory item, the player will be notified if it is an item they have equipped, and its unequipped commands will be executed. The player will not be notified if it is an item they have stashed.
event
Triggers or ends an event.
Aliases
event trigger end
Examples
event trigger RAIN
event end EXPLOSION
trigger INTRUDER LOOSE ALERT
end BLACKOUT
Details
Triggers or ends the specified event.
If trigger is used, the event must not already be ongoing. Its triggered commands will be executed. If end is used,
the event must be ongoing. Its ended commands will be executed.
Triggered/ended commands will not be executed if this command was called by the triggered/ended commands of another event. They will executed if they were called by the commands of a different type of game entity, however.
exit
Locks or unlocks an exit.
Aliases
exit room lock unlock
Examples
exit lock Carousel DOOR
exit unlock Chancellor's Quarters DOOR
lock warehouse DOOR 3
unlock floor-b1-hall-3 ELEVATOR
Details
Locks or unlocks an exit in the specified room. The corresponding entrance in the room the exit leads to will also be locked/unlocked. When an exit is locked, players will be unable to move through that exit.
fixture
Activates or deactivates a fixture, or sets its recipe tag.
Aliases
fixture object activate deactivate
Examples
fixture activate BLENDER
fixture deactivate MICROWAVE
fixture tag BLENDER puree
activate KEURIG Kyra
deactivate OVEN player
fixture activate FIREPLACE Log Cabin
fixture deactivate FOUNTAIN flower-garden
fixture tag BLENDER puree kitchen
activate FREEZER player "player plugs in the FREEZER."
deactivate WASHER 1 laundry-room "WASHER 1 turns off"
Details
This command has three sub-commands:
- activate: Activates the specified fixture. When a fixture is activated, it will begin processing the recipe with the highest count of ingredients satisfied by the room items contained inside of it. If no recipe is found, it will look for one that it can process every second while it is activated.
- deactivate: Deactivates the specified fixture. It will stop processing and looking for recipes.
- tag: Sets the fixture’s recipe tag. This will immediately stop any ongoing recipe processes. If it is currently activated, it will begin looking for recipes it can process that satisfy the new tag. The spreadsheet will be updated with the new tag on the next save.
Keep in mind that a fixture can only be activated/deactivated if it has a recipe tag. If there is a puzzle whose state
is supposed to match that of the fixture’s, you must use the puzzle command to update it separately.
If there are multiple fixtures with the same name, you can specify the room the fixture is in.
Alternatively, you may specify a player to activate/deactivate the fixture. In this case, only fixtures in the same room as the player can be activated/deactivated. When a player is supplied, a narration will be sent. You may also enter “ player“ instead of directly specifying the name of a player. In this case, the player who caused this command to be executed will be the one made to activate/deactivate the fixture.
It is possible to supply a custom narration for the fixture being activated/deactivated. Simply add a string of text surrounded by quotation marks at the end of the command. This can be done even without supplying a player. If the “ player“ argument is used, the text “player” (case-sensitive) within a custom narration will be replaced with the display name of the player who activates/deactivates the fixture.
It is recommended that you do not add line breaks to cells on the sheet. To add line breaks to the
narration, enter \n. It will be replaced with an actual line break in the sent message.
Likewise, because the normal comma character is used as a delimiter in lists of bot commands, you can use
the full-width comma character instead (,), and it will be replaced with a normal comma in the message.
flag
Set and clear flags.
Aliases
flag setflag clearflag
Examples
flag set COLD SEASON FLAG true
setflag HOT SEASON FLAG False
flag set TV PROGRAMMING 4
setflag INDOOR TEMPERATURE {THERMOSTAT}
flag set TV PROGRAMMING += 1
setflag INDOOR TEMPERATURE -= 4.1
flag set player BALANCE += 150
setflag player BALANCE -= 21.5
flag set SOUP OF THE DAY "French Onion"
setflag BLOOD SPLATTER “player WAS HERE”
flag set PRECIPITATION `findEvent('RAIN').ongoing === true || findEvent('SNOW').ongoing === true`
setflag RANDOM ANIMAL `getRandomString(['dog', 'cat', 'mouse', 'owl', 'bear'])`
flag clear BLOOD SPLATTER
clearflag TV PROGRAMMING
flag clear player DEBT
clearflag player DEBT
Details
Set and clear flags.
-
set: Sets the flag value as the specified input. If the flag does not already exist, then a new one will be created with the specified name. The specified value must be a boolean, number, or string. String values must be surrounded by quotation marks. If a string contains “player”, and the command was executed because of a player’s actions, it will be replaced with their display name. To add or subtract from the flag’s current number value, prefix the number to add or subtract with
+=or-=. If you want to set the flag’s value script, surround your input with`tics`. This script will immediately be evaluated, and the flag’s value will be set accordingly. Whether the flag’s value or value script is set, the flag’s set commands will be executed, unless the flag was set by another flag. -
clear: Clears the flag value. This will replace the flag’s current value with
null. When this is cleared, the flag’s cleared commands will be executed, unless the flag was cleared by another flag.
For both sub-commands, if the command was executed because of a player’s actions, and the ID of the flag contains “ player“ (case-sensitive), “player” will be replaced with the player’s name. If a flag with that ID exists, it will have its value set or cleared accordingly. Otherwise, “player” will be treated as a literal part of the ID.
instantiate
Generates an item.
Aliases
instantiate create generate is gn
Examples
instantiate RAW FISH on FLOOR at Beach
create PICKAXE in LOCKER 1 at mining-hub
generate 3 EMPTY DRAIN CLEANER in CUPBOARDS at Kitchen
instantiate GREEN BOOK in MAIN POCKET of LARGE BACKPACK 1 at dorm-library
is 4 SCREWDRIVER in TOOL BOX at Beach House
gn WET CLAY POT (quality = excellent) on POTTERY WHEEL at Art Studio
instantiate KATANA in player RIGHT HAND
create GORILLA MASK on all FACE
instantiate NECK CLAMP to room NECK
generate VIVIANS LAPTOP in Vivian's VIVIANS SATCHEL
is 2 SHOTPUT BALL in Cassie's MAIN POCKET of LARGE BACKPACK
gn 3 GACHA CAPSULE (color=metal + character=upa) in Asuka's LEFT POCKET of GAMER HOODIE
Details
Generates a room item or inventory item in the specified location. The prefab ID must be used. A quantity can also be set by supplying a number before the prefab ID. If no quantity is given, the item will be instantiated with a quantity of 1.
If the prefab has procedural options, they can be manually selected in parentheses. To do this, write the name of the
procedural tag and the poss tag to select within it, separated by an equal sign (=). Multiple procedural selections
can be made, separated by a plus sign (+).
To instantiate a room item, the display name or ID of the room must be given at the end, following “at”. The container to put it in must also be specified after the prefab’s ID, preceded by the container’s preposition or “in”. If the container is a fixture with a child puzzle, the puzzle will be its container. If the container is another room item, the container’s identifier, prefab ID, or name can be used.
To instantiate an inventory item, the name of the player must be given followed by 's. It is possible to instantiate
an inventory item directly to a player’s equipment slot by specifying the equipment slot’s ID. In this case, the player
will be notified that they equipped the item, and the prefab’s equipped commands will be executed. However, a container
item can be specified instead by entering its preposition or “in” followed by its identifier, prefab ID, or name. The
player will not be notified when the item is instantiated this way.
If, when instantiating an inventory item, “player” is supplied instead of a player’s name, then the prefab will be instantiated in the inventory of the player who caused this command to be executed. If “room” is supplied instead, then the command will executed on all players in the room as the initiating player. If “all” is supplied instead, then the command will be executed on all living players, including NPCs and players with the Free Movement role.
If the container to instantiate the item into is a room item or inventory item, the ID of the inventory slot to instantiate the item into can be specified, followed by “of” before the container’s identifier.
kill
Kills a player.
Aliases
kill die
Examples
kill Platt
die Strickland Wu Obi Katou
kill player
die room
Details
Kills the listed players. Player names must be separated by a space. If, instead of specifying the names of players, you enter “player”, then the player who caused this command to be executed will be killed. If “room” is used instead, then all players in the room with the initiating player will be killed, including NPCs and players with the Free Movement role. However, if the command was issued by an event and the “room” argument is used, all players in all rooms that have the event’s room tag will be killed.
When a player is killed, they are removed from the list of living players and added to the list of dead players. This prevents them from using any player commands, thus making them unable to interact with the game world. When a player dies, they are dead permanently. To bring them back to life, they must be manually edited on the spreadsheet. Only use this command if you are absolutely sure.
Upon death, the player will be removed from whatever room and whisper channels they were in. The player will be notified, and a narration will be sent indicating that they have died. All status effects the player had will be cleared. They will retain any items they had in their inventory, but they will not be accessible in any way. In order to make the player’s corpse inspectable, it must be manually added to the appropriate location as a fixture, and their inventory items must be manually added as room items.
A dead player will retain the Player role. To remove the Player role and give them the Dead role, use the reveal
command.
move
Moves the given player to the specified room.
Aliases
move go enter walk m
Examples
move Flint Chancellor's Office
enter player general-managers-office
go player Dining Hall
move room ultimate-conference-hall
m all Elevator
Details
Forcibly moves the given players to the specified room. When a player is moved, they will be removed from the room channel they were already in and added to the destination room channel. They will move to the given destination immediately, without consuming any stamina, and with no regard for whether the room is adjacent to their current room or the exit leading to it is locked.
You can select multiple players by separating their names with a space. If instead of providing the names of players, you enter “all”, all living players will be moved to the specified room, except for players who are already in that room, NPCs, and players with the Free Movement role. However, if you instead use “player”, the player who caused this command to be executed will be moved to the given destination. If “room” is used instead, then all players in the room with the initiating player will be moved, including NPCs and players with the Free Movement role. However, if the command was issued by an event and the “room” argument is used, all players in all rooms that have the event’s room tag will be moved.
When this command is used to move a player to a room that is not adjacent to their current room, the narration in the destination room will not specify which exit they entered from.
puzzle
Solves or unsolves a puzzle.
Aliases
puzzle solve unsolve attempt
Examples
puzzle solve TERMINAL
puzzle unsolve SEARCH QUERY
solve AISHA PROGRAM Ava
unsolve BURIED TREASURE Jackie
solve USERNAME jl
solve USERNAME doublehelix
puzzle solve CALL BUTTON Floor B2 Hall 1
puzzle unsolve SWITCH dorm-6
solve DRINK IN PROGRESS player "Amy begins preparing a drink for player."
unsolve DRINK IN PROGRESS player "Amy places a glass of TEQUILA SUNRISE on the BAR counter for player."
puzzle attempt COMPARTMENT player
attempt 3D PRINTER rabbit Huiyu
Details
Solves or unsolves a puzzle. You may specify an outcome, if the puzzle has more than one solution. When a puzzle is
solved, it will execute the solved commands for the outcome it was solved with. When a puzzle is unsolved, it will
execute the unsolved commands for the outcome it currently has. If there is a fixture whose state is supposed to match
that of the puzzle’s, you must use the fixture command to update it separately.
If there are multiple puzzles with the same name, you can specify the room the puzzle is in.
Alternatively, you may specify a player to solve/unsolve the puzzle. In this case, only puzzles in the same room as the player can be solved/unsolved. When a player is supplied, a narration will be sent. You may also enter “player” instead of directly specifying the name of a player. In this case, the player who caused this command to be executed will be the one made to solve/unsolve the puzzle.
It is possible to supply a custom narration for the puzzle being solved/unsolved. Simply add a string of text surrounded by quotation marks at the end of the command. This can be done even without supplying a player. If the “player” argument is used, the text “player” (case-sensitive) within a custom narration will be replaced with the display name of the player who solves/unsolves the puzzle.
Additionally, if you specify a player, you can make them attempt the puzzle with the attempt option. This makes it
possible to force the player to fail the puzzle because they didn’t provide a correct solution or they didn’t satisfy
the requirements for the puzzle to be solved/unsolved.
It is recommended that you do not add line breaks to cells on the sheet. To add line breaks to the
narration, enter \n. It will be replaced with an actual line break in the sent message.
Likewise, because the normal comma character is used as a delimiter in lists of bot commands, you can use
the full-width comma character instead (,), and it will be replaced with a normal comma in the message.
say
Sends a message.
Aliases
say
Examples
say Unit_050 Welcome. If you would like to listen to piano music, you may request a song, and I will perform it for you.
say Trash Disposal A strange smell begins emanating from the INCINERATOR.
Details
Sends a message. A room or player must be specified.
If a message is sent to a room, it will be treated as a narration.
If the name of a player is specified and that player is an NPC, the player will speak in the channel of the room they’re in. Their dialog will be treated just like that of any normal player’s. The image URL set in the player’s Discord ID will be used for the player’s avatar. It is not possible to use this command on a non-NPC player.
It is recommended that you do not add line breaks to cells on the sheet. To add line breaks to the command,
enter \n. It will be replaced with an actual line break in the sent message.
Likewise, because the normal comma character is used as a delimiter in lists of bot commands, you can use the
full-width comma character instead (,), and it will be replaced with a normal comma in the message.
set
Sets a fixture, puzzle, or group of room items as accessible or inaccessible.
Aliases
set
Examples
set accessible puzzle ROCK CLIMBING WALL
set inaccessible puzzle LOGIN Infirmary
set accessible fixture BUNSEN BURNER
set inaccessible fixture UNDERBRUSH path-2
set accessible puzzle items LOCK robotics-lab
set inaccessible puzzle items LOOSE CRATE
set accessible fixture items DOLLHOUSE
set inaccessible fixture items TOP OF THE SHELVES Library
Details
Sets a fixture, puzzle, or group of room items as accessible or inaccessible. You have to specify whether to set a fixture or puzzle, even if you want to set a group of room items. When you use the optional “items” argument, it will set all of the items contained in that fixture or puzzle as accessible/inaccessible at once. This will also update the accessibility of all child items contained inside of those room items. It is not possible to set the accessibility of individual room items.
You can also specify a room display name or ID at the end of the command. If you do, only fixtures/puzzles/room items in the room you specify can be set as accessible/inaccessible. This is useful if you have multiple fixtures or puzzles with the same name in different locations.
setdefaultroomicon
Sets the default room icon.
Aliases
setdefaultroomicon
Examples
setdefaultroomicon https://media.discordapp.net/attachments/1290826220367249489/1441259427411001455/sLPkDhP.png
setdefaultroomicon
Details
Sets the icon that will display by default when the given room’s information is sent to a player, if there exists no specific icon for that room. The icon given must be a URL with a .jpg, .jpeg, .png, .gif, .webp, or .avif extension. To reset the default icon, simply do not specify a new icon.
Note that this will not persist across bot reboots. When the bot is rebooted, the default room icon will be reverted to
whatever is set for the DEFAULT_ROOM_ICON_URL setting in your .env file.
setdest
Updates an exit’s destination.
Aliases
setdest
Examples
setdest Truck DOOR Mountain Cave TRUCK
setdest Mountain Entrance TRUCK Mountain Entrance TRUCK
setdest motor-boat PORT docks BOAT
setdest wharf MOTOR BOAT wharf MOTOR BOAT
Details
Replaces the destination for the specified room’s exit. Given the following initial room setup:
| Room ID | Exits | Leads To | From |
|---|---|---|---|
| room-1 | EXIT A | room-2 | EXIT B |
| room-2 | EXIT B | room-1 | EXIT A |
| EXIT C | room-3 | EXIT D | |
| room-3 | EXIT D | room-2 | EXIT C |
If the destination for room-1’s EXIT A is set to room-3’s EXIT D, players passing through EXIT A would emerge from EXIT D from that point onward. The Rooms sheet will be updated to reflect the updated destination, like so:
| Room ID | Exits | Leads To | From |
|---|---|---|---|
| room-1 | EXIT A | room-3 | EXIT D <- updated |
| room-2 | EXIT B | room-1 | EXIT A |
| EXIT C | room-3 | EXIT D | |
| room-3 | EXIT D | room-1 | EXIT A <- updated |
Note that this will leave room-2’s EXIT B and EXIT C without exits that lead back to them, which will result in errors next time rooms are loaded. To prevent this, this command should be used sparingly, and all affected exits should have their destinations reassigned.
setdisplayicon
Sets a player’s display icon.
Aliases
setdisplayicon sdi
Examples
setdisplayicon kyra https://cdn.discordapp.com/attachments/697623260736651335/912103115241697301/mm.png
setdisplayicon player https://cdn.discordapp.com/attachments/697623260736651335/911381958553128960/questionmark.png
setdisplayicon player
Details
Sets the icon that will appear as the given player’s avatar when their communications are mirrored as webhook messages.
Webhook messages are primarily sent in spectate channels to reflect a player’s dialog, narrations, and monologs.
However, webhook messages are also sent in room and whisper channels when a player uses the say, gesture, and
narrate commands. Because NPCs don’t have Discord accounts, all of their communications are sent as webhook
messages.
To set a player’s display icon, you must provide an image URL with an extension of .jpg, .jpeg, .png, .webp, or .avif. To reset a player’s display icon to their default display icon, simply specify the player without providing an image URL. If you enter “player” instead of a player’s name, then the player who caused this command to be executed will have their display icon set.
When player data is reloaded, all players will have their display icon reverted to their default display icon. For standard players, this is their server avatar, or their account avatar if they don’t have one set. For NPCs, this is the display icon given for them on the sheet in lieu of a Discord user ID.
Note that if the player is inflicted with a status effect with the concealed behavior attribute, their display icon
will be updated to the image URL set in the DEFAULT_CONCEALED_ICON_URL setting in your .env file, thus overwriting
one that was set manually. However, this command can be used to update their display icon again afterwards. When the
status is cured, it will be reset to their default display icon.
This command will not change the player’s avatar when they send messages to room channels normally.
setdisplayname
Sets a player’s display name.
Aliases
setdisplayname sdn
Examples
setdisplayname Sadie Zinnia
sdn player an individual wearing a PLAGUE DOCTOR MASK
setdisplayname player
sdn player
Details
Sets the name that will be used to refer to a player in narrations in lieu of their actual name. It will also be set as
their username when their communications are reflected with webhook messages. Webhook messages are primarily sent in
spectate channels to reflect a player’s dialog, narrations, and monologs. However, webhook messages are also sent in
room and whisper channels when a player uses the say, gesture, and narrate commands. Because NPCs don’t have
Discord accounts, all of their communications are sent as webhook messages.
To set a player’s display name, enter their actual name, followed by the new display name. Display names can contain spaces, but they have a maximum length of 32 characters. If the display name does not begin with a proper noun, the first letter should not be capitalized. To reset a player’s display name to their actual name, simply specify the player without providing a display name. If you enter “player” instead of a player’s name, then the player who caused this command to be executed will have their display name set.
Setting a player’s display name will not change their name on the spreadsheet, and when player data is reloaded, their display name will be reverted to their actual name.
Note that if the player is inflicted with a status effect with the concealed behavior attribute, their display name
will be updated, thus overwriting one that was set manually. However, this command can be used to update their display
name again afterwards. When the status is cured, their display name will be reset.
This command will not change the player’s nickname in the server.
setpos
Sets a player’s position.
Aliases
setpos
Examples
setpos player 200 5 350
setpos room 400 -10 420
setpos vivian x 350
setpos player y 10
setpos all z 250
Details
Sets the specified player’s position. If the “player” argument is used in place of a name, then the player who caused the command to be executed will have their position updated. If the “room” argument is used instead, then all players in the same room as the player who caused the command to be executed will have their positions updated. Lastly, if the “ all“ argument is used, then all players will have their positions updated, except for NPCs and players with the Free Movement role. You can set individual coordinates with the “x”, “y”, or “z” arguments and the value to set it to. Otherwise, a space-separated list of coordinates in the order x y z must be given.
setpronouns
Sets a player’s pronouns.
Aliases
setpronouns
Examples
setpronouns Lain female
setpronouns Amadeus neutral
setpronouns Platt male
setpronouns Unit_050 it\it\its\its\itself\false
setpronouns Asuka she\it\her\its\herself\false
setpronouns Hollow ey\em\eir\eirs\emself\true
setpronouns Aeries xey\xem\xeir\xeirs\xemself\true
setpronouns player female
setpronouns player neutral
setpronouns player male
setpronouns player ey\em\eir\eirs\emself\true
setpronouns player
Details
Sets the pronouns that will be used in the given player’s description and other places where pronouns are used. This will not change their pronouns on the spreadsheet, and when player data is reloaded, their pronouns will be reverted to their original pronouns.
To set a player’s pronouns, enter their name, followed by a set of pronouns. If you enter “player” instead of a player’s
name, then the player who caused this command to be executed will have their pronouns set.
Pronoun sets must be given in the form:
subjective\objective\dependent possessive\independent possessive\reflexive\plural.
Pay close attention. Because bot command sets are separated by a forward slash (/), you must use a backward
slash (\) to separate pronouns in a pronoun set. However, you can also use shorthand for the most common pronoun sets:
- “female” (
she\her\her\hers\herself\false), - “male” (
he\him\his\his\himself\false), and - “neutral” (
they\them\their\theirs\themself\true).
Note that if the player is inflicted with a status effect with the concealed behavior attribute, their pronouns will
be set to “neutral”, thus overwriting any that were set manually. However, this command can be used to update their
pronouns again afterwards. When the status is cured, their pronouns will be reset.
setroomicon
Sets a room’s display icon.
Aliases
setroomicon
Examples
setroomicon Living Room https://media.discordapp.net/attachments/1290826220367249489/1441259427411001455/sLPkDhP.png
setroomicon kitchen
Details
Sets the icon that will display when the given room’s information is sent to a player. This will override whatever is
set as the DEFAULT_ROOM_ICON_URL setting in your .env file, but only for the given room. The icon given must be a
URL with a .jpg, .jpeg, .png, .gif, .webp, or .avif extension. To reset a room’s icon, simply do not specify a new icon.
When this command is used, the new icon will be saved to the sheet in place of the old one.
setvoice
Sets a player’s voice.
Aliases
setvoice
Examples
setvoice player a deep modulated voice
setvoice player a high digitized voice
setvoice Persephone multiple overlapping voices
setvoice Ghost a disembodied voice
setvoice Typhos Diego
setvoice player Haru
setvoice player
Details
Sets a player’s voice descriptor that will be used when the player’s dialog is heard by someone who can’t see their face.
To set a player’s voice, enter their name, followed by a voice descriptor. It is assumed that voice descriptors will be written in the form “a(n) [adjective] voice”. It is also possible to enter the name of another player (living or dead) instead of a voice descriptor. In this case, the first player’s voice will sound exactly like the second player’s, which they can use to deceive other players. If you enter “player” instead of a player’s name, then the player who caused this command to be executed will have their voice set.
Setting a player’s voice will not change their voice descriptor on the spreadsheet, and when player data is reloaded, their voice will be reverted to their original voice descriptor.
Note that unlike other commands which change a player’s characteristics, the player’s voice will not be changed by
being inflicted or cured of a status effect with the concealed behavior attribute. If this command is used to change a
character’s voice, it must be used again to change it back to normal. It can be reset to their original voice descriptor
by specifying the player without providing a voice descriptor.
Because the normal comma character is used as a delimiter in lists of bot commands, you cannot enter a
comma in a voice string with this command. Instead, use the full-width comma character (,).
It will be replaced with a normal comma in the voice string.
status
Inflict or cure status effects on a player.
Aliases
status inflict cure
Examples
status add player heated
status add room safe
inflict all deafened
inflict Diego heated
status remove player injured
status remove room restricted
cure Flint injured
cure all deafened
Details
This command has two sub-commands:
- add/inflict: Inflicts the specified player with the given status effect. The player will receive the “ Description When Inflicted“ message for the specified status effect. If they already have that status effect and there is a status listed in the “When Duplicated” column, they will be cured of the given status effect and inflicted with that instead. If the inflicted status has a timer, the player will be cured and then inflicted with the status effect in the “Develops Into” column when the timer reaches 0, if there is one. If the status effect is fatal, they will simply die when the timer reaches 0 instead.
- remove/cure: Cures the specified player of the given status effect. The player will receive the “Description When Cured” message for the specified status effect. If there is a status listed in the “When Cured” column, they will then be inflicted with that status effect.
If instead of providing the name of a player, you enter “all” or “living”, all living players will be inflicted/cured of the given status effect, except for NPCs and players with the Free Movement role. However, if you instead use “player”, the player who caused this command to be executed will be inflicted/cured. If “room” is used instead, then all players in the room with the initiating player will be inflicted/cured, including NPCs and players with the Free Movement role.
tag
Adds or removes a room’s tags.
Aliases
tag addtag removetag
Examples
tag add Kitchen video surveilled
tag remove Kitchen audio surveilled
addtag vault soundproof
removetag freezer cold
Details
This command has two sub-commands:
- add/addtag: Adds a tag to the given room. Events that affect rooms with that tag will immediately apply to the given room, and any tag that gives a room special behavior will immediately activate those functions. The new tag will be added to the spreadsheet on the next save.
- remove/removetag: Removes a tag from the given room. Events that affect rooms with that tag will immediately stop applying to the given room, and any tag that gives a room special behavior will immediately stop functioning. The tags will be removed from the spreadsheet on the next save.
Note that unlike the moderator version of this command, you cannot add/remove multiple tags at once.
wait
Waits a set number of seconds.
Aliases
wait
Examples
wait 5
wait 60
wait 300
Description
Not a true command, but a pseudo-command. When this command is used in a list of commands, Alter Ego will wait for the given number of seconds before executing the next command.
Interactables
The primary way of interacting with Alter Ego is via commands. However, Interactables provide an alternative way of doing so that requires less input. Their main purpose is to provide shortcuts to many of the most commonly-performed Actions in Alter Ego.
Interactables make use of Discord’s Interactive Components: Action Rows. Alter Ego also has limited support for Modals.
This article will provide a general overview of what Interactables are, how they’re created, and how they’re used to facilitate gameplay.
Note
“Interactable” is a term referring to Alter Ego’s implementation of Discord’s Message Components that emit Interactions. The term “Interactable” is not used by Discord.
The Interactable Class
Under the hood, all Interactables derive from an abstract base class named Interactable. It has the following attributes:
Type
- Class attribute: Enum (number)
this.type
This is the type of Interactable being created. It can be one of the following:
BUTTONSTRING_SELECT_MENUSTRING_SELECT_MENU_OPTIONMODALTEXT_INPUT
Custom ID
- Class attribute: String
this.customId
This is an ID unique to the Interactable within a single message. Its purpose is to allow the
interaction handler to identify which Interactable was used, and to encode the information
it needs to execute the right behavior for the Interactable. For more information, see Discord’s documentation on the
custom_id field.
Priority
- Class attribute: Number
this.priority
This is a number which determines how high up an Interactable will appear in a list of Action Rows. The lower this value, the higher priority the Interactable has.
Respond With Modal
- Class attribute: Boolean
this.respondWithModal
This Boolean value indicates whether this Interactable will respond with a Modal Interactable when it is selected.
Action Directive
The Action Directive is the cornerstone of Alter Ego’s system of Interactables. It allows Discord’s Components to encode much more information than they were originally intended to, thus simplifying the process of performing Actions.
An Action Directive is constructed with a specific type of Action, a Player to perform it, and the arguments that will be needed to perform it.
After an Action Directive is constructed, its custom ID is generated by encoding its arguments, and the ID of the user it is being created for, in a hash function. This allows a unique custom ID to be generated for each Interactable that encodes all of the information required to perform an Action for a given user without exceeding Discord’s custom ID character limit of 100.
Once its custom ID has been generated, the Action Directive serves as a directive to perform an Action with those specific parameters, for that specific user.
Interactable Manager
Alter Ego has an Interactable Manager class that allows it to create and manage Interactables. An overview of how it works will be provided here.
Create Action Interactables Methods
The Interactable Manager has a number of public methods to create Interactables to perform Actions for a given Player and user. Which Actions have support for Interactables is detailed on the Action article.
All of these methods can generate multiple Interactables. Most of them can return either an array of Buttons or a String Select Menu based on how many Interactables were generated. For these methods, String Select Menus are typically the secondary choice, in case too many Interactables are to be generated, or if a more detailed description needs to be shown. However, some methods can only generate Buttons, and some can only generate String Select Menus.
Most of these public methods perform some validation to determine which Interactables to create. For example, if a Player’s held item is too large to fit in a given Inventory Slot, the method to create Stash Action Interactables will not generate an Interactable to stash that specific Inventory Item in that specific Inventory Slot. This built-in validation makes it relatively easy to insert Interactables in messages where they might be desired.
A small number of these methods can only generate a Modal—these are a last resort, in case it is impossible to perform an Action using only a Button or a String Select Menu, and they are only ever generated as a response to an Interaction with a different Interactable. Modals are reserved for open-ended Interactions where the user can enter any text they desire, like so:
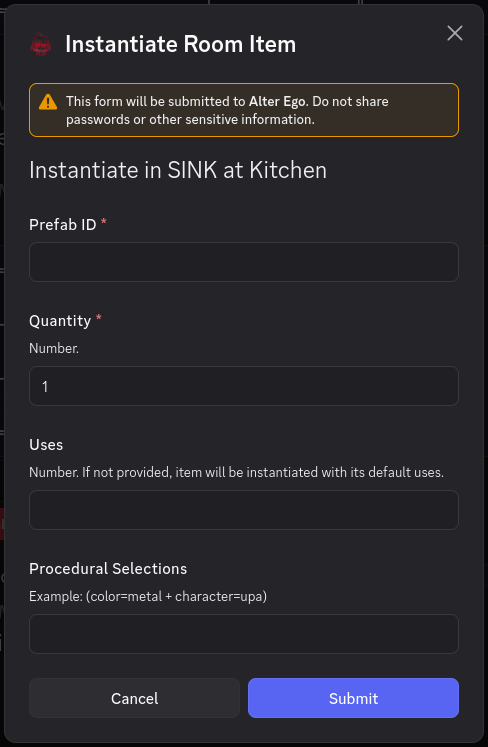
When an Interactable is created, what’s really happening is that an Action Directive is created for the Action to be performed. The arguments required to perform the Action are converted into strings that can later be used to find the Game Entities needed to perform the Action, and an Action Directive is created with those arguments. Then, for each Action Directive that was created, an Interactable is created with that Action Directive’s custom ID and the Action Directive itself, and the array of all created Interactables is returned, so that they can be inserted into a message to be sent to the user.
The Interactable Cache
When an Interactable is created, it is added to the Interactable Manager’s Interactable cache. This is a Collection where the key is the Interactable’s custom ID, and the value is the Interactable itself.
The cache has a size limit of 500. If the size of the cache exceeds this limit, the oldest Interactable is removed to make space for the new one.
If an Interactable with the same custom ID as the one being added is already in the cache, it is deleted and replaced with the new one. Since Interactables can only have the same custom ID if they have the exact same arguments, no information is lost when this occurs; this effectively “refreshes” its lifetime, making it the most recently-added Interactable.
The Interactable Message Cache
In addition to a cache of Interactables, the Interactable Manager also has a cache of Interactable messages: messages which contain Interactable Components. This is also a Collection. When a message with Interactables is sent, the ID of the channel the message was sent to, as well as its message ID, are used as the key, and added to the message cache. The value of each entry is an array of the custom IDs of all Interactables in the message.
This cache has two limits. The first is that it can only contain up to 50 messages. If the size of the cache exceeds this limit, the message containing all of the Interactables is edited to remove its Action Row Components, the message is removed from the message cache, and the Interactables themselves are removed from the Interactable Cache. The second limit is that Interactable messages are valid for up to 5 minutes. If 5 minutes have passed since the message was added to the cache and it hasn’t already been removed due to exceeding its size limit, it will be removed the same way as if the size limit was exceeded.
When an Interactable message is removed from the cache, it is no longer possible to use any of the Interactables that were sent with the message. Even if Interactables with the same custom IDs still exist in the Interactable cache, they must be attached to a different message. The message that was originally added to the cache no longer has any Interactables to interact with.
Interaction Handler
In addition to the Interactable Manager, Alter Ego also has an Interaction Handler class that allows it to respond to Interaction events.
The only Interactions Alter Ego is programmed to respond to are when a user presses a Button, selects an option from a String Select Menu, or presses the Submit button in a Modal. When one of these events occur, the Interaction Handler retrieves the user who performed the Interaction. If the user isn’t a known Moderator or Player, it ignores the Interaction. If the user is valid, it retrieves the custom ID of the Interaction, and then processes it.
First, the Interaction Handler gets the Interactable corresponding with the custom ID from the Interactable Manager’s Interactable cache. If no such Interactable is found, Alter Ego replies to the Interaction with an error message.
If an Interactable is found, and it has an Action Directive, the corresponding Action is created with the Action
Directive’s Player, their location, and the user of the Interaction. If the user
is a Moderator, the Action is considered to have been forced. Note that an Action
born from an Action Directive will always have an undefined message.
After the Action has been created, the Interaction Handler calls the Action’s parse and validate Interaction arguments functions. The purpose of these functions is to take the arguments of the Action Directive and reconstruct the arguments needed to call the Action’s perform function. How these arguments are parsed and validated depends on the Action being performed, but in general:
- Parsing the arguments means that the string arguments of the Action Directive are used to find any Game Entities that are needed to perform the Action with the Game Entity Finder.
- Validating the arguments means ensuring that the Game Entities that were found still actually exist and can be interacted with, and that the Player can actually perform the Action—the state of the game may have changed significantly between when the Interactables were created and when the Interaction occurred, so the Player may not be able to perform it anymore.
If the arguments cannot successfully be parsed, or the parsed arguments are invalid, Alter Ego will reply to the Interaction with an error message, and no Action will be performed.
However, if the Action Directive’s arguments were successfully parsed and validated, the validate function will always return the arguments needed to call the perform function for the given Action. When this occurs, the Action is performed with these arguments, and the Interaction is considered complete. If the Action has a success message, Alter Ego will reply to the Interaction with it.
Data Structures
All game data is stored on a Google Sheet. There are a number of reasons for this:
- It allows multiple moderators to collaborate and develop the map together.
- It requires the data be organized in a consistent way which is easily readable by a bot such as Alter Ego.
- All edits to the spreadsheet are automatically saved, and the moderator(s) can revert the spreadsheet to any previous state they please if need be.
- Data entered on the spreadsheet is persistent. If Alter Ego crashes, is restarted, or otherwise shuts off, all of the game data will be preserved in its most recent state.
Alter Ego uses the Google Sheets API to load the data from the spreadsheet, as well as make edits to the spreadsheet. The data for each set of data structures in the map is kept in a separate sheet. This section lists all of the persistent game entities that can be found on the sheet, as well as some of the transient data structures that are not saved to the spreadsheet.
Creation
In order to create a workable spreadsheet, the latest version template should be duplicated into a moderator’s Google Drive by accessing this link, opening the File menu, and selecting Make a copy. At this point, they will have a copy that they can edit as they please.
Persistent Game Entity
Persistent game entities are stored both on the sheet and in Alter Ego’s internal game state. When the game is loaded, the data from the sheet is downloaded and the internal game state is updated to reflect the sheet. Conversely, when the game is saved, the state of all persistent game entities is saved to the sheet.
Even though persistent game entities and the sheet are synced, there are attributes that only exist in the internal game data, and are derived from the data on the sheet. These attributes will not have a sheet column that it is associated with and instead will only have a class attribute.
Room
A Room is a data structure used by Alter Ego. It represents a room that Players can move to.
Attributes
Despite being the basis of the game, Rooms have relatively few attributes. Note that if an attribute is internal, that means it only exists within the Room class. Internal attributes will be given in the “Class attribute” bullet point, preceded by their data type. If an attribute is external, it only exists on the spreadsheet. External attributes will be given in the “Spreadsheet label” bullet point.
Display Name
- Spreadsheet label: Room Display Name
- Class attribute: String
this.displayName
This is the name of the Room. This can contain any string of characters. This is how the Room will be referred to in most contexts. It will also appear in the heading component when the Room description is is sent to a Player.
ID
- Class attribute: String
this.id
This is an internal attribute which serves as the unique identifier of the Room. This is automatically generated from
the Room’s display name. It consists of the display name converted to all lowercase with special characters removed,
and all spaces converted to hyphens (-). This is to make it align as closely as possible with the characters that
are permitted in the names of Discord text channels. It should align perfectly with the
name of the Room’s corresponding channel, but as Discord does not have any documentation about exactly what characters
are permitted in the name of a text channel, this cannot be 100% guaranteed.
Internally, this is used as the actual ID of the Room. That is, when a Room is looked up, it is by ID, not display name.
Name
Warning
This attribute is deprecated and will be removed in a future release.
Use
this.idfor identification instead, orthis.displayNamefor display purposes.
- Class attribute: String
this.name
This internal attribute is a copy of the Room’s ID. It was how Rooms were identified prior to Alter Ego version 2.0. This attribute will be removed in the future.
Channel
- Class attribute: TextChannel
this.channel
This is an internal attribute. When the Room data is loaded, Alter Ego will attempt to find the channel whose name matches the ID of the Room. By making the channel a persistent internal attribute, Alter Ego can perform many operations more easily, such as adding a Player to the Room’s channel.
It should be noted that even if a Room’s channel is not part of a room category, Players will still be added to the channel when moving to its associated Room and Narrations will still be sent to the channel, but commands and dialog sent to that channel will not register as commands and dialog. When this occurs, Players and Moderators will be unable to issue commands in the channel, and Player dialog and Moderator Narrations will not be mirrored in spectate channels.
Tags
This is a comma-separated list of keywords or phrases assigned to a Room that allows that Room, and others with shared tags, to be affected by Events. There are no rules for how tags must be named, and there is no theoretical limit on the number of tags a single Room can have.
Some tags have predefined behavior. Here, each predefined tag will be listed, and its behavior will be detailed:
soundproof
- All dialog spoken inside the Room will not be narrated in adjacent Rooms, even if it is shouted or if Players in
adjacent Rooms have the
acute hearingbehavior attribute. - Players in the Room will not hear dialog from adjacent Rooms, regardless of the same circumstances.
audio surveilled
- All non-Whispered dialog sent to the Room will be narrated in all Rooms with the
audio monitoringtag with an indication of which Room the dialog originated in. - While there is no limit to how many Rooms can have this tag, applying it to too many could negatively affect Alter Ego’s performance.
audio monitoring
- All non-Whispered dialog sent to any Room with the
audio surveilledtag will be sent to the Room with an indication of which Room the dialog originated in.- Example:
[Break Room] Someone with a crisp voice says "Are you listening to me?"
- Example:
- All shouted dialog sent to Rooms adjacent to a Room with the
audio surveilledtag will be narrated in the Room with theaudio monitoringtag, as long as there is at least one Player in the Room with theaudio surveilledtag.- Example:
[Break Room] Someone in a nearby room with an obnoxious voice shouts "SOMEONE HELP!"
- Example:
video surveilled
- All Narrations sent to the Room will be narrated in all Rooms with the
video monitoringtag with an indication of which Room the Narration originated in. - While there is no limit to how many Rooms can have this tag, applying it to too many could negatively affect Alter Ego’s performance.
video monitoring
- All Narrations sent to any Room with the
video surveilledtag will be sent to the Room with an indication of which Room the Narration originated in.- Example:
[Break Room] Kyra begins inspecting the DESK.
- Example:
- If the Room also has the
audio monitoringtag, then all non-Whispered dialog spoken in any Room with thevideo surveilledandaudio surveilledtags will appear as a more natural dialog message, with the speaker’s display name and display icon alongside the display name of the Room the dialog originated in.
secret
- If the Room also has the
audio surveilledorvideo surveilledtag, then its name will be obscured when dialog and Narrations are transmitted to Rooms with theaudio monitoringorvideo monitoringtags.- Example:
[Intercom] Someone with a crisp voice says "Are you listening to me?" - Example:
[Surveillance feed] Kyra begins inspecting the DESK.
- Example:
Icon URL
- Spreadsheet label: Icon URL
- Class attribute: String
this.iconURL
This is an optional image URL that will accompany a Room’s description. The URL must end in
.jpg, .jpeg, .png, .gif, .webp, or .avif.
Exits
- Spreadsheet labels: Exit Name, Exit Phrase, Exit Tags, X, Y, Z, Unlocked?, Leads To Room, From Exit, Description When Entering From This Exit
- Class attribute: Collection<String, Exit>
this.exits
This is a collection of all of the Room’s Exits, where the key is the Exit’s name. All Rooms that can be accessed via a given Room’s Exits are considered adjacent to the given Room, meaning a Player can freely travel to them, as long as they are unlocked.
All columns on the Rooms sheet from Exit Name onward belong to Exits, rather than the Rooms themselves. For more information, see the article on Exits.
Exit
Warning
This attribute is deprecated and will be removed in a future release.
Use
this.exitsinstead.
This internal attribute was how Exits were stored prior to Alter Ego 2.0. Now, it is always an empty array. This attribute will be removed in the future.
Room Description
- Class attribute: Description
this.description
This internal attribute is the description of a Room. It will always be the description for the first Exit in the Room. When a Player enters from the first Exit or inspects the Room, they will receive a parsed version of this string. The Player will not be sent the Room’s description by itself. Instead, they will be sent a message comprised of Discord Components containing:
- The display name of the Room.
- The Room’s default description, or the description of the Exit they entered from.
- The Room’s occupants, excluding the Player themself.
- The description of the Room’s default drop Fixture. If the Room doesn’t have one, “There’s nothing of note about the [name of default drop Fixture].” will be sent instead.
- The Room’s icon URL. If the Room does not have one, then the default Room icon URL will be used instead. If no default Room icon URL is set, then Alter Ego will use the server icon instead. If the server icon is not set, then no image will be sent in the Room’s display name component.
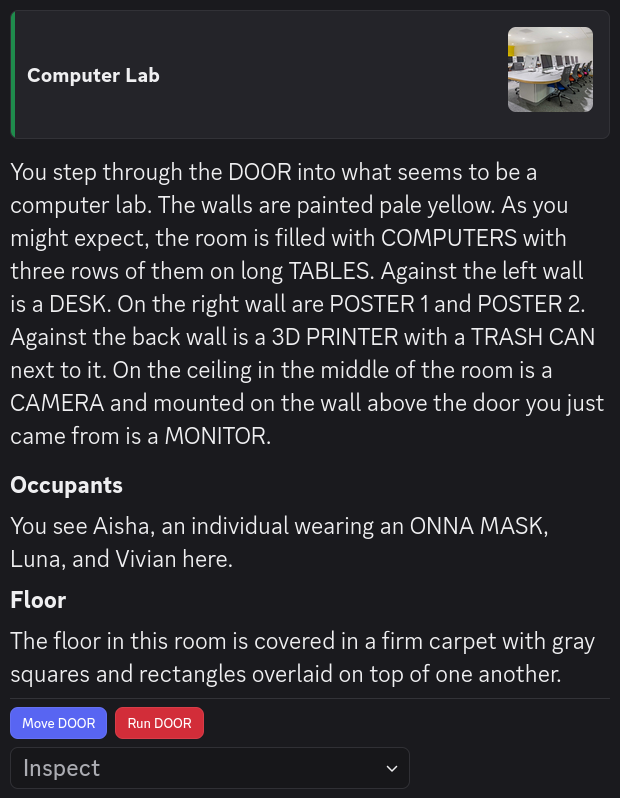
See the article on writing descriptions for more information. Note that because this uses its own custom set of Display Components, it is not possible to manually set the message display type for this Description.
Row
- Class attribute: Number
this.row
This is an internal attribute, but it can also be found on the spreadsheet. This is the row number of the first Exit in a Room. Alter Ego uses this data to determine which row of the Rooms spreadsheet contains the default description for a Room.
Occupants
This is an internal attribute. It is an array of all Players currently in the Room.
Occupants String
- Class attribute: String
this.occupantsString
This is an internal attribute. It is a string listing the display names of all of the Room’s
occupants in alphabetical order. However, any Players with the hidden behavior attribute
are omitted.
Methods
Rooms have a number of functions that can be useful to moderators. This is not an exhaustive list of publicly
accessible methods; only ones that are likely to be useful when writing Flag value scripts, or
if and var
tags in descriptions.
getChannelId
this.getChannelId();
- Purpose: Gets the ID of the channel associated with this room.
- Returns: String
- Parameters: None
generateOccupantsString
this.generateOccupantsString(list?);
- Purpose: Generates a string representing the occupants of the room, sorted alphabetically by display name.
- Returns: String
- Parameters:
generateOccupantsStringExcluding
this.generateOccupantsStringExcluding(player, list?);
- Purpose: Generates a string representing the occupants of the room excluding the given player, sorted alphabetically by display name.
- Returns: String
- Parameters:
getExit
this.getExit(name);
- Purpose: Gets the exit with the given name.
- Returns: Exit
- Parameters:
- String
name- The name of the exit to get.
- String
hasTag
this.hasTag(tag);
isAudioSurveilled
this.isAudioSurveilled();
- Purpose: Returns true if the room has the
audio surveilledtag. - Returns: Boolean
- Parameters: None
isVideoSurveilled
this.isVideoSurveilled();
- Purpose: Returns true if the room has the
video surveilledtag. - Returns: Boolean
- Parameters: None
isAudioMonitoring
this.isAudioMonitoring();
- Purpose: Returns true if the room has the
audio monitoringtag. - Returns: Boolean
- Parameters: None
isVideoMonitoring
this.isVideoMonitoring();
- Purpose: Returns true if the room has the
video monitoringtag. - Returns: Boolean
- Parameters: None
getContainedItems
this.getContainedItems();
containsNoItems
this.containsNoItems();
- Purpose: Returns true if this room contains no items.
- Returns: Boolean
- Parameters: None
containsItem
this.containsItem(identifier);
- Purpose: Returns true if this room contains an item with the given identifier or prefab ID.
- Returns: Boolean
- Parameters:
- String
identifier- The identifier or prefab ID to search for.
- String
getContainedItem
this.getContainedItem(identifier);
- Purpose: Returns the item contained inside of this room with the given identifier or prefab ID. If no such item exists, returns undefined.
- Returns: Room Item
- Parameters:
- String
identifier- The identifier or prefab ID to search for.
- String
Exit
An Exit is a data structure used by Alter Ego. It represents an exit in a Room.
Attributes
Exits are the internal data structure linking Rooms to one another. As such, most of their attributes serve this purpose. Note that if an attribute is internal, that means it only exists within the Exit class. Internal attributes will be given in the “Class attribute” bullet point, preceded by their data type. If an attribute is external, it only exists on the spreadsheet. External attributes will be given in the “Spreadsheet label” bullet point.
Name
- Spreadsheet label: Exit Name
- Class attribute: String
this.name
This is the name of the Exit. All letters should be capitalized, and spaces are allowed. For clarity’s sake, it should usually be mentioned in all descriptions of the Room it belongs to, unless it is supposed to be hidden.
Phrase
- Spreadsheet label: Exit Phrase
- Class attribute: String
this.phrase
This is a natural-sounding phrase to use to refer to the Exit in Narrations. This is used when a Player begins moving toward the Exit, as well as when they exit into or enter from it.
In general, if the name of an Exit ends with a number or is a proper noun, this should be manually set to just be the name of the Exit. Otherwise, Narrations such as “[Player display name] exits into the DOOR 1.” or “[Player display name] enters from the STOKE HALL.” will be sent, which may sound unnatural.
This only contains what is entered on the sheet. To get the the actual phrase that will be used in Narrations,
use the getNamePhrase method.
Tags
This is a comma-separated list of keywords or phrases assigned to the Exit that give it special behavior. This is not to be confused with Room tags.
Currently, the only tag with programmed behavior is not knockable. If an Exit has this tag,
a Player cannot knock on it.
More Exit tags will be added in future releases.
Position
- Class attribute: object
this.pos
This is an internal attribute whose properties are the X, Y, and Z coordinates of the Exit. It has the following structure:
interface Pos {
    x: number;
    y: number;
    z: number;
}
For more information, see the article on Maps.
X
- Spreadsheet label: X
- Class attribute: Number
this.pos.x
This is the X coordinate of the Exit. This corresponds with the X-axis on a 3D grid.
Y
- Spreadsheet label: Y
- Class attribute: Number
this.pos.y
This is the Y coordinate of the Exit. This corresponds with the Y-axis on a 3D grid, which represents vertical height.
Z
- Spreadsheet label: Z
- Class attribute: Number
this.pos.z
This is the Z coordinate of the Exit. This corresponds with the Z-axis on a 3D grid.
Unlocked
- Spreadsheet label: Unlocked?
- Class attribute: Boolean
this.unlocked
This indicates whether the Exit is unlocked or not. If this is true, then Players can travel through
this Exit. If it is false, then the Player will simply be told that the Exit is locked.
Destination Display Name
- Spreadsheet label: Leads To Room
- Class attribute: String
this.destDisplayName
This is the display name of the Room the Exit leads to, as entered on the spreadsheet. This must match the Room’s display name on the spreadsheet exactly.
Destination
- Class attribute: Room
this.dest
This internal attribute contains a reference to the actual Room object that the Exit leads to. When a Player travels through this Exit, their permission to view the channel of their current Room will be revoked and they will then be given permission to view the channel associated with the Exit’s destination.
Link
- Spreadsheet label: From Exit
- Class attribute: String
this.link
This is the name of the Exit in the destination Room that this Exit leads to. That Exit must also have this Exit as its link. That is, Exits must link back to one another in both directions. For example, in a set of two Rooms, each with one Exit only, their Exit tables must look like this:
| Room Display Name | Exit Name | Leads To Room | From Exit |
|---|---|---|---|
| Room 1 | DOOR | Room 2 | EXIT |
| Room 2 | EXIT | Room 1 | DOOR |
Description
- Spreadsheet label: Description When Entering From This Exit
- Class attribute: Description
this.description
This is the description of the Room coming from this Exit. That is, when a Player enters a Room from this Exit, they will receive a parsed version of this string. The Player will not be sent the Exit’s description by itself. Instead, they will be sent a message comprised of Discord Components containing:
- The display name of the Room.
- The description of the Exit they entered from.
- The Room’s occupants, excluding the Player themself.
- The description of the Room’s default drop Fixture. If the Room doesn’t have one, “There’s nothing of note about the [name of default drop Fixture].” will be sent instead.
- The Room’s icon URL. If the Room does not have one, then the default Room icon URL will be used instead. If no default Room icon URL is set, then Alter Ego will use the server icon instead. If the server icon is not set, then no image will be sent in the Room’s display name component.
See the article on writing descriptions for more information. Note that because this uses its own custom set of Display Components, it is not possible to manually set the message display type for this Description.
Row
- Class attribute: Number
this.row
This is an internal attribute, but it can also be found on the spreadsheet. This is the row number of this Exit in a Room.
Methods
Exits have a number of functions that can be useful to moderators. This is not an exhaustive list of publicly
accessible methods; only ones that are likely to be useful when writing Flag value scripts, or
if and var
tags in descriptions.
getNamePhrase
this.getNamePhrase();
- Purpose: Gets a phrase to refer to the exit in narrations.
- Returns: String —
If the exit has a phrase assigned to it, returns that. If not, returns the exit’s name if it ends with a number,
or
the ${this.name}otherwise. - Parameters: None
getDoorPhrase
this.getDoorPhrase();
- Purpose: Gets a phrase to refer to the door in narrations.
- Returns: String —
If the exit’s name phrase ends with a number, includes the word “DOOR”, or has the tag
not knockable, returns the exit’s name phrase by itself. Otherwise, returnsthe door to ${this.getNamePhrase()}. - Parameters: None
hasTag
this.hasTag(tag);
Fixture
Note
These were previously called Objects, but were renamed in Alter Ego 2.0 to avoid confusion with JavaScript’s Object data type.
A Fixture is a data structure used by Alter Ego. It represents a fixed structure within a Room that cannot be taken or moved by a Player. Their primary purpose is to give structure and interactivity to a Room.
Attributes
Fixtures have relatively few attributes. Although their behavior is mostly static, they are capable of quite a few things. Note that if an attribute is internal, that means it only exists within the Fixture class. Internal attributes will be given in the “Class attribute” bullet point, preceded by their data type. If an attribute is external, it only exists on the spreadsheet. External attributes will be given in the “Spreadsheet label” bullet point.
Name
- Spreadsheet label: Fixture Name
- Class attribute: String
this.name
This is the name of the Fixture. All letters should be capitalized, and spaces are allowed. Note that multiple Fixtures can have the same name, so long as they are in different Rooms.
Location Display Name
- Spreadsheet label: Location
- Class attribute: String
this.locationDisplayName
This is the display name of the Room that the Fixture can be found in. This must match the Room’s display name on the spreadsheet exactly, or its ID.
Location
- Class attribute: Room
this.location
This internal attribute is a reference to the actual Room object the Fixture can be found in.
Accessible
- Spreadsheet label: Accessible?
- Class attribute: Boolean
this.accessible
This is a simple Boolean value indicating whether the Fixture can currently be interacted with or not. If this is
true, then players can inspect the Fixture, among other things. If it is false, Alter Ego will act as if the
Fixture doesn’t exist when a Player tries to interact with it in any way.
Child Puzzle Name
- Spreadsheet label: Child Puzzle
- Class attribute: String
this.childPuzzleName
This is the name of a Puzzle that is associated with the Fixture, if any. The child Puzzle must be in the same Room as the Fixture referencing it. If the name of a Puzzle is supplied, then any Room Items contained within the Fixture will technically be contained within the child Puzzle. This allows Room Items to be made inaccessible until the child Puzzle is solved, while also allowing players to take and drop Room Items from/into the Fixture if the child Puzzle is solved. Additionally, when a Fixture containing Room Items is assigned a child Puzzle, the item list must be in the child Puzzle’s already solved description. If no child Puzzle is needed, this cell can simply be left blank on the spreadsheet.
Assigning a child Puzzle to a Fixture is most useful when the Puzzle is intended to contain Room Items. For example,
if there is a Fixture named LOCKER, and it has a child Puzzle named COMBINATION LOCK, all of the Room Items
contained inside of the LOCKER will actually belong to the COMBINATION LOCK, and Players will be able to solve the
COMBINATION LOCK by entering LOCKER instead of the name of the Puzzle itself. This makes it easier to assign unique
names to Puzzles while still making it easy for Players to interact with them.
However, a child Puzzle isn’t always needed, even if there is a Puzzle that should ostensibly be linked. For example,
suppose there is a Fixture named SHOWER which is intended to contain Room Items such as SOAP and SHAMPOO.
It would be beneficial to have a Puzzle in the same location also named SHOWER so that it can use bot commands to
clean a Player who solves it, but if it were a child Puzzle, the Room Items would be listed in its already solved
description, which may not make sense. If, instead of assigning it as a child Puzzle, the Puzzle simply has the same
name as the Fixture, Players will still be able to solve the Puzzle, and Room Items can be listed in the description
of the Fixture itself.
Child Puzzle
This is an internal attribute which simply contains a reference to the actual Puzzle object whose name matches
this.childPuzzleName and whose location is the same as the Fixture. If no child Puzzle name is given, this will be
null instead.
Recipe Tag
- Spreadsheet label: Recipe Tag
- Class attribute: String
this.recipeTag
This a keyword or phrase assigned to a Fixture that allows it to process Recipes that require that tag. A Fixture can only have a single Recipe tag, but it can be changed with the fixture command. There are no rules for how Recipe tags must be named.
Activatable
- Spreadsheet label: Activatable?
- Class attribute: Boolean
this.activatable
This is another Boolean value indicating whether the Fixture can be activated or deactivated by a Player with
the use command. If this is true, then a Player can activate and deactivate the
Fixture at will. If this is false, then its activation state cannot be altered by a Player. Even if the Fixture is
not activatable, it can still be activated and deactivated with the fixture command, and it will still process
Recipes if it is activated.
Activated
- Spreadsheet label: Activated?
- Class attribute: Boolean
this.activated
This is another Boolean value indicating whether the Fixture is currently checking for and processing Recipes. If this
is true, then the Fixture will check every second if it contains the necessary ingredients for any Recipe with a
matching tag. If it does, then the Recipe will be processed and the Recipe’s products will be instantiated in the
Fixture when it is complete. A Fixture can only process one Recipe at a time. If it is found that the Fixture is able
to process multiple Recipes with the ingredients it contains, then it will process whichever Recipe has the highest
number of matched ingredients, and the remaining Room Items will be left untouched. If the Fixture is still able to
process a Recipe with the remaining Room Items, then it will do so upon finishing the first one, as long as it is not
automatically deactivated.
Important
If a Fixture has a child Puzzle, then the ingredients must be contained inside of the child Puzzle, rather than the Fixture itself. Likewise, the products will be instantiated in the child Puzzle.
Automatically Deactivated
- Spreadsheet label: Deactivate Automatically?
- Class attribute: Boolean
this.autoDeactivate
This is another Boolean value indicating whether the Fixture will automatically deactivate after processing a Recipe.
If this is true, then the Fixture will stop checking for and processing Recipes every time it finishes processing
one, even if the Fixture’s activatable attribute is false. Note that if the Fixture is automatically deactivated and
no processable Recipe is found, then it will deactivate after one minute of activation. If this is false, then the
Fixture will continue checking for and processing Recipes after completing each one.
Hiding Spot Capacity
- Spreadsheet label: Hiding Spot Capacity
- Class attribute: Number
this.hidingSpotCapacity
This is a whole number indicating how many Players can hide in this Fixture simultaneously. If this is greater than 0, then that many Players can hide in it, and this value can be bypassed with the use of the hide moderator command. If this is 0, the Fixture cannot be used as a hiding spot at all.
Hiding Spot
- Class attribute: Hiding Spot | null
this.hidingSpot
This internal attribute is a reference to the Hiding Spot object belonging to the Fixture.
If the hiding spot capacity is 0, this is null.
Preposition
- Spreadsheet label: Preposition
- Class attribute: String
this.preposition
This attribute is a string that performs two functions:
- It determines whether or not the Fixture can contain Items. If it is blank, players cannot take Room Items from or drop Room Items into the Fixture. If it is not blank, then they can.
- When a Player drops a non-discreet Room Item into the Fixture, Alter Ego will
narrate them doing so using this preposition. For example, if the player Nero drops a Room Item
named
SWORDinto a Fixture namedCABINETwhose preposition is “in”, Alter Ego will send “Nero puts a SWORD in the CABINET.” toCABINET’s Room channel.
Note that a preposition can be multiple words, but in most cases, it should only be one word. Most commands that take
a Fixture’s preposition expect it to be one word, so its actual preposition would not be usable in commands if it is
more than one word. If multiple words are necessary, care should be taken to ensure that the Narration Alter Ego sends
will make grammatical sense. For example, if in the above example, Nero instead dropped the SWORD into a Fixture
named DESK, a preposition of “on top” would result in the strange sentence “Nero puts a SWORD on top the DESK.”
A preposition of “on top of” or just simply “on” would result in a better sentence.
Description
- Spreadsheet label: Description
- Class attribute: Description
this.description
This is the description of the Fixture. When a Player inspects this Fixture, they will receive a parsed version of this string. See the article on writing descriptions for more information.
Unless it is manually specified, this Description will be sent
using the PLAIN_TEXT message display type.
Row
- Class attribute: Number
this.row
This is an internal attribute, but it can also be found on the spreadsheet. This is the row number of the Fixture.
Process
- Class attribute: object
this.process
This is an internal attribute used to process Recipes. It has the following structure:
interface Process {
    /** The recipe being processed. **/
    recipe: Recipe;
    /** The ingredients used in the recipe. */
    ingredients: Array<CollatedItem<RoomItem>>;
    /** The products created during recipe processing. */
    products: Array<RoomItem>;
    /** How many times the given ingredients satisfy the recipe. Only set right before products are instantiated. */
    satisfactoryProcessCount: number;
    /** The duration of the recipe. */
    duration: Duration;
    /** The timer used to track the duration of the recipe. */
    timer: Timer | null;
}
For more information on the Duration data type, see the documentation for Luxon.
Recipe Interval
This is an internal attribute that allows Fixtures to check for and process Recipes every second. If the Fixture does
not have a Recipe tag, then this will be null.
Methods
Fixtures have a number of functions that can be useful to moderators. This is not an exhaustive list of publicly
accessible methods; only ones that are likely to be useful when writing Flag value scripts, or
if and var
tags in descriptions.
isItemContainer
this.isItemContainer();
- Purpose: Returns true if the fixture is capable of containing items.
- Returns: Boolean
- Parameters: None
canCurrentlyContainItems
this.canCurrentlyContainItems(requireEmptySpace?, bypassLimitations?);
- Purpose: Returns true if the fixture is currently capable of being taken from/dropped into.
- Returns: Boolean
- Parameters:
getContainedItems
this.getContainedItems();
getContainedItemsForItemList
this.getContainedItemsForItemList(itemListName?, player?);
- Purpose: Gets all of the items that should appear in the fixture’s item list.
- Returns: Array<Room Item>
- Parameters:
containsNoItems
this.containsNoItems();
- Purpose: Returns true if this entity contains no items.
- Returns: Boolean
- Parameters: None
containsItem
this.containsItem(identifier);
- Purpose: Returns true if this entity contains an item with the given identifier or prefab ID.
- Returns: Boolean
- Parameters:
- String
identifier- The identifier or prefab ID to search for.
- String
getContainedItem
this.getContainedItem(identifier);
- Purpose: Returns the item contained inside of this container with the given identifier or prefab ID. If no such item exists, returns undefined.
- Returns: Room Item
- Parameters:
- String
identifier- The identifier or prefab ID to search for.
- String
getContainedItemsWeight
this.getContainedItemsWeight();
- Purpose: Gets the combined weight of all the items this entity contains.
- Returns: Number
- Parameters: None
isProcessingItems
this.isProcessingItems();
- Purpose: Returns true if the fixture is activated and deactivates automatically.
- Returns: Boolean
- Parameters: None
getContainingPhrase
this.getContainingPhrase();
- Purpose: Gets the fixture’s name preceded by “the”.
- Returns: String
- Parameters: None
getPreposition
this.getPreposition();
- Purpose: Gets the fixture’s preposition. If no preposition is set, returns “in”.
- Returns: String
- Parameters: None
getIngredientItem
this.getIngredientItem(prefabId);
- Purpose: Gets the actual ingredient item instance that was used as an ingredient in the currently processed recipe. If no such item exists, returns the corresponding ingredient prefab of the currently processed recipe. If no recipe is currently being processed, returns undefined.
- Returns: Prefab | Room Item
- Parameters:
- String
prefabId- The prefab ID to search for.
- String
getProductItem
this.getProductItem(prefabId);
- Purpose: Gets the actual product item instance that was instantiated in the currently processed recipe. If no such item exists, returns the corresponding product prefab of the currently processed recipe. If no recipe is currently being processed, returns undefined.
- Returns: Prefab | Room Item
- Parameters:
- String
prefabId- The prefab ID to search for.
- String
Hiding Spot
A Hiding Spot is a data structure used by Alter Ego. It represents a place where Players can hide to evade detection.
It functions somewhat like a Room contained within a single Fixture. It is its own space where Players can speak and interact with each other, albeit in a very limited and temporary manner.
In a Hiding Spot, Players cannot interact with any Fixtures other than the one they are hidden in. They also cannot interact with any Room Items except for those contained inside of the Fixture the Hiding Spot belongs to.
Hiding Spots do not have a dedicated sheet on the spreadsheet. Rather, they are derived from data on the Fixtures sheet. If a Fixture has a hiding spot capacity greater than 0, a Hiding Spot will be created and assigned to it.
Attributes
Hiding Spots have few attributes.
Name
- Class attribute: String
this.name
This is the name of the Hiding Spot. It matches the name of the Fixture it belongs to.
Capacity
- Class attribute: Number
this.capacity
This is the capacity of the Hiding Spot. It represents how many Players can hide in it at once. It is inherited from the hiding spot capacity of the Fixture it belongs to.
Occupants
This is an array of all of the Players currently hidden in this Hiding Spot.
Whisper
This is the Whisper currently associated with this Hiding Spot. All Hiding Spots have a Whisper when they are occupied. This is so that their occupants can whisper to each other without being heard in the surrounding Room.
Whenever a Player who doesn’t have the no sight behavior attribute is added to the Hiding Spot,
the current Whisper is deleted, and a new one is created with the new list of occupants.
When the Whisper is deleted, it is set as null.
Methods
Hiding Spots have a number of functions that can be useful to moderators. This is not an exhaustive list of publicly
accessible methods; only ones that are likely to be useful when writing Flag value scripts, or
if and var
tags in descriptions.
getFixture
this.getFixture();
- Purpose: Gets the fixture this belongs to.
- Returns: Fixture
- Parameters: None.
getLocation
this.getLocation();
- Purpose: Gets the room this hiding spot is in.
- Returns: Room
- Parameters: None.
generateOccupantsString
this.generateOccupantsString(viewerHasNoSightBehaviorAttribute?);
- Purpose: Generates a string representing the occupants of the hiding spot.
- Returns: String
- Parameters:
- Boolean
viewerHasNoSightBehaviorAttribute- Whether or not to return a vague list indicating the quantity of occupants. If this istrue, returns the number of occupants followed bypeopleif there is more than 1 occupant, orsomeoneif there is only 1. Defaults tofalse.
- Boolean
Prefab
A Prefab is a data structure used by Alter Ego. It represents the concept of an item, and is the underlying data structure which gives Room Items and Inventory Items their properties.
Prefabs are static; once loaded from the spreadsheet, they do not change in any way. Thus, the GameEntitySaver class will never make changes to the Prefabs sheet. As a result, the Prefabs sheet can be freely edited without edit mode being enabled.
Attributes
Due to the versatility of functions that different items can have, Prefabs have many attributes. Note that if an attribute is internal, that means it only exists within the Prefab class. Internal attributes will be given in the “Class attribute” bullet point, preceded by their data type. If an attribute is external, it only exists on the spreadsheet. External attributes will be given in the “Spreadsheet label” bullet point.
ID
- Spreadsheet label: Prefab ID
- Class attribute: String
this.id
This is a unique identifier for the Prefab. All letters should be capitalized, and spaces are allowed. Though different Prefabs can have many attributes in common, no two Prefabs can have the same ID.
Possible Names
- Spreadsheet label: Prefab Name
- Class attribute: Collection<Map<String, String>, [String, String]>
this.possibleNames
A Prefab’s name is what will be shown to Players. It is what they are expected to enter in order to interact with an Item. A Prefab must have a “single name” to refer to a single instance of it, but it can also have a “plural name” to refer to multiple instances of it.
This attribute is a collection of possible names that a Room Item or Inventory Item that uses this Prefab can have. The key of the collection is a procedural selection, which consists of a map where the key is the name of a procedural, and the value is a selected possibility. The value of the collection is a pair of strings, where the first will be the Item’s single name, and the second (if supplied) will be the Item’s plural name.
In effect, this allows Item instances of this Prefab to have different names depending on what procedural selections it generates with. These must correspond with the Prefab’s procedural options.
It is possible to enter this field without specifying any procedural selections. This will make all Item instances of the Prefab have the same single name and plural name. If this is desirable, simply enter the single name of the Prefab. If only one instance of a Prefab is intended to exist, it does not need a plural name. Additionally, it does not need a plural name if it would be the same as its single name. However, if a plural name is desired, it can be added after the single name, separated by a comma.
For example, a Prefab with the single name SCISSORS does not need a plural name, as the plural name would be the
same. However, a Prefab with the single name SMALL KNIFE would benefit from a plural name. To enter both, input
SMALL KNIFE, SMALL KNIVES into the cell. As demonstrated in these examples, all letters in the Prefab’s names
should be capitalized, and spaces are allowed. However, apostrophes and quotation marks will be ignored.
To create names that are set based on an Item instance’s procedural selections, they must be given in the form:
[procedural name=possibility name: SINGLE NAME(, PLURAL NAME)]
Extra whitespace will be ignored.
The same rules as static names apply: if a Prefab doesn’t need a plural name, it can be omitted. So, for example, this is a perfectly valid possible name:
[tea flavor = chamomile: CHAMOMILE TEA]
Multiple possible names can be given, each one separated by a comma, like the following examples:
[cheese=american: AMERICAN CHEESE], [cheese=swiss: SWISS CHEESE], [cheese=colby: COLBY CHEESE], [cheese=colby jack: COLBY JACK CHEESE]
[lunch meat=turkey: TURKEY SANDWICH, TURKEY SANDWICHES], [lunch meat=ham: HAM SANDWICH, HAM SANDWICHES], [lunch meat=chicken: CHICKEN SANDWICH, CHICKEN SANDWICHES], [lunch meat=roast beef: ROAST BEEF SANDWICH, ROAST BEEF SANDWICHES]
[base color=default: MUG, MUGS], [glaze color=red: RED MUG, RED MUGS], [glaze color=orange: ORANGE MUG, ORANGE MUGS], [glaze color=brown: BROWN MUG, BROWN MUGS], [glaze color=yellow: YELLOW MUG, YELLOW MUGS], [glaze color=green: GREEN MUG, GREEN MUGS], [glaze color=teal: TEAL MUG, TEAL MUGS], [glaze color=light blue: LIGHT BLUE MUG, LIGHT BLUE MUGS], [glaze color=indigo: INDIGO MUG, INDIGO MUGS], [glaze color=violet: VIOLET MUG, VIOLET MUGS], [glaze color=pink: PINK MUG, PINK MUGS], [glaze color=white: WHITE MUG, WHITE MUGS], [glaze color=gray: GRAY MUG, GRAY MUGS], [glaze color=black: BLACK MUG, BLACK MUGS], [base color=red: RED MUG, RED MUGS], [base color=white: WHITE MUG, WHITE MUGS]
If an Item is instantiated without procedural selections that satisfy any of the listed possible names, then its names will be set as the first set of possible names listed. If it is instantiated with multiple procedural selections that satisfy the listed possible names, then its names will be set as the first set of possible names that its procedural selections satisfy. Effectively, this means that the earlier in the list a possible name is given, the higher priority it has.
Possible Containing Phrases
- Spreadsheet label: Containing Phrases
- Class attribute: Collection<Map<String, String>, [String, String]>
this.possibleContainingPhrases
A Prefab’s containing phrase is what will be used to refer to an Item instance of the Prefab in contexts where grammar is important. This will be how the Item appears in item lists, Narrations, and Notifications. A Prefab must have a “single containing phrase” to refer to a single instance of it, but it can also have a “plural containing phrase” to refer to multiple instances of it. The single containing phrase should almost always include the Prefab’s single name, and the plural containing phrase should almost always include the Prefab’s plural name, if it has one. If the Prefab does not have a plural name because it would be the same as its single name, the plural containing phrase should contain the Prefab’s single name instead.
The structure, syntax, and behavior are mostly identical to that of the Prefab’s possible names. The only differences worth noting are:
- If more than one Item instance of a Prefab is expected to exist, it must have a plural containing phrase, and
- A containing phrase can have lowercase text and symbols, because Players are not expected to enter these.
If variable containing phrases are not desired, it is sufficient to simply enter a single containing phrase into the cell, like so:
a MACHETE
To input a plural containing phrase, enter it after the single containing phrase, with a comma separating the two:
a MACHETE, MACHETES
Lastly, here are a few examples of containing phrases which change based on an Item’s procedural selections:
[tea flavor = chamomile: a cup of CHAMOMILE TEA on a saucer, cups of CHAMOMILE TEA on saucers]
[cheese=american: a slice of AMERICAN CHEESE, slices of AMERICAN CHEESE], [cheese=swiss: a slice of SWISS CHEESE, slices of SWISS CHEESE], [cheese=colby: a slice of COLBY CHEESE, slices of COLBY CHEESE], [cheese=colby jack: a slice of COLBY JACK CHEESE, slices of COLBY JACK CHEESE]
[lunch meat=turkey: a TURKEY SANDWICH with lettuce and tomato, TURKEY SANDWICHES with lettuce and tomato], [lunch meat=ham: a HAM SANDWICH with lettuce and tomato, HAM SANDWICHES with lettuce and tomato], [lunch meat=chicken: a CHICKEN SANDWICH with lettuce and tomato, CHICKEN SANDWICHES with lettuce and tomato], [lunch meat=roast beef: a ROAST BEEF SANDWICH with lettuce and tomato, ROAST BEEF SANDWICHES with lettuce and tomato]
[base color=default: a MUG, MUGS], [glaze color=red: a RED MUG, RED MUGS], [glaze color=orange: an ORANGE MUG, ORANGE MUGS], [glaze color=brown: a BROWN MUG, BROWN MUGS], [glaze color=yellow: a YELLOW MUG, YELLOW MUGS], [glaze color=green: a GREEN MUG, GREEN MUGS], [glaze color=teal: a TEAL MUG, TEAL MUGS], [glaze color=light blue: a LIGHT BLUE MUG, LIGHT BLUE MUGS], [glaze color=indigo: an INDIGO MUG, INDIGO MUGS], [glaze color=violet: a VIOLET MUG, VIOLET MUGS], [glaze color=pink: a PINK MUG, PINK MUGS], [glaze color=white: a WHITE MUG, WHITE MUGS], [glaze color=gray: a GRAY MUG, GRAY MUGS], [glaze color=black: a BLACK MUG, BLACK MUGS], [base color=red: a RED MUG, RED MUGS], [base color=white: a WHITE MUG, WHITE MUGS]
Single Name
- Class attribute: String
this.name
This internal attribute is the first possible single name the Prefab has. This is rarely used. It is recommended to use the single name of an Item instance of the Prefab, rather than the single name of the Prefab itself.
Plural Name
- Class attribute: String
this.pluralName
This internal attribute is the first possible plural name the Prefab has. This is rarely used. It is recommended to use the plural name of an Item instance of the Prefab, rather than the plural name of the Prefab itself.
Single Containing Phrase
- Class attribute: String
this.singleContainingPhrase
This internal attribute is the first possible single containing phrase the Prefab has. This is rarely used. It is recommended to use the single containing phrase of an Item instance of the Prefab, rather than the single containing phrase of the Prefab itself.
Plural Containing Phrase
- Class attribute: String
this.pluralContainingPhrase
This internal attribute is the first possible plural containing phrase the Prefab has. This is rarely used. It is recommended to use the plural containing phrase of an Item instance of the Prefab, rather than the plural containing phrase of the Prefab itself.
Discreet
- Spreadsheet label: Discreet?
- Class attribute: Boolean
this.discreet
This is a simple Boolean value indicating whether interactions with Room Items and Inventory Items using this Prefab
will be narrated or not. Specifically, if this is false, then Alter Ego will send a Narration to the Room if a Player
inspects, takes, or drops a Room Item using this Prefab; or inspects, stashes, unstashes, steals, gives, crafts,
uncrafts, or moves to another Room carrying an Inventory Item using this Prefab. Additionally, if this is false, then
when an Inventory Item using this Prefab is moved to either of the Player’s hands, it will appear in the hands
item list in that Player’s description.
Size
- Spreadsheet label: Size
- Class attribute: Number
this.size
This is a whole number representing how large the Prefab is. It is not associated with any particular unit of measurement, but instead represents relative sizes. For example, an ID card may have a size of 1 whereas a pistol may have a size of 5 and a ladder may have a size of 30. There are no hard rules to determine what size a Prefab should have, however it should be non-negative.
In general, it is good practice to choose sizes based on the capacities of the most common Inventory Slots in the game. For instance, if most equippable Prefabs with Inventory Slots such as pockets have capacities of 3 or 4, any Prefabs that should not be able to fit in those pockets should have a size of 5 or higher.
It is also good to consider what each Prefab will be used for when deciding on its size. For example, if a Prefab is intended to be used as an ingredient in a Recipe that requires it to be contained inside of another ingredient, and it is possible to input one or more of that ingredient to create a product with that many uses, the Prefab’s size should be set based on the capacity of the Inventory Slot it is expected to be in as part of the Recipe.
As an example of the previous practice, consider a Recipe in which a Prefab CLEAN BLENDER CUP is an ingredient, and
it must contain 1X quantity of the Prefab APPLE SLICES, in order to produce 1 BLENDER CUP OF APPLE JUICE with 1X
uses. If the CLEAN BLENDER CUP has a single Inventory Slot with a capacity of 10, then it is possible to limit the
maximum number of servings that can be produced at once by setting the size of the APPLE SLICES Prefab based on that
capacity. For example, if the size is set to 2, then up to 5 APPLE SLICES can be put inside of the
CLEAN BLENDER CUP, producing a BLENDER CUP OF APPLE JUICE with 5 uses. If it is instead set to 3, then the maximum
number of servings would instead be 3, as no more than 3 APPLE SLICES would fit inside of the CLEAN BLENDER CUP.
Weight
- Spreadsheet label: Weight
- Class attribute: Number
this.weight
This is a whole number representing roughly how much the Prefab weighs in kilograms. This number determines whether a Player is capable of taking a Room Item using this Prefab with their strength stat. For more details, see the sections about Room Item and Inventory Item weights.
Usable
- Spreadsheet label: Usable?
- Class attribute: Boolean
this.usable
This is another Boolean value indicating whether Inventory Items using this Prefab can be used to inflict/cure one or
more Status Effects on the Player using it. If this is false, the Player will be told the Inventory Item
has no programmed use. Additionally, if a Player already has all of the Status Effects the Prefab inflicts and doesn’t
have any of the Status Effects it cures, the Player will not be able to use the Inventory Item and will instead be told
that it has no effect.
Third Person Verb
- Spreadsheet label: Use Verb
- Class attribute: String
this.thirdPersonVerb
This is the phrase that will be used in the Narration when a Player uses an Inventory Item with this Prefab. Usage of an Inventory Item will always be narrated, and will use the following format:
[Player displayName] [this.thirdPersonVerb] [InventoryItem singleContainingPhrase].
See the following table for some examples of the resulting Narration:
| Player displayName | Single Containing Phrase | Third Person Verb | Narration |
|---|---|---|---|
| Florian | a STRAWBERRY TART | eats | Florian eats a STRAWBERRY TART. |
| Kyra | a glass of LEMONADE | drinks | Kyra drinks a glass of LEMONADE. |
| An individual wearing a MASK | a TOWEL | dries off with | An individual wearing a MASK dries off with a TOWEL. |
| Michio | a TOOTHBRUSH with toothpaste | brushes with | Michio brushes with a TOOTHBRUSH with toothpaste. |
It’s important to note that this is specifically the verb to use to refer to the player in third person. However, this is strictly a static string. As such, it cannot use the Player’s pronouns. Third person verbs should be written in such a way that pronoun usage is avoided.
If no third person verb is given, “uses” will be used in its place.
Second Person Verb
- Spreadsheet label: Use Verb
- Class attribute: String
this.secondPersonVerb
This is a phrase that will be used in Notifications when a Player uses an Inventory Item with this Prefab. It shares the same cell as the third person verb. To supply a second person verb, enter it after the third person verb, separating the two with a comma. Usage of an Inventory Item will always send a Notification to the Player, and will use the following format:
You [this.secondPersonVerb] [InventoryItem singleContainingPhrase].
See the following table for some examples of the resulting Notification:
| Single Containing Phrase | Second Person Verb | Notification |
|---|---|---|
| a STRAWBERRY TART | eat | You eat a STRAWBERRY TART. |
| a glass of LEMONADE | drink | You drink a glass of LEMONADE. |
| a TOWEL | dry off with | You dry off with a TOWEL. |
| a TOOTHBRUSH with toothpaste | brush your teeth with | You brush your teeth with a TOOTHBRUSH with toothpaste. |
If no second person verb is given, “use” will be used in its place.
Use Verb
Warning
This attribute is deprecated and will be removed in a future release.
Use
this.thirdPersonVerborthis.secondPersonVerbinstead.
- Spreadsheet label: Use Verb
- Class attribute: String
this.verb
Identical to this.thirdPersonVerb. This will eventually be removed.
Uses
- Spreadsheet label: Uses
- Class attribute: Number
this.uses
This is a whole number indicating how many times a single instance of this Prefab can be used. For more details, see the sections about Room Item uses and Inventory Item uses.
Effects Strings
This is a comma-separated list of Status Effects that Inventory Items using this Prefab will inflict the Player with when used.
Effects
- Class
attribute: Array<Status Effect>
this.effects
This is an internal attribute which contains references to each of the Status Effect objects whose IDs are listed in
this.effectsStrings.
Cures Strings
This is a comma-separated list of Status Effects that Inventory Items using this Prefab will cure the Player of when
used. Status Effects will turn into their cured condition, if applicable. Note that it will
attempt to cure them in the order given. As a consequence, if the next Status Effect in the list is the current Status
Effect’s cured condition, it will immediately be cured after being inflicted, turning into its cured condition, and so
on. For example, imagine the following series of Status Effects, where each one’s cured condition follows the ->
symbol:
starving->famished->hungry->satisfied->full
If a Player with the starving Status Effect uses an Inventory Item whose Prefab has the cures string
starving, famished, hungry, satisfied, then the Player will be cured of starving and inflicted with famished, then
cured of famished and inflicted with hungry, and so on until the Player is eventually inflicted with full.
In order to avoid this behavior, if a Prefab’s cures string is meant to contain a list of Status Effects in a series,
they should be listed in reverse order. In the above example, the cures string should be
satisfied, hungry, famished, starving. That way, the Player will only be cured of starving and inflicted with
famished.
Cures
- Class
attribute: Array<Status Effect>
this.cures
This is an internal attribute which contains references to each of the Status Effect objects whose IDs are listed in
this.curesStrings.
Next Stage ID
- Spreadsheet label: Turns Into
- Class attribute: String
this.nextStageId
This is the ID of the Prefab that Items using this Prefab will turn into once their number of uses reaches 0. Items with infinite uses will never access this attribute. When an Item turns into its next stage, all of its attributes will be replaced with that of the new Prefab. However, the Item’s procedural selections will be carried over to the next stage. If any of its procedural selections do not satisfy the procedural options of the next stage Prefab, they will be discarded.
Note that if an Item has a limited number of uses and this is blank, then it will simply be destroyed once it runs out of uses.
Next Stage
This is an internal attribute which simply contains a reference to the actual Prefab object whose ID matches
this.nextStageId. If no next stage ID is given, this will be null instead.
Equippable
- Spreadsheet label: Equippable?
- Class attribute: Boolean
this.equippable
This is another Boolean value indicating whether Inventory Items using this Prefab can be equipped to one of the
player’s Equipment Slots. If this is true, then Players will be able to equip it to one of the
Equipment Slots that it’s restricted to. If this is false, they will simply be told that the item is unequippable.
Additionally, if this is false, Players will be unable to unequip the Inventory Item if it’s already equipped. Note
that a moderator can forcibly equip and unequip Inventory Items for a Player
regardless of whether this is true or false. Note that when an Inventory Item is equipped or unequipped, a Narration
will always be sent to the Room the Player is in.
Equipment Slots
This is a list of Equipment Slots that Inventory Items using this Prefab can be equipped to. This should be a
comma-separated list. If a Player or a moderator attempts to equip an Inventory Item without specifying an Equipment
Slot to equip it to, Alter Ego will attempt to equip it to the first Equipment Slot listed here. If something is already
equipped to that Equipment Slot, another one will have to be manually specified. Note that if no Equipment Slots are
given here, Players will be unable to equip Inventory Items using this Prefab, even if its equippable attribute is set
to true. However, moderators can forcibly equip Inventory Items to any of a Player’s Equipment Slots, regardless of
whether or not it is listed here.
Covered Equipment Slots
This is a list of Equipment Slots that this Prefab will cover when it is equipped. When an Equipment Slot is covered by
another equipped Inventory Item, the single containing phrase of whatever Inventory Item is equipped to it will be
not appear in the equipment item list in the Player’s description. Only when the Player
unequips all Inventory Items whose Prefabs cover that Equipment Slot will the single containing phrase of that
Inventory Item appear in the Player description’s equipment item list again.
Commands String
- Spreadsheet label: When Equipped / Unequipped
- Class attribute: String
this.commandsString
This is a comma-separated list of bot commands that will be executed when an Inventory
Item using this Prefab is equipped. A comma-separated list of bot commands that will be executed when the Inventory
Item is unequipped can also be included, with both sets separated by a forward slash (/). If no unequipped commands
are desired, then the forward slash can be omitted from the cell. If no equipped commands are desired, the forward
slash should be the first character in the cell, with the unequipped commands following it.
Note that when writing equipped and unequipped bot commands, the player argument will always refer to the Player the
Inventory Item belongs to.
Equipped Commands
This is an internal attribute which contains a list of commands that will be executed when an Inventory Item using this Prefab is equipped.
Unequipped Commands
- Spreadsheet label: When Equipped / Unequipped
- Class attribute: Array<String>
this.unequippedCommands
This is an internal attribute which contains a list of commands that will be executed when an Inventory Item using this Prefab is unequipped.
Inventory
- Spreadsheet label: Contains Inventory Slots
- Class
attribute: Collection<String, Inventory Slot>
this.inventory
This is a collection of Inventory Slot objects that instances of this Prefab will have, where the key is the Inventory Slot’s ID. Room Items and Inventory Items with Inventory Slots are capable of containing other Items of the same type (i.e. a Room Item can contain other Room Items, and an Inventory Item can contain otherInventory Items).
In order to define an Inventory Slot for a Prefab, the ID of the Inventory Slot and its capacity should be given,
separated by a colon (:). For example, a Prefab with the ID “PANTS” might have two Inventory Slots, named “LEFT
POCKET” and “RIGHT POCKET”, each with a capacity of 3. In this case, the cell for the “PANTS” Prefab’s Inventory
Slots would be LEFT POCKET: 3, RIGHT POCKET: 3. There is no theoretical limit to the amount of Inventory Slots a
single Prefab can have.
The size of every Item placed into a single Inventory Slot is added to that Inventory Slot’s takenSpace value. If the
quantity of that Item is higher than 1, its size will be multiplied by its quantity before being added. If inserting
an Item would cause the Inventory Slot’s takenSpace value to exceed its capacity, it cannot be inserted into that
Inventory Slot. Additionally, every Item inserted adds its own weight to the Inventory Slot’s weight. Lastly, the Item
itself will be inserted into the Inventory Slot’s items array.
When Inventory Slots are initialized, their takenSpace and weight attributes are set to 0. Their items arrays are
initially empty. Prefab Inventory Slots will always retain this initialized state. That is, even if an Item contains
other Items in one of its Inventory Slots, the corresponding Inventory Slots of its associated Prefab will remain in
its initialized, empty state. Prefabs cannot contain Items. The inventory attribute of Prefabs is merely a template
for instances of those Prefabs to use so that they can contain Items.
Preposition
- Spreadsheet label: Preposition
- Class attribute: String
this.preposition
This attribute is similar to the preposition attribute in the Fixture class. However, it does
not determine whether instances of this Prefab can contain Room Items/Inventory Items. That function is taken care of
by the inventory attribute of the Prefab. Otherwise, it functions the same. When a Player drops/stashes a
non-discreet Room Item/Inventory Item into an instance of this Prefab, Alter Ego will narrate them doing so using this
preposition. For example, if the player Seamus stashes an Inventory Item named MALLET into another Inventory Item named
GUITAR CASE whose Prefab has the preposition “in”, Alter Ego will send “Seamus stashes a MALLET in his GUITAR CASE.” to
the Room channel Seamus is currently in. If, however, Seamus drops the MALLET Inventory Item into a GUITAR CASE Item in
the Room, Alter Ego will send “Seamus puts a MALLET in the GUITAR CASE.”
Description
- Spreadsheet label: Description
- Class attribute: Description
this.description
This is the description of the Prefab. When a Player inspects an instance of this Prefab, they will receive a parsed version of this string. Any item lists in a Prefab’s description must be blank. Note that when a Player inspects an Inventory Item that is equipped to one of another Player’s Equipment Slots, all sentences containing item lists will be removed from the description before it is parsed, effectively making it so that Players cannot see what is stashed in that Inventory Item. See the article on writing descriptions for more information.
Procedural Options
This is an internal attribute which contains a map where all of the keys are the named procedural tags in the
Prefab’s description, and the values are all of the named poss tags belonging to each one. For more information, see
the procedural and
poss sections of the article on writing descriptions.
Procedural options can only affect Prefabs aesthetically. They cannot affect the Prefab’s functionality. So, for example, it is not possible to create procedural options that allow the Prefab to inflict or cure different Status Effects, or alter what Equipment Slots it can be equipped to. Additionally, if a Prefab is usable as an ingredient in a Recipe, or it is used as a requirement or solution to a Puzzle, or is otherwise referenced by other game entities, then all instances of that Prefab, regardless of procedural options, will be treated the same.
So, for example, it is not possible to create a generic KEY Prefab that can be used to unlock specific LOCKER
Puzzles based on what procedural selections it was instantiated with. All instances of that KEY Prefab would be able
to solve every Puzzle in which it was listed as a requirement. In such a scenario, they would need to be made into
multiple entirely different Prefabs.
Procedural options can be used to create Prefabs with different descriptions; that is their primary purpose. However, they can also be used to create Prefabs with names and containing phrases that differ based on which procedural is selected when it is instantiated as an Item. For more information on how to do this, see the sections on possible names and possible containing phrases.
Because procedural options can only affect Prefabs aesthetically, their primary use case is to allow Items to be created with small, minor variations, without making them entirely separate Prefabs. This is extremely useful in reducing the size of the spreadsheet—especially when these Prefabs are used in Recipes.
To give an example, suppose there is a series of crafting Recipes that allow a Player to create a sandwich consisting of one slice of cheese and/or one slice of meat. Because of the mechanics of crafting Recipes, there must be a Prefab for every possible combination of cheese and meat. Assuming meat and cheese will always have the same number of varieties, \(n\), then the number of Prefabs that would be needed to account for every possible combination would be calculated with the formula:
\[ n^2 + 2n \]
And the number of crafting Recipes that would be required to create every variation (keeping in mind that ingredients can be added in any order) would be calculated with the formula:
\[ 2n^2 + 2n \]
In effect, this means that in order to allow the Player to create sandwiches with one of 4 different kinds of meat and/or one of 4 different kinds of cheese, 24 Prefabs and 40 Recipes would need to be created. In order to add just one more kind of meat and one more kind of cheese would necessitate 35 Prefabs and 60 Recipes.
However, this can be avoided by creating just one CHEESE Prefab and one MEAT Prefab, with procedural options for
the different kinds. Then, only 3 Prefabs and 4 Recipes need to be created. And since procedural options are
significantly easier to add—it is as simple as adding a new tag in the Prefab’s description—this also allows for
more varieties of meat and cheese than would be feasible if they were all separate Prefabs.
Row
- Class attribute: Number
this.row
This is an internal attribute, but it can also be found on the spreadsheet. This is the row number of the Prefab.
Inventory Slot
Note
Not to be confused with Equipment Slots.
An Inventory Slot is a data structure used by Alter Ego. It represents an inventory slot belonging to a Room Item or Inventory Item which can contain other Items, akin to pockets.
Inventory Slots are defined entirely within the Contains Inventory Slots column of the Prefabs sheet. They share a cell with all other Inventory Slots belonging to the same Prefab, in the interest of saving space. The syntax of an Inventory Slot cell on the spreadsheet is like so:
SLOT ONE: CAPACITY, SLOT TWO: CAPACITY(, SLOT N: CAPACITY)
Attributes
Inventory Slots are the internal data structure used by Prefabs, Room Items, and Inventory Items to contain Items. As such, most of their attributes serve this purpose.
ID
- Class attribute: String
this.id
This is the ID of the Inventory Slot. This is how it will be accessed and referred to, for both Players and Moderators. All letters should be capitalized, and spaces are allowed. The ID of an Inventory Slot must be unique relative to other slots belonging to the same Prefab.
This corresponds to the “SLOT ID” part of the Contains Inventory Slots column—that is, the part before the colon.
Name
Warning
This attribute is deprecated and will be removed in a future release.
Use
this.idinstead.
- Class attribute: String
this.name
This is a copy of the Inventory Slot’s ID. It was how Inventory Slots were identified prior to Alter Ego version 2.0. This attribute will be removed in the future.
Capacity
- Class attribute: Number
this.capacity
This is the maximum capacity of the Inventory Slot. It represents the maximum sum of sizes that can be stored in the slot. This corresponds to the “CAPACITY” part of the Contains Inventory Slots column—that is, the part after the colon.
Taken Space
- Class attribute: Number
this.takenSpace
This is the current sum of sizes of Items stored inside of the Inventory Slot. When an Item is inserted into the Inventory Slot, its size will be multiplied by its quantity, and added to this value.
This will always be 0 on a Prefab.
Weight
- Class attribute: Number
this.weight
This is the current combined weight of all Items stored inside of the Inventory Slot. When an Item is inserted into the Inventory Slot, its weight will be multiplied by its quantity, and added to this value.
This will always be 0 on a Prefab.
Items
- Class attribute: Array<RoomItem | InventoryItem>
this.items
This is the list of Items currently stored inside of the Inventory Slot. Note that if the Inventory Slot belongs to a Room Item, this array can only contain Room Items. Likewise, if it belongs to an Inventory Item, this can only contain Inventory Items.
If this belongs to a Prefab, it will always be empty.
Item
Warning
This attribute is deprecated and will be removed in a future release.
Use
this.itemsinstead.
- Class attribute: Array<RoomItem | InventoryItem>
this.item
This was how Items were stored prior to Alter Ego 2.0. Now, it is always an empty array. This attribute will be removed in the future.
Methods
Inventory Slots have a number of functions that can be useful to moderators. This is not an exhaustive list of publicly
accessible methods; only ones that are likely to be useful when writing Flag value scripts, or
if and var
tags in descriptions.
getContainedItems
this.getContainedItems();
- Purpose: Gets all of the items this inventory slot contains.
- Returns: Array<RoomItem | InventoryItem>
- Parameters: None
containsNoItems
this.containsNoItems();
- Purpose: Returns true if this inventory slot contains no items.
- Returns: Boolean
- Parameters: None
getContainedItemsWeight
this.getContainedItemsWeight();
- Purpose: Gets the combined weight of all the items this inventory slot contains.
- Returns: Number
- Parameters: None
capacityIsSmallerThan
this.capacityIsSmallerThan(item, quantity?);
- Purpose: Returns true if the inventory slot’s capacity is smaller than the given item.
- Returns: Boolean
- Parameters:
- RoomItem | InventoryItem | Prefab
item- The item to check for. - Number
quantity- The quantity to multiply the item’s size by. Defaults to 1.
- RoomItem | InventoryItem | Prefab
willBeOverFilledBy
this.willBeOverFilledBy(item, quantity?);
- Purpose: Returns true if the inventory slot will be over capacity if it takes the given item.
- Returns: Boolean
- Parameters:
- RoomItem | InventoryItem | Prefab
item- The item to check for. - Number
quantity- The quantity to multiply the item’s size by. Defaults to 1.
- RoomItem | InventoryItem | Prefab
Recipe
A Recipe is a data structure used by Alter Ego. Its primary purpose is to allow Players to transform Room Items or Inventory Items into other Items using game-like crafting mechanics.
Recipes are static; once loaded from the spreadsheet, they do not change in any way. Thus, the GameEntitySaver class will never make changes to the Recipes sheet. As a result, the Recipes sheet can be freely edited without edit mode being enabled.
This article will impose two terms:
- Crafting is the act of transforming two Recipe Items into up to two Recipe Items in a Craft Action.
- Processing is the act of transforming one or more Recipe Items into zero or more Recipe Items using a Fixture.
Every Recipe is either a crafting-type Recipe or a processing-type Recipe, but not both.
Attributes
Recipes have relatively few attributes. Their behavior is entirely static, incapable of changing. These attributes simply serve to provide instructions for Alter Ego to follow. Note that if an attribute is internal, that means it only exists within the Recipe class. Internal attributes will be given in the “Class attribute” bullet point, preceded by their data type. If an attribute is external, it only exists on the spreadsheet. External attributes will be given in the “Spreadsheet label” bullet point.
Ingredients Strings
This is a comma-separated list of Prefab IDs, in Recipe Item format. Ingredients determine what Room Items or Inventory Items are required for the Recipe. Multiple Recipes can have the same list of ingredients.
Regardless of what order ingredients appear in on the sheet, they are stored in alphabetical order, sorted by Prefab ID. Additionally, ingredients that are contained inside of another ingredient are not included. This list includes only the top-level ingredients.
There are different sets of rules for ingredients, depending on the Recipe’s type.
Crafting-type Recipes:
- Must have exactly two ingredients and
- Can have two of the same Prefab as ingredients.
Processing-type Recipes:
- Must have at least one ingredient,
- Can have infinitely many ingredients, and
- Must not have more than one of the same Prefab as ingredients.
Note that the final rule does not prohibit a Recipe from requiring multiple instances of the same ingredient. For more information, see the article on Recipe Items.
Additionally, both Recipe types must not include ingredients that are containers with more than one Inventory Slot, or more than one container.
Ingredients
- Class attribute: Array<Recipe Item>
this.ingredients
This is an internal attribute which consists of a list of Recipe Item objects created from the list of
ingredients in this.ingredientsStrings. As with this.ingredientsStrings, they are stored in alphabetical
order, sorted by Prefab ID. Contained ingredients are not included. This list includes only the top-level
ingredients.
Ingredients Flat
- Class attribute: Array<Recipe Item>
this.ingredientsFlat
This is an internal attribute which consists of a list of Recipe Item objects. It contains all of the ingredients
in this.ingredients, but it also includes all ingredients contained inside of them, all listed in a flat array.
They are stored in alphabetical order, sorted by Prefab ID.
Uncraftable
- Spreadsheet label: Uncraftable?
- Class attribute: Boolean
this.uncraftable
This is a Boolean value indicating whether or not this Recipe can be reversed. If this is true, then
an Uncraft Action can be performed to convert the product into its
ingredients. If this value is false, then the Recipe cannot be reversed.
Note that in order for a Recipe to be uncraftable, it must be a crafting-type Recipe with only one product. Crafting-type Recipes with two products cannot be uncraftable.
Fixture Tag
- Spreadsheet label: Processed by Fixture With Tag
- Class attribute: String
this.fixtureTag
This is a simple phrase that determines which Fixtures can be used to process this Recipe, if any. There are no rules for how Fixture tags must be named, but a single Recipe can only have one Fixture tag. The presence of a Fixture tag determines the type of each Recipe. If a Fixture tag is given, it will be a processing-type Recipe. If no Fixture tag is given, it will be a crafting-type Recipe.
The tag should match exactly the Recipe tag of any Fixtures that can be used to process this Recipe. For example, a Recipe with the Fixture tag “blender” can only be processed by a Fixture with the Recipe tag “blender” when it is activated.
Object Tag
Warning
This attribute is deprecated and will be removed in a future release.
Use
this.fixtureTaginstead.
- Class attribute: String
this.objectTag
This internal attribute serves the same purpose as this.fixtureTag. It is still present to maintain compatibility
with legacy game data, but it will eventually be removed. References to this attribute in game data should be
replaced with this.fixtureTag.
Duration String
- Spreadsheet label: Process Duration
- Class attribute: String
this.durationString
This is a string which determines how long the Recipe will take to process before it is completed. This can only be
given for processing-type Recipes. This should consist of a number (i.e. 30, 1.5) with a letter immediately
following it, with no space between them. There is a fixed set of predefined units that correspond with each letter.
They are as follows:
| Letter | Unit |
|---|---|
| s | seconds |
| m | minutes |
| h | hours |
| d | days |
| w | weeks |
| M | months |
| y | years |
So, a Recipe that should take 30 seconds to process should have a duration of 30s, one that should take 15 minutes
should have a duration of 15m, one that should take 2 hours should have a duration of 2h, one that should take 1.5
days should have a duration of 1.5d, and so on.
Duration
This is an internal attribute which contains a Duration object created from the duration string. If the Recipe has no
duration string, this is null.
Products Strings
This is a comma-separated list of Prefab IDs, in Recipe Item format. Products determine what the ingredients will be turned into upon completion of the Recipe.
Unlike ingredients, products are not sorted. They are listed in the order they appear in on the sheet. However, products that are contained inside of another product are not included. This list includes only the top-level products.
There are different sets of rules for products, depending on the Recipe’s type.
Crafting-type Recipes:
- Must not have more than two products and
- Can have two of the same Prefab as products.
Processing-type Recipes:
- Can have any number of products and
- Can have multiple of the same Prefab as products.
Note that although processing-type Recipes with multiple of the same Prefab as ingredients are typically not allowed, the same does not apply to products. A processing-type Recipe can produce as many of the same Prefab as desired. However, it usually makes more sense to express this as a quantity of the product, rather than listing the same Prefab as a product multiple times. See the article on Recipe Items for more information.
Additionally, both Recipe types must not include products that are containers with more than one Inventory Slot, or more than one container.
Products
- Class attribute: Array<Recipe Item>
this.products
This is an internal attribute which consists of a list of Recipe Item objects created from the list of
products in this.productsStrings. As with this.productsStrings, contained products are not included.
This list includes only the top-level products.
Products Flat
- Class attribute: Array<Recipe Item>
this.productsFlat
This is an internal attribute which consists of a list of Recipe Item objects. It contains all of the products
in this.products, but it also includes all products contained inside of them, all listed in a flat array.
Unlike this.products, they are stored in alphabetical order, sorted by Prefab ID.
Initiated Description
- Spreadsheet label: Description When Initiated
- Class attribute: Description
this.initiatedDescription
This is a description that indicates when a Recipe has begun being processed. When a Player activates a Fixture that can process this Recipe and all of the ingredients required for it are contained within the Fixture, they will receive a parsed version of this string. See the article on writing descriptions for more information.
Note that unlike most other game entities, the this keyword does not refer to the Recipe, but rather the Fixture
processing the Recipe. For example, in the description
<desc><s>You begin filling up the GLASS in the <var v="this.name" />.</s></desc>, the variable <var v="this.name" />
would be replaced with the name of the Fixture processing the Recipe. This also means that you can access the Fixture’s
process attribute, and the ingredients contained inside. However, keep in mind that doing so may
result in errors when the parse command is used, unless guards are
implemented to prevent accessing data that doesn’t exist when the command is used.
Crafting-type Recipes will never use this text because they are completed instantaneously.
Completed Description
- Spreadsheet label: Description When Completed
- Class attribute: Description
this.completedDescription
This is a description that indicates when a Recipe has finished being processed. When a Player crafts two Inventory
Items together, or a Fixture finishes processing a Recipe that they initiated by activating the Fixture and they are still
in the same Room as the Fixture, they will receive a parsed version of this string. Just like the initiated description,
the this keyword refers to the Fixture processing the Recipe. However, in crafting-type Recipes, the this keyword
refers to the Recipe itself, and not the Player, as one might assume.
Uncrafted Description
- Spreadsheet label: Description When Uncrafted
- Class attribute: Description
this.uncraftedDescription
When a Player uncrafts an Inventory Item, they will receive a parsed version of this string. Because uncraftable
Recipes cannot have a Fixture tag, the this keyword will always refer to the Recipe itself.
Row
- Class attribute: Number
this.row
This is an internal attribute, but it can also be found on the spreadsheet. This is the row number of the Recipe.
Mechanics
Crafting
Crafting is a simple game mechanic that uses Recipes. It is performed via a Craft Action. Whether the action is initiated by a Player or by a moderator, the rules are the same:
- The Player must have Equipment Slots named “RIGHT HAND” and “LEFT HAND”.
- The Player must have two Inventory Items, one equipped to their RIGHT HAND and one equipped to their LEFT HAND.
- There must be a crafting-type Recipe whose top-level ingredients are the Prefabs underlying the Player’s two held
Inventory Items.
- If the Recipe requires a held Inventory Item to contain one or more Inventory Items inside of it, then the Player must have those Inventory Items stashed inside of it.
- The quantities and uses of the Player’s Inventory Items must all satisfy those specified by the Recipe’s ingredients at least once.
If all of the above requirements are met, the Player will craft the two Inventory Items together. See this section for more details on how this happens.
Once the products have been created, Alter Ego will send the Player the Recipe’s completed description. Additionally, if any of the product Prefabs are non-discreet, Alter Ego will narrate the Player crafting them.
Uncrafting
Uncrafting is a simplified reversal of the crafting mechanic. It is performed via an Uncraft Action. Whether the action is initiated by a Player or by a moderator, the rules are the same:
- The Player must have Equipment Slots named “RIGHT HAND” and “LEFT HAND”.
- The Player must have one Inventory Item equipped to their RIGHT HAND or LEFT HAND.
- The Player’s other hand must be empty.
- There must be a crafting-type Recipe whose only product is the Prefab underlying the Player’s held Inventory Item.
If all of the above requirements are met, the Player will uncraft their held Inventory Item.
First, Alter Ego checks the Recipe’s ingredients to see if only one of them is discreet. If so, the ingredient with the discreet Prefab will be ingredient 1, and the non-discreet Prefab will be ingredient 2. If both are discreet or both are non-discreet, ingredients 1 and 2 will be the ingredient Prefabs in alphabetical order by their IDs.
Next, the Player’s held Inventory Item will be replaced with the properties of ingredient 1’s Prefab, and any Inventory Items contained inside of it will be recursively destroyed. The Prefab of ingredient 2 will then be instantiated in the Player’s free hand. Note that even if the original Inventory Item had a limited number of uses, both of the ingredients will be created with the default number of uses of their respective Prefabs. They will also both be created with the original held Inventory Item’s procedural selections.
Note that even if any of the Recipe’s ingredients are required to contain Inventory Items inside of them, those contained Items will not be instantiated when the product is uncrafted.
Alter Ego will then send the Player the Recipe’s uncrafted description.
If the product or either of the ingredients are non-discreet, Alter Ego will narrate the Player uncrafting them. If only one of the ingredients is discreet, then the Narration will be as follows:
[Player displayName] removes [ingredient 1 singleContainingPhrase] from [ingredient 2 singleContainingPhrase].
If both ingredients are non-discreet, then the Narration will instead be:
[Player displayName] separates [product singleContainingPhrase] into [ingredient 1 singleContainingPhrase] and [ingredient 2 singleContainingPhrase].
Processing
Processing is a complex game mechanic that uses Recipes.
Recipes can be processed in a Fixture as long as that Fixture is activated and has a Recipe tag that matches the Recipe’s Fixture tag, regardless of how the Fixture was activated. There are four ways a Fixture can be activated:
- By a Player using the use player command,
- By a moderator using the fixture moderator command,
- By a game entity that can issue bot commands using the fixture bot command, or
- By being loaded from the spreadsheet with its activation state being set to
true.
While a Fixture with a Recipe tag is activated, Alter Ego will attempt every second to find a Recipe that can be processed by the Fixture. In order to determine this, it looks for all Room Items contained in the Fixture, as well as any Room Items contained inside those Room Items (recursively). Next, it checks all Recipes whose Fixture tag matches the Fixture’s Recipe tag. For each Recipe, it compares the list of Room Items contained within the Fixture (including child Room Items) to the Recipe’s ingredients list. If an exact match is found, it begins processing the Room Items. If the list of Room Items in the Fixture does not exactly match any Recipe’s ingredients list, Alter Ego collects a list of all Recipes whose ingredients can all be found among the Fixture’s contained Room Items. When it finishes, it chooses to process the Recipe that uses the highest number of Room Items contained in the Fixture; i.e., the Recipe that will leave the fewest Room Items unprocessed.
If Alter Ego finds a Recipe that it can process using the Fixture, it will begin processing the Recipe. If the Fixture was activated by a Player, whether forcibly or by their own will, they will be sent the Recipe’s initiated description. However, even if the Fixture was not activated by a Player for the current Recipe being processed, it will still be processed. If a Recipe was already being processed and a different one that uses more of the Fixture’s contained Room Items is found, then it will be canceled in favor of the new one.
A Recipe being processed means that the Fixture’s process variable has been assigned, and that Alter Ego will decrement the process’s duration by 1 every second. When the duration reaches 0, the Recipe is carried out using the ingredients stored in the Fixture’s process variable. See this section for more details on how this happens.
Keep in mind that Recipe Items in processing-type Recipes that are not explicitly set with a constant quantity are considered to have a variable quantity. This can be convenient for many Recipes. For example, consider this Recipe:
RAW EGG ➡️ COOKED EGG
Both the ingredient and product Recipe Items are considered to have variable quantities. This means that if the Fixture
contained 3 RAW EGGS, then it would produce 3 COOKED EGGS. On the other hand, if the Recipe was instead:
RAW EGG, SPATULA ➡️ COOKED EGG, SPATULA
Then the SPATULA ingredient and product would also have variable quantities, meaning that for every RAW EGG the
Fixture contained, it would also need to contain an equal number of SPATULAS in order for the Recipe to be processed.
In order to modify this Recipe such that the Fixture only needs to contain 1 SPATULA and any amount of RAW EGGS,
the ideal syntax would be:
1X RAW EGG, 1 SPATULA ➡️ 1X COOKED EGG, 1 SPATULA
For more information, see the article on Recipe Items.
Once Room Items are finished being processed, the Player who activated the Fixture and started the process will be sent the Recipe’s completed description, if it was a Player who did so and they are still alive and in the same Room as the Fixture. If the Fixture is set to automatically deactivate, it will be deactivated. If not, it will continue attempting to process Recipes with the Room Items contained inside of it, which may include the Room Items instantiated at the end of the previous process.
How Ingredients Become Products
First, Alter Ego prepares to carry out the Recipe. Before anything else, the actual Items being used as ingredients are collated, including all of the Items contained inside of them. This means that all Items with the same identifier (or Prefab ID), container type, container name, and procedural selections are considered the same Item, and are grouped together. Their quantities and uses are all added together. This allows multiple instances of the same Prefab to be considered the same ingredient, and makes it easier to determine which ones to consume when the Items are transformed as part of the Recipe.
Then, it calculates how many times the Recipe can be carried out with the given quantities and uses of the collated Items. This number is referred to as the satisfactory process count. It also creates a map of variable names assigned to each of the Recipe’s ingredients, and calculates the actual value of each variable using the quantity or uses of the corresponding Inventory Item. It also combines the procedural selections of all of the ingredients. Even if any procedural selections have clashing values, one procedural can only be assigned to one possibility. The selected possibility when collisions occur will be the one belonging to the ingredient whose Prefab ID is sorted the latest alphabetically.
Once the preparations are complete, Alter Ego iterates through the collated Items. For each one, it checks to see if the ingredient is also a product. If that is the case, it decreases the Inventory Item’s uses by the satisfactory process count. If its uses is decreased to 0, then it will be replaced with its next stage. If it doesn’t have a next stage, it will simply be destroyed. If the collated Items contain multiple of the same Item, it will divide the consumed uses among them as evenly as possible—even splitting one off of the stack into a new Item if necessary—in order to ensure that the total number of uses remaining is exactly what it should be. Likewise, it will not destroy any more of the used ingredients than it needs to.
As a demonstration of the above condition, suppose there is a Recipe with the following ingredients and products:
DIRTY PLATE, DETERGENT ➡️ CLEAN PLATE, DETERGENT
Now suppose that there is a Fixture SINK containing DETERGENT with a quantity of 2, and 10 uses. When the Room
Items are collated, the DETERGENT is considered to have 20 uses in total. Here are three examples of what would
happen if various quantities of DIRTY PLATES are added to the SINK:
- If
DIRTY PLATEhas a quantity of 10, then when the ingredients are processed, theSINKwill contain 10CLEAN PLATESand 2DETERGENTSwith 5 uses. - If the
DIRTY PLATEhas a quantity of 11, then when the ingredients are processed, theSINKwill contain 11CLEAN PLATES, 1DETERGENTwith 4 uses, and 1DETERGENTwith 5 uses (for a total of 9 uses). - If the
DIRTY PLATEhas a quantity of 19, then when the ingredients are processed, theSINKwill contain 19CLEAN PLATES, 1DETERGENTwith 1 use, and 1EMPTY DETERGENTwith no uses.
If an ingredient is not also a product, then it is destroyed. This occurs in a similar manner to how an ingredient’s uses are decreased if it is an ingredient and a product. Alter Ego will destroy only as many instances as it is required to according to the specifications of the Recipe, even if the ingredient is a collated Item comprised of multiple Items with varying quantities. However, keep in mind that any Items contained inside of the ingredient Item will also be destroyed when this occurs.
Once all of the ingredients have either been destroyed or had their uses decreased appropriately, the products are instantiated. Alter Ego iterates through all of the products in the Recipe and instantiates them with the quantities and uses specified by the Recipe. If the quantity and/or uses of an individual product are variable, then the number will be multiplied by the satisfactory process count. For uses specifically, if the product has a variable number of uses that was specified with a named variable, then the actual value of that variable will be multiplied by the Recipe Item’s uses instead of the satisfactory process count. If a product is specified to contain Items, then those Items will be instantiated inside of it after it is created.
Recipe Item
A Recipe Item is a data structure used by Alter Ego. It represents an ingredient or product Prefab in a Recipe, with extra information to improve Recipe flexibility. It is unrelated to Room Items and Inventory Items, instead defining the ways in which these Items can be transformed via a Recipe.
Recipe Items were created to better articulate the added complexity of Recipes as reworked in Alter Ego 2.0. These objects represent the necessary sheet data for Alter Ego to perform the transformations specified by a Recipe.
Attributes
Recipe Items are the internal data structure representing ingredients and products, and their technical information, in a Recipe. As such, all of their attributes serve this purpose, correlating to either the Ingredients column or Products column of a Recipe row.
Recipe Item String
- Class Attribute: String
this.recipeItemString
This is the string representation of the Recipe Item, as entered on the spreadsheet. This follows the “Recipe Item Syntax” of a Recipe’s ingredients or products. The syntax follows a very flexible format which is difficult to wholly demonstrate in a human-readable manner, so some examples are provided here:
PREFAB ID- Where “Prefab ID” is any given Prefab ID.
1 PREFAB ID- Where
1can be any whole number representing the quantity of the given Item to consume or produce, regardless of the amount of times the Recipe can be satisfied by its actual ingredients.
- Where
1X PREFAB ID- Where
1can be any whole number, andXcan be any uppercase basic Latin character, to represent the quantity of the given Item to consume or produce relative to the amount of times the Recipe can be satisfied. - Example: If a Recipe Item is given as
2X PREFAB ID, then the Recipe will either consume or produce 2 instances of that Item for as many times as the Recipe is satisfied by its ingredients. So, if the Recipe can be satisfied by its ingredients 2 times in a single process, the given Item will be consumed 4 times if it is an ingredient, or it will be produced 4 times if it is a product.
- Where
PREFAB ID [1X]- Where
1can be any whole number, andXcan be any uppercase basic Latin character, to represent the number of Item uses to consume or produce relative to the amount of times the Recipe can be satisfied. - Example: If a Recipe Item is given as
PREFAB ID [2X], then the Recipe will either decrease its uses by 2 or produce it with 2 uses for as many times as the Recipe is satisfied by its ingredients. So, if the Recipe can be satisfied by its ingredients 2 times in a single process, the given Item will have its uses decremented by 4 if it is an ingredient, or it will be produced with 4 uses if it is a product. This will override the number of default uses as defined by its Prefab.
- Where
PREFAB ONE (PREFAB TWO)- Where
PREFAB ONEcan be any Prefab ID denoting a Prefab with exactly one Inventory Slot that can contain Items, andPREFAB TWOcan be any Prefab ID that can fit inside its container. PREFAB TWOcan also utilize the syntax for variable quantity or uses consumption, like so:PREFAB ONE (1X PREFAB TWO)PREFAB ONE (PREFAB TWO [1X])
- Where
PREFAB ONE (PREFAB TWO + PREFAB THREE)- Where
PREFAB ONEcan be any Prefab ID denoting a Prefab that can contain Items,PREFAB TWOcan be any Prefab ID that can fit inside its container, andPREFAB THREEis another Prefab ID that can fit inside its container. - There is no limit to how many Prefabs can be contained inside
PREFAB ONE. It is only limited by the combined sizes of all of its contained Prefabs. PREFAB TWOandPREFAB THREEcan also utilize the syntax for variable quantity or uses consumption.
- Where
The “variable” of a Recipe Item, represented as X above, can be used to make ingredients and products related to each other in uses or quantity. Some examples and explanations of this behavior are as follows:
1 BLENDER CUP OF MILK (1X BANANA CHUNK)➡️1 BANANA MILKSHAKE [1X]- This example is a processing-type Recipe, which produces one
BANANA MILKSHAKEwith as many uses asBANANA CHUNKSwere inside theBLENDER CUP OF MILKingredient.
- This example is a processing-type Recipe, which produces one
1 OILED PAN (1X FIRM TOFU BITES + 1X GREEN BEANS + 1X CHOPPED BROCCOLI + 1X CHOPPED MUSHROOMS + 1X SLICED CARROTS)➡️1 PAN OF STIR FRIED VEGETABLES [2X]- This example is a processing-type Recipe, which produces one
PAN OF STIR FRIED VEGETABLESwith as many uses asFIRM TOFU BITES,GREEN BEANS,CHOPPED BROCCOLI,CHOPPED MUSHROOMS, ANDSLICED CARROTSwere inside theOILED PANingredient. - It’s important to note that any of the contained ingredients whose quantity exceeds the actual value of
Xwhen the Recipe is processed will be destroyed, because the container they were in was destroyed as part of the Recipe.
- This example is a processing-type Recipe, which produces one
CLEAN TEAPOT (1X ENERGIZING TEA LEAVES), KETTLE FILLED WITH HOT WATER➡️TEAPOT OF ENERGIZING TEA [1X], KETTLE FILLED WITH HOT WATER- This example is a crafting-type Recipe, which produces one
TEAPOT OF ENERGIZING TEAwith as many uses asENERGIZING TEA LEAVESwere inside theCLEAN TEAPOTingredient. - Since the
KETTLE FILLED WITH HOT WATERingredient is also a product, its number of uses will be decreased by however manyENERGIZING TEA LEAVESwere inside theCLEAN TEAPOTingredient.
- This example is a crafting-type Recipe, which produces one
Prefab ID
- Class Attribute: String
this.prefabId
This is the ID of the Recipe Item’s Prefab, as it was entered on the sheet.
Prefab
- Class Attribute: Prefab
this.prefab
This contains a reference to the actual Prefab object of the Recipe Item.
Contained Items String
- Class Attribute: String
this.containedItemsString
This is the list of contained Items as a plus-separated string. Each Item is itself in the Recipe Item format, with the caveat that they cannot contain other Items.
Contained Items
- Class Attribute: Array<Recipe Item>
this.containedItems
This is an array of the actual Recipe Items contained inside of this Recipe Item. Each contained Item is guaranteed to not contain another Item.
Container
- Class Attribute: Recipe Item | null
this.container
This is the Recipe Item that contains this Recipe Item. If this Recipe Item is not contained in another one,
then this is null.
Quantity
- Class attribute: Number
this.quantity
This is the quantity of the Recipe Item to be consumed or produced. It is a whole number. Defaults to 1 if not given.
Quantity Variable Name
- Class attribute: String
this.quantityVariableName
This is the variable name to use for the quantity of this Recipe Item when the Recipe it belongs to is carried out. It must be either an empty string, or a single uppercase basic Latin character. Defaults to an empty string.
Uses
- Class attribute: Number
this.uses
This is the number of uses that will be consumed from the Recipe Item if it is an ingredient, or the number of uses it will be produced with if it is a product.
Uses Variable Name
- Class attribute: String
this.usesVariableName
This is the variable name to use for the number of uses when a Recipe using this Recipe Item is carried out. It must be either an empty string, or a single uppercase basic Latin character. Defaults to an empty string.
Quantity Is Constant
- Class attribute: Boolean
this.quantityIsConstant
Whether or not the quantity of this Recipe Item is constant. In order to be a constant, a variable must not be given. However, whether the quantity is determined to be constant depends on the type of Recipe this Item belongs to.
If the Recipe is a crafting-type Recipe, then the quantity will always be a constant if no variable is given. That is
to say, if a Recipe Item is given with the syntax PREFAB ID in a crafting Recipe, the quantity will be
considered a constant.
If the Recipe is a processing-type Recipe, then the quantity will only be a constant if a quantity was explicitly
provided without a variable. For example, if a Recipe Item is given with the syntax PREFAB ID in a processing Recipe,
then it will not be considered constant even though no variable name was provided. In order for one to be considered
a constant, a quantity must be given with no variable, like so: 1 PREFAB ID.
Uses Is Constant
- Class attribute: Boolean
this.usesIsConstant
Whether or not the uses of this Recipe Item is constant. This is determined in the exact same way as
this.quantityIsConstant, except it depends on the number of uses instead of the quantity.
Room Item
Note
These were previously called Items, but were renamed in Alter Ego 2.0 to better differentiate them from Inventory Items.
A Room Item is a data structure used by Alter Ego. It represents an item in a Room that a Player can take with them. It is an instance of a Prefab, and is similar to an Inventory Item.
Attributes
Room Items themselves have relatively few attributes. However, being instances of Prefabs, they inherit many attributes as a result. Note that if an attribute is internal, that means it only exists within the RoomItem class. Internal attributes will be given in the “Class attribute” bullet point, preceded by their data type. If an attribute is external, it only exists on the spreadsheet. External attributes will be given in the “Spreadsheet label” bullet point.
Prefab ID
- Spreadsheet label: Prefab
- Class attribute: String
this.prefabId
This is the ID of the Prefab this Item is an instance of, as it was entered on the sheet.
Prefab
- Class attribute: Prefab
this.prefab
This is an internal attribute which contains a reference to the actual Prefab object this Room Item is an instance of. It gives the Room Item most of its properties. All of the Prefab’s attributes are accessible via this property.
Identifier
- Spreadsheet label: Container Identifier
- Class attribute: String
this.identifier
This is a unique name given to the Room Item if it is capable of containing other Room Items. This is necessary when loading Room Items in order for Alter Ego to determine which container the child Room Items belong to, in case there are multiple container Room Items with the same Prefab. Typically, this is the Prefab ID followed by a number (the standard followed by the itemManager module), but there are no naming rules for identifiers. No two Room Items or Inventory Items can have the same identifier. For an example of how this looks, see the following table:
| Prefab ID | Container Identifier | Location | Container | Quantity |
|---|---|---|---|---|
| VINYL GLOVE BOX | VINYL GLOVE BOX 1 | Kitchen | Fixture: HAND WASH STATION 1 | 1 |
| VINYL GLOVE BOX | VINYL GLOVE BOX 2 | Kitchen | Fixture: HAND WASH STATION 2 | 1 |
| VINYL GLOVES | Kitchen | RoomItem: VINYL GLOVE BOX 1/VINYL GLOVE BOX | 10 | |
| VINYL GLOVES | Kitchen | RoomItem: VINYL GLOVE BOX 2/VINYL GLOVE BOX | 10 |
For Room Items that are not capable of containing Room Items, this can be left blank.
Single Name
- Class attribute: String
this.name
This is an internal attribute which is inherited from the Prefab’s possible names. This is the single name that the Room Item was instantiated with. If the Prefab has multiple possible names, and the Room Item was instantiated with at least one procedural selection that satisfies one of the possible names, its single name will be the single name of the first of the Prefab’s possible names that it satisfied.
For example, if the Prefab has the possible names:
[base color=default: PLATE, PLATES], [glaze color=orange: ORANGE PLATE, ORANGE PLATES], [glaze color=brown: BROWN PLATE, BROWN PLATES], [base color=red: RED PLATE, RED PLATES], [base color=white: WHITE PLATE, WHITE PLATES]
And the Room Item was instantiated with the procedural selections (glaze color=orange + base color=white), then the
first set of possible names that will be satisfied is the set for glaze color=orange,
so the Room Item’s single name will be:
ORANGE PLATE
However, if the Prefab only has one set of possible names, then the Room Item’s single name will be the sole single name that the Prefab can have.
Note that a Room Item’s single name is set on creation, and cannot be changed afterwards.
Plural Name
- Class attribute: String
this.pluralName
This is an internal attribute which is inherited from the Prefab’s possible names. This is the plural name that the Room Item was instantiated with. If the Prefab has multiple possible names, and the Room Item was instantiated with at least one procedural selection that satisfies one of the possible names, its plural name will be the plural name of the first of the Prefab’s possible names that it satisfied. If that set of possible names does not have a plural name, it will be set as an empty string.
Otherwise, all of the same principles of the single name apply to the plural name as well. For the example above, the Room Item’s plural name would be:
ORANGE PLATES
Single Containing Phrase
- Class attribute: String
this.singleContainingPhrase
This is an internal attribute which is inherited from the Prefab’s possible containing phrases. This is the single containing phrase that the Room Item was instantiated with. If the Prefab has multiple possible containing phrases, and the Room Item was instantiated with at least one procedural selection that satisfies one of the possible containing phrases, its single containing phrase will be the single containing phrase of the first of the Prefab’s possible containing phrases that it satisfied.
For example, if the Prefab has the possible containing phrases:
[secondary base color=default: a TEACUP on a saucer, TEACUPS on saucers], [secondary glaze color=orange: an ORANGE TEACUP on a saucer, ORANGE TEACUPS on saucers], [secondary glaze color=brown: a BROWN TEACUP on a saucer, BROWN TEACUPS on saucers], [secondary base color=red: a RED TEACUP on a saucer, RED TEACUPS on saucers], [secondary base color=white: a WHITE TEACUP on a saucer, WHITE TEACUPS on saucers]
And the Room Item was instantiated with the procedural selections
(secondary glaze color=orange + secondary base color=white), then the first set of possible containing phrases that
will be satisfied is the set for secondary glaze color=orange, so the Room Item’s single containing phrase will be:
an ORANGE TEACUP on a saucer
However, if the Prefab only has one set of possible containing phrases, then the Room Item’s single containing phrase will be the sole single containing phrase that the Prefab can have.
Note that a Room Item’s single containing phrase is set on creation, and cannot be changed afterwards.
Plural Containing Phrase
- Class attribute: String
this.pluralContainingPhrase
This is an internal attribute which is inherited from the Prefab’s possible containing phrases. This is the plural containing phrase that the Room Item was instantiated with. If the Prefab has multiple possible containing phrases, and the Room Item was instantiated with at least one procedural selection that satisfies one of the possible containing phrases, its plural containing phrase will be the plural containing phrase of the first of the Prefab’s possible containing phrases that it satisfied. If that set of possible containing phrases does not have a plural containing phrase, it will be set as an empty string.
Otherwise, all of the same principles of the single containing phrase apply to the plural containing phrase as well. For the example above, the Room Item’s plural containing phrase would be:
ORANGE TEACUPS on saucers
Location Display Name
- Spreadsheet label: Location
- Class attribute: String
this.locationDisplayName
This is the display name of the Room that the Room Item can be found in. This must match the Room’s display name on the spreadsheet exactly, or its ID.
Location
- Class attribute: Room
this.location
This internal attribute is a reference to the actual Room object the Room Item can be found in.
Accessible
- Spreadsheet label: Accessible?
- Class attribute: Boolean
this.accessible
This is a simple Boolean value indicating whether the Room Item can currently be interacted with or not. If this is
true, then Players can inspect and take the Room Item. If it is false, Alter Ego will act as if the Room Item
doesn’t exist when a Player tries to interact with it in any way.
Container Name
- Spreadsheet label: Container
- Class attribute: String
this.containerName
This is the name of the container the Room Item can be found in. A Room Item’s container is the data structure whose description will mention the Room Item in an item list. When the Room Item is taken, the Room Item will be no longer appear in the item list in its container. Note that the Room Item’s container must be in the same Room as the Room Item itself.
In order to properly specify a Room Item’s container, the type of the container must be specified, then a colon, then
the container’s name. However, if the container is another Room Item, then its identifier must be given instead of its
name, and so must the ID of the Inventory Slot this Room Item is in, with both separated by a
forward slash (/). For some examples of correct container names, see the following table:
| Type | Name / Identifier | Inventory Slot ID | Container Name | Cell Contents |
|---|---|---|---|---|
| Fixture | SHELF | SHELF | Fixture: SHELF | |
| Puzzle | LOCKER 1 | LOCKER 1 | Puzzle: LOCKER 1 | |
| RoomItem | KIARAS BACKPACK 1 | MAIN POCKET | KIARAS BACKPACK 1/MAIN POCKET | RoomItem: KIARAS BACKPACK 1/MAIN POCKET |
Keep in mind that this attribute contains only the container name, as shown in the table. However, when entering this cell manually, it must be input as specified in the Cell Contents column of the table above.
Container Type
- Spreadsheet label: Container
- Class attribute: String
this.containerType
This is the type of the container the Room Item can be found in. This can be either Fixture, Puzzle, or RoomItem.
This attribute is set based on the type given in the same cell as the container name.
Container
This is an internal attribute which simply contains a reference to the actual Fixture, Puzzle, or Room Item object
whose name matches this.containerName and whose location is the same as the Room Item.
Slot
- Class attribute: String
this.slot
This is an internal attribute which simply contains the ID of the specific Inventory Slot that this Room Item is contained in. If this Room Item is not contained inside of another Room Item, this is an empty string.
Quantity
- Spreadsheet label: Quantity
- Class attribute: Number
this.quantity
This is a whole number indicating how many instances of this Room Item there are in the given container. So long as its quantity is greater than 0, this Room Item can be inspected and taken from its container. If no quantity is given, the Room Item will be treated as though it has an infinite quantity. Room Items capable of containing other Room Items cannot have a quantity greater than 1. Multiple instances of container Room Items must be entered as entirely different Room Items on the sheet, but they will be considered the same in certain contexts, such as in item lists.
Uses
- Spreadsheet label: Uses
- Class attribute: Number
this.uses
This is a whole number indicating how many times this Room Item can be used. Although this number is derived from a Room Item’s Prefab, it can be manually set to differ on the spreadsheet. If no number of uses is given, the Room Item can be used infinitely. Note that Room Items cannot be used by a Player directly, so this attribute primarily denotes how many times a Room Item can be used if it is turned into an Inventory Item by being taken. For more details, see the section about Inventory Item uses.
Alter Ego uses this attribute when processing this Room Item as part of a Recipe. If this Room Item is used as an ingredient and its Prefab is listed as a product in the Recipe, and it has a limited number of uses, its uses will be decreased every time the Recipe is finished processing. The amount by which its uses will decrease depends on how many times the ingredients contained in the Fixture the Room Item belongs to satisfy the Recipe being processed. If, when the Fixture is finished processing the Recipe, the Room Item’s uses are decreased to 0, one of two things will happen:
- If the Room Item’s Prefab has a next stage, then it will be destroyed and its next stage will be instantiated in its place.
- If the Room Item’s Prefab has no next stage, it will simply be destroyed.
Size
- Class attribute: Number
this.size
This is an internal attribute. It is a whole number inherited from the size of the Room Item’s Prefab.
Weight
- Class attribute: Number
this.weight
This is an internal attribute. It is a whole number inherited from the weight of the Room Item’s Prefab. If the Room Item is capable of containing other Room Items, the Room Items inside of it will add to its weight.
Inventory
- Class attribute:
Collection<string, Inventory Slot<Room Item>>
this.inventory
This is a collection of Inventory Slot objects that the Room Item has, where the key is the Inventory Slot’s ID. It is inherited from its Prefab. However, unlike its Prefab, the Room Item’s Inventory Slots can actually contain Room Items.
For more details, see the section about Prefab inventories.
Description
- Spreadsheet label: Description
- Class attribute: Description
this.description
This is the description of the Room Item. When a Player inspects this Room Item, they will receive a parsed version of this string. Note that this can be completely different from the description of the Room Item’s Prefab. Not only will its item lists actually mention the Room Items contained inside, but if the Prefab has procedural options, then when the Room Item is instantiated, its description will only contain the procedurals and possibilities that were selected.
See the article on writing descriptions for more information.
Unless it is manually specified, this Description will be sent
using the PLAIN_TEXT message display type.
Procedural Selections
This internal attribute is a map of procedural selections for the Room Item, where the key is the name of a
procedural tag in its description, and the value is the name of the poss tag that was selected in that procedural
when the Room Item was instantiated. This is used to determine which of the Prefab’s possible names and possible
containing phrases to assign to the Room Item during instantiation.
Regardless of what procedural selections were supplied when the Room Item was instantiated, this map will only contain the procedural selections that actually exist in the Room Item’s description. Any others are discarded and lost forever. As the Room Item’s description is inherited from the description of its Prefab, its procedural selections can only be procedural options that exist in the Prefab’s description, unless the Room Item was added to the sheet directly, with custom procedurals in its description that don’t exist in its Prefab. However, doing this is not recommended.
Procedural selections that belong to a Room Item are transferred whenever the Room Item is transformed into something else. This happens whenever a Room Item is processed by a Fixture as part of a Recipe. This can occur in one of two ways:
- If the Room Item has a limited number of uses and it is transformed into its Prefab’s next stage when its uses decreases to 0, its next stage will be instantiated with the same procedural selections.
- If a Room Item is used as an ingredient in a Recipe, then the procedural selections of all ingredients will be combined, and applied to all of the instantiated products.
The latter occurrence is especially useful, as it makes it possible to create Recipe chains in which procedural selections can be inherited and passed along to the next products in the chain. However, once again it is worth noting that if a next stage or a product does not have procedural options in its description that would be satisfied by a given procedural selection, that procedural selection will be discarded and lost when that Room Item is instantiated.
Row
- Class attribute: Number
this.row
This is an internal attribute, but it can also be found on the spreadsheet. This is the row number of the Room Item.
Methods
Room Items have a number of functions that can be useful to moderators. This is not an exhaustive list of publicly
accessible methods; only ones that are likely to be useful when writing Flag value scripts, or
if and var
tags in descriptions.
isItemContainer
this.isItemContainer();
- Purpose: Returns true if the room item is capable of containing items.
- Returns: Boolean
- Parameters: None
canCurrentlyContainItems
this.canCurrentlyContainItems(requireEmptySpace?, bypassLimitations?);
- Purpose: Returns true if the room item is currently capable of being taken from/dropped into.
- Returns: Boolean
- Parameters:
getContainedItems
this.getContainedItems();
getContainedItemsForItemList
this.getContainedItemsForItemList(itemListName?, player?);
- Purpose: Gets all of the items that should appear in the given item list.
- Returns: Array<Room Item>
- Parameters:
containsNoItems
this.containsNoItems();
- Purpose: Returns true if this entity contains no items.
- Returns: Boolean
- Parameters: None
containsItem
this.containsItem(identifier);
- Purpose: Returns true if this entity contains an item with the given identifier or prefab ID.
- Returns: Boolean
- Parameters:
- String
identifier- The identifier or prefab ID to search for.
- String
getContainedItem
this.getContainedItem(identifier);
- Purpose: Returns the item contained inside of this container with the given identifier or prefab ID. If no such item exists, returns undefined.
- Returns: Room Item
- Parameters:
- String
identifier- The identifier or prefab ID to search for.
- String
getContainedItemsWeight
this.getContainedItemsWeight();
- Purpose: Gets the combined weight of all the items this entity contains.
- Returns: Number
- Parameters: None
ownerIs
this.ownerIs(player);
- Purpose: Returns true if the owner of this item instance is the given player. For room items, always returns false.
- Returns: Boolean
- Parameters:
- Player
player- The player to check ownership against.
- Player
hasProceduralSelection
this.hasProceduralSelection([proceduralName, possName]);
- Purpose: Returns true if the item has the given procedural selection.
- Returns: Boolean
- Parameters:
Puzzle
A Puzzle is a data structure used by Alter Ego. Its primary purpose is to allow Players to interact with the game world and change its state in predictable, predefined ways. While this can be in the form of a gameplay puzzle that the Player can solve, a Puzzle can be far simpler than what would traditionally be called a puzzle in most games.
Attributes
In order to provide a versatile array of behaviors, Puzzles have many attributes. Note that if an attribute is internal, that means it only exists within the Puzzle class. Internal attributes will be given in the “Class attribute” bullet point, preceded by their data type. If an attribute is external, it only exists on the spreadsheet. External attributes will be given in the “Spreadsheet label” bullet point.
Name
- Spreadsheet label: Puzzle Name
- Class attribute: String
this.name
This is the name of the Puzzle. All letters should be capitalized, and spaces are allowed. Players will be able to interact with this Puzzle by using it as an argument in the use command. Note that multiple Puzzles can have the same name, so long as they are in different Rooms. However, to lower the likelihood of collisions and enable certain features, it is recommended that each Puzzle be given a unique name whenever possible.
Solved
- Spreadsheet label: Solved?
- Class attribute: Boolean
this.solved
This is a simple Boolean value indicating whether the Puzzle has already been solved or not. If this is true, then the
Puzzle has been solved. If it is false, then the Puzzle has not been solved. How this affects a Puzzle’s behavior
varies based on the Puzzle’s type, but in general, if the Puzzle has not been solved, then a Player
can attempt to solve it. If the Puzzle has been solved, then the Player will simply receive the text in
the already solved description.
Outcome
- Spreadsheet label: Outcome
- Class attribute: String
this.outcome
This is a string indicating which solution the Puzzle has been solved with, if any. If the Puzzle is not solved or only has one possible solution, then this must be blank. In general, this does not need to be set manually. Alter Ego will automatically set this when the Puzzle is solved, if it has multiple possible solutions. This should only be set manually if the Puzzle should be solved by default. If that is the case, then it should match exactly one of the Puzzle’s solutions.
Requires Moderator
- Spreadsheet label: Requires Mod?
- Class attribute: Boolean
this.requiresMod
This is another Boolean value indicating whether the Puzzle requires moderator
intervention to solve. If this is true, then the Puzzle can only be solved by using the
puzzle command, and a Player who
attempts to solve the Puzzle will receive the message “You need moderator assistance to do that.” If this is false,
then a Player will be able to attempt to solve the Puzzle freely.
A Puzzle that requires moderator intervention to solve can be useful in a few situations. A few examples are:
- A Puzzle whose solution cannot be entered in a Discord message and interpreted by Alter Ego, such as an image or an arrangement of items in a certain order,
- A Puzzle with an open-ended solution that requires a Player to think creatively,
- A Puzzle that can only be attempted under certain conditions,
- A Puzzle that is not intended to be solved until a certain time, and
- A Puzzle that is not intended to be directly interacted with, only existing for game-mechanic purposes.
By making use of this attribute, a Puzzle can be given greater flexibility of solutions, while still making use of the predefined behavior that makes Puzzles such a useful data type.
Location Display Name
- Spreadsheet label: Location
- Class attribute: String
this.locationDisplayName
This is the display name of the Room that the Puzzle can be found in. This must match the Room’s display name on the spreadsheet exactly, or its ID.
Location
- Class attribute: Room
this.location
This internal attribute is a reference to the actual Room object the Puzzle can be found in.
Parent Fixture Name
- Spreadsheet label: Parent Fixture
- Class attribute: String
this.parentFixtureName
This is the name of a Fixture that is associated with the Puzzle, if any. The parent Fixture must be in
the same Room as the Puzzle referencing it. If the name of a Fixture is supplied, then a Player will be able to supply
the name of the parent Fixture as an argument in the use command instead of the name of the Puzzle.
Narrations involving the Puzzle will also use the parent Fixture’s name instead of the Puzzle’s
name. This is particularly useful if every Puzzle is given a unique name. For example, if the Puzzle is named “PANIC
BUTTON” and the parent Fixture is named “YELLOW BUTTON”, then a Player will be able to interact with the Puzzle by
sending .use YELLOW BUTTON or .use PANIC BUTTON. When the Puzzle is interacted with by a Player named Haru, Alter
Ego will send “Haru uses the YELLOW BUTTON.” to the PANIC BUTTON’s Room channel.
Additionally, by assigning a Puzzle a parent Fixture, it becomes possible for the Puzzle to contain Room Items. This allows Room Items to be made inaccessible until the Puzzle is solved, while also allowing Players to take and drop Room Items from/into the parent Fixture if the Puzzle is solved. When a Fixture capable of containing Items is assigned a child Puzzle, the item list must be in the Puzzle’s already solved description. If no parent Fixture is needed, this cell can simply be left blank on the spreadsheet.
Parent Fixture
This is an internal attribute which simply contains a reference to the actual Fixture object whose name matches
this.parentFixtureName and whose location is the same as the Puzzle. If no parent Fixture name is given, this will be
null instead.
Parent Object Name
Warning
This attribute is deprecated and will be removed in a future release.
Use
this.parentFixtureNameinstead.
- Class attribute: String
this.parentObjectName
This internal attribute is a copy of the parent Fixture name. It is named this way because Fixtures were named Objects prior to Alter Ego version 2.0. This attribute will be removed in the future.
Parent Object
Warning
This attribute is deprecated and will be removed in a future release.
Use
this.parentFixtureinstead.
- Class attribute: null
this.parentObject
This is an internal attribute left over from when Fixtures were named Objects prior to Alter Ego version 2.0. This is
never assigned, so it is always null. This attribute will be removed in the future.
Type
- Spreadsheet label: Type
- Class attribute: String
this.type
This is a string which determines the specific behavior of the Puzzle. This must match exactly one of the predefined
Puzzle types that have been programmed into Alter Ego. Here, each Puzzle type will be listed, and their behavior will be
detailed. Note that if the term [PUZZLE NAME] is used, it doesn’t necessarily refer to the Puzzle’s name attribute. It
can refer to that, or the name of the Puzzle’s parent Fixture, if it has one.
password
- A Player must enter the correct password in order to solve the Puzzle. The password is case-sensitive.
- If a Player enters an incorrect password, they will be sent the Puzzle’s incorrect description.
- Once the Puzzle has been solved, it can never be directly unsolved by a Player without moderator intervention.
- If a Player attempts to solve the Puzzle again, they will be sent the Puzzle’s already solved description.
- When a Player interacts with the Puzzle in any way, whether they solve it or not, Alter Ego will narrate
[Player displayName] uses the [PUZZLE NAME].in the Puzzle’s Room channel.
interact
- A Player must only interact with the Puzzle in order to solve it.
- Once the Puzzle has been solved, it can never be directly unsolved by a Player without moderator intervention.
- If a Player attempts to solve the Puzzle again, they will be sent the Puzzle’s already solved description.
- When a Player interacts with the Puzzle in any way, whether they solve it or not, Alter Ego will narrate
[Player displayName] uses the [PUZZLE NAME].in the Puzzle’s Room channel.
matrix
- The Puzzle behaves exactly the same as an
interact-type Puzzle. However, its command sets have special behavior. - When the Puzzle’s solved/unsolved commands are executed, its requirements are accessible in
the commands being executed.
- If a command contains the name of one of its required Puzzles in curly braces (for example:
{PUZZLE NAME}), that text will be replaced with that Puzzle’s outcome before it is executed. - If a command contains the ID of one of its required Flags in curly braces
(for example:
{ONCE GLAZED SCULPTURE IDENTIFIER}) and that Flag has a String value, that text will be replaced with the Flag’s value before it is executed. Note that although the example Flag must have been listed in the requirements in the formFlag: ONCE GLAZED SCULPTURE IDENTIFIER, theFlag:prefix must be omitted here. - Requirements of other data types cannot be used for find-and-replace in
matrix-type Puzzles.
- If a command contains the name of one of its required Puzzles in curly braces (for example:
- This special behavior allows solved/unsolved commands to have variable arguments that result in different behavior depending on the state of the Puzzle’s requirements. This is especially useful for instantiating procedurally-generated Prefabs with possibilities manually selected by a Player in other Puzzles. However, this behavior can be used in any of the Puzzle’s bot commands.
toggle
- A Player must only interact with the Puzzle in order to solve it.
- Once the Puzzle has been solved, it can be unsolved when a Player interacts with it again. This allows it to be “toggled” between two states at will.
- When a Player interacts with the Puzzle, whether they solve or unsolve it, Alter Ego will narrate
[Player displayName] uses the [PUZZLE NAME].in the Puzzle’s Room channel. However, if the Player attempts to unsolve it and the requirements have not all been met, Alter Ego will narrate[Player displayName] attempts to use the [PUZZLE NAME], but struggles.instead.
player
- A Player must only interact with the Puzzle in order to solve it. However, the Player’s name must match one of the Puzzle’s solutions. The name is case-sensitive.
- If a Player attempts to solve the Puzzle and their name is not listed as one of its solutions, they will be sent the Puzzle’s incorrect description.
- Once the Puzzle has been solved, it can never be directly unsolved by a Player without moderator intervention.
- If a Player attempts to solve the Puzzle again, they will be sent the Puzzle’s already solved description, even if they would not be able to solve it themself.
- When a Player interacts with the Puzzle in any way, whether they solve it or not, Alter Ego will narrate
[Player displayName] uses the [PUZZLE NAME].in the Puzzle’s Room channel.
room player
- A Player must enter the display name of a Player in the same Room as them in order to solve the Puzzle. However, the chosen Player’s display name must match one of the Puzzle’s solutions. The display name is not case-sensitive.
- If a Player solves the Puzzle, Alter Ego will narrate
[Player displayName] uses the [PUZZLE NAME].in the Puzzle’s Room channel. When the Puzzle’s solved commands are executed, the selected Player will be passed into the commandHandler module. As a result, any bot commands that use theplayerargument will execute as if the selected Player was the one who initiated them. - Once the Puzzle has been solved, it can never be directly unsolved by a Player without moderator intervention.
- If a Player attempts to solve the Puzzle again, they will be sent the Puzzle’s already solved description. Alter Ego
will narrate
[Player displayName] uses the [PUZZLE NAME].in the Puzzle’s Room channel. - If a Player fails to solve the Puzzle, Alter Ego will narrate
[Player displayName] attempts to use the [PUZZLE NAME], but struggles.in the Puzzle’s Room channel.
player toggle
- A Player must only interact with the Puzzle in order to solve it. However, the Player’s name must match one of the Puzzle’s solutions. The name is case-sensitive.
- If a Player attempts to solve the Puzzle and their name is not listed as one of its solutions, they will be sent the Puzzle’s incorrect description.
- Once the Puzzle has been solved, it can be unsolved by the Player whose name matches the current outcome, as long as all of the Puzzle’s requirements are met. Effectively, this means it can only be unsolved by the Player who solved it.
- If a Player attempts to unsolve the Puzzle, but they are not the Player given in the Puzzle’s outcome, or they attempt to unsolve it and the requirements have not all been met, they will be sent its already solved description.
- When a Player interacts with the Puzzle, whether they solve or unsolve it, Alter Ego will narrate
[Player displayName] uses the [PUZZLE NAME].in the Puzzle’s Room channel.
combination lock
- A Player must enter the correct password in order to solve the Puzzle. The password is case-sensitive. If a Player
solves the Puzzle, Alter Ego will narrate
[Player displayName] unlocks the [PUZZLE NAME].in the Puzzle’s Room channel. - Once the Puzzle has been solved, it can be unsolved when a Player attempts to solve it again using an incorrect password or by using the lock alias for the use command.
- If a Player unsolves the Puzzle, they will be sent its unsolved description, and Alter Ego will narrate
[Player displayName] locks the [PUZZLE NAME].in the Puzzle’s Room channel. - If the Puzzle is already solved and a Player attempts to solve the Puzzle again using the right password, or without
supplying a password, they will be sent its already solved description, and Alter Ego will narrate
[Player displayName] opens the [PUZZLE NAME].in the Puzzle’s Room channel. - If a Player fails to solve the Puzzle, they will be sent its incorrect description, and Alter Ego will narrate
[Player displayName] attempts and fails to unlock the [PUZZLE NAME].in the Puzzle’s Room channel.
key lock
- A Player must have an Inventory Item based on the Prefab specified in the Puzzle’s
solution in order to solve the Puzzle. If the Puzzle has no solutions, it behaves almost identically to a
toggle-type Puzzle. If a Player solves the Puzzle, Alter Ego will narrate[Player displayName] unlocks the [PUZZLE NAME].in the Puzzle’s Room channel. - Once the Puzzle has been solved, it can be unsolved when a Player uses the lock alias for the use command, but only if
they have the required Inventory Item. If the Player does not have the required Inventory Item, they will be sent the
Puzzle’s requirements not met description, and Alter Ego will narrate
[Player displayName] attempts and fails to lock the [PUZZLE NAME].in the Puzzle’s Room channel. - If a Player unsolves the Puzzle, they will be sent its unsolved description, and Alter Ego will narrate
[Player displayName] locks the [PUZZLE NAME].in the Puzzle’s Room channel. - If the Puzzle is already solved and a Player attempts to solve the Puzzle again while holding the required Inventory
Item, Alter Ego will narrate
[Player displayName] opens the [PUZZLE NAME].in the Puzzle’s Room channel.
probability
- A Player must only interact with the Puzzle in order to solve it. One of the Puzzle’s solutions will be randomly chosen as the outcome.
- Once the Puzzle has been solved, it can never be directly unsolved by a Player without moderator intervention.
- If a Player attempts to solve the Puzzle again, they will be sent the Puzzle’s already solved description.
- When a Player interacts with the Puzzle in any way, whether they solve it or not, Alter Ego will narrate
[Player displayName] uses the [PUZZLE NAME].in the Puzzle’s Room channel.
stat probability
- A Player must only interact with the Puzzle in order to solve it. A stat-weighted Die will be rolled to semi-randomly choose one of the Puzzle’s solutions as the outcome.
- There are five versions of this Puzzle type:
str probability,per probability,dex probability,spd probability, andsta probability. The stat that the Die is weighted with determines which of the Player’s stats will be used. The Player’s roll modifier in that stat will be applied to the initial roll, and the ratio of the final result to the maximum Die value is multiplied by the number of solutions to determine the outcome. In effect, this means that a higher stat value is more likely to consistently yield outcomes which appear later in the list of solutions; whereas a lower stat value is more likely to consistently yield outcomes which appear first in the list of solutions. A Player with a stat value of 1, for example, may never get the final listed solution and a Player with a stat value of 10 may never get the first listed solution, depending on how many solutions there are and the range of possible Die rolls. - The precision of outcomes is limited by the range of Die values. For example, if the Die has a minimum of 1 and a maximum of 6, but there are 20 solutions, some outcomes may be impossible to achieve.
- Once the Puzzle has been solved, it can never be directly unsolved by a Player without moderator intervention.
- If a Player attempts to solve the Puzzle again, they will be sent the Puzzle’s already solved description.
- When a Player interacts with the Puzzle in any way, whether they solve it or not, Alter Ego will narrate
[Player displayName] uses the [PUZZLE NAME].in the Puzzle’s Room channel.
channels
- A Player must only interact with the Puzzle in order to solve it. However, the Player can also enter the correct
password to solve the Puzzle. The password is case-sensitive. If a password is supplied, it will be used as the
outcome. If no password is supplied and the Puzzle has no current outcome, the first solution in the list will be used
as the outcome. If no password is supplied and the Puzzle does have a current outcome, that outcome will be used.
If a Player solves the Puzzle, Alter Ego will narrate
[Player displayName] turns on the [PUZZLE NAME].in the Puzzle’s Room channel. - Once the Puzzle has been solved, it can be unsolved when a Player interacts with the Puzzle without providing a password. The outcome that the Puzzle was previously solved with will be retained and used if the Player solves the Puzzle again without providing a password.
- If a Player unsolves the Puzzle, they will be sent its unsolved description, and Alter Ego will narrate
[Player displayName] turns off the [PUZZLE NAME].in the Puzzle’s Room channel. - If the Puzzle is already solved and a Player attempts to solve the Puzzle again using a correct solution, they will
solve it again with that solution as the outcome, and Alter Ego will narrate
[Player displayName] changes the channel to [outcome] on the [PUZZLE NAME].in the Puzzle’s Room channel. - If a Player fails to solve the Puzzle, they will be sent its incorrect description, and Alter Ego will narrate
[Player displayName] attempts and fails to change the channel on the [PUZZLE NAME].in the Puzzle’s Room channel.
weight
- A Player must take from or drop into the Puzzle a Room Item which makes the total weight of all Room Items contained in the Puzzle equal one of the Puzzle’s solutions in order to solve the Puzzle. In order to prevent the Player from simply entering the correct weight as a password with the use command, the Puzzle should be made inaccessible.
- Once the Puzzle has been solved, it can be unsolved when the Player takes from or drops into the Puzzle a Room Item which makes the total weight of all Room Items in the Puzzle not equal one of its solutions. The Player will be sent its unsolved description.
- If a Player fails to solve the Puzzle, they will be sent its incorrect description.
- When a Player interacts with the Puzzle in any way, whether they solve it or not, Alter Ego will not narrate anything in the Puzzle’s Room channel.
container
- A Player must take from or drop into the Puzzle a Room Item which makes it contain all of the Room Items listed in one
of its solutions. Every time a Room Item is dropped into the Puzzle, Alter Ego will check if the complete list of
Room Items contained inside it matches one of its solutions. If multiple Room Items are required to solve
the Puzzle, they should be separated with a plus sign (
+) in the solution. In order to prevent the Player from simply entering the Prefab IDs as a password with the use command, the Puzzle should be made inaccessible. - Once the Puzzle has been solved, it can be unsolved when the Player takes from or drops into the Puzzle a Room Item. However, if the new list of contained Room Items is also a valid solution, the Puzzle will immediately be solved again using them as an outcome. Otherwise, the Player will be sent its unsolved description.
- If a Player fails to solve the Puzzle, they will be sent its incorrect description.
- When a Player interacts with the Puzzle in any way, whether they solve it or not, Alter Ego will not narrate anything in the Puzzle’s Room channel.
take
- A Player must take from the Puzzle a Room Item listed in one of its solutions in order to solve it.
- Once the Puzzle has been solved, it can be solved again by taking a Room Item listed in one of its solutions. It can be solved repeatedly this way. It can never be directly unsolved by a Player without moderator intervention.
- If a Player takes a Room Item from the Puzzle that is not listed among its solutions, they will fail to solve the Puzzle, and they will be sent its incorrect description.
- When a Player interacts with the Puzzle in any way, whether they solve it or not, Alter Ego will not narrate anything in the Puzzle’s Room channel. However, if the Room Item is non-discreet, it will still narrate that they took it.
drop
- A Player must drop into the Puzzle a Room Item listed in one of its solutions in order to solve it.
- Once the Puzzle has been solved, it can be solved again by dropping a Room Item listed in one of its solutions into it. It can be solved repeatedly this way. It can never be directly unsolved by a Player without moderator intervention.
- If a Player drops a Room Item into the Puzzle that is not listed among its solutions, they will fail to solve the Puzzle, and they will be sent its incorrect description.
- When a Player interacts with the Puzzle in any way, whether they solve it or not, Alter Ego will not narrate anything in the Puzzle’s Room channel. However, if the Room Item is non-discreet, it will still narrate that they dropped it.
voice
- A Player must say the correct password in the Puzzle’s location to solve it. The password is case-insensitive, and non-alphanumeric (A-Z, 0-9, and spaces) characters will be ignored. Additionally, the Player’s whole message does not need to be the password; it only needs to contain it. For example, if the password is “unlock the door”, then a Player who says “How do I unlock the door?” will still solve the Puzzle.
- It is worth nothing that even if the Player is not in the Room directly, as long as their dialog is audible in the
Room that the Puzzle is in, and the dialog is not whispered, they will solve the Puzzle.
This can happen when:
- A Player shouts the correct password in a Room adjacent to the Puzzle,
- A Player with the
senderbehavior attribute says the correct password while a Player with thereceiverbehavior attribute is in the Room that the Puzzle is in, or - A Player says the correct password and their dialog is transmitted to the Room that the Puzzle is in, because it
has the
audio monitoringtag.
- Once the Puzzle has been solved, it can never be directly unsolved by a Player without moderator intervention.
- If the Puzzle is already solved and a Player attempts to solve the Puzzle again with a valid solution, they will solve it again with that solution as the outcome.
- When a Player interacts with the Puzzle in any way, whether they solve it or not, Alter Ego will not narrate anything in the Puzzle’s Room channel.
switch
- A Player must enter the correct password in order to solve the Puzzle. The password is case-sensitive. If a Player
solves the Puzzle, Alter Ego will narrate
[Player displayName] sets the [PUZZLE NAME] to [outcome].in the Puzzle’s Room channel. - A
switch-type Puzzle can never be unsolved under any circumstances; it can only be set to different outcomes. For this reason, Alter Ego will fail to loadswitch-type Puzzles that are not solved and which do not have an outcome set. - If the Player attempts to solve the Puzzle again using the same password as the current outcome,
they will be sent its already solved description, and Alter Ego will narrate
[Player displayName] uses the [PUZZLE NAME], but nothing happens.in the Puzzle’s Room channel. - If a Player fails to solve the Puzzle, they will be sent its incorrect description, and Alter Ego will narrate
[Player displayName] attempts to set the [PUZZLE NAME], but struggles.in the Puzzle’s Room channel.
option
- A Player must enter the correct password in order to solve the Puzzle. The password is case-sensitive. If a Player
solves the Puzzle, Alter Ego will narrate
[Player displayName] sets the [PUZZLE NAME] to [outcome].in the Puzzle’s Room channel. - Once the Puzzle has been solved, it can be unsolved when a Player attempts to solve it without supplying a password.
- If a Player unsolves the Puzzle, they will be sent its unsolved description, and Alter Ego will narrate
[Player displayName] resets the [PUZZLE NAME].in the Puzzle’s Room channel. - If the Puzzle is already solved and a Player attempts to solve it again with a valid solution that is different from the current outcome, they will solve it again.
- If the Puzzle is already solved and a Player attempts to solve it again using the same password as the current
outcome, they will be sent its already solved description, and Alter Ego will narrate
[Player displayName] sets the [PUZZLE NAME], but nothing changes.in the Puzzle’s Room channel. - If a Player fails to solve the Puzzle, they will be sent its incorrect description, and Alter Ego will narrate
[Player displayName] attempts to set the [PUZZLE NAME], but struggles.in the Puzzle’s Room channel.
media
- A Player must provide the name of an Inventory Item in their inventory which is one of the Puzzle’s solutions in order
to solve the Puzzle. Unlike other Puzzle types which require an Inventory Item to solve, the name of the Inventory
Item must be provided in the Player’s use command; simply having it in their inventory isn’t sufficient. If a
Player solves the Puzzle, Alter Ego will narrate
[Player displayName] inserts [item phrase] into the [PUZZLE NAME].in the Puzzle’s Room channel. The item phrase can be one of two things: if the Inventory Item’s Prefab is discreet, it will simply be “an item”; otherwise, it will be the Inventory Item’s single containing phrase. - Once the Puzzle has been solved, it can be unsolved when a Player interacts with the Puzzle without providing the name of an Inventory Item.
- If a Player unsolves the Puzzle, they will be sent the Puzzle’s unsolved description, and Alter Ego will narrate
[Player displayName] presses eject on the [PUZZLE NAME].in the Puzzle’s Room channel. - If the Puzzle is already solved and a Player attempts to solve the Puzzle again with one of the Puzzle’s solutions,
they will be sent the Puzzle’s already solved description, and Alter Ego will narrate
[Player displayName] attempts to insert [item phrase] into the [PUZZLE NAME], but something is already inside.in the Puzzle’s Room channel. - If a Player fails to solve the Puzzle, Alter Ego will narrate
[Player displayName] attempts to insert [item phrase] into the [PUZZLE NAME], but it doesn't fit.in the Puzzle’s Room channel. The item phrase can be one of two things: if the Inventory Item’s Prefab is discreet, it will simply be “an item”; otherwise, it will be the Inventory Item’s single containing phrase. - If a Player attempts to solve the Puzzle without specifying the name of an Inventory Item, they will be sent its
requirements not met description, and Alter Ego will narrate
[Player displayName] attempts to use the [PUZZLE NAME], but struggles.in the Puzzle’s Room channel.
exit
- A Player must exit the Puzzle’s location through the Exit whose name matches the name of this Puzzle in order to solve it. However, if the Exit is locked, they will still be unable to pass through it, and thus unable to solve it. They will only solve the Puzzle if it has no listed solutions, or if their name is listed as a solution.
- If the Player solves the Puzzle and their name is listed as a solution, their name will be set as the Puzzle’s
outcome. If the Puzzle has no solutions, they will still solve it, but the outcome will be set as
undefined. - Once the Puzzle has been solved, it can never be directly unsolved by a Player without moderator intervention.
- Even if the Puzzle has been solved, it will be repeatedly solved any time a Player moves through the Exit, if they would be able to solve it otherwise.
- When a Player interacts with the Puzzle in any way, whether they solve it or not, Alter Ego will not narrate anything in the Puzzle’s Room channel.
restricted exit
- A Player must exit the Puzzle’s location through the Exit whose name matches the name of this Puzzle in order to solve it. However, the Player’s name must match one of the Puzzle’s solutions, and the Puzzle must be accessible. The Exit must be in the same Room as the Puzzle.
- If the Player solves the Puzzle, they will be able to move through the Exit, even if it’s locked.
- Once the Puzzle has been solved, it can never be directly unsolved by a Player without moderator intervention.
- Even if the Puzzle has been solved, it will be repeatedly solved any time a Player moves through the Exit if they are listed in its solutions and the Puzzle is accessible.
- When a Player interacts with the Puzzle in any way, whether they solve it or not, Alter Ego will not narrate anything in the Puzzle’s Room channel.
Accessible
- Spreadsheet label: Accessible?
- Class attribute: Boolean
this.accessible
This is a Boolean value indicating whether the Puzzle can currently be interacted with or not. If this is true,
then Players can attempt to solve the Puzzle with the use command. However, if the Puzzle has requirements and not all
of them are met, the Puzzle will be made inaccessible. If it is false, then a number of things will happen when a
Player uses the Puzzle, based on various factors. If the Puzzle has any requirements, Alter Ego will check each one to
see if it is met.
If all requirements are met, the Puzzle will be made accessible, and the Player will be able to attempt to solve it.
If all requirements are not met, the Player will receive the Puzzle’s
requirements not met description, and Alter Ego will narrate
[Player displayName] uses the [PUZZLE NAME]. in the Puzzle’s Room channel. However, if the
Puzzle has no requirements not met description, Alter Ego will act as if the Puzzle doesn’t exist if the Player tries
to use it, and no Narration will be sent.
Note that if a Puzzle’s type is weight, container, take, or drop, the Puzzle does not need to be accessible to
be attempted. However, its requirements will still be evaluated, and its accessibility updated accordingly.
Requirements Strings
This is a comma-separated list of strings corresponding to Puzzle names, Event IDs, Prefab IDs, and/or Flag IDs that are required for the Puzzle to be made accessible if it is not already, and vice versa. They have the following structure:
interface PuzzleRequirement {
    /** The type of entity required. Either `Puzzle`, `Event`, `Flag`, or `Prefab`. **/
    type: string;
    /** The ID of the required entity. */
    entityId: string;
}
Required Puzzle names must match a Puzzle’s name exactly on the spreadsheet, although they can
optionally be prefixed with Puzzle: . They do not need to be in the same Room as the Puzzle that requires them. If
there are multiple Puzzles with the same name as one that is required, then the first to appear on the sheet will be
required. For this reason, it is strongly suggested that Puzzles are given unique names. If a Puzzle is a requirement,
then it must be solved in order for the requirement to be considered met.
Prefabs can also be listed as requirements. However, they must be prefixed with Prefab: , Item: , RoomItem: ,
or InventoryItem: , followed by the Prefab ID. None of these aliases affect the requirement in any way — they will
all be interpreted as a Prefab requirement. If a Prefab is a requirement, then the Player must have an Inventory
Item based on that Prefab for the requirement to be considered met. Additionally, if a Prefab requirement is present,
and the Item being used to solve the Puzzle has a limited number of uses,
its uses will be decremented. This can result in it being transformed into its next stage,
or even destroyed, if its uses is decremented to 0.
Events can additionally be listed as requirements. However, they must be prefixed with Event: , followed by the
Event ID. If an Event is a requirement, then it must be ongoing for the requirement to be considered met.
Flags can additionally be listed as requirements. However, they must be prefixed with Flag: , followed by the Flag
ID. If a Flag is a requirement, its value script will be evaluated first, if it has one.
It must either have a String value that is not empty, or have a Boolean value that is true
for the requirement to be considered met.
In order for a Puzzle to be made accessible, all of its requirements must be met.
Requirements
This is an internal attribute which contains references to each of the Puzzle, Prefab, Event, and Flag objects whose
IDs are listed in this.requirementsStrings.
Solutions
This is a comma-separated list of accepted solutions to the Puzzle. There is no limit to how many solutions can be listed. There are two types of solutions: passwords and items.
Password solutions are generally case-sensitive and generally must be given in the Player’s use command in order to attempt to solve the Puzzle, although this varies by Puzzle type.
Item solutions must consist of Item: , Prefab: , or InventoryItem: followed by a Prefab ID. In general, Item
solutions require only that the Player have an Inventory Item of the given Prefab in their inventory in order to solve
the Puzzle. In some situations, listing an Item as a requirement or as a solution to the Puzzle produces identical
behavior. The difference, however, is that required Items must all be present in the Player’s inventory, whereas an
Item solution only requires one Item in the Player’s inventory to solve the Puzzle.
A Puzzle can only be solved with one solution as its outcome at a time.
Remaining Attempts
- Spreadsheet label: Remaining Attempts
- Class attribute: Number
this.remainingAttempts
This is a whole number indicating how many times the Puzzle can be failed. Each time a Player attempts to solve the Puzzle and fails, this number will decrease by 1. If this reaches 0, the Puzzle cannot be solved, even if the correct solution is provided, and a Player who attempts to do so will receive the Puzzle’s no more attempts description. If no number is given, the Puzzle can be attempted and failed infinitely many times.
In general, it is good practice to indicate how many attempts a Puzzle has remaining before a Player attempts to solve it by including that information in the parent Fixture’s description. Otherwise, multiple Players may independently attempt to solve it for the first time, unaware that it has a limited number of attempts, and its number of attempts will be quickly exhausted.
It is also good practice not to lock important information behind a Puzzle with a limited number of attempts. It is not possible to restore the number of attempts except by editing its remaining attempts manually on the spreadsheet. The best use case for a Puzzle with a limited number of attempts is to restrict access to an optional, powerful Item that is not needed for anything else.
Command Sets String
- Spreadsheet label: When Solved / Unsolved
- Class attribute: String
this.commandSetsString
This is a comma-separated list of sets of bot commands that will be executed when the Puzzle is solved or unsolved.
If the Puzzle has only one solution, then command sets are implicit, and do not need to be written. Instead, a simple
list of commands is sufficient. This takes the form of a comma-separated list of bot commands that will be executed when
the Puzzle is solved. A comma-separated list of bot commands that will be executed when the Puzzle is unsolved can also
be included, with both sets separated by a forward slash (/). If no unsolved commands are desired, then the forward
slash can be omitted from the cell. If no solved commands are desired but unsolved commands are, the forward slash
should be the first character in the cell, with the unsolved commands following it.
Note that when writing bot commands, it is good practice to be as precise as possible and provide room IDs if they are permitted, in order to prevent potential bugs.
These are all valid examples of commands for a Puzzle with only one solution:
unsolve GREEN 12, unsolve PANEL 12 floor-2-hall-3, lock suite-12 DOORset accessible puzzle items LOCKER 1 locker-room / set inaccessible puzzle items LOCKER 1 locker-room/ set inaccessible fixture INPUT computer-lab
If the Puzzle has multiple solutions, then the command set format is required, with each set being comma-separated. The correct format is:
[solution 1(, solution 2(, solution N)): solved commands / unsolved commands]
Multiple solutions can share the same set of commands. The same rules as above apply, however there is one additional
rule to keep in mind: Item solutions must be listed exactly as they appear in the solutions set, with the Item: ,
Prefab: , or InventoryItem: prefix.
Due to the complexity of multi-solution Puzzles, their list of command sets can get quite long. For this reason, it is best to learn and master regex in order to write command sets. RegExr is an excellent resource for practicing and using regex.
These are all valid examples of Puzzles with multiple solutions:
-
[17, seventeen: unlock suite-10 VENT / lock suite-10 VENT] -
[2: solve VENT suite-2, unlock suite-2 VENT / unsolve VENT suite-2, lock suite-2 VENT], [3, 4, 5, 6, 19, 27, 30, 42, 43, 49, 65, 66, 69, 83, 91: unsolve VENT suite-2, lock suite-2 VENT] -
[OPEN: trigger BLAST DOOR 1, unlock cave-11 TUNNEL 1, unlock cave-11 TUNNEL 2, unlock cave-11 TUNNEL 3, trigger EXPLOSION COUNTDOWN END], [CLOSED: end BLAST DOOR 1, lock cave-11 TUNNEL 1, lock cave-11 TUNNEL 2, lock cave-11 TUNNEL 3] -
[Item: BLUE DANUBE CD: destroy player BLUE DANUBE CD, trigger BLUE DANUBE WALTZ / end BLUE DANUBE WALTZ, instantiate BLUE DANUBE CD on FLOOR at ballroom], [Item: EINE KLEINE NACHTMUSIK CD: destroy player EINE KLEINE NACHTMUSIK CD, trigger EINE KLEINE NACHTMUSIK WALTZ / end EINE KLEINE NACHTMUSIK WALTZ, instantiate EINE KLEINE NACHTMUSIK CD on FLOOR at ballroom], [Item: FUR ELISE CD: destroy player FUR ELISE CD, trigger FUR ELISE WALTZ / end FUR ELISE WALTZ, instantiate FUR ELISE CD on FLOOR at ballroom], [Item: BEETHOVENS FIFTH CD: destroy player BEETHOVENS FIFTH CD, trigger BEETHOVENS FIFTH WALTZ / end BEETHOVENS FIFTH WALTZ, instantiate BEETHOVENS FIFTH CD on FLOOR at ballroom], [Item: FOUR SEASONS CD: destroy player FOUR SEASONS CD, trigger FOUR SEASONS WALTZ / end FOUR SEASONS WALTZ, instantiate FOUR SEASONS CD on FLOOR at ballroom], [Item: MARRIAGE OF FIGARO CD: destroy player MARRIAGE OF FIGARO CD, trigger MARRIAGE OF FIGARO WALTZ / end MARRIAGE OF FIGARO WALTZ, instantiate MARRIAGE OF FIGARO CD on FLOOR at ballroom], [Item: CANON IN D MAJOR CD: destroy player CANON IN D MAJOR CD, trigger CANON IN D MAJOR WALTZ / end CANON IN D MAJOR WALTZ, instantiate CANON IN D MAJOR CD on FLOOR at ballroom], [Item: CLAIR DE LUNE CD: destroy player CLAIR DE LUNE CD, trigger CLAIR DE LUNE WALTZ / end CLAIR DE LUNE WALTZ, instantiate CLAIR DE LUNE CD on FLOOR at ballroom] -
[TIRAMISU, tiramisu: solve DESSERT IN PROGRESS player "Nestor begins preparing a dessert for player.", wait 60, instantiate TIRAMISU on TABLES at estia, unsolve DESSERT IN PROGRESS player "Penelope places a serving of TIRAMISU on one of the TABLES for player.", unsolve DESSERTS estia], [EK MEK, ek mek: solve DESSERT IN PROGRESS player "Nestor begins preparing an appetizer for player.", wait 60, instantiate EK MEK on TABLES at estia, unsolve DESSERT IN PROGRESS player "Penelope places a serving of EK MEK on one of the TABLES for player.", unsolve DESSERTS estia], [GELATO, gelato: solve DESSERT IN PROGRESS player "Nestor begins preparing a dessert for player.", wait 60, instantiate GELATO on TABLES at estia, unsolve DESSERT IN PROGRESS player "Penelope places a bowl of GELATO on one of the TABLES for player.", unsolve DESSERTS estia]
Command Chaining
When a Puzzle’s commands solve or unsolve another Puzzle, its commands will not be executed. This is to guard against infinite loops, which can cause Alter Ego to crash. However, it is possible to circumvent this by causing an Event’s triggered/ended commands or a Flag’s set/cleared commands to be executed, which in turn cause a Puzzle’s solved/unsolved to be executed. This practice is called command chaining, and it can be utilized to achieve very complex behavior.
To give an example, suppose there are the following Puzzles:
| Puzzle Name | When Solved / Unsolved |
|---|---|
| KEYPAD | trigger SEED VAULT GAS WARNING |
| SEED VAULT GAS PROCEED | trigger SEED VAULT GAS, wait 10, unsolve SEED VAULT GAS PROCEED |
| SEED VAULT GAS FINISH | trigger SEED VAULT GAS SAFE, wait 10, unsolve SEED VAULT GAS FINISH |
And the following Events:
| Event ID | Duration | When Triggered / Ended |
|---|---|---|
| SEED VAULT GAS WARNING | 30s | / solve SEED VAULT GAS PROCEED |
| SEED VAULT GAS | 270s | lock seed-vault DOOR / unsolve KEYPAD seed-vault, solve SEED VAULT GAS FINISH |
| SEED VAULT GAS SAFE | 2m | / unlock seed-vault DOOR |
When the KEYPAD Puzzle is solved, whether by a Player or some other means, it will trigger SEED VAULT GAS WARNING. Much like Puzzles cannot cause Puzzles’ commands to be executed, Events cannot cause Events’ commands to be executed. So, after its short duration, SEED VAULT GAS WARNING solves SEED VAULT GAS PROCEED, a Puzzle that only exists to trigger SEED VAULT GAS, so that its commands can be executed, and so on, until the final step, when SEED VAULT GAS SAFE ends.
This is how command chaining works: the bot commands of different Game Entities are chained together, to achieve more complex behavior than what is possible with individual Game Entities.
This particular example could be referred to as a Puzzle-Event-Puzzle chain, but more complex chains are possible. Command chains usually involve Puzzles, because they are the easiest to chain, Players are able to interact with them directly, and they are capable of having many different command sets.
To achieve the most versatile behavior, a Puzzle-Flag-Puzzle chain is ideal, as it is possible to set a Flag’s value
script using bot commands—meaning it is possible to execute custom code depending on the outcome of a Puzzle—and
Flags, like Puzzles, can have multiple command sets. The player argument can even be repeatedly passed back and
forth in a Puzzle-Flag-Puzzle command chain, keeping the initiating Player in scope the entire time.
Mastery over command chaining is vital to unlocking the full potential of Alter Ego. However, caution should still be taken in order to ensure that infinite loops cannot occur.
Command Sets
This is an internal attribute which consists of a list of command set objects. Command set objects have the following structure:
interface PuzzleCommandSet {
    /** Strings indicating which puzzle solutions will execute the commands in this command set. Optional. */
    outcomes?: Array<string>;
    /** Bot commands that will be executed when the puzzle is solved. */
    solvedCommands: Array<string>;
    /** Bot commands that will be executed when the puzzle is unsolved. */
    unsolvedCommands: Array<string>;
}
Solved Description
- Spreadsheet label: Description When Solved
- Class attribute: Description
this.correctDescription
When a Player solves the Puzzle, they will receive a parsed version of this string. See the article
on writing descriptions for more information. If a Puzzle has multiple
solutions, it can be beneficial to make this vary based on the outcome the Player receives using if conditionals. It
should be noted that solutions are all strings, even if they’re numbers. Therefore, solutions in if conditionals
should be surrounded with single quote characters (').
Unless it is manually specified, this Description will be sent
using the PLAIN_TEXT message display type. However, the accompanying
Narration will be sent using the STANDARD message display type.
Already Solved Description
- Spreadsheet label: Description When Already Solved
- Class attribute: Description
this.alreadySolvedDescription
When a Player attempts to solve the Puzzle when it is already solved, they will receive a parsed version of this string.
For Puzzles that contain Room Items, the il tag must be contained in this description.
Unless it is manually specified, this Description will be sent using the PLAIN_TEXT message display type.
However, the accompanying Narration will be sent using the MINOR message display type.
Unsolved Description
- Spreadsheet label: Description When Unsolved
- Class attribute: Description
this.unsolvedDescription
When a Player unsolves the Puzzle, they will receive a parsed version of this string. This will be parsed before the
Puzzle is marked as unsolved, and before the outcome is cleared, so if conditionals can still be used to make this
Description vary based on the Puzzle’s current outcome.
Unless it is manually specified, this Description will be sent using the PLAIN_TEXT message display type.
However, the accompanying Narration will be sent using the STANDARD message display type.
Incorrect Description
- Spreadsheet label: Description When Incorrect Answer Given
- Class attribute: Description
this.incorrectDescription
When a Player attempts to solve the Puzzle and enters the wrong solution, they will receive a parsed version of this string. It is not possible to access the exact password that the Player supplied in this Description; that information is discarded.
Unless it is manually specified, this Description will be sent using the PLAIN_TEXT message display type.
However, the accompanying Narration will be sent using the MINOR message display type.
No More Attempts Description
- Spreadsheet label: Description When No Attempts Remain
- Class attribute: Description
this.noMoreAttemptsDescription
When a Player attempts to solve the Puzzle but it has 0 remaining attempts, they will receive a parsed version of this string.
Unless it is manually specified, this Description will be sent using the PLAIN_TEXT message display type.
However, the accompanying Narration will be sent using the MINOR message display type.
Requirements Not Met Description
- Spreadsheet label: Description When Requirements Not Met
- Class attribute: Description
this.requirementsNotMetDescription
When a Player attempts to solve the Puzzle but all of the requirements have not been met, they will receive a parsed
version of this string. It is possible to use if conditionals to specify which of the requirements has not been met.
If the Puzzle is not accessible and this is blank, then Alter Ego will pretend as if the Puzzle doesn’t exist when a Player attempts to solve it.
Unless it is manually specified, this Description will be sent using the PLAIN_TEXT message display type.
However, the accompanying Narration will be sent using the MINOR message display type.
Row
- Class attribute: Number
this.row
This is an internal attribute, but it can also be found on the spreadsheet. This is the row number of the Puzzle.
Methods
Puzzles have a number of functions that can be useful to moderators. This is not an exhaustive list of publicly
accessible methods; only ones that are likely to be useful when writing Flag value scripts, or
if and var
tags in descriptions.
isItemContainer
this.isItemContainer();
- Purpose: Returns true if the puzzle is capable of containing items.
- Returns: Boolean
- Parameters: None
canCurrentlyContainItems
this.canCurrentlyContainItems(requireEmptySpace?, bypassLimitations?);
- Purpose: Returns true if the puzzle is currently capable of being taken from/dropped into.
- Returns: Boolean
- Parameters:
getContainedItems
this.getContainedItems();
- Purpose: Gets all of the items this entity contains. Includes inaccessible items.
- Returns: Array<Room Item>
- Parameters: None
getContainedItemsForItemList
this.getContainedItemsForItemList(itemListName?, player?);
- Purpose: Gets all of the items that should appear in the puzzle’s item list. Includes inaccessible items.
- Returns: Array<Room Item>
- Parameters:
containsNoItems
this.containsNoItems();
- Purpose: Returns true if this entity contains no items.
- Returns: Boolean
- Parameters: None
containsItem
this.containsItem(identifier);
- Purpose: Returns true if this entity contains an item with the given identifier or prefab ID.
- Returns: Boolean
- Parameters:
- String
identifier- The identifier or prefab ID to search for.
- String
getContainedItem
this.getContainedItem(identifier);
- Purpose: Returns the item contained inside of this container with the given identifier or prefab ID. If no such item exists, returns undefined.
- Returns: Room Item
- Parameters:
- String
identifier- The identifier or prefab ID to search for.
- String
getContainedItemsWeight
this.getContainedItemsWeight();
- Purpose: Gets the combined weight of all the items this entity contains.
- Returns: Number
- Parameters: None
getContainingPhrase
this.getContainingPhrase();
- Purpose: Gets the name of the parent fixture preceded by “the”. If no parent fixture exists, returns the puzzle’s name preceded by “the” instead.
- Returns: String
- Parameters: None
getPreposition
this.getPreposition();
- Purpose: Gets the preposition of the parent fixture, if applicable. If no parent fixture exists, returns “in”.
- Returns: String
- Parameters: None
Event
An Event is a data structure used by Alter Ego. Its primary purpose is to allow moderators to create a more dynamic game world capable of automatically changing its state in predictable, predefined ways. Players cannot directly interact with Events. In most cases, Events are completely autonomous, requiring little to no intervention from Players or moderators.
Attributes
Events have relatively few attributes. However, they are capable of quite a lot despite this. Note that if an attribute is internal, that means it only exists within the Event class. Internal attributes will be given in the “Class attribute” bullet point, preceded by their data type. If an attribute is external, it only exists on the spreadsheet. External attributes will be given in the “Spreadsheet label” bullet point.
ID
- Spreadsheet label: Event ID
- Class attribute: String
this.id
This is the ID of the Event. All letters should be capitalized, and spaces are allowed. Every Event must have a unique ID. This is how Events can be identified so that they can be triggered or ended with moderator commands or bot commands.
Name
Warning
This attribute is deprecated and will be removed in a future release.
Use
this.idinstead.
- Class attribute: String
this.name
This internal attribute is a copy of the Event’s ID. It was how Events were identified prior to Alter Ego version 2.0. This attribute will be removed in the future.
Ongoing
- Spreadsheet label: Ongoing?
- Class attribute: Boolean
this.ongoing
This is a simple Boolean value indicating whether the Event is currently ongoing or not. If this true, then the Event
is ongoing. If it is false, then the Event is not ongoing.
Duration String
- Spreadsheet label: Duration
- Class attribute: String
this.durationString
This is a string which determines how long an Event will be ongoing after it is triggered. This should consist of a
number (i.e. 30, 1.5) with a letter immediately following it, with no space between them. There is a
fixed set of predefined units that correspond with each letter. They are as follows:
| Letter | Unit |
|---|---|
| s | seconds |
| m | minutes |
| h | hours |
| d | days |
| w | weeks |
| M | months |
| y | years |
So, an Event that should last 30 seconds should have a duration of 30s, one that should last 15 minutes should have a
duration of 15m, one that should last 2 hours should have a duration of 2h, one that should last 1.5 days should
have a duration of 1.5d, and so on. If no duration is provided, the Event will not end on its own.
Duration
This is an internal attribute which contains a Duration object created from the duration string. If the Event has no
duration string, this is null.
Remaining String
- Spreadsheet label: Time Remaining
- Class attribute: String
this.remainingString
This is a string which determines how much longer the Event has until it ends. If the Event has no fixed duration, then this can be left blank. An Event that is currently ongoing and has a duration must have the time remaining provided. It must follow a specific format:
(D) H:mm:ss
D stands for the number of 24-hour days remaining; it is optional. H stands for the number of hours remaining. mm
stands for the number of minutes remaining; leading zeroes are required. ss stands for the number of seconds
remaining; leading zeroes are required. For example, an Event with 2 days, 13 hours, 45 minutes, and 11 seconds
remaining would have a remaining string of 2 13:45:11. An Event with 1 day, 4 hours, 9 minutes, and 7 seconds
remaining would have a remaining string of 1 4:09:07. An Event with 59 minutes remaining would have a remaining string
of 0:59:00.
Remaining
This is an internal attribute which contains a Duration object indicating how much time is remaining until the Event
ends. If the Event has no duration or the Event is not currently ongoing, this is null. While the Event is ongoing,
1000 milliseconds are subtracted from this Duration every second until it is less than or equal to zero, at which point
the Event ends.
Trigger Times Strings
This is an array of strings representing times that this Event will automatically trigger at. Every minute, Alter Ego iterates through the list of all Events and checks the trigger times for each one. If the current month, weekday, date, hour, and minute match one of the Event’s trigger times, it will automatically be triggered, after which it will be ongoing. A single Event can have multiple trigger times. However, if it is already ongoing, it will not be triggered again. If this cell is left blank, then the Event will not trigger automatically at any time of day.
Note that trigger times are based on the clock of the system running Alter Ego. If it is running on a server with a different timezone than the moderator’s local time, the server’s timezone must be used.
In addition to setting the time that an Event will trigger, it is also possible to specify the day of the week, the numbered day of the month, or days of the year. Trigger times must be written in a specific format.
First, the accepted time formats are as follows:
p, the time (in hours and minutes) in the system’s local format.pp, the time (in hours, minutes, and seconds) in the system’s local format. Note that triggering Events on specific seconds is not supported, so the seconds will be ignored.HH:mm, whereHHstands for the hour in a 24-hour format (0-23) andmmstands for the minutes with leading zeroes. Example:7:35or15:00.hh:mm a, wherehhstands for the hour in a 12-hour format (1-12),mmstands for the minutes with leading zeroes, andais eitherAMorPM. Example:7:35 AMor3:00 PM.
The accepted date formats are as follows:
ccc, the abbreviated day of the week in the system’s local format. Example:Wed.cccc, the day of the week in the system’s local format. Example:Wednesday.do, the numbered day of the month with ordinal. Example:16th.do MMM, the numbered day of the month with ordinal and abbreviated month. Example:16th Apr.do MMMM, the numbered day of the month with ordinal and the month. Example:16th April.d MMM, the numbered day of the month and abbreviated month. Example:16 Apr.d MMMM, the numbered day of the month and the month. Example:16 April.MMM do, the abbreviated month and numbered day of the month with ordinal. Example:Apr 16th.MMMM do, the month and numbered day of the month with ordinal. Example:April 16th.MMM d, the abbreviated month and numbered day of the month. Example:Apr 16.MMMM d, the month and numbered day of the month. Example:April 16.
It is possible to set a trigger time with only a time of day, and no date. In this case, the Event will trigger at the same time every day. However, it is not possible to set a trigger time with only a date; a time must also be specified. In this case, the date must always precede the time. This is the full table of acceptable formats grouped by date format, as well as an example and a note indicating when the given example will cause the Event to trigger:
| Example | Triggers on | ||||
|---|---|---|---|---|---|
p | pp | HH:mm | hh:mm a | 8:30 PM | Every day at 8:30 PM |
ccc p | ccc pp | ccc HH:mm | ccc hh:mm a | Wed 8:30:00 PM | Every Wednesday at 8:30 PM |
cccc p | cccc pp | cccc HH:mm | cccc hh:mm a | Wednesday 20:30 | Every Wednesday at 8:30 PM |
do p | do pp | do HH:mm | do hh:mm a | 16th 08:30 PM | The 16th day of every month at 8:30 PM |
do MMM p | do MMM pp | do MMM HH:mm | do MMM hh:mm a | 16th Apr 8:30 PM | The 16th of April at 8:30 PM |
do MMMM p | do MMMM pp | do MMMM HH:mm | do MMMM hh:mm a | 16th April 8:30:00 PM | The 16th of April at 8:30 PM |
d MMM p | d MMM pp | d MMM HH:mm | d MMM hh:mm a | 16 Apr 20:30 | The 16th of April at 8:30 PM |
d MMMM p | d MMMM pp | d MMMM HH:mm | d MMMM hh:mm a | 16 April 08:30 PM | The 16th of April at 8:30 PM |
MMM do p | MMM do pp | MMM do HH:mm | MMM do hh:mm a | Apr 16th 8:30 PM | The 16th of April at 8:30 PM |
MMMM do p | MMMM do pp | MMMM do HH:mm | MMMM do hh:mm a | April 16th 8:30:00 PM | The 16th of April at 8:30 PM |
MMM d p | MMM d pp | MMM d HH:mm | MMM d hh:mm a | Apr 16 20:30 | The 16th of April at 8:30 PM |
MMMM d p | MMMM d pp | MMMM d HH:mm | MMMM d hh:mm a | April 16 08:30 PM | The 16th of April at 8:30 PM |
Room Tag
- Spreadsheet label: In Rooms with Tag
- Class attribute: String
this.roomTag
This is a keyword or phrase assigned to an Event that allows it to affect Rooms. When the Event is triggered, its triggered narration is sent to the channels of all Rooms which have this tag, provided there is at least one Player in each Room. Likewise, when the Event is ended, its ended narration is sent. Additionally, when an Event is ongoing, any Players in a Room affected by it will be subjected to its inflicted and refreshed Status Effects.
Commands String
- Spreadsheet label: When Triggered / Ended
- Class attribute: String
this.commandsString
This is a comma-separated list of bot commands that will be executed when the Event is
triggered. A comma-separated list of bot commands that will be executed when the Event is ended can also be included,
with both sets separated by a forward slash (/). If no ended commands are desired, then the forward slash can be
omitted from the cell. If no triggered commands are desired but ended commands are, the forward slash should be the
first character in the cell, with the ended commands following it.
Note that when writing bot commands, it is good practice to be as precise as possible and provide room names if they are permitted, in order to prevent potential bugs. It should also be noted that when an Event’s commands trigger or end another Event, its commands will not be executed.
Triggered Commands
This is an internal attribute which contains a list of commands that will be executed when the Event is triggered.
Ended Commands
This is an internal attribute which contains a list of commands that will be executed when the Event is ended.
Inflicted Status Effects Strings
This is a comma-separated list of Status Effects that will be inflicted onto all Players who are in a Room which is affected by this Event. Every second, if the Event is ongoing, Alter Ego will look for all Rooms affected by it and attempt to inflict all Players in those Rooms with these Status Effects, if there are any listed. Players who are in the Room when the Event is triggered and Players who enter the Room later while it is still ongoing will all be inflicted, unless they have a Status Effect which overrides it.
Inflicted Status Effects
This is an internal attribute which contains references to each of the Status Effect objects whose IDs are listed in
this.effectsStrings.
Refreshed Status Effects Strings
This is a comma-separated list of Status Effects whose durations will be reset to full on all Players who are in a Room which is affected by this Event. Every second, if the Event is ongoing, Alter Ego will look for all Rooms affected by it and attempt to refresh the durations of all Status Effects every Player in each Room has that are listed here. When a Status Effect’s duration is refreshed, it is set to its original value: the duration of the Status Effect that the Player’s Status Effect is an instance of. The Player’s instance of the Status Effect will continue to have its duration decremented by 1000 milliseconds every second; however, this will be canceled out every second when its duration is refreshed. Effectively, this makes it so that the Player’s instance of the Status Effect cannot expire or develop into its next stage because its duration can never reach 0.
This is particularly useful if the Event is intended to inflict a Status Effect upon all Players who enter certain Rooms
that should not expire while the Player continues to stay in one of the affected Rooms (such as soaking wet for a
RAIN Event and blinded for a BLACKOUT Event). However, due to the asynchronous nature of the JavaScript language,
it may still be possible for a refreshed Status Effect to expire if its duration is only 1 second. For that reason,
refreshed Status Effects that are intended to expire immediately after a Player leaves an affected Room should have a
duration of 5 seconds or more. It should also be noted that a Status Effect being refreshed does not mean it will
be inflicted upon all Players who are in an affected Room. It must be inflicted by some other means, such as being
listed as one of the Event’s inflicted Status Effects.
Refreshed Status Effects
This is an internal attribute which contains references to each of the Status Effect objects whose IDs are listed in
this.refreshesStrings.
Triggered Narration
- Spreadsheet label: Narration When Triggered
- Class attribute: Description
this.triggeredNarration
This is the Narration that will be parsed and then sent to the channels of all occupied Rooms that the
Event is affected by when it is triggered. If no Players are in one of the Rooms affected by the Event, the Narration
will not be sent to that Room’s channel. See the article
on writing descriptions
for more information. However, note that because this is a Narration and not a description, it cannot make use of the
player variable under any circumstances.
Unless it is manually specified, this Narration will be sent
using the STANDARD message display type.
Ended Narration
- Spreadsheet label: Narration When Ended
- Class attribute: Description
this.endedNarration
This is the Narration that will be parsed and then sent to the channels of all occupied Rooms that the Event is affected
by when it is ended. If no Players are in one of the Rooms affected by the Event, the Narration will not be sent to that
Room’s channel. See the article on writing descriptions for more
information. However, note that because this is a Narration and not a description, it cannot make use of the player
variable under any circumstances.
Unless it is manually specified, this Narration will be sent using the STANDARD message display type.
Row
- Class attribute: Number
this.row
This is an internal attribute, but it can also be found on the spreadsheet. This is the row number of the Event.
Timer
This is an internal attribute which contains a timer counting down until the Event ends. Every 1000 milliseconds, 1
second is subtracted from the Event’s remaining Duration until it reaches 0. When it does, the
Event ends, and this attribute becomes null.
Effects Timer
This is an internal attribute which contains a timer that inflicts and refreshes Status Effects while the Event is
ongoing. Every 1000 milliseconds, Alter Ego iterates through all Rooms tagged with this
Event’s room tag and attempts to inflict and refresh its inflicted and refreshed Status Effects on
any Players occupying them. If this Event has no inflicted or refreshed Status Effects, or if the Event is not ongoing,
this attribute becomes null.
Status
A Status, also called a Status Effect, is a data structure used by Alter Ego. It represents a condition that affects a Player.
Status Effects that are loaded from the spreadsheet are static; once loaded, they do not change in any way. Thus, the GameEntitySaver class will never make changes to the Status Effects sheet. As a result, the Status Effects sheet can be freely edited without edit mode being enabled. Only instantiated Status Effects — Status Effects that are inflicted on a Player — are dynamic.
Attributes
Status Effects have several attributes. However, their behavior is relatively limited. Note that if an attribute is internal, that means it only exists within the Status class. Internal attributes will be given in the “Class attribute” bullet point, preceded by their data type. If an attribute is external, it only exists on the spreadsheet. External attributes will be given in the “Spreadsheet label” bullet point.
ID
- Spreadsheet label: Status Effect ID
- Class attribute: String
this.id
This is the unique ID of the Status Effect. This should be given in all lowercase letters. Punctuation is allowed. This should ideally be an adjective, because messages sent to Players which contain the ID of a Status Effect are written assuming they will be given in the form of an adjective.
Name
Warning
This attribute is deprecated and will be removed in a future release.
Use
this.idinstead.
- Class attribute: String
this.name
This internal attribute is a copy of the Status Effect’s ID. It was how Status Effects were identified prior to Alter Ego version 2.0. This attribute will be removed in the future.
Duration String
- Spreadsheet label: Duration
- Class attribute: String
this.durationString
This is a string which determines how long it will take the Status to expire after it is inflicted. This should
consist of a number (i.e. 30, 1.5) with a letter immediately following it, with no space between them. There is a
fixed set of predefined units that correspond with each letter. They are as follows:
| Letter | Unit |
|---|---|
| s | seconds |
| m | minutes |
| h | hours |
| d | days |
| w | weeks |
| M | months |
| y | years |
So, a Status Effect that should last 30 seconds should have a duration of 30s, one that should last 15 minutes should
have a duration of 15m, one that should last 2 hours should have a duration of 2h, one that should last 1.5 days
should have a duration of 1.5d, and so on. If no duration is provided, the Status Effect will not expire on its own.
Duration
This is an internal attribute which contains a Duration object created from the duration string. If the Status has no
duration string, this is null.
Remaining
This is an internal attribute which contains a Duration object indicating how much time is remaining until the Status
Effect expires. This is null for all Status Effects loaded from the spreadsheet. This is only assigned to an
instantiated Status Effect that has a duration. If the instantiated Status Effect has no duration, this is null. While
the instantiated Status Effect is active, 1000 milliseconds are subtracted from this Duration every second until it is
less than or equal to zero, at which point the Status Effect expires. However, the amount subtracted every second can
vary. If at least one Player in the game has the “heated” Status Effect, the amount subtracted is multiplied by the
HEATED_SLOWDOWN_RATE setting, effectively making the Status
Effect take longer to expire.
Fatal
- Spreadsheet label: Fatal?
- Class attribute: Boolean
this.fatal
This is a simple Boolean value indicating whether an instance of this Status Effect will kill the Player when it expires
or not. If this is true, then a Player inflicted with this Status Effect will die when the Status Effect expires. If
this is false, the Player will simply be cured of the Status Effect. However, Alter Ego will not check if the Status
Effect is fatal if it has a next stage.
Visible
- Spreadsheet label: Visible?
- Class attribute: Boolean
this.visible
This is a simple Boolean value indicating whether an instance of this Status Effect will appear if a Player inflicted
with it uses the status command. If this is true, then it will appear in the
Player’s status. If this is false, then it will not. However, it will still be visible to
a moderator
who views the Player’s status.
Overriders Strings
This is a comma-separated list of Status Effect IDs that prevent this Status Effect from being inflicted. If a Player currently has any of the Status Effects listed here, then they cannot be inflicted with this Status Effect under any circumstances. However, it should be noted that overriders do not automatically cure Status Effects that they override when they are inflicted on a Player.
Overriders
This is an internal attribute which contains references to each of the Status Effect objects whose IDs are listed in
this.overridersStrings.
Cures Strings
This is a comma-separated list of Status Effect IDs that an instance of this Status Effect will cure once it is inflicted on a Player. Among other things, this allows particular Status Effects to be mutually exclusive, allowing for cycles where a Player can only be inflicted with one Status Effect in the cycle at any given time. For that reason, if the Status Effect is being inflicted due to being a previous Status Effect’s next stage or cured condition, it will not cure any Status Effects on this list.
Cures
This is an internal attribute which contains references to each of the Status Effect objects whose IDs are listed in
this.curesStrings.
Next Stage ID
- Spreadsheet label: Develops Into
- Class attribute: String
this.nextStageId
This is the ID of a single Status Effect that an instance of this Status Effect will develop into when it expires. When it expires, it will be cured, and the next stage will be inflicted on the Player. If the Player cannot be inflicted with the Status Effect’s next stage because they are inflicted with any of the next stage’s overriders, they will be sent the Status Effect’s cured description. Otherwise, they will be sent the next stage’s inflicted description.
It is not possible for a Status Effect to have more than one next stage.
Next Stage
This is an internal attribute which contains a reference to the Status Effect object whose ID is given in
this.nextStageId. If the Status Effect has no next stage, this is null.
Duplicated Status ID
- Spreadsheet label: When Duplicated
- Class attribute: String
this.duplicatedStatusId
This is the ID of a single Status Effect that an instance of this Status Effect will develop into if it is inflicted on a Player who already has an instance of this Status Effect. If the Status Effect is duplicated, the Player will be cured of it without being sent its cured description, and they will be inflicted with the duplicated Status. However, the Status Effect cannot be duplicated if the Player is inflicted with one of its overriders.
It is not possible for a Status Effect to have more than one duplicated Status.
Duplicated Status
This is an internal attribute which contains a reference to the Status Effect object whose ID is given in
this.duplicatedStatusId. If the Status Effect has no duplicated Status, this is null.
Cured Condition ID
- Spreadsheet label: When Cured
- Class attribute: String
this.curedConditionId
This is the ID of a single Status Effect that an instance of this Status Effect will develop into if it is cured. When it is cured, the cured condition will be inflicted on the Player. However, it will not be inflicted if the Status Effect is cured by being duplicated, by being one of a recently inflicted Status Effect’s cures, or by developing into its next stage. The cured condition will only be inflicted if the Status Effect is cured by expiring with no next stage, or if it is cured by some external phenomenon (such as a moderator command or the Player using an Inventory Item) before it normally expires. When the cured condition is inflicted, the Player will not receive its inflicted description; they will be sent the cured Status Effect’s cured description.
It is not possible for a Status Effect to have more than one cured condition.
Cured Condition
This is an internal attribute which contains a reference to the Status Effect object whose ID is given in
this.curedConditionId. If the Status Effect has no cured condition, this is null.
Stat Modifiers
This is a comma-separated list of stat modifier objects that an instance of this Status Effect will apply to a Player inflicted with it. Stat modifier objects have the following structure:
interface StatModifier {
    /** Whether the stat modifier modifies the player's own stat. */
    modifiesSelf: boolean;
    /** The stat to modify. */
    stat: string;
    /** Whether it assigns the value or adds to it. */
    assignValue: boolean;
    /** The value to assign or add. */
    value: number;
}
In order to define a stat modifier, the name or abbreviation of the stat to modify must be listed. This must be
strength, perception, dexterity, speed, or stamina; or their abbreviations, str, per, dex, spd, or
sta. It must then be followed by an operator: +, -, or =. Next must be an integer value from 1 to 10.
Finally, if the stat is meant to modify the attacker’s stat in a Die roll where a Player inflicted with this
Status Effect is the defender, prefix the modifier with @.
Valid examples of stat modifiers for a single Status Effect are:
per-1. This decreases the Player’s perception stat by 1.str-2, dex-2, spd-2, sta-2. This decreases the Player’s strength, dexterity, speed, and stamina stats by 2.spd+4. This increases the Player’s speed stat by 4.str+9, per+9, dex+9, spd+9, sta+9. This increases all of the Player’s stats by 9.spd=1, sta=1. This sets the Player’s speed and stamina stats to 1.@str=0, dex+9. This increases the Player’s dexterity stat by 9 and temporarily sets the attacking Player’s strength stat to 0 when this Player is the defender. Effectively, this makes the defending Player immune to attacks.
Note that regardless of the values of stat modifiers, a Player’s stat cannot be less than 1 or greater than 10. It will
be clamped between these values if the modifiers would exceed these values. The only exception is when a stat modifier
assigns a value with the = operator. In this case, the clamp function is bypassed, and the Player’s stat can be set to
any integer value outside of that range.
Stat modifiers are stackable. If a Player has multiple Status Effects that modify the same stat, the modifiers will be
added together before being applied to the stat. However, stat modifiers which assign a value to a given stat will
overrule all other modifiers to that stat. So, even if a Player has one Status Effect with a stat modifier of sta+9,
if they have a Status Effect with a stat modifier of sta=1, their stamina stat will be set to 1.
Behavior Attributes
This is a comma-separated list of keywords that give the Status Effect predefined behavior when it is inflicted on a Player. Through the combination of different behavior attributes, the Status Effect can transform gameplay for the inflicted Player in drastic ways.
While it is possible to add behavior attributes to a Status Effect that do not have predefined behavior, these will not
have any effect. It can still be useful to do so, as it provides a way to store information about a Player in one of
their Status Effects, which can be accessed with the
hasBehaviorAttribute Player method. For example, if a Status Effect has the behavior
attribute computer expert — which has no predefined behavior, it is possible to write
descriptions which can show additional information to any Players who
have a Status Effect with that behavior attribute.
However, the most useful behavior attributes are those with predefined behavior. Here, each predefined behavior
attribute will be listed, and their behavior will be detailed. Note that behavior attributes are case-sensitive.
Bracket characters ([]) should not be included when assigning behavior attributes to a Status.
disable all
- Disables all commands.
disable [command]
- Disables the given command.
enable [command]
- Enables the given command when the Player has a Status Effect with the
disable allattribute.
enable say
- Enables the say command, which is disabled by default.
no channel
- Removes the Player from the channel of the Room they’re in.
- When the Player moves to a different Room, they will not be added to the Room’s channel.
- If the Player is added to a Whisper as a result of hiding, they will not be given permission to read the Whisper channel, unless the only Status Effect they have with this attribute is the “hidden” Status Effect.
hear room
- All dialog from other Players in the Room will be sent to the Player via DM.
acute hearing
- All dialog from other Players in adjacent Rooms will be sent to the Player via DM.
- All Whisper messages from other Players in the same Room will be sent to the Player via DM.
knows [Player name]
- When the known Player speaks and their display name differs from their name, the Player will
receive a DM revealing the known Player’s identity. Example:
[Player display name], with [Player voice string] you recognize as [Player name]'s, says "[Message]". - When the Player has the
no sightandhear roombehavior attributes, they will receive a DM revealing the known Player’s identity when they speak. Example:[Player name] says "[Message]". - If the Player is in a Whisper and doesn’t have permission to read the Whisper channel, they will receive a DM
revealing the known Player’s identity when they speak in the Whisper. Example:
[Player name] whispers "[Message]". - When the known Player’s voice can be heard from an adjacent Room, the Player will receive a DM revealing the known
Player’s identity. Example:
[Player name] shouts "[Message]" in a nearby room. - When the known Player has the
senderbehavior attribute and someone in the same Room as the Player has thereceiverattribute, the Player will receive a DM revealing the known Player’s identity when they speak. Example:[sender Player name] says "[Message]" through [receiver Player display name]'s [receiver Item name]. - When the Player is in a Room with the
audio monitoringtag and the known Player speaks in a Room with theaudio surveilledtag, the Player will receive a DM revealing the known Player’s identity. Example:[Room display name] [Player name] says "[Message]". - Note: The Player name is case-sensitive. It must match the Player’s name exactly as it appears on the spreadsheet.
no hearing
- The Player cannot be Whispered to. They will be removed from any Whispers that they are a part of.
- If the Player is added to a Whisper as a result of hiding, they will not be given permission to read the Whisper channel.
- If the Player is in a Whisper as a result of hiding, they will not receive any notifications about dialog sent in that Whisper.
- The Player cannot hear shouted dialog from adjacent Rooms.
- The Player will not be notified when someone in an adjacent Room performs a Knock Action. Instead of being narrated in the destination Room channel, knocking it will be sent to all hearing Players in the Room via DM.
- The Player will not hear dialog coming from a Player with the
receiverbehavior attribute. - If the Player is in a Room with the
audio monitoringtag, they will not hear dialog coming from a Room with theaudio surveilledtag.
sender
- All of the Player’s dialog (except Whispers) will be narrated in the Room of the Player with the
receiverattribute, if there is one that isn’t also thesenderPlayer, regardless of the respective Players’ locations. - The Player will attempt to solve any
voice-type Puzzles in the Room that thereceiverPlayer is in.
receiver
- Non-Whispered dialog spoken by the Player with the
senderattribute will be narrated in the Room of thereceiverPlayer, regardless of the respective Players’ locations. Example:[sender Player voice string] coming from [receiver Player display name]'s [receiver Item name] says "[Message]".
send text
- The Player can use the text command to send text messages to another Player, as long as the command isn’t disabled.
- The recipient must have the
receive textbehavior attribute, unless the text is being sent with the text Moderator command.
receive text
- The Player can selected by another Player with the
send textbehavior attribute as a recipient for a text message.
no speech
- Any message the Player sends to a Room or Whisper channel will be deleted.
see room
- All Narrations (including those from moderators and Alter Ego) that are sent to the Room the Player is in will be sent
to the Player via DM, unless the Player has the
no sightbehavior attribute or thehiddenbehavior attribute. - If the Player has the
hiddenattribute, all Narrations (including those from moderators and Alter Ego) that are sent to the Whisper they’re in (if applicable) will be sent to the Player via DM, unless the Player has theno sightbehavior attribute.
no sight
- The Player will not receive the Room description when they enter a Room. Instead, they will be sent
Fumbling against the wall, you make your way to the next room over. - The
see roombehavior attribute is overridden; the Player will not be sent Narrations via DM. - The Player will not be told who is hiding in a Fixture if they inspect it or attempt to hide in it. Instead, the
Hiding Spot’s occupants will be listed as
[quantity] peopleorsomeone. - If the Player is found in a Hiding Spot, they will not be told who found them.
Instead, the Player who found them will be described as
someone. - If the Player has the
hear roombehavior attribute, the dialog they receive via DM will not have the speaking Player’s identity attached. Example:Someone in the room with [speaker voice string] says "[Message]". - If the Player has the
acute hearingbehavior attribute, any dialog they receive via DM will not have the speaking Player’s identity attached. Example:Someone in a nearby room with [speaker voice string] says "[Message]". - If the Player is in a Whisper and doesn’t have permission to read the Whisper channel, they will receive dialog sent
in that Whisper via DM. However, the dialog they receive will not have the speaking Player’s identity attached.
Example:
Someone with [speaker voice string] whispers "[Message]".
unconscious
- Alter Ego will narrate
[Player display name] goes unconscious.in the Room the Player is in when this behavior attribute is inflicted.- If the Status Effect which inflicts this behavior attribute onto the Player is named “asleep”, Alter Ego will
instead narrate
[Player display name] falls asleep. - If the Status Effect which inflicts this behavior attribute onto the Player is named “blacked out”, Alter Ego will
instead narrate
[Player display name] blacks out.
- If the Status Effect which inflicts this behavior attribute onto the Player is named “asleep”, Alter Ego will
instead narrate
- Alter Ego will narrate
[Player display name] regains consciousness.in the Room the Player is in when this behavior attribute is cured. They will also be sent the description of the Room they wake up in.- If the Status Effect which inflicted this behavior attribute onto the Player is named “asleep” or “blacked out”,
Alter Ego will instead narrate
[Player display name] wakes up.
- If the Status Effect which inflicted this behavior attribute onto the Player is named “asleep” or “blacked out”,
Alter Ego will instead narrate
- The Player will receive no notifications except those about Status Effects.
- The Player will not receive dialog via DM, regardless of any other behavior attributes they may have.
- The Player cannot be Whispered to. They will be removed from any Whispers that they are a part of.
- Attempts to steal an Inventory Item from this Player will always succeed.
- The Player will appear in the list of sleeping Players when another Player enters the Room they’re in.
- The Player will not receive notifications about edit mode being enabled or disabled.
hidden
- Alter Ego will narrate
[Player display name] hides in the [Player hiding spot].in the Room the Player is in when this behavior attribute is inflicted. - Alter Ego will narrate
[Player display name] comes out of the [Player hiding spot].in the Room the Player is in when this behavior attribute is cured. - The Player cannot be Whispered to. They will be removed from any Whispers that they are a part of.
- If the Status Effect is inflicted by a Hide Action, a Whisper will automatically be created with all Players hiding in the same Fixture.
- If the Player whispers and someone in the Room has the
acute hearingbehavior attribute, the whispered dialog that will be sent via DM will not have the Player’s identity attached. Example:You overhear someone in the room with [Player voice string] whisper "[Message]". - Narrations about the Player’s actions will not be sent to the channel of the Room they’re in, unless the action is coming out of hiding.
- If the Player is in a Whisper, Narrations about their actions will be sent to the Whisper channel.
- The Player will not appear in the list of occupants when another Player enters the Room they’re in.
- The Player will not appear in the occupants string of the Room they’re in.
- The Player cannot be inspected, except by another Player hiding in the same Fixture as them.
- The Player cannot be given to or stolen from, except by another Player hiding in the same Fixture as them.
- The Player cannot be the target for a Gesture, except by another Player hiding in the same Fixture as them.
- The Player can only use the dress command to dress from the Fixture they’re hiding in, from its child Puzzle, or from Room Items contained within it.
- The Player can only drop Inventory Items into the Fixture they’re hiding in, into its child Puzzle, or into Room Items contained within it.
- The Player can only perform Gestures with no target, or Gestures that target the Fixture they’re hiding in, Room Items contained within it, Players hiding in the same Fixture they’re hiding in, and their own Inventory Items.
- The Player can only give Inventory Items to Players hiding in the same Fixture as them.
- The Player can only inspect the Room, the Fixture they’re hiding in, Room Items contained within it, their own Inventory Items, Players hiding in the same Fixture they’re hiding in, and their Inventory Items.
- When the Player uses the say command, their display name appear as
Someone in the room with [Player voice string]. However, their display name will not actually be changed. - When the Player uses the say command, their display icon will appear as the
HIDDEN_ICON_URLdefined in Alter Ego’s settings. However, their display icon will not actually be changed. - The Player can only steal Inventory Items from Players hiding in the same Fixture as them.
- The Player can only take Room Items from the Fixture they’re hiding in, from its child Puzzle, or from Room Items contained within it.
- The Player can only undress into the Fixture they’re hiding in, into its child Puzzle, or into Room Items contained within it.
- The Player can only activate/deactivate the Fixture they’re hiding in.
- The Player can only attempt the child Puzzle of the Fixture they’re hiding in.
concealed
- When this behavior attribute is inflicted:
- The Player’s display name will be changed. If an equipped Inventory Item inflicted this behavior attribute, then
it will be changed to
an individual wearing [Inventory Item single containing phrase]. If the behavior attribute was inflicted some other way, it will be changed toan individual wearing a MASK. - The Player’s display icon will be changed to the
DEFAULT_CONCEALED_ICON_URLdefined in Alter Ego’s settings. - The Player’s pronouns will be changed to
neutral.
- The Player’s display name will be changed. If an equipped Inventory Item inflicted this behavior attribute, then
it will be changed to
- When this behavior attribute is cured:
- The Player’s display name will be reset.
- The Player’s display icon will be reset.
- The Player’s pronouns will be reset.
- Alter Ego will narrate
The [Inventory Item name] comes off, revealing the individual to be [Player name].in the Room the Player is in, if an unequipped Inventory Item cured this behavior attribute. If the behavior attribute was cured some other way, “MASK” will be used in place of[Inventory Item name].
- The Player cannot be Whispered to. They will be removed from any Whispers that they are a part of.
all or nothing
- All Die rolls when the Player is the attacker will be the minimum or maximum possible for the Die before modifiers are applied. For example, if the minimum is 1 and the maximum is 20, all of the Player’s rolls will be 1 or 20 before modifiers.
coin flipper
- All Die rolls when the Player is the attacker will have a 50% chance of having a modifier of +1 applied if the Player has an Inventory Item with “COIN” in its name.
no stamina decrease
- The Player will not consume stamina when moving.
thief
- The Player will always succeed without getting caught when stealing an Inventory Item from another Player. However, they will still get caught if the Inventory Item is non-discreet.
Attributes
Warning
This attribute is deprecated and will be removed in a future release.
Use
this.behaviorAttributesinstead.
This internal attribute is a copy of the Status Effect’s behavior attributes, expressed as an array. It was how behavior attributes were defined prior to Alter Ego version 2.0. This attribute will be removed in the future.
Effect
- Spreadsheet label: Effect
This is an external attribute that is never loaded by Alter Ego. This should be a description of the Status Effect, explaining entirely how it works and what it does to a Player inflicted with it. However, it can be left blank.
Inflicted Description
- Spreadsheet label: Description When Inflicted
- Class attribute: Description
this.inflictedDescription
When a Player is inflicted with this Status Effect, they will receive a parsed version of this string. See the article on writing descriptions for more information.
Unless it is manually specified, this Description will be sent
using the STANDARD message display type.
Cured Description
- Spreadsheet label: Description When Cured
- Class attribute: Description
this.curedDescription
When a Player is cured of this Status Effect, they will receive a parsed version of this string.
Unless it is manually specified, this Description will be sent using the STANDARD message display type.
Row
- Class attribute: Number
this.row
This is an internal attribute, but it can also be found on the spreadsheet. This is the row number of the Status Effect.
Timer
This is an internal attribute which contains a timer counting down until the Status Effect expires. This is null for
all Status Effects loaded from the spreadsheet. This is only assigned to an instantiated Status Effect that has a
duration. If the instantiated Status Effect has no duration, this is null. While the instantiated Status Effect is
active, every 1000 milliseconds, 1 second is subtracted from the Status
Effect’s remaining Duration until it reaches 0. When it does, the timer is stopped, and the
Status Effect is cured.
Player
A Player is a data structure used by Alter Ego. It represents a player that can interact with the game world in a variety of ways.
There are two types of Players: full Players and NPCs. A full Player is associated with a Discord account, and can be controlled by that account. An NPC, short for non-player character, can do nearly everything a full Player can do, however it is not associated with a Discord account; it can only be controlled by a moderator.
It should be noted that when Player data is loaded, so too are Inventory Items. Inventory Items can be loaded without loading Player data, but not vice versa.
Attributes
In order to provide a wide array of functionality, Players have many attributes. Note that if an attribute is internal, that means it only exists within the Player class. Internal attributes will be given in the “Class attribute” bullet point, preceded by their data type. If an attribute is external, it only exists on the spreadsheet. External attributes will be given in the “Spreadsheet label” bullet point.
ID
- Spreadsheet label: Discord ID
- Class attribute: String
this.id
For full Players, this is the unique ID assigned to their Discord account. Developer Mode must be enabled in order to obtain this ID by right-clicking on a Discord user and selecting Copy ID. When Player data is loaded, Alter Ego will fetch the guild member whose account has this ID. That Discord user will then be able to control this Player. Because Alter Ego requires guild member data, this account must belong to a Discord user in the server. If the user associated with a particular Player leaves the server, Alter Ego will be unable to load that Player’s data; they must either be removed from the spreadsheet, converted to an NPC, or reassigned a different ID.
Because NPCs aren’t associated with a Discord account, this attribute is repurposed for them. Instead of a Discord user
ID, this must be an image URL with a .png, .jpg, .jpeg, .webp, or .avif file extension. This image will be
used as the NPC’s avatar when they speak; it will appear in Room, Whisper,
and spectate channels.
Member
- Class attribute: GuildMember | null
this.member
This is an internal attribute which contains a reference to the guild member whose Discord ID matches the Player ID. For
NPCs, this is null.
Name
- Spreadsheet label: Name
- Class attribute: String
this.name
This is the name of the Player. Because this is also used as the name of the Player’s spectate channel, it is subject to Discord’s limits on channel names. Only alphanumeric characters (A-Z, a-z, 0-9) and hyphens (-) are permitted; spaces, symbols, and punctuation are not. This should generally match the Player’s nickname on the server, although it doesn’t have to. For that reason, this should be 32 characters or fewer. This conventionally follows naming customs: the first letter is capitalized, and the rest is in lowercase. However, this is not a requirement.
Within the Game’s data, Players are indexed by their name. As such, it must be unique. However, keep in mind that the version of their name that will be used as a key within the Game’s data will be converted to all uppercase, and all quotation characters will be removed. So, the key may not match what their actual name is exactly.
Display Name
- Class attribute: String
this.displayName
This internal attribute is the string which Alter Ego uses to refer to the Player during most gameplay scenarios. It is
used instead of the name in Narrations, spectate channels, and more. The reason this is used is that
unlike the Player’s name, this can change during gameplay. It is automatically changed when the Player is inflicted with
a Status Effect that has the concealed behavior attribute, and it can be manually
changed with the setdisplayname
command.
When Player data is loaded, this is the same as the Player’s name. For that reason, moderators should be careful when loading Player data during gameplay, as any Players with different display names will have their display names reset.
Display Icon
This is an internal attribute which contains an image URL that will be used as an avatar when the Player uses
the say command, and when their dialog
appears in a spectate channel. It is also used when NPCs use
the whisper command. For full Players, this is most often null - their
display avatar is used
instead. Only NPCs have this set to a non-null value by default: the image URL in their ID.
Much like the Player’s display name, this can change during gameplay. It is automatically set to the
DEFAULT_CONCEALED_ICON_URL defined in Alter Ego’s settings when the
Player is inflicted with a Status Effect that has the concealed behavior attribute, and it can be manually changed
with the setdisplayicon
command.
However, it should be noted this will not replace a full Player’s avatar when they speak in a Room or Whisper
channel by sending a message to it; it will only appear in spectate channels when this is the case.
Title
- Spreadsheet label: Title or “NPC”
- Class attribute: String
this.title
This is primarily a relic from older versions of Alter Ego which used this attribute to produce behavior that has since been re-implemented using Status Effect behavior attributes. For full Players, this can be left blank without issue. However, its main benefit is that it can be used as a variable in descriptions.
There is one programmed use case for this attribute. If this is set to NPC, then the Player will become an NPC. If the
Player has the NPC title, then Alter Ego will not do anything to them that would require a Discord account, such as
sending them DMs, granting/revoking them permission to read channels, and adding/removing roles. NPC Players also will
not be counted in the online Player count, will not be inflicted with or cured of Status Effects when the “all” argument
is used in the status command, and will not be moved when the “all”
argument is used in the move command.
Talent
Warning
This attribute is deprecated and will be removed in a future release.
Use
this.titleinstead.
- Class attribute: String
this.talent
This was the previous name of the title attribute. It was renamed in Alter Ego version 2.0 to be more general-use. This attribute contains a copy of the Player’s title. However, it will be removed entirely in a future release.
Is NPC
- Class attribute: Boolean
this.isNPC
This internal attribute denotes whether or not the Player is an NPC. If the Player’s title is NPC, this is true.
Otherwise, it is false. Once a Player is loaded, this cannot be changed.
Pronoun String
- Spreadsheet label: Pronouns
- Class attribute: String
this.pronounString
This is a string which determines what set of third-person
singular personal pronouns will be used to refer to the
Player by default. This must adhere to a strict format:
subjective/objective/dependent possessive/independent possessive/reflexive/plural, although there are shorthands for
the three most common pronoun sets:
maleis shorthand forhe/him/his/his/himself/false.femaleis shorthand forshe/her/her/hers/herself/false.neutralis shorthand forthey/them/their/theirs/themself/true.
There are several parts to this format. They are as follows:
- The subjective pronoun is used to refer to the Player as the subject of a verb. For example, “She speaks.”
- The objective pronoun is used to refer to the Player as an object of a verb. For example, “I saw him.”
- The dependent possessive pronoun is used to refer to the Player as the owner of something which is the object of the verb. For example, “That’s their room.”
- The independent possessive pronoun is used to refer to the Player as the owner of something which is the subject of the verb. For example, “The car is hers.”
- The reflexive pronoun is used to refer to the Player when they are the object of a verb where they are also the subject. For example, “They wash themself.”
- The plural variable determines whether this set of pronouns pluralizes verbs. If this is
true, then verbs will take the form they use with plural pronouns. For example, “They are here. They have money. They smell strange.” If this isfalse, then verbs will take the form they use with singular pronouns. For example, “He is here. She has money. It smells strange.”
As long as this format is followed, any set of pronouns can be used. For example, a Player who uses it pronouns would
have the pronoun string it/it/its/its/itself/false.
A Player cannot have more than one pronoun set at a time. For example, a Player who uses both he and they pronouns interchangeably can be referred to with he or they by Alter Ego, but not both. It cannot alternate between them at will. However, this is relatively minor, as Player pronouns are seldom used in built-in Narrations. Descriptions, custom Narrations, and dialog can all be written with alternating pronouns.
Original Pronouns
- Class attribute: object
this.originalPronouns
This internal attribute is an object containing variables that contain each of the Player’s default pronouns. This is primarily used in response messages in moderator commands and in log messages.
Please see the following class attribute for more info.
Pronouns
- Class attribute: object
this.pronouns
This internal attribute is an object containing variables that contain each of the Player’s current pronouns. This is
primarily what is used in Narrations. The reason this is used is that unlike the Player’s original pronouns, this can
change during gameplay. It is automatically changed to the neutral pronoun set when the Player is inflicted with a
Status Effect that has the concealed behavior attribute, and it can be manually changed with
the setpronouns command.
When Player data is loaded, this is the same as the Player’s original pronouns, right down to the structure. For that
reason, moderators should be careful when loading Player data during gameplay, as any Players with pronouns different
from their original pronouns will have their pronouns reset.
This, as well as the original pronouns attribute, has the following structure:
interface Pronouns {
    /** The subjective pronoun. */
    sbj?: string;
    /** The subjective pronoun with first letter capitalized. */
    Sbj?: string;
    /** The objective pronoun. */
    obj?: string;
    /** The objective pronoun with first letter capitalized. */
    Obj?: string;
    /** The dependent possessive pronoun. */
    dpos?: string;
    /** The dependent possessive pronoun with first letter capitalized. */
    Dpos?: string;
    /** The independent possessive pronoun. */
    ipos?: string;
    /** The independent possessive pronoun with first letter capitalized. */
    Ipos?: string;
    /** The reflexive pronoun. */
    ref?: string;
    /** The reflexive pronoun with first letter capitalized. */
    Ref?: string;
    /** Whether this set of pronouns turns verbs into their plural form. */
    plural?: boolean;
}
This essentially groups what would be multiple class attributes into one. They are listed below:
Subjective
- Class attribute: String
this.pronouns.sbj
This is the Player’s subjective pronoun.
Capital Subjective
- Class attribute: String
this.pronouns.Sbj
This is the Player’s subjective pronoun, except the first letter is capitalized. This is useful at the beginning of a sentence when writing descriptions that use the Player’s pronouns as variables.
Objective
- Class attribute: String
this.pronouns.obj
This is the Player’s objective pronoun.
Capital Objective
- Class attribute: String
this.pronouns.Obj
This is the Player’s objective pronoun, except the first letter is capitalized.
Dependent Possessive
- Class attribute: String
this.pronouns.dpos
This is the Player’s dependent possessive pronoun.
Capital Dependent Possessive
- Class attribute: String
this.pronouns.Dpos
This is the Player’s dependent possessive pronoun, except the first letter is capitalized.
Independent Possessive
- Class attribute: String
this.pronouns.ipos
This is the Player’s independent possessive pronoun.
Capital Independent Possessive
- Class attribute: String
this.pronouns.Ipos
This is the Player’s independent possessive pronoun, except the first letter is capitalized.
Reflexive
- Class attribute: String
this.pronouns.ref
This is the Player’s reflexive pronoun.
Capital Reflexive
- Class attribute: String
this.pronouns.Ref
This is the Player’s reflexive pronoun, except the first letter is capitalized.
Plural
- Class attribute: Boolean
this.pronouns.plural
This is a Boolean value indicating whether this pronoun set pluralizes verbs.
Original Voice String
- Spreadsheet label: Speaks With
- Class attribute: String
this.originalVoiceString
This is a phrase that will be used in Narrations when the Player speaks while their identity is obscured in some way. All Narrations which use this are written with the assumption that this string will begin with “a” or “an” and end with “voice”. Here are some examples with the Player’s voice string in bold:
- You hear a bitter voice in the room say “…What are you looking at?”
- You hear a brash voice from a nearby room shout “HEY! IS ANYONE IN THERE!?”
- You overhear an individual wearing a PLAGUE DOCTOR MASK, with a crisp voice you recognize to be Kyra’s, whisper “Yes, everything is going according to plan.”
- A deep modulated voice coming from Amy’s WALKIE TALKIE says “That is correct. I am hidden somewhere in this facility.”
Voice String
- Class attribute: String
this.voiceString
This internal attribute contains the Player’s current voice descriptor. This is primarily what is used in Narrations.
The reason this is used is that unlike the Player’s original voice string, this can change during gameplay. It can be
manually changed with
the setvoice command. When Player
data is loaded, this is the same as the Player’s original voice string. For that reason, moderators should be careful
when loading Player data during gameplay, as any Players with a voice string different from their original voice string
will have their voice string reset. If the name of another Player, whether living or dead, is supplied, then the Player
will speak using that Player’s voice. This will even trick Players with the
knows [Player name] behavior attribute into recognizing this Player’s voice as the
mimicked Player.
Stats
- Spreadsheet label: Stats
This is an external attribute. It only exists to group the Player’s stats together under one label. A Player’s stats are used in a variety of situations. Common applications of all of them include their ability to be modified by Status Effects and their ability to be used as a modifier in Die rolls. Here, their individual properties and applications will be detailed below.
Default Strength
- Spreadsheet label: Str
- Class attribute: Number
this.defaultStrength
This is the Player’s default strength stat. This quantifies the Player’s physical strength. It must be a whole number from 1 - 10.
Strength
- Class attribute: Number
this.strength
This internal attribute is the Player’s current strength stat. By default, this equals their default strength, however it can be changed by Status Effects with stat modifiers.
This stat is used to calculate the Player’s maximum carry weight. This value is recalculated every time the Player’s strength stat changes. The formula to calculate the Player’s max carry weight in kilograms is quadratic, not linear. It is roughly based on the range of real human weightlifting capacities. The full formula, where \(x\) is the Player’s strength stat, is:
\[ W_{max} = 1.783x^2 - 2x + 22 \]
The result is rounded down to the nearest whole number.
In effect, each strength stat value corresponds with a predetermined max carry weight, as shown in this chart:
| Strength Value | Max Carry Weight (kg) | Max Carry Weight (lb) |
|---|---|---|
| 1 | 21 | 46 |
| 2 | 25 | 55 |
| 3 | 32 | 70 |
| 4 | 42 | 92 |
| 5 | 56 | 123 |
| 6 | 74 | 163 |
| 7 | 95 | 209 |
| 8 | 120 | 264 |
| 9 | 148 | 326 |
| 10 | 180 | 396 |
The strength stat also has special behavior in Die rolls. If a Die is rolled using this Player’s strength stat, the defender’s dexterity roll modifier will be multiplied by \(-1\) and added to the Die’s modifier. In effect, this factors in the defender’s ability to dodge the Player’s attack.
Default Perception
- Spreadsheet label: Per
- Class attribute: Number
this.defaultPerception
This is the Player’s default perception stat. This quantifies the Player’s perceptiveness. It must be a whole number from 1 - 10.
Perception
- Class attribute: Number
this.perception
This internal attribute is the Player’s current perception stat. By default, this equals their default perception, however it can be changed by Status Effects with stat modifiers.
This stat has no programmed use. However, it can be used in if conditionals when writing descriptions to affect what the Player sees when inspecting various things. For example, a Player with a high perception stat may receive more clues to assist in solving Puzzles and murders than a Player with a low perception stat. Whereas a Player with a low perception stat might see this:
It's a small compartment below the dartboard. Written on it is "Prime x Prime x Prime = 266". There doesn't seem to be any way to open it. Maybe it will open if you hit three prime numbers on the dartboard that multiply together to make 266.
A Player with an average perception stat might see this:
It's a small compartment below the dartboard. Written on it is "Prime x Prime x Prime = 266". There doesn't seem to be any way to open it. Maybe it will open if you hit three prime numbers on the dartboard that multiply together to make 266. If that's the case, then you know a prime number is a number whose only products are 1 and itself. You don't even have to try any of the double or triple point values, or 50 for that matter.
And a Player with a high perception stat might see this:
It's a small compartment below the dartboard. Written on it is "Prime x Prime x Prime = 266". There doesn't seem to be any way to open it. Maybe it will open if you hit three prime numbers on the dartboard that multiply together to make 266. If that's the case, then you know a prime number is a number whose only products are 1 and itself. You don't even have to try any of the double or triple point values, or 50 for that matter. The only prime numbers on this board would be 2, 3, 5, 7, 11, 13, 17, and 19. Better yet, 266 is an even number, so you know one of the products MUST be 2, and you only need to find the other two numbers. This should be easy.
It should be noted that because this stat has no programmed use, it doesn’t necessarily have to correlate with the Player’s perceptiveness. It could correlate with the Player’s logical intelligence, or anything else. How this stat is used is entirely up to the moderator’s discretion when writing descriptions.
Default Dexterity
- Spreadsheet label: Dex
- Class attribute: Number
this.defaultDexterity
This is the Player’s default dexterity stat. This quantifies the Player’s skill and speed when using their hands or body. It must be a whole number from 1 - 10.
Dexterity
- Class attribute: Number
this.dexterity
This internal attribute is the Player’s current dexterity stat. By default, this equals their default dexterity, however it can be changed by Status Effects with stat modifiers.
This stat is used to determine the Player’s probability of success when attempting to steal Inventory Items from another Player. When this occurs, a Die is rolled using this Player’s dexterity stat, with the victim as the defender. If the Player has a high dexterity stat, and thus a positive dexterity roll modifier, then they will be more likely to succeed when attempting to steal. If the Player has a low dexterity stat, and thus a negative dexterity roll modifier, then they will be more likely to fail when attempting to steal.
It also has special behavior in Die rolls. If a Die is rolled using a different Player’s strength stat where this Player
is the defender, this Player’s dexterity roll modifier will be multiplied by -1 and added to the Die’s modifier. In
effect, this factors in the Player’s ability to dodge the attacker’s attack. If the Player has a high dexterity stat,
the attacker will be more likely to have a low attack roll, and vice versa.
Default Speed
- Spreadsheet label: Spd
- Class attribute: Number
this.defaultSpeed
This is the Player’s default speed stat. This quantifies the Player’s walking and running speed. It must be a whole number from 1 - 10.
Speed
- Class attribute: Number
this.speed
This internal attribute is the Player’s current speed stat. By default, this equals their default speed, however it can be changed by Status Effects with stat modifiers.
This stat is used to calculate the amount of time it takes for the Player to travel from one Exit to another in a Room.
The flat distance in pixels between the Player’s current position and the desired Exit’s position is calculated using
the distance formula with the two positions’
respective X and Z coordinates. The flat distance is then converted to meters by dividing this
value by the PIXELS_PER_METER setting. The rise of the Exit’s position
relative to the Player’s is calculated by subtracting the Player’s Y coordinate
from the Exit’s and dividing the resulting value by the pixels per meter setting. The slope between the two
positions is then calculated by dividing the rise in meters by the flat distance in meters.
Movement speed is roughly based on the range of real human movement speeds. For example, a Player with a speed stat of 10 would have a movement speed of 8.34 meters per second. This is slightly less than Usain Bolt’s top sprinting speed of 10.44 meters per second. The base formula to calculate a Player’s movement speed in meters per millisecond (m/ms) is quadratic, not linear. It is as follows:
\[ R = (0.0183(rx)^2 + 0.005rx + 0.916)w \]
In this formula are several variables:
- \(x\) is the Player’s speed stat.
- \(r\) is \(1\) if the Player is walking and \(2\) if the Player is running.
- \(w\) is a fraction which represents slowdown based on the combined weight of all of the Player’s Inventory Items. The formula to calculate this, where \(c\) is the Player’s carry weight, is \(w = \frac{15}{c}\). However, the calculated value is clamped between \( \frac{1}{4} \) and \(1\).
The final rate, \(R’\), in meters per millisecond (m/ms), is then calculated with the following formula, where \(R\) is the base rate and \(s\) is the slope:
\[ R’ = R - sR \]
The time it takes to move, \(t\), in seconds, is then calculated with the following formula, where \(d\) is the flat distance in meters and \(R’\) is the final rate in meters per millisecond:
\[ t = \frac{d}{R’} * 1000 \]
However, there is an alternative calculation method. If the flat distance between the Player’s position and the Exit’s position is \(0\), then the time it takes to move between them is calculated based on the assumption that the Player is in a stairwell consisting of two horizontally-flipped right triangles with legs of equal length vertically stacked on top of one another, like this diagram:
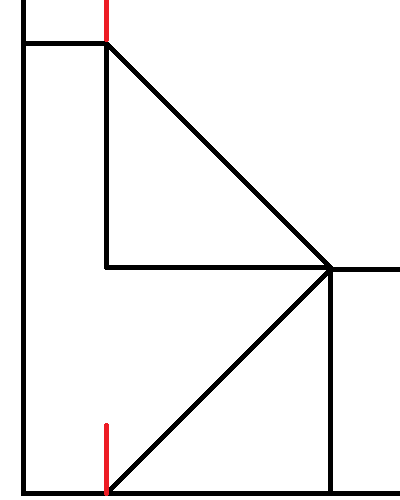
Here, the Player is marked by the bottom red line and the Exit is marked by the top red line. They have the same X and Z coordinates; only their Y coordinates differ. The distance, \(d\), in meters between the Player and the Exit is calculated by using the Pythagorean theorem to find the length of the hypotenuse for each triangle. In this formula, \(l\) represents the length of each leg, calculated by dividing the rise in meters by \(2\):
\[ d = 2 * \sqrt{2l^2} \]
Then, if the rise is positive, meaning the Player is moving upstairs, the Player’s base rate is multiplied by \( \frac{2}{3} \). If the rise is negative, meaning the Player is moving downstairs, the Player’s base rate is multiplied by \( \frac{4}{3} \). In effect, their rate is decreased when moving upstairs and increased when moving downstairs.
Finally, the time it takes to move in this scenario, \(t\), in seconds, is calculated with the following formula, where \(d\) is the recently determined distance in meters and \(R\) is the base rate (without accounting for slope) in meters per millisecond:
\[ t = \frac{d}{R} * 2 * 1000 \]
Default Stamina
- Spreadsheet label: Sta
- Class attribute: Number
this.defaultStamina
This is the Player’s default speed stat. This quantifies the Player’s physical endurance. It must be a whole number from 1 - 10.
Max Stamina
- Class attribute: Number
this.maxStamina
This internal attribute is the Player’s current maximum stamina stat. By default, this equals their default stamina, however it can be changed by Status Effects with stat modifiers.
This stat is used to determine how long the Player can walk or run before being inflicted with the weary Status
Effect. The higher this is, the longer the Player can move without resting.
Stamina
- Class attribute: Number
this.stamina
This internal attribute is the Player’s current stamina stat. By default, this equals their maximum stamina, however it changes as the Player moves and rests. Whenever the Player’s max stamina changes, so too does their stamina; the ratio of their current stamina to their max stamina is retained.
As the Player moves, their stamina stat decreases. Every 100 milliseconds, the amount of stamina the Player loses, \( L\), is calculated using the following formula:
\[ L = dm * (u + su) \]
In this formula are several variables:
- \(d\) is the flat distance in meters the Player has moved in the past 100 milliseconds.
- \(m\) is \(1\) if the Player is walking and \(3\) if the Player is running.
- \(u\) is the
STAMINA_USE_RATEsetting. - \(s\) is the slope of the Player’s movement, calculated by dividing the number of meters they’ve risen in meters by the flat distance in meters they’ve moved in the past 100 milliseconds.
However, there is an alternative calculation method. If the flat distance between the Player’s position and the Exit’s position is \(0\), then the time it takes to move between them is calculated based on the assumption that the Player is in a stairwell. If the rise is positive, meaning the Player is moving upstairs, the amount of stamina the Player loses is calculated like so:
\[ L = 4dmu \]
If the rise is negative, meaning the Player is moving downstairs, the amount of stamina the Player loses is calculated like so:
\[ L = -\frac{dmu}{4} \]
When the Player’s stamina dips below half of their max stamina, they will be sent a warning that they’re starting to get
tired. If it reaches \(0\), they will stop moving and be inflicted with the weary Status Effect.
When the Player is not moving, their stamina is gradually restored. Every 30 seconds, they recover \( \frac{1}{20} \) of their max stamina.
Default Intelligence
Warning
This attribute is deprecated and will be removed in a future release.
Use
this.defaultPerceptioninstead.
- Class attribute: Number
this.defaultIntelligence
This was the previous name of the perception stat. It was renamed in Alter Ego version 2.0 to reflect its modern usage. This attribute contains a copy of the Player’s default perception. However, it will eventually be removed.
Intelligence
Warning
This attribute is deprecated and will be removed in a future release.
Use
this.perceptioninstead.
- Class attribute: Number
this.intelligence
This was the previous name of the perception stat. It was renamed in Alter Ego version 2.0 to reflect its modern usage. This attribute contains a copy of the Player’s perception. Whenever the Player’s perception is updated, this is also updated to match it. However, it will eventually be removed.
Alive
- Spreadsheet label: Alive?
- Class attribute: Boolean
this.alive
This indicates whether the player is alive or not. If this is true, then the Player is alive, and can interact with
the game world like normally. If this is false, then the Player is dead, and they cannot do anything. When a Player
dies, some of their data is lost. In particular, their location, hiding spot, and Status Effects will be lost. However,
they retain everything else, including their Inventory Items. However, because dead Players cannot be inspected or
interacted with, all of their data is inaccessible.
Location Display Name
- Spreadsheet label: Location
- Class attribute: String
this.locationDisplayName
This is the display name of the Room that the Player is currently in. This must match the Room’s display name on the spreadsheet exactly.
Location
- Class attribute: Room
this.location
This internal attribute is a reference to the actual Room object the Player is currently in.
Position
- Class attribute: object
this.pos
This internal attribute is an object containing variables that contain each of the Player’s current coordinates. This is used to calculate the amount of time it will take for the Player to move to an Exit. When the Player is moving, their position is constantly updated. Every 100 milliseconds, the amount of time that has elapsed since the Player started moving is taken as a ratio of the total amount of time it will take to move to the desired Exit. Each of the Player’s starting coordinates is subtracted from the Exit’s corresponding coordinates, and the resulting value is multiplied by that ratio and rounded to the nearest whole number. Then, each of these values are added to the Player’s starting coordinates to determined the Player’s updated position. This effectively makes it so that if the Player stops moving, they won’t have to move the full distance if they decide to move to that Exit again.
When the Player enters a Room, their position is updated to match the position of the Exit they entered from. However, if the Player didn’t enter from a specific Exit, as would be the case when Player or Room data is loaded or when moving to a non-adjacent Room, their position is set to the average position of all Exits in the Room.
The Player’s position has the following structure:
interface Pos {
    x: number;
    y: number;
    z: number;
}
This essentially groups what would be multiple class attributes into one. They are listed below:
X
- Class attribute: Number
this.pos.x
This is the Player’s current X coordinate. This corresponds with the X-axis on a 3D grid.
Y
- Class attribute: Number
this.pos.y
This is the Player’s current Y coordinate. This corresponds with the Y-axis on a 3D grid, which represents vertical height.
Z
- Class attribute: Number
this.pos.z
This is the Player’s current Z coordinate. This corresponds with the Z-axis on a 3D grid.
Hiding Spot
- Spreadsheet label: Hiding Spot
- Class attribute: String
this.hidingSpot
This is a string which contains the name of the Fixture the Player is currently hiding in. Since this is just a string, it can be set manually on the spreadsheet to anything, whether it’s the name of a Fixture in the Room or not. If the Player is not currently hidden, this should be left blank.
Status Displays
This string is a comma-separated list of the IDs of all Status Effects that the Player currently has, including those that aren’t visible. If a Status Effect has a duration, it can be listed here by putting the duration in parentheses. The duration must follow a specific format:
(D) H:mm:ss
D stands for the number of 24-hour days remaining; it is optional. H stands for the number of hours remaining. mm
stands for the number of minutes remaining; leading zeroes are required. ss stands for the number of seconds
remaining; leading zeroes are required. For example, a Status Effect named famished with 2 days, 13 hours, 45 minutes,
and 11 seconds remaining would be listed as famished (2 13:45:11). A Status Effect named clean with 1 day, 4 hours,
9 minutes, and 7 seconds remaining would be listed as clean (1 4:09:07). A Status Effect named mortally wounded with
59 minutes remaining would be listed as mortally wounded (0:59:00).
It should be noted that when entering Status Effects on the spreadsheet manually, it isn’t necessary to include the duration. If the Status Effect has a limited duration, it will automatically have its duration listed on the spreadsheet when Alter Ego saves the game data. The Player’s status string is regenerated with updated durations every second of gameplay.
The status display object has the following structure:
interface StatusDisplay {
    /** The ID of the status effect. */
    id: string;
    /** The remaining time for the status effect. */
    timeRemaining: string;
}
When Player data is loaded from the sheet, the Status Effects listed, as well their Durations, are parsed and converted into these objects. When data is saved to the sheet, all of the status displays are converted to strings and separated by a comma.
Status String
Warning
This attribute is deprecated and will be removed in a future release.
If this is used to check whether or not a Player has a Status with the given ID, use the
this.hasStatusmethod instead.
- Class attribute: String
this.statusString
This internal attribute was used prior to Alter Ego version 2.0 to display all of the Player’s current Status Effects
as a string, with representations of their time remaining. However, it has since been replaced by this.statusDisplays,
and now it is always an empty string. This will be removed in a future release.
Status
- Class attribute: Collection<String, Status>
this.status
This internal attribute contains a collection of all instantiated Status Effects that the Player currently has, keyed by Status ID. Every time a Status Effect is inflicted or cured, the Player’s stats are recalculated.
Description
- Spreadsheet label: Description
- Class attribute: Description
this.description
This is the description of the Player. When another Player inspects this Player, they will receive a parsed version of this string. See the article on writing descriptions for more information.
Player descriptions have a few peculiarities that set them apart from other descriptions, mostly due to the complexity of Players. In this section, Player descriptions will be explained in full detail. The default Player description provided in the playerdefaults file is:
<desc><s>You examine <var v="this.displayName"/>.</s> <if cond="this.hasBehaviorAttribute('concealed')"><s><var v="this.pronouns.Sbj" /> <if cond="this.pronouns.plural">are</if><if cond="!this.pronouns.plural">is</if> [HEIGHT], but <var v="this.pronouns.dpos" /> face is concealed.</s></if><if cond="!this.hasBehaviorAttribute('concealed')"><s><var v="this.pronouns.Sbj" /><if cond="this.pronouns.plural">'re</if><if cond="!this.pronouns.plural">'s</if> [HEIGHT] with [SKIN TONE], [HAIR], and [EYES].</s> <if cond="this.hasStatus('tired')"><s><var v="this.pronouns.Sbj"/> <if cond="this.pronouns.plural">have</if><if cond="!this.pronouns.plural">has</if> bags under <var v="this.pronouns.dpos"/> eyes.</s></if><if cond="this.hasStatus('exhausted')"><s><var v="this.pronouns.Sbj"/> <if cond="this.pronouns.plural">have</if><if cond="!this.pronouns.plural">has</if> dark bags under <var v="this.pronouns.dpos"/> eyes.</s> <s><var v="this.pronouns.Sbj"/> look<if cond="!this.pronouns.plural">s</if> absolutely **exhausted**.</s></if><if cond="this.hasStatus('delirious')"><s><var v="this.pronouns.Sbj"/> look<if cond="!this.pronouns.plural">s</if> completely **delirious**, like <var v="this.pronouns.sbj"/> <if cond="this.pronouns.plural">have</if><if cond="!this.pronouns.plural">has</if>n't slept in days.</s></if></if><br /><br /><s><var v="this.pronouns.Sbj" /> wear<if cond="!this.pronouns.plural">s</if> <il name="equipment"></il>.</s><if cond="this.getContainedItemsForItemList('equipment').length === 0"><s><var v="this.pronouns.Sbj" /> <if cond="!this.pronouns.plural">is</if><if cond="this.pronouns.plural">are</if> completely naked.</s></if> <s>You see <var v="this.pronouns.obj"/> carrying <il name="hands"></il>.</s> <if cond="this.hasStatus('stinky')"><s><var v="this.pronouns.Sbj"/>'<if cond="this.pronouns.plural">re</if><if cond="!this.pronouns.plural">s</if> a little stinky.</s></if><if cond="this.hasStatus('rancid')"><s><var v="this.pronouns.Sbj"/> smell<if cond="!this.pronouns.plural">s</if> absolutely **rancid**.</s></if> <if cond="this.hasStatus('soaking wet')"><s>Also, <var v="this.pronouns.sbj"/> <if cond="!this.pronouns.plural">is</if><if cond="this.pronouns.plural">are</if> soaking wet.</s></if><if cond="this.hasStatus('wet')"><s>Also, <var v="this.pronouns.sbj"/> <if cond="!this.pronouns.plural">is</if><if cond="this.pronouns.plural">are</if> a bit wet.</s></if></desc>
This description always refers to the Player with the correct name and pronouns according to the situation, and it does
so by making use of the Player’s class attributes with if and var tags. While prior to Alter Ego version 2.0, it was
necessary to replace the this keyword in Player descriptions with container in order to access a Player’s
attributes, this is no longer the case. Now, Player descriptions can use the this keyword like any other description,
and allowing a Player to view their own description in a MIRROR or some other reflective Fixture is as simple as:
<desc><s>It's a mirror hung on the wall above the sink.</s> <s>You can see your reflection in it:</s><br /><s> >>> </s><var v="player.description.parseFor(player)" /></desc>
Within the desc tags of the Player’s description, there are eight main sections:
-
Section 1: Player display name
<s>You examine <var v="this.displayName"/>.</s>- This refers to the Player by their current display name. This should never be changed.
-
Section 2: Concealed description
<if cond="this.hasBehaviorAttribute('concealed')"><s><var v="this.pronouns.Sbj" /> <if cond="this.pronouns.plural">are</if><if cond="!this.pronouns.plural">is</if> [HEIGHT], but <var v="this.pronouns.dpos" /> face is concealed.</s></if>- This section describes the Player with very little detail in order to avoid revealing their identity when they
have the
concealedbehavior attribute. - The
concealedbehavior attribute automatically changes the Player’s pronouns to theneutralset. Consequently, for the sake of simplicity, this section could be written as:
However, doing so removes the possibility of using the setpronouns command after the Player is inflicted with the<if cond="this.hasBehaviorAttribute('concealed')"><s>They are [HEIGHT], but their face is concealed.</s></if>concealedbehavior attribute. It can still be used, but the new pronouns will not be reflected in the Player’s description.
- This section describes the Player with very little detail in order to avoid revealing their identity when they
have the
-
Section 3: Non-concealed description
<if cond="!this.hasBehaviorAttribute('concealed')"><s><var v="this.pronouns.Sbj" /><if cond="this.pronouns.plural">'re</if><if cond="!this.pronouns.plural">'s</if> [HEIGHT] with [SKIN TONE], [HAIR], and [EYES].</s> <if cond="this.hasStatus('tired')"><s><var v="this.pronouns.Sbj"/> <if cond="this.pronouns.plural">have</if><if cond="!this.pronouns.plural">has</if> bags under <var v="this.pronouns.dpos"/> eyes.</s></if><if cond="this.hasStatus('exhausted')"><s><var v="this.pronouns.Sbj"/> <if cond="this.pronouns.plural">have</if><if cond="!this.pronouns.plural">has</if> dark bags under <var v="this.pronouns.dpos"/> eyes.</s> <s><var v="this.pronouns.Sbj"/> look<if cond="!this.pronouns.plural">s</if> absolutely **exhausted**.</s></if><if cond="this.hasStatus('delirious')"><s><var v="this.pronouns.Sbj"/> look<if cond="!this.pronouns.plural">s</if> completely **delirious**, like <var v="this.pronouns.sbj"/> <if cond="this.pronouns.plural">have</if><if cond="!this.pronouns.plural">has</if>n't slept in days.</s></if></if>- This section describes the Player in more detail. It’s used when the Player doesn’t have the
concealedbehavior attribute. - Because the Player’s pronouns do not automatically change unless they are inflicted with the
concealedbehavior attribute, this section could be written without making use of the Player’s pronouns invartags. Instead, the Player’s pronouns could be written as plain text. This would allow a Player who uses multiple pronouns interchangeably to be referred to with alternating pronouns, for example. However, this would hamper the use of the setpronouns command for the Player unless additional logic checking is added. - This section can be further divided into two subsections:
- Subsection 1: Main description
<s><var v="this.pronouns.Sbj" /><if cond="this.pronouns.plural">'re</if><if cond="!this.pronouns.plural">'s</if> [HEIGHT] with [SKIN TONE], [HAIR], and [EYES].</s>- In this subsection, the Player can be described in much more detail than the default description allows for, and detail can be added throughout the course of the game if the Player’s appearance changes in significant ways. However, Player descriptions should ideally be kept short to not overwhelm Players with too much irrelevant information.
- An example of this section that makes use of static pronouns, extra detail, and extra conditionals, might
look like this:
<s>She's very tall with moderately light skin.</s> <s>She's quite scrawny, and a bit lanky, with a small bust.</s> <if cond="this.hasEquippedItem('FLORIANS EYEPATCH', 'GLASSES')"><s>It only has one eye, which is deep red in color.</s> <s>Its left eye is covered with an eyepatch.</s></if><if cond="!this.hasEquippedItem('FLORIANS EYEPATCH', 'GLASSES')"><s>Her eyes are deep red in color<if cond="player.name === 'Florian' || player.perception > 6">, but on closer inspection, her left eye appears to be made of glass, and doesn't quite match the color of her right eye</if>.</s></if> <s>They have short, dark mauve hair <if cond="this.hasEquippedItem('PAIR OF HAIR TIES', 'HAT')">that's tied into two small pigtails,</if><if cond="!this.hasEquippedItem('PAIR OF HAIR TIES', 'HAT')"> that goes down to her upper chest,</if> with bangs swept to the right.</s> <s>She has a wavy side fringe that goes down to her shoulder.</s> <s>The tips of this fringe and some scattered strands of his hair are dyed black.</s> <s>His nails are painted black, as well.</s> <s>Its face bears a skeptical look to it, as if it's either judging or analyzing you.</s>
- Subsection 2: Tiredness indicator
<if cond="this.hasStatus('tired')"><s><var v="this.pronouns.Sbj"/> <if cond="this.pronouns.plural">have</if><if cond="!this.pronouns.plural">has</if> bags under <var v="this.pronouns.dpos"/> eyes.</s></if><if cond="this.hasStatus('exhausted')"><s><var v="this.pronouns.Sbj"/> <if cond="this.pronouns.plural">have</if><if cond="!this.pronouns.plural">has</if> dark bags under <var v="this.pronouns.dpos"/> eyes.</s> <s><var v="this.pronouns.Sbj"/> look<if cond="!this.pronouns.plural">s</if> absolutely **exhausted**.</s></if><if cond="this.hasStatus('delirious')"><s><var v="this.pronouns.Sbj"/> look<if cond="!this.pronouns.plural">s</if> completely **delirious**, like <var v="this.pronouns.sbj"/> <if cond="this.pronouns.plural">have</if><if cond="!this.pronouns.plural">has</if>n't slept in days.</s></if>- In this subsection are several
ifconditionals that appear if the Player has one of several mutually exclusive Status Effects:tired,exhausted, ordelirious. This indicates that the Player hasn’t slept in a while. - This subsection can be safely removed if it is not desired.
- In this subsection are several
- Subsection 1: Main description
- This section describes the Player in more detail. It’s used when the Player doesn’t have the
-
Section 4: Equipment item list
<br /><br /><s><var v="this.pronouns.Sbj" /> wear<if cond="!this.pronouns.plural">s</if> <il name="equipment"></il>.</s>- Right before this sentence is a pair of line breaks. This breaks up the description into two separate parts, making it easier to read.
- This sentence lists all Inventory Items that the Player currently has equipped, except for
those equipped to their
RIGHT HANDandLEFT HANDEquipment Slots and those whose Equipment Slot is covered by another equipped Inventory Item. These items will be automatically inserted based on the Player’s current inventory whenever they are inspected. - If nothing appears in the
iltag, this sentence will not appear in the parsed description. - Because this sentence appears regardless of whether or not the Player has the
concealedbehavior attribute,vartags should be used to reference the Player’s pronouns. They should not be replaced with static pronouns.
-
Section 5: No equipped items indicator
<if cond="this.getContainedItemsForItemList('equipment').length === 0"><s><var v="this.pronouns.Sbj" /> <if cond="!this.pronouns.plural">is</if><if cond="this.pronouns.plural">are</if> completely naked.</s></if>- This
ifconditional calls thegetContainedItemsForItemListmethod for theequipmentitem list, and if it returns an empty array (meaning the Player has no equipped Inventory Items), then the sentence indicating that the Player is completely naked will appear in their description. - Because this only evaluates as true if the
equipmentitem list is empty, this sentence will appear even if the Player’shandsitem list is not empty. - Since the sentence before this will have been removed if this sentence appears, there is no need to insert a space between the two sentences.
- Because this sentence appears regardless of whether or not the Player has the
concealedbehavior attribute,vartags should be used to reference the Player’s pronouns. They should not be replaced with static pronouns. - This section can be safely removed if it is not desired.
- This
-
Section 6: Hands item list
<s>You see <var v="this.pronouns.obj"/> carrying <il name="hands"></il>.</s>- This sentence lists all non-discreet Inventory Items that the Player currently has equipped
to their
RIGHT HANDorLEFT HANDEquipment Slots. These items will be automatically inserted based on the Player’s current inventory whenever they are inspected. - If nothing appears in the
iltag, this sentence will not appear in the parsed description. - Because this sentence appears regardless of whether or not the Player has the
concealedbehavior attribute,vartags should be used to reference the Player’s pronouns. They should not be replaced with static pronouns.
- This sentence lists all non-discreet Inventory Items that the Player currently has equipped
to their
-
Section 7: Odor indicator
<if cond="this.hasStatus('stinky')"><s><var v="this.pronouns.Sbj"/>'<if cond="this.pronouns.plural">re</if><if cond="!this.pronouns.plural">s</if> a little stinky.</s></if><if cond="this.hasStatus('rancid')"><s><var v="this.pronouns.Sbj"/> smell<if cond="!this.pronouns.plural">s</if> absolutely **rancid**.</s></if>- In this section are two
ifconditionals that appear if the Player has one of two mutually exclusive Status Effects:stinkyorrancid. This indicates that the Player hasn’t bathed in a while. - Because this sentence appears regardless of whether or not the Player has the
concealedbehavior attribute,vartags should be used to reference the Player’s pronouns. They should not be replaced with static pronouns. - This section can be safely removed if it is not desired.
- In this section are two
-
Section 8: Wetness indicator
<if cond="this.hasStatus('soaking wet')"><s>Also, <var v="this.pronouns.sbj"/> <if cond="!this.pronouns.plural">is</if><if cond="this.pronouns.plural">are</if> soaking wet.</s></if><if cond="this.hasStatus('wet')"><s>Also, <var v="this.pronouns.sbj"/> <if cond="!this.pronouns.plural">is</if><if cond="this.pronouns.plural">are</if> a bit wet.</s></if>- In this section are two
ifconditionals that appear if the Player has one of two mutually exclusive Status Effects:soaking wetorwet. This indicates that the Player was recently soaked with water. - Because this sentence appears regardless of whether or not the Player has the
concealedbehavior attribute,vartags should be used to reference the Player’s pronouns. They should not be replaced with static pronouns. - This section can be safely removed if it is not desired.
- In this section are two
Additional information can be added to the Player’s description as needed. However, when doing so, precautions should be
taken to ensure that it does not conflict with the effects of the concealed behavior attribute. If additional sections
are added, they generally must use var tags to reference the Player’s pronouns.
Unless it is manually specified, this Description will be sent
using the PLAIN_TEXT message display type.
Inventory
- Class attribute: Collection<String, Equipment Slot>
this.inventory
This internal attribute is a collection of Equipment Slots that the Player has, keyed by Equipment Slot ID. See the article on Equipment Slots for more information.
Notification Channel
This is an internal attribute. When Player data is loaded, Alter Ego will attempt to create a DM channel with the guild
member corresponding to this Player. This channel is where all messages intended to be sent to only this Player will be
sent. This includes parsed Descriptions, Notifications, error messages, and so on. If the Player is
an NPC, this is null.
Spectate Channel
- Class attribute: TextChannel | null
this.spectateChannel
This is an internal attribute. When Player data is loaded, Alter Ego will attempt to find the channel in
the Spectate category whose name matches the name of the Player. If
it is not found, it will create one with that Player’s name. It will not do this if there are already 50 spectate
channels in the Spectate category, however. It also will not attempt to find or create spectate channels for NPCs. In
both scenarios, this is null.
A spectate channel replicates the experience of being this Player. Everything the Player sees, including descriptions, Narrations, dialog, and more, is sent to this channel in chronological order. Here, spectators and dead Players can watch the game happen in real time, or read it at any point in the future, even after the game has concluded.
There are some things that do not appear in spectate channels, however. Out-Of-Character (OOC) messages—messages that
begin with (—are not sent, as
they are not considered true dialog. The Player’s commands are also not sent, nor are error messages about command
syntax. When the Player uses the status command or
time command, the responses will not appear in their spectate channel.
Max Carry Weight
- Class attribute: Number
this.maxCarryWeight
This internal attribute is the maximum weight the Player can currently carry in kilograms. How it is calculated is described in more detail in the strength stat section. If the Player attempts to take a Room Item that is heavier than this number, they will be told it is too heavy to lift, and if the Room Item is non-discreet, their attempt to take it will be Narrated in the Room channel. Likewise, if they attempt to take a Room Item that would make their current carry weight exceed this value, they will be told that they’re carrying too much weight; however, this will not be Narrated. The same happens if another Player attempts to give this Player an Inventory Item that would exceed this value. If the Player uses the dress command, they will be unable to dress themself in any Room Items that would exceed this value, although they will not be notified of it.
Carry Weight
- Class attribute: Number
this.carryWeight
This internal attribute is the combined weight of all of the Player’s Inventory Items. This is updated every time the Player’s inventory changes. This is used to determine how much slower the Player will be when moving.
Row
- Class attribute: Number
this.row
This is an internal attribute, but it can also be found on the spreadsheet. This is the row number of the Player.
Is Moving
- Class attribute: Boolean
this.isMoving
This internal attribute indicates whether the Player is currently in the process of moving or not. If this is true,
then they are currently moving. If this is false, then they are resting.
It should be noted that the Player can be forcibly stopped from moving in many ways. If Player data is reloaded,
if edit mode is enabled, if the Player is inflicted with a Status Effect with the
disable all, disable move, or disable run behavior attributes, if the Player is forcibly moved using moderator or
bot commands, or if the Player dies, they will stop moving, and all class attributes associated
with movement will be reset.
Move Timer
This internal attribute uses the setInterval method
to handle the Player’s movement. Every 100 milliseconds, 100 milliseconds are subtracted from the Player’s
remaining time, and the Player’s position and stamina are updated. However, if at least one
Player in the game has the heated Status Effect, the amount of milliseconds subtracted from the Player’s remaining
time is first multiplied by the HEATED_SLOWDOWN_RATE setting, effectively
making the Player move more slowly. When the remaining time reaches 0, the Player moves to
their destination, as long as the Exit leading to it is unlocked or passable.
If the Player stops moving for any reason, the
clearInterval method is used on this so that the Player’s
movement will no longer continue. When Player data is loaded, this is null.
Remaining Time
- Class attribute: Number
this.remainingTime
This internal attribute is the number of milliseconds remaining until the Player is done moving to the Exit they’re
currently moving to. If the Player stops moving for any reason, this is set to 0.
Move Queue
This internal attribute is a list of all movements the Player wishes to make in sequential order. When the Player uses the move command or run command, the Exits they supply as arguments are inserted into this list. Each one is parsed, and if the desired Exit is found, the Player begins moving to that Exit. When they reach the next Room, the next entry in the queue is parsed and the cycle continues until the Player reaches the final destination. However, if any entry in the queue is an invalid destination or they attempt to enter a locked Exit, the Player is notified of their mistake, they stop moving, and the queue is emptied.
This class attribute is unused if the Player is moved with the moderator or bot command, because those commands move the Player instantaneously. As such, NPCs cannot have queued movements.
Online
- Class attribute: Boolean
this.online
This internal attribute determines whether or not the Player is included in the count of online Players in Alter
Ego’s status message. If this is true, then the
Player is counted. If this is false, then they are not. A Player is set as online whenever they use a command or speak
in-game. NPCs are never considered online.
Process
- Class attribute: object
this.process
This is an internal attribute used to process Recipes. It has the following structure:
interface Process {
    /** The recipe being processed. **/
    recipe: Recipe;
    /** The ingredients used in the recipe. */
    ingredients: Array<CollatedItem<InventoryItem>>;
    /** The products created during recipe processing. */
    products: Array<InventoryItem>;
    /** How many times the given ingredients satisfy the recipe. Only set right before products are instantiated. */
    satisfactoryProcessCount: number;
    /** The duration of the recipe. */
    duration: null;
    /** The timer used to track the duration of the recipe. */
    timer: null;
}
Unlike Fixtures, the duration and timer are never set. The Player’s process is only set during crafting and uncrafting, and it is cleared immediately after.
Methods
Players have a number of functions that can be useful to moderators. This is not an exhaustive list of publicly
accessible methods; only ones that are likely to be useful when writing Flag value scripts, or
if and var
tags in descriptions.
calculateMoveRate
this.calculateMoveRate(isRunning?);
- Purpose: Calculates the player’s movement rate in meters per second, irrespective of distance or slope.
- Returns: Number
- Parameters:
- Boolean
isRunning- Whether the player is running or not. Defaults to false.
- Boolean
hasStatus
this.hasStatus(statusId);
- Purpose: Returns true if the player has a status with the specified ID.
- Returns: Boolean
- Parameters:
- String
statusId- The ID of the status to look for.
- String
hasBehaviorAttribute
this.hasBehaviorAttribute(behaviorAttribute);
- Purpose: Returns true if the player has a status with the specified behavior attribute.
- Returns: Boolean
- Parameters:
- String
behaviorAttribute- The name of the behavior attribute.
- String
hasAttribute
Warning
This method is deprecated and will be removed in a future release.
Use
this.hasBehaviorAttributeinstead.
this.hasAttribute(attribute);
- Purpose: Returns true if the player has a status with the specified behavior attribute.
- Returns: Boolean
- Parameters:
- String
attribute- The name of the behavior attribute.
- String
canSee
this.canSee();
- Purpose: Returns true if the player doesn’t have the
no sightbehavior attribute. - Returns: Boolean
- Parameters: None
canHear
this.canHear();
- Purpose: Returns true if the player doesn’t have the
no hearingbehavior attribute. - Returns: Boolean
- Parameters: None
knows
this.knows(playerName);
- Purpose: Returns true if the player has the
knows ${playerName}behavior attribute. - Returns: Boolean
- Parameters:
- String
playerName- The name of a player.
- String
isConscious
this.isConscious();
- Purpose: Returns true if the player doesn’t have the
unconsciousbehavior attribute. - Returns: Boolean
- Parameters: None
isHidden
this.isHidden();
- Purpose: Returns true if the player has the
hiddenbehavior attribute. - Returns: Boolean
- Parameters: None
getStatModifier
this.getStatModifier(stat);
- Purpose: Calculates dice roll modifier based on the specified stat value.
- Returns: Number
- Parameters:
- Number
stat- The stat value.
- Number
getContainedItems
this.getContainedItems();
- Purpose: Gets all of the items this entity contains.
- Returns: Array<Inventory Item>
- Parameters: None
getContainedItemsForItemList
this.getContainedItemsForItemList(itemListName?, player?);
- Purpose: Gets all of the items that should appear in the given item list.
- Returns: Array<Inventory Item>
- Parameters:
containsNoItems
this.containsNoItems();
- Purpose: Returns true if this entity contains no items.
- Returns: Boolean
- Parameters: None
containsItem
this.containsItem(identifier);
- Purpose: Returns true if this entity contains an item with the given identifier or prefab ID.
- Returns: Boolean
- Parameters:
- String
identifier- The identifier or prefab ID to search for.
- String
getContainedItem
this.getContainedItem(identifier);
- Purpose: Returns the item contained inside of this container with the given identifier or prefab ID. If no such item exists, returns undefined.
- Returns: Inventory Item
- Parameters:
- String
identifier- The identifier or prefab ID to search for.
- String
getContainedItemsWeight
this.getContainedItemsWeight();
- Purpose: Gets the combined weight of all the items this entity contains.
- Returns: Number
- Parameters: None
getIngredientItem
this.getIngredientItem(prefabId);
- Purpose: Gets the actual ingredient item instance that was used as an ingredient in the currently processed recipe. If no such item exists, returns the corresponding ingredient prefab of the currently processed recipe. If no recipe is currently being processed, returns undefined.
- Returns: Prefab | Inventory Item
- Parameters:
- String
prefabId- The prefab ID to search for.
- String
getProductItem
this.getProductItem(prefabId);
- Purpose: Gets the actual product item instance that was instantiated in the currently processed recipe. If no such item exists, returns the corresponding product prefab of the currently processed recipe. If no recipe is currently being processed, returns undefined.
- Returns: Prefab | Inventory Item
- Parameters:
- String
prefabId- The prefab ID to search for.
- String
getEquipmentSlot
this.getEquipmentSlot(equipmentSlotId);
- Purpose: Gets the equipment slot in the player’s inventory with the given ID. If it doesn’t exist, returns undefined.
- Returns: Equipment Slot
- Parameters:
- String
equipmentSlotId- The equipment slot ID to search for.
- String
hasEquippedItem
this.hasEquippedItem(identifier, equipmentSlotId);
- Purpose: Returns true if the player has an item with the given identifier or prefab ID equipped to the given equipment slot.
- Returns: Boolean
- Parameters:
Inventory Item
An Inventory Item is a data structure used by Alter Ego. It represents an item that is currently possessed by a Player. It is an instance of a Prefab, and is similar to a Room Item.
Attributes
Inventory Items themselves have relatively few attributes. However, being instances of Prefabs, they inherit many attributes as a result. Note that if an attribute is internal, that means it only exists within the InventoryItem class. Internal attributes will be given in the “Class attribute” bullet point, preceded by their data type. If an attribute is external, it only exists on the spreadsheet. External attributes will be given in the “Spreadsheet label” bullet point.
Player Name
- Spreadsheet label: Player Name
- Class attribute: String
this.playerName
This is the name of the Player whose inventory this Inventory Item is in. This must match the Player’s name exactly on the spreadsheet.
Player
- Class attribute: Player
this.player
This is an internal attribute which contains a reference to the actual Player object whose name is given in
this.playerName. All of the Player’s attributes are accessible via this property.
Prefab ID
- Spreadsheet label: Prefab
- Class attribute: String
this.prefabId
This is the ID of the Prefab this Item is an instance of, as it was entered on the sheet.
This cell can never be left blank, even for empty Equipment Slots. If the Inventory Item is an
Equipment Slot with nothing equipped to it, this should be NULL.
Prefab
This is an internal attribute which contains a reference to the actual Prefab object this Inventory Item is an instance of. It gives the Inventory Item most of its properties. All of the Prefab’s attributes are accessible via this property.
If the Prefab ID given was NULL, then the Inventory Item’s Prefab will be null.
Identifier
- Spreadsheet label: Container Identifier
- Class attribute: String
this.identifier
This is a unique name given to the Inventory Item if it is capable of containing other Inventory Items. This is necessary when loading Inventory Items in order for Alter Ego to determine which container the child Inventory Items belong to, in case there are multiple container Inventory Items with the same Prefab. Typically, this is the Prefab ID followed by a number (the standard followed by the itemManager module), but there are no naming rules for identifiers. No two Room Items or Inventory Items can have the same identifier. For an example of how this looks, see the following table:
| Player Name | Prefab ID | Container Identifier | Equipment Slot | Container | Quantity |
|---|---|---|---|---|---|
| Astrid | BLACK PARKA | BLACK PARKA 1 | RIGHT HAND | 1 | |
| Astrid | BLACK PARKA | BLACK PARKA 2 | JACKET | 1 | |
| Astrid | COIN | RIGHT HAND | BLACK PARKA 1/RIGHT POCKET | 10 | |
| Astrid | COIN | JACKET | BLACK PARKA 2/RIGHT POCKET | 10 |
For Inventory Items that are not capable of containing Inventory Items, this can be left blank.
Single Name
- Class attribute: String
this.name
This is an internal attribute which is inherited from the Prefab’s possible names. This is the single name that the Inventory Item was instantiated with. If the Prefab has multiple possible names, and the Inventory Item was instantiated with at least one procedural selection that satisfies one of the possible names, its single name will be the single name of the first of the Prefab’s possible names that it satisfied.
For example, if the Prefab has the possible names:
[base color=default: PLATE, PLATES], [glaze color=orange: ORANGE PLATE, ORANGE PLATES], [glaze color=brown: BROWN PLATE, BROWN PLATES], [base color=red: RED PLATE, RED PLATES], [base color=white: WHITE PLATE, WHITE PLATES]
And the Inventory Item was instantiated with the procedural selections (glaze color=orange + base color=white),
then the first set of possible names that will be satisfied is the set for glaze color=orange,
so the Inventory Item’s single name will be:
ORANGE PLATE
However, if the Prefab only has one set of possible names, then the Inventory Item’s single name will be the sole single name that the Prefab can have.
Note that an Inventory Item’s single name is set on creation, and cannot be changed afterwards.
Plural Name
- Class attribute: String
this.pluralName
This is an internal attribute which is inherited from the Prefab’s possible names. This is the plural name that the Inventory Item was instantiated with. If the Prefab has multiple possible names, and the Inventory Item was instantiated with at least one procedural selection that satisfies one of the possible names, its plural name will be the plural name of the first of the Prefab’s possible names that it satisfied. If that set of possible names does not have a plural name, it will be set as an empty string.
Otherwise, all of the same principles of the single name apply to the plural name as well. For the example above, the Inventory Item’s plural name would be:
ORANGE PLATES
Single Containing Phrase
- Class attribute: String
this.singleContainingPhrase
This is an internal attribute which is inherited from the Prefab’s possible containing phrases. This is the single containing phrase that the Inventory Item was instantiated with. If the Prefab has multiple possible containing phrases, and the Inventory Item was instantiated with at least one procedural selection that satisfies one of the possible containing phrases, its single containing phrase will be the single containing phrase of the first of the Prefab’s possible containing phrases that it satisfied.
For example, if the Prefab has the possible containing phrases:
[secondary base color=default: a TEACUP on a saucer, TEACUPS on saucers], [secondary glaze color=orange: an ORANGE TEACUP on a saucer, ORANGE TEACUPS on saucers], [secondary glaze color=brown: a BROWN TEACUP on a saucer, BROWN TEACUPS on saucers], [secondary base color=red: a RED TEACUP on a saucer, RED TEACUPS on saucers], [secondary base color=white: a WHITE TEACUP on a saucer, WHITE TEACUPS on saucers]
And the Inventory Item was instantiated with the procedural selections
(secondary glaze color=orange + secondary base color=white), then the first set of possible containing phrases that
will be satisfied is the set for secondary glaze color=orange, so the Inventory Item’s single containing phrase will be:
an ORANGE TEACUP on a saucer
However, if the Prefab only has one set of possible containing phrases, then the Inventory Item’s single containing phrase will be the sole single containing phrase that the Prefab can have.
Note that an Inventory Item’s single containing phrase is set on creation, and cannot be changed afterwards.
Plural Containing Phrase
- Class attribute: String
this.pluralContainingPhrase
This is an internal attribute which is inherited from the Prefab’s possible containing phrases. This is the plural containing phrase that the Inventory Item was instantiated with. If the Prefab has multiple possible containing phrases, and the Inventory Item was instantiated with at least one procedural selection that satisfies one of the possible containing phrases, its plural containing phrase will be the plural containing phrase of the first of the Prefab’s possible containing phrases that it satisfied. If that set of possible containing phrases does not have a plural containing phrase, it will be set as an empty string.
Otherwise, all of the same principles of the single containing phrase apply to the plural containing phrase as well. For the example above, the Inventory Item’s plural containing phrase would be:
ORANGE TEACUPS on saucers
Equipment Slot
- Spreadsheet label: Equipment Slot
- Class attribute: String
this.equipmentSlot
This is the ID of the Equipment Slot that this Inventory Item belongs to, whether it is equipped to it or contained in another Inventory Item that is. This cell can never be left blank. For more information, see the article on Equipment Slots.
Container Name
- Spreadsheet label: Container
- Class attribute: String
this.containerName
This is the identifier of the container the Inventory Item can be found in. An Inventory Item’s container is the Inventory Item whose description will mention it in an item list. When the Inventory Item is unstashed, the Inventory Item will no longer appear in the item list in its container. Note that the Inventory Item’s container must belong to the same Player and Equipment Slot as the Inventory Item itself.
In order to properly specify an Inventory Item’s container, the container’s identifier must be given, as well as the ID
of the specific Inventory Slot it is in, with both separated by a forward slash (/).
Unlike Room Items, Inventory Items cannot have containers of different types; they can only be other Inventory Items,
so a type doesn’t need to be specified.
The following are some examples of correct container names:
- LAB COAT 1/RIGHT POCKET
- LAB COAT 2/LEFT POCKET
- PLASTIC BAG 34/PLASTIC BAG
Keep in mind that this attribute consists of the container names as written, including the forward slash and Inventory Slot ID.
If no container name is supplied, then this Inventory Item is equipped to the listed Equipment Slot.
Container Type
- Class attribute: String
this.containerType
This is internal attribute is the type of the container the Inventory Item can be found in.
This will always be InventoryItem.
Container
- Class attribute: Inventory Item | null
this.container
This is an internal attribute which simply contains a reference to the actual Inventory Item object in the Player’s
inventory whose container identifier matches that of this.containerName. If this Inventory Item is equipped to an
Equipment Slot (and thus doesn’t have a container name) or the container it belongs to no longer exists in the Player’s
inventory, then this is null.
Slot
- Class attribute: String
this.slot
This is an internal attribute which simply contains the ID of the specific Inventory Slot that this Inventory Item is contained in. If this Inventory Item is not contained inside of another Inventory Item, this is an empty string.
Quantity
- Spreadsheet label: Quantity
- Class attribute: Number
this.quantity
This is a whole number indicating how many instances of this Inventory Item there are in the given container. So long
as its quantity is greater than 0, this Inventory Item can be inspected and unstashed from its container. Unlike
Room Items, Inventory Items cannot have an infinite quantity; a value must be provided. Inventory Items capable of
containing other Inventory Items cannot have a quantity greater than 1. Multiple instances of container Inventory
Items must be entered as entirely different Inventory Items on the sheet, but they will be considered the same in
certain contexts, such as in item lists. Equipped Inventory Items cannot have a quantity other than 1, unless they have
the NULL Prefab - in that case, their quantity should be left blank.
Uses
- Spreadsheet label: Uses
- Class attribute: Number
this.uses
This is a whole number indicating how many times this Inventory Item can be used in a UseAction. Although this number is derived from an Inventory Item’s Prefab, it can be manually set to differ on the spreadsheet. If no number of uses is given, the Inventory Item can be used infinitely. If the Inventory Item is dropped, its uses will be retained when it’s converted into a Room Item. This number can then be used when the subsequent Room Item is processed as part of a Recipe. For more details, see the section about Room Item uses.
Inventory Items can also be used another way. If a Player crafts an Inventory Item, and the Inventory Item is listed as an ingredient and a product in a Recipe, and it has a limited number of uses, its uses will be decreased. The amount by which its uses will decrease depends on how many times the crafting ingredients satisfy the Recipe being processed. Since crafting ingredients must be held in the Player’s hand Equipment Slots, and equipped Inventory Items can only have a quantity of 1, this means that the number of uses will usually decrease by 1. However, if ingredients are contained inside of one of the equipped Inventory Items and those ingredients have a higher quantity, then the number of uses that will be subtracted can be greater than 1.
Note that when an Inventory Item is uncrafted, its number of uses is not retained. The ingredient Prefabs will be instantiated with their default number of uses.
If an Inventory Item’s uses are decreased to 0, one of two things will happen:
- If the Inventory Item’s Prefab has a next stage, then it will be destroyed and its next stage will be instantiated in its place.
- If the Inventory Item’s Prefab has no next stage, it will simply be destroyed.
Size
- Class attribute: Number
this.size
This is an internal attribute. It is a whole number inherited from the size of the Inventory Item’s Prefab.
Weight
- Class attribute: Number
this.weight
This is an internal attribute. It is a whole number inherited from the weight of Inventory Item’s Prefab. If the Inventory Item is capable of containing other Inventory Items, the Inventory Items inside of it will add to its weight. This will also be added to the Player’s carry weight.
Inventory
- Class attribute:
Collection<string, Inventory Slot<Inventory Item>>
this.inventory
This is a collection of Inventory Slot objects that the Inventory Item has, where the key is the Inventory Slot’s ID. It is inherited from its Prefab. However, unlike its Prefab, the Inventory Item’s Inventory Slots can actually contain Inventory Items.
For more details, see the section about Prefab inventories.
Description
- Spreadsheet label: Description
- Class attribute: Description
this.description
This is the description of the Inventory Item. When a Player inspects this Inventory Item, they will receive a parsed version of this string. Note that this can be completely different from the description of the Inventory Item’s Prefab. Its item lists will actually mention the Inventory Items contained inside, but if it is inspected by a different Player than the one it belongs to, all sentences containing item lists will be removed. Also if the Prefab has procedural options, then when the Inventory Item is instantiated, its description will only contain the procedurals and possibilities that were selected.
Unless it is manually specified, this Description will be sent
using the PLAIN_TEXT message display type.
Procedural Selections
This internal attribute is a map of procedural selections for the Inventory Item, where the key is the name of a
procedural tag in its description, and the value is the name of the poss tag that was selected in that procedural
when the Inventory Item was instantiated. This is used to determine which of the Prefab’s possible names and possible
containing phrases to assign to the Inventory Item during instantiation.
Regardless of what procedural selections were supplied when the Inventory Item was instantiated, this map will only contain the procedural selections that actually exist in the Inventory Item’s description. Any others are discarded and lost forever. As the Inventory Item’s description is inherited from the description of its Prefab, its procedural selections can only be procedural options that exist in the Prefab’s description, unless the Inventory Item was added to the sheet directly, with custom procedurals in its description that don’t exist in its Prefab. However, doing this is not recommended.
Procedural selections that belong to an Inventory Item are transferred whenever the Inventory Item is transformed into something else. This can happen when an Inventory Item’s uses are decreased to 0 and it is transformed into its next stage, whether its uses were decremented by a Use Action or as part of crafting Recipe. It can also occur in one of two ways:
- If an Inventory Item is used as an ingredient in a crafting Recipe, then the procedural selections of all ingredients will be combined, and applied to all of the instantiated products.
- If an Inventory Item is converted into its ingredients in an Uncraft Action, then its procedural selections will be applied to all of the instantiated ingredients.
Both of these occurrences are especially useful, as it makes it possible to create Recipe chains in which procedural selections can be inherited and passed along to the next products in the chain. However, once again it is worth noting that if a next stage or a product does not have procedural options in its description that would be satisfied by a given procedural selection, that procedural selection will be discarded and lost when that Inventory Item is instantiated.
Row
- Class attribute: Number
this.row
This is an internal attribute, but it can also be found on the spreadsheet. This is the row number of the Inventory Item.
Methods
Inventory Items have a number of functions that can be useful to moderators. This is not an exhaustive list of publicly
accessible methods; only ones that are likely to be useful when writing Flag value scripts, or
if and var
tags in descriptions.
getContainedItems
this.getContainedItems();
- Purpose: Gets all of the items this entity contains.
- Returns: Array<Inventory Item>
- Parameters: None
getContainedItemsForItemList
this.getContainedItemsForItemList(itemListName?, player?);
- Purpose: Gets all of the items that should appear in the given item list.
- Returns: Array<Inventory Item>
- Parameters:
containsNoItems
this.containsNoItems();
- Purpose: Returns true if this entity contains no items.
- Returns: Boolean
- Parameters: None
containsItem
this.containsItem(identifier);
- Purpose: Returns true if this entity contains an item with the given identifier or prefab ID.
- Returns: Boolean
- Parameters:
- String
identifier- The identifier or prefab ID to search for.
- String
getContainedItem
this.getContainedItem(identifier);
- Purpose: Returns the item contained inside of this container with the given identifier or prefab ID. If no such item exists, returns undefined.
- Returns: Inventory Item
- Parameters:
- String
identifier- The identifier or prefab ID to search for.
- String
getContainedItemsWeight
this.getContainedItemsWeight();
- Purpose: Gets the combined weight of all the items this entity contains.
- Returns: Number
- Parameters: None
usableOn
this.usableOn(player);
- Purpose: Returns true if the item is usable on the given player.
- Returns: Boolean
- Parameters:
- Player
player
- Player
ownerIs
this.ownerIs(player);
- Purpose: Returns true if the owner of this item instance is the given player.
- Returns: Boolean
- Parameters:
- Player
player- The player to check ownership against.
- Player
isCoveredByEquippedItem
this.isCoveredByEquippedItem();
- Purpose: Returns true if the item is covered by an equipped inventory item. Also returns true if it’s stashed.
- Returns: Boolean
- Parameters: None
hasProceduralSelection
this.hasProceduralSelection([proceduralName, possName]);
- Purpose: Returns true if the item has the given procedural selection.
- Returns: Boolean
- Parameters:
Equipment Slot
Note
Not to be confused with Inventory Slots.
An Equipment Slot is a data structure used by Alter Ego. It represents a part of a Player’s body that they can equip Inventory Items to.
Equipment Slots do not have a dedicated sheet on the spreadsheet. Rather, they are derived from data on the Inventory Items sheet. If an Inventory Item has no container name, then an Equipment Slot will be created for it to be equipped to.
Equipment Slots are almost fully customizable. A single Player can have as many or as few Equipment Slots as desired, and each Player can have a unique set of Equipment Slots. If the startgame or addplayer commands are used, then all Players will have the default inventory, but this can be edited after the data is saved to the spreadsheet.
Crafting, as well as many interactions involving equipping and stashing, are currently
hard-coded to expect up to two “hand” slots: a RIGHT HAND and a LEFT HAND. There is currently no other way to
define hands for use in interactions involving hands. Players can be missing their LEFT HAND, but this will forbid
them from engaging in hand-crafting. RIGHT HANDs are expected to come before LEFT HANDs on the Inventory Items
sheet. Moderators may encounter erroneous behavior if they fail to conform to this expectation.
Equipment Slots can contain 0 or 1 Inventory Items.
To define an Equipment Slot without an Inventory Item, then the Prefab for this Equipment Slot should be NULL.
Attributes
Equipment Slots have very few attributes.
ID
- Class attribute: String
this.id
This is the ID of the Equipment Slot, which is inherited from the Equipment Slot attribute of the Inventory Item equipped to it. All letters should be capitalized, and spaces are allowed.
Name
Warning
This attribute is deprecated and will be removed in a future release.
Use
this.idinstead.
- Class attribute: String
this.name
This is a copy of the Equipment Slot’s ID. It was how Equipment Slots were identified prior to Alter Ego version 2.0. This attribute will be removed in the future.
Equipped Item
- Class attribute: Inventory Item | null
this.equippedItem
This is the Inventory Item currently equipped to this Equipment Slot. If the Inventory Item has a NULL Prefab —
indicating that nothing is currently equipped, then this is null.
Items
- Class
attribute: Array<Inventory Item>
this.items
This is a list of Inventory Items that currently occupy this Equipment Slot. This includes the Inventory Item currently equipped to it, any Inventory Items contained within it, any Inventory Items contained within those, and so on.
Row
- Class attribute: Number
this.row
This is the row number of the Inventory Item equipped to this Equipment Slot.
Methods
Equipment Slots have a number of functions that can be useful to moderators. This is not an exhaustive list of publicly
accessible methods; only ones that are likely to be useful when writing Flag value scripts, or
if and var
tags in descriptions.
containsNoItems
this.containsNoItems();
- Purpose: Returns true if the equipment slot contains no items.
- Returns: Boolean
- Parameters: None
Gesture
A Gesture is a data structure used by Alter Ego. It represents a form of body language that a Player can perform to communicate with other Players nonverbally.
Gestures are static; once loaded from the spreadsheet, they do not change in any way. Thus, the GameEntitySaver class will never make changes to the Gestures sheet. As a result, the Gestures sheet can be freely edited without edit mode being enabled.
Attributes
Gestures have very few attributes. Note that if an attribute is internal, that means it only exists within the Gesture class. Internal attributes will be given in the “Class attribute” bullet point, preceded by their data type. If an attribute is external, it only exists on the spreadsheet. External attributes will be given in the “Spreadsheet label” bullet point.
ID
- Spreadsheet label: Gesture ID
- Class attribute: String
this.id
This is the unique ID of the Gesture. This is what a Player must input in order to perform this Gesture. This should be given in all lowercase letters. Punctuation is allowed.
A Gesture cannot have the ID “list”, as attempting to perform a Gesture with that ID would instead bring up the list of all Gestures.
Name
Warning
This attribute is deprecated and will be removed in a future release.
Use
this.idinstead.
- Class attribute: String
this.name
This internal attribute is a copy of the Gesture’s ID. It was how Gestures were identified prior to Alter Ego version 2.0. This attribute will be removed in the future.
Requires
This is a comma-separated list of data types the Gesture can take as a target. Accepted data types are:
If this is not blank, then a Player who attempts to perform this Gesture must supply something in the Room they’re in of one of the accepted data types as a target. For example, if the Gesture requires a Fixture, then the Player must give the name of a Fixture in the Room in order to perform this Gesture. If the Gesture requires a Room Item or an Inventory Item, then the Player must give the name of a Room Item in the Room they’re in or an Inventory Item in their RIGHT HAND or LEFT HAND. If this is blank, then the Player can perform this Gesture without specifying a target.
Disabled Statuses Strings
- Spreadsheet label: Don’t Allow If Player Is
- Class attribute: Array<String>
this.disabledStatusesStrings
This is a comma-separated list of Status Effect IDs that prevent this Gesture from being performed. If a Player who is inflicted with any of the Status Effects listed here attempts to perform this Gesture, they will be unable to do so.
Additionally, if the Player has any of these Status Effects, the Gesture will not appear in the list of Gestures they can perform.
Disabled Statuses
This is an internal attribute which contains references to each of the Status Effect objects whose IDs are listed in
this.disabledStatusesStrings.
Description
- Spreadsheet label: Description In List
- Class attribute: String
this.description
This is a plain-text string that describes what the Player will do when they perform this Gesture. This appears in the Gesture list. It does not use XML tags - it must be plain text. An ideal Gesture description should be in second person and use as few words as possible.
Narration
- Spreadsheet label: Narration When Performed
- Class attribute: Description
this.narration
This is a Description that will be parsed and then narrated in the Room that the Player is in when this Gesture is performed. See the article on writing descriptions for more information.
Unless it is manually specified, this Narration will be sent
using the PLAYER message display type.
Row
- Class attribute: Number
this.row
This is an internal attribute, but it can also be found on the spreadsheet. This is the row number of the Gesture.
Target Type
- Class attribute: String
this.targetType
This is an internal attribute which is only assigned when a Gesture is instantiated in a Gesture Action. It indicates the data type of the Gesture’s target. This allows the Gesture’s Narration to contain conditional formatting based on the data type of the target.
Target
This is an internal attribute which is only assigned when a Gesture is instantiated in a Gesture Action. It
contains a reference to the target object. This allows the Gesture’s Narration to
make use of the target’s class attributes. For example, if a
Gesture requires a Fixture as a target, then the tag <var v="this.target.name" /> can be used to insert
the name of the Fixture in the Narration; if a Gesture requires a Room Item or Inventory Item as a
target, then the tag <var v="this.target.singleContainingPhrase" /> can be used to insert the
single containing phrase of the Item in the Narration; and so on.
Flag
A Flag is a data structure used by Alter Ego. It represents a small piece of data that needs to be stored so it can be accessed by other data structures. They are primarily useful when writing descriptions.
Attributes
As Flags are a relatively simple data type, they have few attributes. Note that if an attribute is internal, that means it only exists within the Flag class. Internal attributes will be given in the “Class attribute” bullet point, preceded by their data type. If an attribute is external, it only exists on the spreadsheet. External attributes will be given in the “Spreadsheet label” bullet point.
ID
- Spreadsheet label: Flag ID
- Class attribute: String
this.id
This is a unique identifier for the Flag. All letters should be capitalized, and spaces are allowed. No two Flags can have the same ID.
Value
This is the current value of the Flag, and is the core attribute around which all of its other behavior
revolves. It is so important that unlike every other function in the
finder module, the findFlag function
returns only the Flag’s value, and not the Flag itself. This is the stored data that necessitates the
Flag class’s entire existence.
A Flag’s value can either be a String, Number, or Boolean. Any other data type is invalid. However, its data
type can change at any time, if it is set with a value of a different data type. When a Flag’s value is
replaced with one of these data types, it is being set. However, if its value is replaced with null,
this means the Flag is being cleared.
The value can only be updated directly by using the using the flag commands.
However, the value can also be updated by evaluating its value script, explained below.
Value Script
Caution
This feature has the ability to run code. In order to evaluate a Flag’s value script, Alter Ego uses its scriptParser module, which evaluates code in a heavily restricted context. While we have confirmed through tests that it explicitly blocks access to many functions which can cause severe damage, we make no guarantees that it is 100% secure, especially if Alter Ego is run outside of a Docker container. Given that the only way to insert code is to write it on the spreadsheet or use Moderator commands, write access to the sheet and access to the Moderator role should be given to as few people as possible, and only people that you fully trust. There may, possibly exist exploits that allow malicious users to do such things as:
- Sending Alter Ego’s authentication token to the server
- Killing a player in the game
- Shutting down Alter Ego
- Read, modify, and delete files on your computer
We, the Alter Ego developers, assume no responsibility for damage caused by malicious use of this feature. You have been warned.
- Spreadsheet label: Value Computed By
- Class attribute: String
this.valueScript
This is a small script that allows a Flag’s value to be generated dynamically. Value scripts are short snippets of JavaScript that return either a String, Number, or Boolean value. When the script is evaluated, the Flag’s value will be updated accordingly.
Value scripts can be evaluated in one of four ways:
- Loading a Flag with a value script from the sheet,
- Setting one with the flag commands,
- Attempting or solving a Puzzle that lists the Flag as a requirement, or
- Setting the
evaluateparameter in the finder module’sfindFlagfunction totrue.
Scripts are evaluated using the same function that evaluates if and var tags in descriptions.
As such, value scripts are beholden to the same rules, and have access to all of the same functions.
However, keep in mind that the this keyword in a value script will always refer to the Flag the
value script belongs to. Additionally, the player keyword is only accessible when a Flag’s value
script is evaluated by the findFlag function, when a Player attempts or solves a Puzzle, or when the
flag Bot command is called with a player passed along. This means that when value scripts are evaluated
when Flags are loaded from the sheet, an error will be thrown if any of them use the player keyword
without being guarded against with a clause such as player !== undefined.
Note that for security, scripts are evaluated in a heavily restricted context. A Flag’s value script can only contain a single expression, and it cannot return a value of any type that a Flag cannot be set with. Additionally, many object properties and functions are outright blocked. Value scripts can only read data, not write it. Attempting to evaluate any script which breaks these rules will result in an error being thrown, and the Flag’s value will not be updated.
The scriptParser module which evaluates these scripts has been tested to ensure that it cannot do things such as access the process in which Alter Ego is running, or require modules that would allow access to files on your computer. However, we, the Alter Ego developers, cannot guarantee that it is 100% secure. Please heed the warning above, and use this feature with caution. If you find vulnerabilities with the scriptParser, please report them by opening a new Issue on the Alter Ego GitHub page so they can be fixed.
For more information on writing value scripts, see the writing descriptions tutorial.
Command Sets String
- Spreadsheet label: When Set / Cleared
- Class attribute: String
this.commandSetsString
This is a comma-separated list of sets of Bot commands that will be
executed when the Flag is set or cleared. Set and cleared commands are separated by a forward
slash (/). If no cleared commands are desired, then the forward slash can be omitted from the
cell. If no set commands are desired but cleared commands are, the forward slash should be the first
character in the cell, with the cleared commands following it.
Note that when writing Bot commands, it is good practice to be as precise as possible and provide room IDs if they are permitted, in order to prevent potential bugs. It should also be noted that when a Flag’s commands set or clear another Flag, its commands will not be executed.
It is possible to create separate command sets for different Flag values. If the Flag is set with the value listed, or it already had that value and it is being cleared, then that command set will be executed. Multiple values can share the same command set. The command set format is as follows:
[value 1(, value 2(, value N)): set commands / cleared commands]
They share the same syntax as Puzzle command sets. However, keep in mind that the “player” or “room” argument usable in many Bot commands will only be available if the Flag is being set or cleared because a Player attempted or solved a Puzzle that listed it as a requirement, or if the flag Bot command was executed and passed the initiating Player along. It is possible to keep a Player in scope through the use of Puzzle-Flag-Puzzle command chaining.
Set and cleared commands are not executed when a Flag is set or cleared by calling the findFlag
function with the evaluate parameter set to true.
Command Sets
- Class attribute: Array<FlagCommandSet>
this.commandSets
This is an internal attribute which consists of a list of command set objects. Command set objects have the following structure:
{ Array<String> values, Array<String> setCommands, Array<String> clearedCommands }
Transient Game Entity
Transient game entities only exist in Alter Ego’s internal game state. As such, they do not have a corresponding sheet column and only have class attributes. They may be derived from data that exists on the sheet—in which case they can be reconstructed when game data is reloaded—but they are not directly persisted onto the sheet.
Game
A Game is a data structure used by Alter Ego. It contains all of the data associated with the game that Alter Ego facilitates. Alter Ego can only ever manage one Game at a time. The singular Game object it manages is created on boot, but until data is loaded from the spreadsheet, it is largely empty.
Attributes
The Game object is not accessible in descriptions or in Flag value scripts. As such, most the attributes listed in this article are not directly accessible either. However, a general overview will still be given here, as it can be useful to know how data is structured in the Game class.
Guild Context
- Class attribute: GuildContext
this.guildContext
This is a class which contains a reference to the Guild in which the Game is occurring, as well as all of the parts of it that are relevant to Alter Ego. This includes all of the Roles and Channels Alter Ego uses.
Bot Context
- Class attribute: BotContext
this.botContext
This is a singleton class which contains a reference to Alter Ego’s Client, and a number of attributes and functions that help it interface with Discord. For example, this is where all of its commands are stored.
Settings
- Class attribute: GameSettings
this.settings
This is an object which contains all of Alter Ego’s settings.
Constants
- Class attribute: GameConstants
this.constants
This is a singleton object which contains a number of constant values that are used to refer to cell ranges on the spreadsheet. These are used during saving and loading.
Communication Handler
- Class attribute: GameCommunicationHandler
this.communicationHandler
This class acts as an interface for Alter Ego’s message handler module. Instead of calling message handler functions directly, it is best to call the communication handler. It contains an internal cache of recently-performed Actions to ensure that only one message describing a given Action will be sent to each relevant channel, preventing redundant Narrations and Notifications. It also caches mirrors of dialog sent in spectate channels, so that if the original message is edited or deleted, its mirrors will be edited or deleted accordingly.
Entity Finder
- Class attribute: GameEntityFinder
this.entityFinder
This class acts as a search tool to retrieve Game Entities. It has a variety of functions, and allows Game Entities to be found using various combinations of criteria. Internally, the finder module is merely an interface for the Game’s entity finder.
Entity Loader
- Class attribute: GameEntityLoader
this.entityLoader
This class has numerous functions to load Game Entities from the spreadsheet, and to check for errors in each one. This is what the load command calls whenever it is used.
Entity Saver
- Class attribute: GameEntitySaver
this.entitySaver
This class has functions to save Game entities to the spreadsheet. It writes the entire state of the Game to the
spreadsheet in a format that can be loaded by the entity loader. It is automatically called periodically based on the
value of the AUTOSAVE_INTERVAL setting, but it can also be called by enabling
edit mode or using the save command.
Log Handler
- Class attribute: GameLogHandler
this.logHandler
This class has functions to send messages to the log channel. Most Actions have a corresponding log function.
Notification Generator
- Class attribute: GameNotificationGenerator
this.notificationGenerator
This class has numerous functions to generate the text of Notifications and Narrations. Most Actions have at least one corresponding notification generator function.
Narration Handler
- Class attribute: GameNarrationHandler
this.narrationHandler
This class has numerous functions to send Narrations and Notifications. It is the only place where Narration and Notification objects are created. Most Actions have at least one corresponding narration handler function. The Action associated with each Narration and Notification is passed when calling each function, and this is eventually accessed by the communication handler.
In Progress
- Class attribute: Boolean
this.inProgress
This Boolean value indicates whether the Game is currently in progress or not. When the Game is initially created on
boot, this is false. It is set to true when the startgame command is
used, and then set as false again once the end timer expires. It is also set as true when the load command is used
with the all start or all resume arguments. When the
endgame command is used, it is once again set as false.
Many commands cannot be used when this is false. For example, most Player commands
cannot be used if the Game is not in progress.
Can Join
- Class attribute: Boolean
this.canJoin
This Boolean value is only relevant for use with the startgame command. It is set as true when the command is issued,
and it remains true until the end timer expires. At all other times, it is false. If it is true, then members with
the Eligible role can use the play command
to voluntarily join the current Game.
Half Timer
This is a timer which is used by the startgame command. It expires when half of the given duration has elapsed. When this expires, Alter Ego will send a message to the general channel warning Eligible members that their time to use the play command is running out.
End Timer
This is a timer which is used by the startgame command. It expires when the length of time given in the command has elapsed. When this occurs, the play command can no longer be used, and Alter Ego will save the generated default Player data to the spreadsheet.
Heated
- Class attribute: Boolean
this.heated
This Boolean value indicates whether there is a heated situation occurring—a situation in which a Moderator is busy
coordinating a combat encounter between two or more Players. If any Player has the “heated” Status Effect,
this is true, and most in-game timers are affected by the
HEATED_SLOWDOWN_RATE setting.
Edit Mode
- Class attribute: Boolean
this.editMode
This Boolean value indicates whether edit mode is currently activated.
Loaded Entities With Errors
This is a set of categories of Game Entities that have errors in their loaded data. If the entity loader finds errors with any loaded Game Entities, it adds that category to this set; conversely, if these errors are fixed, it removes that category from this set. Edit mode can only be disabled if this set is empty; this prevents gameplay from occurring if there are errors in any of the Game’s data.
Rooms
- Class attribute: Collection<String, Room>
this.rooms
This is a collection of all Rooms loaded into the Game, keyed by ID. As collections are an extension of Maps, this means Rooms have a constant lookup time of \(O(1)\). This effectively means that Rooms can be looked up by ID repeatedly without incurring a significant performance cost.
Fixtures
This is an array of all Fixtures loaded into the Game, in the same order as on the spreadsheet. As Fixtures don’t have a unique ID, this means that they have a linear lookup time of \(O(n)\). This means that the more Fixtures there are, the higher the cost is of looking them up repeatedly. If a Fixture needs to be looked up repeatedly, it is best to create a Flag with a value script to compute the desired property, and evaluate it as-needed.
Objects
Warning
This attribute is deprecated and will be removed in a future release.
Use
this.fixturesinstead.
This array is where Objects were stored prior to being renamed to Fixtures in Alter Ego 2.0. This is always an empty array, and it will be removed in a future release.
Prefabs
- Class attribute: Collection<String, Prefab>
this.prefabs
This is a collection of all Prefabs loaded into the Game, keyed by ID. They have a constant lookup time of \(O(1)\), meaning that they can be looked up by ID repeatedly without incurring a significant performance cost.
Recipes
This is an array of all Recipes loaded into the Game, in the same order as on the spreadsheet. They have a linear lookup time of \(O(n)\). If a Recipe needs to be looked up repeatedly, it is best to create a Flag with a value script to compute the desired property, and evaluate it as-needed.
Room Items
This is an array of all Room Items loaded into the Game, in the same order as on the spreadsheet. They have a linear lookup time of \(O(n)\). If a Room Item needs to be looked up repeatedly, it is best to create a Flag with a value script to compute the desired property, and evaluate it as-needed.
Items
Warning
This attribute is deprecated and will be removed in a future release.
Use
this.roomItemsinstead.
This array is where Items were stored prior to being renamed to Room Items in Alter Ego 2.0. This is always an empty array, and it will be removed in a future release.
Puzzles
This is an array of all Puzzles loaded into the Game, in the same order as on the spreadsheet. They have a linear lookup time of \(O(n)\). If a Puzzle needs to be looked up repeatedly, it is best to create a Flag with a value script to compute the desired property, and evaluate it as-needed.
Events
- Class attribute: Collection<String, Event>
this.events
This is a collection of all Events loaded into the Game, keyed by ID. They have a constant lookup time of \(O(1)\), meaning that they can be looked up by ID repeatedly without incurring a significant performance cost.
Status Effects
- Class attribute: Collection<String, Status>
this.statusEffects
This is a collection of all Status Effects loaded into the Game, keyed by ID. They have a constant lookup time of \(O(1)\), meaning that they can be looked up by ID repeatedly without incurring a significant performance cost.
Players
- Class attribute: Collection<String, Player>
this.players
This is a collection of all Players loaded into the Game, keyed by name. They have a constant lookup time of \(O(1)\), meaning that they can be looked up by ID repeatedly without incurring a significant performance cost. However, keep in mind that the key is a copy of the Player’s name converted to all uppercase, with all quotation characters removed. So, it may not match what their actual name is exactly.
Living Players
- Class attribute: Collection<String, Player>
this.livingPlayers
This is a collection of all living Players loaded into the Game, keyed by name. They have a constant lookup time of \(O(1)\), meaning that they can be looked up by ID repeatedly without incurring a significant performance cost. However, keep in mind that the key is a copy of the Player’s name converted to all uppercase, with all quotation characters removed. So, it may not match what their actual name is exactly.
When a Player dies, they are removed from this collection.
Dead Players
- Class attribute: Collection<String, Player>
this.deadPlayers
This is a collection of all dead Players loaded into the Game, keyed by name. They have a constant lookup time of \(O(1)\), meaning that they can be looked up by ID repeatedly without incurring a significant performance cost. However, keep in mind that the key is a copy of the Player’s name converted to all uppercase, with all quotation characters removed. So, it may not match what their actual name is exactly.
When a Player dies, they are added to this collection.
Inventory Items
- Class attribute: Array<Inventory Item>
this.inventoryItems
This is an array of all Inventory Items loaded into the Game, in the same order as on the spreadsheet. They have a linear lookup time of \(O(n)\). If an Inventory Item needs to be looked up repeatedly, it is best to create a Flag with a value script to compute the desired property, and evaluate it as-needed.
Gestures
- Class attribute: Collection<String, Gesture>
this.gestures
This is a collection of all Gestures loaded into the Game, keyed by ID. They have a constant lookup time of \(O(1)\), meaning that they can be looked up by ID repeatedly without incurring a significant performance cost.
Flags
- Class attribute: Collection<String, Flag>
this.flags
This is a collection of all Flags loaded into the Game, keyed by ID. They have a constant lookup time of \(O(1)\), meaning that they can be looked up by ID repeatedly without incurring a significant performance cost.
Whispers
- Class attribute: Collection<String, Whisper>
this.whispers
This is a collection of all Whispers that currently exist in the game, keyed by ID. They have a constant lookup time of \(O(1)\), meaning that they can be looked up by ID repeatedly without incurring a significant performance cost.
When a Whisper is created, it is added to this collection. When it is deleted, it is removed. Whispers are not saved to the spreadsheet, so when Alter Ego is rebooted, all data pertaining to Whispers is irrevocably lost.
Moderators
- Class attribute: Collection<String, Moderator>
this.moderators
This is a collection of known Moderators, keyed by Discord user ID. When a member with the Moderator role issues a command or sends a message in one of the Game’s channels, they are added to this collection. A Moderator object contains their Discord ID and associated GuildMember, and contains functions to fetch the member’s display name and display icon for use in the message handler module. It also contains their current latch.
When Alter Ego is rebooted, all data pertaining to Moderators is lost, but they can easily be recreated when member with the Moderator role issues a command or sends a message in a Game channel.
Message Queue
- Class attribute: PriorityQueue
this.messageQueue
This is a queue of messages Alter Ego has yet to send. In order to avoid being rate limited, messages are stored in a queue corresponding to the destination channel and sent when possible. This queue has five priority levels, to ensure that the most important messages are sent first. In order of highest to lowest, these priority levels are:
mod: Messages intended to be sent to the command channel to communicate information to Moderators.tell: Messages intended to be shown to Players, such as Narrations and Notifications.mechanic: Messages which convey information related to Alter Ego’s mechanics, but aren’t directly related to in-game occurrences. These include things like the output of the help command, Gesture lists, and error messages warning users that their command wasn’t executed successfully.log: Messages intended for the log channel.spectate: Messages intended for spectate channels.
Action
An Action is a data structure used by Alter Ego. It represents an action that changes the game state in some way. If persistent Game Entities can be understood as nouns, Actions can be understood as verbs. They are usually performed by Players in specific Rooms, but this is not always the case.
Actions are fully transient. They are only intended to exist temporarily, so they are not saved to the spreadsheet. Actions have a very short life; they are only persisted briefly in the communication handler’s Action cache, after which they disappear forever.
A single instance of an Action can only be performed once. In order to perform that Action again, a new Action must be created.
It is not possible to create an Action by itself—it is an abstract base class with many derived classes that do different things. Each derived class will be listed below, along with a general overview of its purpose and behavior.
Attributes
All derived Action classes have the following attributes.
ID
- Class attribute: String
this.id
This is a unique ID that is automatically generated when an Action is created. This allows it to be distinguished from all other Actions.
Message
- Class attribute: OmitPartialGroupDMChannel<Message> | undefined
this.message
This is a reference to the Discord message which caused this Action to be created. This is usually the command that was
issued by a Player or Moderator. However, this is sometimes undefined. This can occur when the Action wasn’t created
by a user-issued command. For example, Bot commands always create Actions with an
undefined message, and Actions created by other Actions often create those Actions with an undefined message.
This is usually used when an Action cannot proceed because of an error. If the Action was created with a message, Alter Ego will reply to the message to indicate why it couldn’t be executed successfully.
Player
This is the Player performing the Action. However, this is sometimes undefined, as not all Actions are performed by
Players. Typically, if an Action was created by another Action, the original Player is passed along to the new Action.
Location
This is the Room that the Action is being performed in. Usually, if a Player is performing the Action, this is that
Player’s location. However, this is sometimes undefined, as not all Actions are performed in
specific Rooms.
Forced
- Class attribute: Boolean
this.forced
This is a Boolean value which indicates whether or not the Action is being performed forcibly. This usually means that a Player is being forced to perform the Action by a Moderator command, or by a Bot command. This is used by the log handler to indicate that a Player did not perform an Action of their own volition. However, near-universally, any Action which is created by a Moderator command or Bot command is considered to have been forced.
Whisper
This is the Whisper associated with the Action, if there is one. This is used in Narrations.
If no Whisper is associated with the Action, this is undefined.
User
This is the user who caused the Action to be created. If the Action was created by a Moderator command, the user is the Moderator who issued the command. Otherwise, the user is the Player performing the Action.
Success Message
- Class attribute: String
this.successMessage
This is a message indicating that the Action was performed successfully. Currently, this is automatically generated when the Action is finished being performed successfully. Currently, this is only used by Moderator commands.
Types of Actions
Activate Action
An Activate Action activates a Fixture. It is performed when the fixture command or use command is used.
Announce Action
An Announce Action is performed when a Player with the Free Movement role speaks in the announcement channel.
Attempt Action
An Attempt Action attempts to solve a Puzzle for a Player. It is performed when the puzzle command or use command is used. It is also performed when:
- A Dress Action or Take Action is performed on a
take-,weight-, orcontainer-type Puzzle, or - A Drop Action or Undress Action is performed on a
drop-,weight-, orcontainer-type Puzzle.
Craft Action
A Craft Action crafts two Inventory Items together. It is performed when the craft command is used. It can also be performed with interactables.
Cure Action
A Cure Action cures a Player of a given Status Effect. It is performed when the status command is used, and it is performed to specifically cure the “asleep” Status Effect when the wake command is used. It is also performed when:
- A Status inflicted on a Player with a duration expires and isn’t fatal,
- A Player is inflicted with a Status Effect that they already have, which is supposed to be replaced with its duplicated Status—the original Status is cured before the duplicated Status is inflicted,
- A Player is inflicted with a Status that cures one or more Status Effects,
- A Player performs an Unhide Action—the “hidden” Status is cured,
- A Player is inflicted with a Status with a next stage—the next stage is cured before it it is inflicted (if it already exists), or
- A Player performs a Use Action with an Inventory Item that cures one or more Status Effects.
Deactivate Action
A Deactivate Action deactivates a Fixture. It is performed when the fixture command or use command is used. It is also performed when a Fixture’s process timer expires, but only if the Fixture is set to deactivate automatically.
Destroy Inventory Item Action
A Destroy Inventory Item Action destroys an Inventory Item. If the Inventory Item was
equipped, it is destroyed completely, and replaced with a null Inventory Item.
Otherwise, its quantity is set to 0, and it is removed from its container. Usually, all of the child
Inventory Items are recursively destroyed as well.
A Destroy Inventory Item Action is performed when the destroy command is used. It is also performed on a Recipe’s ingredients when they are crafted. It can also be performed with interactables.
Destroy Room Item Action
A Destroy Room Item Action destroys a Room Item. This means that its quantity is set to 0. If its container is another Room Item, it is removed from its container. Usually all of the child Room Items are recursively destroyed as well.
A Destroy Room Item Action is performed when the destroy command is used. It is also performed on a Recipe’s ingredients when they are processed, and when a Room Item’s uses are decreased to 0. It can also be performed with interactables.
Die Action
Note
Not to be confused with Die, an unrelated transient data structure.
A Die Action kills a Player. It is performed when the kill command is used. It is also performed when a fatal Status inflicted on a Player expires.
Dress Action
A Dress Action takes all equippable Room Items from a specified container and equips them to the Player’s Equipment Slots. It is performed when the dress command is used.
Drop Action
A Drop Action removes an Inventory Item from one of the Player’s hands, converts it to a Room Item, and puts it in the specified container. It is performed when the drop command is used. It can also be performed with interactables.
End Action
An End Action ends an Event. It is performed when the event command is used. It is also performed when an Event’s timer expires.
Enter Action
An Enter Action adds a Player to the given Room. Then, if the Player’s move queue is not empty, it performs a new Queue Move Action. An Enter Action is only performed as part of a Move Action.
Equip Action
An Equip Action removes an Inventory Item from one of the Player’s hands and equips it to one of their Equipment Slots. It is performed when the equip command is used. It can also be performed with interactables.
Exit Action
An Exit Action removes a Player from the given Room, and from any Whispers they’re currently in. It is only performed as part of a Move Action.
Find Action
A Find Action takes a type of Game Entity and an optional search query and displays all of the Game Entities that satisfy the given criteria in a table with their row numbers. It is performed when the find command is used. It can also be performed with interactables.
Gesture Action
A Gesture Action does a Gesture for a Player. It can also display a list of Gestures that can be done by the Player performing it. It is performed when the gesture command is used.
Give Action
A Give Action removes an Inventory Item from one of the Player’s hands and adds it to one of the hands of the recipient Player. It is performed when the give command is used.
Help Action
A Help Action displays a list of commands available to the user. If an alias of a command is given, it shows the help menu for that command, with all of its aliases, examples, and usage details. It is performed when the help command is used.
Hide Action
A Hide Action attempts to hide a Player in a given Hiding Spot. It is performed when the hide command is used.
Inflict Action
An Inflict Action inflicts a Player with a given Status Effect. It is performed when the status command is used, and it is performed to specifically inflict the “asleep” Status Effect when the sleep command is used. It is also performed when:
- Player data is loaded from the sheet,
- A Player is cured of a Status with a cured condition,
- A Player performs a Hide Action—the “hidden” Status is inflicted,
- A Player is inflicted with a Status Effect that they already have which has a duplicated Status,
- A Player is in a Room affected by an ongoing Event which inflicts Status Effects,
- A Player runs out of stamina—the “weary” Status is inflicted,
- A Status inflicted on a Player with a next stage expires, or
- A Player performs a Use Action with an Inventory Item that inflicts one or more Status Effects.
Inspect Action
An Inspect Action parses the Description of the specified Room, Fixture, Room Item, Player, or Inventory Item and sends it to the Player performing it. It is performed when the inspect command is used. It can also be performed with interactables.
Instantiate Inventory Item Action
An Instantiate Inventory Item Action instantiates an Inventory Item with the given Prefab. It can be instantiated to a Player’s Equipment Slot or in an Inventory Slot of one of their other Inventory Items. If the Prefab being instantiated has Inventory Slots of its own, it will be generated with a unique identifier; if it is being instantiated with a quantity greater than 1, each one will be created as a separate Inventory Item with its own identifier.
An Instantiate Inventory Item Action is performed when the instantiate command is used. It is also performed with a Recipe’s products when they are crafted. It can also be performed with interactables.
Instantiate Room Item Action
An Instantiate Room Item Action instantiates a Room Item with the given Prefab in the specified container. If the Prefab being instantiated has Inventory Slots of its own, it will be generated with a unique identifier; if it is being instantiated with a quantity greater than 1, each one will be created as a separate Room Item with its own identifier.
An Instantiate Room Item Action is performed when the instantiate command is used. It is also performed with a Recipe’s products when they are processed, and when a Room Item with a next stage has its uses decreased to 0. It can also be performed with interactables.
Inventory Action
An Inventory Action displays a Player’s inventory. It is performed when the inventory command is used.
Knock Action
A Knock Action sends a Narration in a Player’s location that they are knocking on the given Exit’s door, and sends a Narration in the Room that the Exit leads to that someone is knocking on the corresponding Exit. It is performed when the knock command is used.
Lock Action
A Lock Action locks the given Exit in a Room. It is performed when the exit command is used. A Lock Action does not lock the Exit’s corresponding link—that must be done with a separate Lock Action.
Monolog Action
A Monolog Action displays the given text in a MONOLOG message display in the
notification channel and spectate channel of the
character performing it. It represents the Player’s inner thoughts. It is performed when the
monolog command is used.
Move Action
A Move Action removes a Player from one Room and adds them to another. Internally, it performs an
Exit Action and Enter Action in succession. If the Player is moving through
an Exit, and that Exit has an associated restricted exit-type Puzzle in which
their name is listed as a solution, they will perform a Solve Action on it.
A Move Action is performed when the move Moderator or move Bot command is used. It is also performed when a Queue Move Action is performed by a Player with the Free Movement role without specifying an Exit, and when a Player’s remaining time reaches 0 in their move timer, as long as the Exit they are moving toward is unlocked or passable.
Narrate Action
A Narrate Action sends a Narration to all relevant destinations. First, it sends the Narration to
its location, as long as it isn’t occurring in a Hiding Spot. Then, it sends
the Narration to its Whisper, if it has one. Finally, it sends the Narration to its respective
video monitoring Rooms, as long as its
location is video surveilled, it isn’t occurring in a Hiding Spot, and the
Action being narrated isn’t a Say Action. If any occupant of these destinations has the
see room behavior attribute, they will be sent a Notification communicating
the content of the Narration.
A Narrate Action is performed by every function in the Game’s narration handler. It is also performed when:
- The narrate command is used,
- The say Moderator command is used to send a message to a Room channel or Whisper channel, or
- A user with the Moderator role sends a message in a Room channel or Whisper channel.
Queue Move Action
A Queue Move Action finds the user-entered Exit or Room. If it is found, a Start Move Action is performed. However, if the Player has the Free Movement role and they entered the name of a Room, they will instead instantly perform a Move Action.
A Queue Move Action is performed when the move Player command or run Player command is used. It also performed when an Enter Action is performed, if the Player’s move queue is not empty. It can also be performed with interactables.
Recipes Action
A Recipes Action displays a list of all Recipes that can be carried out by a Player. By default, all Recipes that can be done using only the Room Items in the Player’s location will be shown, as long as they have at least one of the Recipe’s ingredients in their inventory. However, if one of their Inventory Items is specified, all Recipes that use its Prefab as an ingredient will be shown. It is performed when the recipes command is used.
Say Action
A Say Action sends the given dialog to all relevant destinations. How this works is detailed here.
The Player’s own dialog is always mirrored in their
spectate channel. NPCs, as well as any Players with the
no hearing and unconscious behavior attributes, will not receive
any Notifications regarding spoken dialog, and it will not be mirrored in their spectate channels.
If a Player who can hear spoken dialog has the no sight behavior attribute, or they are being
mimicked, they will receive a Notification that takes priority over the ordinary style of
mirrored dialog in spectate channels. Otherwise, if the Player has the
hear room behavior attribute, or they know the speaker’s voice
but can’t identify them by appearance, they will receive a Notification that does not take priority over the usual
style of mirrored dialog in spectate channels.
If the dialog was whispered, it is mirrored in the
spectate channels of all Players in the Whisper. If any Players in the Room have the
acute hearing behavior attribute, they will receive a Notification communicating the
content of the whispered dialog.
If the dialog wasn’t whispered, it will be mirrored in the spectate channels of all
Players in the Room, and any voice-type Puzzles in the Room will be attempted. Any Players in
non-soundproof neighboring Rooms with the acute hearing behavior attribute will receive a
Notification communicating the content of the spoken dialog.
Then, if the Room is audio surveilled, the dialog will be narrated in
all audio monitoring Rooms, and mirrored in the spectate channels of their occupants.
voice-type Puzzles in these Rooms will also be attempted.
Next, if the dialog was shouted—either by the contents being in all uppercase, or by being preceded with
heading characters—it will be narrated in any non-soundproof neighboring Rooms,
as well as all audio monitoring Rooms if one of the neighboring Rooms is audio surveilled. voice-type Puzzles in
these Rooms will be attempted, and the dialog will be mirrored in the spectate channels of all of their occupants.
Finally, if the speaker has the sender behavior attribute, the spoken dialog is narrated in
all Rooms with at least one Player with the receiver behavior attribute. If any of these Rooms
are audio surveilled, the dialog will also be narrated in all audio monitoring Rooms. voice-type Puzzles in all of
these Rooms will be attempted, and the dialog will be mirrored in the spectate channels of all of their occupants.
A Say Action is performed when a Player or latched Moderator sends a message in a Room channel or Whisper channel. It is also performed when the say command is used, or when the whisper Moderator command is used to make an NPC speak in a Whisper.
Solve Action
A Solve Action solves a Puzzle and sets its outcome. It is performed when
the puzzle command is used. It is
also performed when a Player moves through an Exit that has an associated
restricted exit-type Puzzle if their name is listed as a solution, and when a Player’s
dialog is spoken (or audible in) a Room with a voice-type Puzzle if the alphanumeric content
(case-insensitive) of the dialog contains one of the Puzzle’s solutions.
Start Move Action
A Start Move Action calculates how much time it will take for a Player to move to the given Exit from their current position and starts their move timer, beginning the process of moving them to the destination. It is performed as part of a Queue Move Action.
Stash Action
A Stash Action removes an Inventory Item from one of the Player’s hands and inserts it into an Inventory Slot of one of their other Inventory Items. It is performed when the stash command is used. It can also be performed with interactables.
Steal Action
A Steal Action attempts to remove a random Inventory Item from an Inventory Slot of one a Player’s equipped Inventory Items and add it to one of the stealing Player’s hands. There are three possible outcomes:
- The stealing Player fails to steal an Inventory Item, and the victim is notified that they tried.
- The stealing Player successfully steals an Inventory Item, but the victim is notified.
- The stealing Player successfully steals an Inventory Item without the victim noticing.
The stealing Player’s success is determined by the result of a Die weighted by their dexterity stat, where a higher stat means a higher success rate. However, if the stolen Inventory Item is non-discreet, the victim will always notice. The only exception is if the victim is unconscious—in this case, they will never notice, and Steal Actions will always succeed.
A Steal Action is performed when the steal command is used.
Stop Action
A Stop Action stops a Player’s movement and clears their move queue. It is performed when the stop command is used, and when a Player finishes moving to an Exit that is locked or impassable. It can also be performed with interactables.
Take Action
A Take Action removes a Room Item from its container, converts it to an Inventory Item, and puts it in one of the Player’s hands. It is performed when the take command is used. It can also be performed with interactables.
Text Action
A Text Action sends a text message from the sending Player to a recipient Player. The message is sent as a
PLAIN_TEXT Notification to both the recipient and sender
along with any Attachments and
Embeds that were sent in the original message.
This Notification will be sent even to unconscious Players.
A Text Action is performed when the text command is used.
Trigger Action
A Trigger Action triggers an Event. It is performed when the event command is used. It is also performed when the current date and time matches any of the Event’s trigger times.
Uncraft Action
An Uncraft Action uncrafts an Inventory Item into two Inventory Items that can produce it in a Recipe. It is performed when the uncraft command is used. It can also be performed with interactables.
Undress Action
An Undress Action removes all unequippable Inventory Items from the Player’s Equipment Slots and drops them in the specified container. It is performed when the undress command is used.
Unequip Action
An Unequip Action removes an Inventory Item from one of the Player’s Equipment Slots and puts it in one of their hands. It is performed when the unequip command is used. It can also be performed with interactables.
Unhide Action
An Unhide Action removes a Player from their Hiding Spot. It is performed when the unhide alias of the hide command is used.
Unlock Action
An Unlock Action unlocks the given Exit in a Room. It is performed when the exit command is used. An Unlock Action does not lock the Exit’s corresponding link—that must be done with a separate Unlock Action.
Unsolve Action
An Unsolve Action unsolves a Puzzle and clears its outcome. It is performed when the puzzle command is used.
Unstash Action
An Unstash Action removes an Inventory Item from an Inventory Slot of one of the Player’s other Inventory Items and puts it in one of their hands. It is performed when the unstash command is used. It can also be performed with interactables.
Use Action
A Use Action uses an Inventory Item on a Player. It is performed when the use command is used. It can also be performed with interactables.
View Action
A View Action displays the given Game Entity. By default, it displays most of the Game Entity’s data as it would appear on the sheet, but it is also possible to view one of its specific attributes individually. It is performed when the view command is used. It can also be performed with interactables.
Whisper Action
A Whisper Action creates a Whisper between the given Players. It is performed when the whisper command is used.
Description
A Description is a data structure used by Alter Ego. It represents a description of an in-game entity or occurrence. It is constructed from a string of text containing XML, which allows the text to change in dynamic ways to reflect the ever-changing state of the game world.
Descriptions cannot be created directly, and they are not saved on the spreadsheet directly; only text renditions of them are. Once a Description has been created, it cannot change. It can be written to appear as if it changes, but these changes are all made possible and accounted for in the original Description. To change a Description, a new one must be made based on a different string of text.
For information on how to write Descriptions, see the tutorial on writing descriptions.
Attributes
Descriptions have few attributes.
Text
- Class Attribute: String
this.text
This is the text that the Description is based on. This is what is loaded from and saved to the spreadsheet. Once the Description has been created, this cannot be changed.
Document
- Class Attribute: Document
this.document
This is the Document object created from the text of the Description. When a Description is created, the text is passed into the parser module, which reads the XML contained inside of it and creates this Document. This is the actual body of the Description—it is what allows the Description to appear as if it is dynamic.
Message Display Type
- Class Attribute: Enum (number)
This is the message display type that is set for the Description in the
opening desc tag. If no message display type was manually set, this is undefined.
Procedurals
This is a map of procedurals contained inside of this Description. The key for
each entry is the name of the procedural tag, and the value is the set of names of all named poss tags within that
procedural tag. This is used to set a Prefab’s procedural options, as well as the
procedural selections of both Room Items and
Inventory Items.
Methods
Descriptions have a single function that can be useful to moderators. This is primarily only useful when writing
if and var
tags in descriptions.
parseFor
this.parseFor(player, container?);
- Purpose: Parses the description for the given player. Returns the parsed description as a string. Useful for inserting parsed descriptions into other descriptions.
- Returns: String
- Parameters:
- Player
player- The player to parse the description for. - GameEntity
container- The game entity to treat as the description’s container. This is the description’s actual container by default. There is generally no reason to select something else as the container.
- Player
Die
A Die is a data structure used by Alter Ego. Its purpose is to add a degree of randomness to gameplay. The result of a Die roll can be modified based on various factors, most notably a Player’s stats. Players cannot directly interact with Dice, and their very presence is hidden from a Player’s view; there are no circumstances in which a Player will see the results of a Die roll directly. Currently, there are only two cases where Players can initiate a Die roll of their own volition:
- A Die roll is initiated when a Player uses the steal command. The roll is
modified by their dexterity stat and whether or not they have the
thiefbehavior attribute. - A Die roll is initiated when a Player solves a
probability-type orstat probability-type Puzzle. The roll is modified by the stat used, if applicable. The result is then used to determine which solution is used to solve the Puzzle.
Dice are predominantly used by moderators in order to determine the result of a given Player’s action. This is done with the roll command.
Parameters
A Die can be rolled with up to three optional parameters.
Attacker
This is the active Player in a Die roll. In other words, when rolling to determine the outcome of an action, this is the Player who is attempting the action. If no attacker is given, then the base roll will be the final result.
Defender
This is the passive Player in a Die roll. If an attacker is given, then a defender is optional. A defender should only be given if the attacker is attempting to perform an action against another Player. The defender is capable of modifying the outcome of the attacker’s roll in certain situations, detailed below.
Stat
This is the stat that is being used to modify the Die’s base roll. To be exact, this is the specified stat of the attacker. However, this is optional. A Die can be rolled with an attacker and defender, or just an attacker, without specifying a stat.
Stat Roll Modifier
This is not a parameter, but a value derived from the attacker’s specified stat. This determines what value is added or subtracted from the base roll. The stat roll modifier, \(M\), is calculated with the following formula:
\[ M = \left\lfloor \Bigl\lfloor \frac{1}{2}s - \frac{10}{6} \Bigr\rfloor + \frac{a - i}{a} \right\rfloor \]
In this formula are several variables:
- \(s\) is the attacker’s specified stat.
- \(a\) is the
DICE_MAXsetting. - \(i\) is the
DICE_MINsetting.
Attributes
Dice have few attributes.
Minimum
- Class attribute: Number
this.min
This is the minimum possible value for the base Die roll. This equals the DICE_MIN setting.
Maximum
- Class attribute: Number
this.max
This is the maximum possible value for the base Die roll. This equals the DICE_MAX setting.
Base Roll
- Class attribute: Number
this.baseRoll
This is the initial result of the Die roll before any modifiers are applied. This is calculated by generating a random number and clamping it between the minimum and maximum values, inclusive.
If the attacker has the all or nothing behavior attribute, then the base roll has 50-50 odds of being either the Die’s
minimum or maximum value, with nothing in-between.
Modifier
- Class attribute: Number
this.modifier
This is the value that is added or subtracted from the base roll to determine the final result. The modifier begins with a value of 0, and is calculated as follows.
If the attacker has the coin flipper behavior attribute, and they have
an Inventory Item
whose single name
contains the string “COIN”, a coin flip is performed to determine if they will have a +1 added to the Die’s modifier,
independent of stat. Effectively, this has a 50% chance of occurring if the given conditions are met.
If the Die is being rolled with a defender and uses the strength stat, this is
interpreted as the attacker physically attacking the defender. Thus, the defender’s ability to dodge the attack is taken
into account. Under these circumstances, the defender’s dexterity roll modifier will be multiplied by -1 and added to
the Die’s modifier.
Then, if the Die is being rolled with a defender, and the defender has any Status Effects with stat modifiers that affect the attacker, the attacker is very briefly inflicted with Status Effects that modify their current stats accordingly. This will likely affect their calculated stat roll modifier.
Finally, if the Die is being rolled for a stat, the attacker’s stat roll modifier for the given stat is calculated and added to Die’s modifier. This is the final value of the Die’s modifier.
Modifier String
- Class attribute: String
this.modifierString
This is a comma-separated list of all of the factors which were used to calculate the Die’s final modifier, along with the values that each factor added.
Result
- Class attribute: Number
this.result
This is the final result of the Die roll, equal to the base roll plus the modifier.
Narration
A Narration is a data structure used by Alter Ego. It represents a narration of in-game occurrences that can be communicated to multiple Players at once. Narrations are exclusively created and sent by the Game’s narration handler.
Once a Narration has been created, a Narrate Action is performed with it. A Narration object acts as a set of instructions for how the Narration should be communicated in a Narrate Action.
In general, Narrations are sent to Room channels, for all Players inside of them to see. As such, they are usually written to be somewhat generic, and not tailored to any one Player’s perspective.
Narrations are fully transient. They are only intended to exist temporarily, so they are not saved to the spreadsheet. Narrations have an extremely short life; once a Narration has been sent as a message, it disappears forever.
Narrations have a counterpart that are more tailored to individual Players: Notifications.
Attributes
Narrations have several attributes.
Message Display Type
- Class attribute: Enum (number)
this.messageDisplayType
This is the message display type to use for the message that will be sent to communicate the Narration. This determines how it will be displayed. This is assigned automatically by the narration handler, and these assignments are almost all hard-coded. However, it is possible to set the message display type for Narrations written as Descriptions.
Action
- Class attribute: Action
this.action
This is the Action being narrated. It is used by the Game’s communication handler to ensure that Actions are only communicated in the same channel once.
Player
- Class attribute: Player
this.player
This is the Player whose Action is being narrated.
Location
- Class attribute: Room
this.location
This is the Room where the Action being narrated is occurring. The Narration is usually sent to the channel of its location.
Whisper
This is the Whisper where the Action being narrated is occurring. If the Action is not occurring in a Whisper,
this is null. Usually, if it is occurring in a Whisper, this means that the Narration will be sent to the
channel of the Whisper, instead of its location.
Content
- Class attribute: String
this.content
The text content for the Narration. This is always what gets sent as a message. However, it can sometimes be altered to add contextual information before it is sent, such as where the Narration originated from if it came from another Room.
Message
- Class attribute: OmitPartialGroupDMChannel<Message> | null
this.message
This is the original message that caused the Narration to be sent, if applicable. This is usually the message of the
Narration’s Action. However, if the Narration didn’t originate with a message, this is null.
Attachments
- Class attribute: Collection<String, Attachment>
this.attachments
This is a collection of attachments sent with the original message. These will be sent with the message communicating the Narration, and in any spectate mirrors of the Narration. If the Narration doesn’t have a message, or the message was sent with no attachments, this is an empty collection.
Embeds
This is an array of embeds sent with the original message. These will be sent with the message communicating the Narration, and in any spectate mirrors of the Narration. If the Narration doesn’t have a message, or the message was sent with no embeds, this is an empty array.
Narrator
This is the Player or Moderator who wrote the Narration, if applicable. A narrator is required to send a Narration with
the PLAYER message display type. This is usually only set if the originating Action was a Narrate Action. However,
a narrator is also set when a Gesture Action is performed.
If there is no narrator, this is null.
Narrator Display Name
- Class attribute: String
this.narratorDisplayName
This is the display name that will be used to represent the narrator in a webhook message—the type of message sent
in the PLAYER message display type. If the narrator is a Player, this will usually be their
display name. If the narrator is a Moderator, this will be their nickname in the server, or
their account’s display name if they don’t have one set.
Narrator Display Icon
- Class attribute: String
this.narratorDisplayIcon
This is the avatar URL that will be used to represent the narrator in a webhook message—the type of message sent
in the PLAYER message display type. If the narrator is a Player, this will usually be their
display icon. If the narrator is a Moderator, this will be their server avatar, or their
account’s avatar if they don’t have one set.
Is OOC Message
- Class attribute: Boolean
this.isOOCMessage
This Boolean value indicates whether or not the Narration is considered an out-of-character. A Narration can only be
out-of-character if it has a narrator, and the content of the Narration begins with an opening parenthesis (().
If this is true, the Narration will not be mirrored in spectate channels.
Location is Surveilled
- Class attribute: Boolean
this.locationIsSurveilled
This Boolean value indicates whether or not the Narration’s location has the
video surveilled tag. If this is true, then the Narration will be mirrored in all Rooms
with the video monitoring tag. However, if the Narration is an OOC message,
this is always false.
Video Monitoring Rooms
This is a list of all occupied Rooms with the video monitoring tag. NPCs count as occupants.
If the location doesn’t have the video surveilled tag, or if the Narration is an OOC message, this is empty.
Notification
A Notification is a data structure used by Alter Ego. It represents a private notification of in-game occurrences that is sent to a single Player. Notifications are exclusively created and sent by the Game’s narration handler.
Once a Notification has been created, it is sent to the Player via the Game’s communication handler. However, it will not be sent if:
- The Player is an NPC, or
- The Player has the
unconsciousbehavior attribute (with few exceptions).
A Notification object acts as a set of instructions for how the Notification should be communicated to a Player. Notifications are written to be specific to the perspective of the Player they are being written before. As such, they typically address the Player in second person. They are most often generated by the Game’s notification generator.
Notifications are fully transient. They are only intended to exist temporarily, so they are not saved to the spreadsheet. Notifications have an extremely short life; before a Notification is even added to the message queue, it is discarded, and lost forever.
Notifications have a counterpart that are more generalized, and intended to be seen by multiple Players at once: Narrations.
Attributes
Notifications have few attributes.
Player
- Class attribute: Player
this.player
This is Player the Notification is created for. When the Notification is sent, it is sent to their notification channel.
Message Display Type
- Class attribute: Enum (number)
this.messageDisplayType
This is the message display type to use for the message that will be sent to communicate the Notification. This determines how it will be displayed. This is assigned automatically by the narration handler, and these assignments are almost all hard-coded.
Action
- Class attribute: Action
this.action
This is the Action the Player is being notified of. It is used by the Game’s communication handler to ensure that Actions are only communicated in the same channel once.
Content
- Class attribute: String
this.content
The text content for the Notification. This is always what gets sent as a message.
Mirror in Spectate Channel
- Class attribute: Boolean
this.mirrorInSpectateChannel
This Boolean value indicates whether or not the Notification should be mirrored in the Player’s
spectate channel. This is usually true, but some functions explicitly set it to false.
This usually happens because the Action being communicated has already been mirrored in the Player’s spectate channel
in some other way.
Attachments
- Class attribute: Collection<String, Attachment>
this.attachments
This is a collection of attachments to send with the Notification. Usually this is an empty collection. It is only set when the Notification is mirroring a Narration with attachments, or when a Text Action is performed.
Embeds
This is an array of embeds to send with the Notification. Usually this is an empty array. It is only set when the Notification is mirroring a Narration with embeds, or when a Text Action is performed.
Interactables
- Class attribute: Array<Interactable>
this.interactables
This is an array of Interactables to send with the Notification. For more information, see the article on Interactables.
Whisper
A Whisper is a data structure used by Alter Ego. It represents a group of two or more Players speaking quietly to each other such that no one else in the Room can hear them.
A normal Whisper can only be created when a Player or moderator uses
the whisper command. There is no
upper limit to the number of Players that can be included in a Whisper, so long as they are all in the same Room.
However, it is not possible for one Player to create a Whisper with Players in the Room who have the hidden,
concealed, no hearing, or unconscious behavior attributes. If a Player in a
Whisper becomes inflicted with a Status Effect with one of these behavior attributes or they leave the
Room, they will be removed from the Whisper. If, when a Player is removed from the Whisper, the group of Players
remaining is the same as a different Whisper that already exists, it will be deleted upon the Player’s removal.
Otherwise, a Whisper will only be deleted once all Players have been removed from it.
A Whisper can also be created when a Player hides in a Fixture. This allows a
Whisper to be created with only one Player. However, if more Players hide in the same Fixture, the Whisper will be
deleted and a new one will be created with all Players. A Whisper created in this way behaves similarly to a Room, but
with most of the same properties as a normal Whisper. When a Player comes out of hiding or is inflicted with a Status
Effect with the no channel or no hearing behavior attributes, they will be removed from the Whisper. When all
Players are removed from the Whisper, it will be deleted.
Whispers are fully transient. They are only intended to exist temporarily, so they are not saved to the spreadsheet. Consequently, if Alter Ego is rebooted, any data related to ongoing Whispers will be lost. If their channels still exist and Players still have access to them, they will still be able to speak in them, but they will not be registered as Whispers, and their speech in said channels will not be considered dialog. Those channels will have to be manually deleted.
Attributes
Whispers have few attributes.
ID
- Class attribute: String
this.id
This is a unique identifier for the Prefab. It is generated automatically upon creation of the Whisper, and updated any time a Player is removed from the Whisper.
It has the following format:
locationId(-hidingSpotName)?-playerList
locationIdis the ID of the Room the Whisper is occurring in.hidingSpotNameis optional. If the Whisper is associated with a Hiding Spot, this is its name.playerListis a list of display names of Players in the Whisper, sorted in alphabetical order, with each one separated by a dash (-).
Whisper IDs are generated to follow the same rules as Room IDs.
Players
- Class attribute: Collection<String, Player>
this.players
This is a collection of Players in the Whisper. The key for each entry is the Player’s name.
Location ID
- Class attribute: String
this.locationId
This is the ID of the Room that the Whisper is occurring in.
Location
- Class attribute: Room
this.location
This is the actual Room that the Whisper is occurring in. All of the Players in the Whisper must be in this Room.
Hiding Spot Name
- Class attribute: String
this.hidingSpotName
The name of the Hiding Spot the whisper belongs to. If this Whisper is not associated with a Hiding Spot,
this is undefined.
Channel Name
- Class attribute: String
this.channelName
This is the name that the channel will be set to. It is usually identical to the Whisper’s ID, but it is limited to 100 characters in length, as this is the maximum number of characters allowed in a Discord channel name. Whenever the Whisper’s ID is updated, so too is its channel name.
Channel
- Class attribute: TextChannel
this.channel
When the Whisper is initialized, a channel is created for it in the Whisper category. In this channel, Players can speak to each other freely without others in the Room hearing them.
If a Player is part of a Whisper but has the no channel behavior attribute, they will not be given permission to view
the channel. This is helpful for Players with the concealed behavior attribute, for example, because having that
permission would allow other Players in the Whisper to see their Discord account, thus
revealing their identity. Similarly, Players in the Whisper with the no hearing behavior attribute are not given
permission to view the channel. NPCs are also not given permission to view the channel, because they don’t have Discord
accounts. When a Player is removed from the Whisper, their permission to view the channel is revoked.
When a Whisper is marked to be deleted, one of two things can happen. If the
AUTO_DELETE_WHISPER_CHANNELS setting is true, then the channel will
be deleted as well. If it is false, then the channel’s name will be set to archived-(Room ID). Discord only allows a
single category to have up to 50 channels. Therefore, if Whisper channels are not automatically deleted, they must be
moved to another category or manually deleted before this limit is reached. Otherwise, no new Whispers can be created.
Deleted
- Class Attribute: Boolean
this.deleted
Whether or not the Whisper has been deleted. This is needed so that messages are not sent to a Whisper channel that has since been deleted by the time Alter Ego sends the messages in its queue.
Settings
Alter Ego has various settings that can be configured in the file .env, or as environment variables. All values in
.env should be enclosed with single quotes. Remember to uncomment (i.e. remove the # before the line) for them to go
into effect. This page details each setting and what it does.
Time Zone
TZ
This is the time zone that Alter Ego will operate in. Note that this is only used if Alter Ego is run in a Docker container. If it is run directly in Node, it will use the system’s time zone.
For help filling this out, see the setting time zone section of the installation article.
Default: America/New_York
Credentials
For help filling these out, see the setting credentials section of the installation article.
Bot settings
SPREADSHEET_ID
This is the ID of the spreadsheet that Alter Ego will read and write to. For help filling this out, see the setting spreadsheet ID section of the installation article.
COMMAND_PREFIX
This is what users must begin their messages with in order to run a command. If Alter Ego detects that a message begins with this string, it will pass the message into its command handler module to determine if it was a command or not, and run it if it was.
Default: .
DEBUG_MODE
This is a simple Boolean value. If this is true, Alter Ego will
start in debug mode. If this is false, it will start normally.
If debug mode is enabled, Alter Ego will output loaded data to the console whenever the load command is used. Commands issued in the server will not be deleted, and commands issued in DMs will be displayed in the console. Additionally, the startgame and endgame commands will be announced in the Testing channel instead of the General channel, and only members with the Tester role will be able to use the play command.
Unless you plan to develop new features for Alter Ego, there is generally no reason to enable debug mode.
Default: false
AUTO_LOAD
This is a Boolean value that determines if the game should be automatically loaded when Alter Ego boots up. It does the
equivalent of sending load all resume. This is useful if you reboot the bot frequently.
Default: false
Gameplay settings
PIXELS_PER_METER
This is how many pixels it takes to represent 1 meter on your Map. When calculating the amount of time it takes a player to move from one room to another, Alter Ego needs to convert the distance between the two rooms from pixels to meters. In order to set this properly, find a part of your map with a standard size (for example, a basketball court must be 28 x 15 meters according to the International Basketball Federation). Divide the number of pixels making up its length by its length in meters. The result should go here.
Default: 25
STAMINA_USE_RATE
This is used to calculate how much stamina a player will lose every 1/10th of a second they are moving. You can change this to be higher or lower, depending on how quickly you want players to lose stamina, but it should always be a negative number.
Default: -0.01
HEATED_SLOWDOWN_RATE
This number is used to slow down time when at least one player is inflicted with the “heated” Status Effect. To accomplish this feat, the amount of time that elapses between ticks during player movement, player stamina recovery, and timed Status Effects is multiplied by this number. This allows you to narrate heated situations such as combat without worrying about how much time is passing. The lower this number, the more slowed down time will become. Players are not informed that time is being slowed, so setting this number too low can tip them off that a heated situation is ongoing.
Default: 0.5
AUTOSAVE_INTERVAL
This is how often, in seconds, Alter Ego should save all game data to the spreadsheet.
Default: 30
DICE_MIN
This is an integer that indicates the lowest possible number for a standard die roll. This should usually be set to 1.
DICE_MAX
This is an integer that indicates the highest possible number for a standard die roll. The default is 6, but it can be
changed to any number higher than DICE_MAX.
DEFAULT_DROP_FIXTURE
This is the name of the Fixture in each room that players will drop Items on if they don’t specify one themselves. Every Room must have a Fixture with this name capable of holding Items. If they don’t, players must specify where to drop Items.
Default: FLOOR
DEFAULT_ROOM_ICON_URL
This is the URL of an image that will be inserted into
the Room description message
when a player enters or inspects a Room if the Room does not have a unique icon URL. This must end in .jpg, .jpeg,
.png, .gif, .webp, or .avif.
If this is left blank and the Room does not have a unique icon URL, then Alter Ego will use the server icon instead. If the server icon is not set, then no image will be sent in the description message.
Default: blank
DEFAULT_CONCEALED_ICON_URL
This is the URL of an image that will be used as the display icon for a player or NPC who is inflicted with a status
effect with the concealed behavior attribute.
However, a new display icon can also be set with moderator or bot commands.
This must end in .jpg, .jpeg, .png, .gif, .webp, or .avif.
Default: https://cdn.discordapp.com/attachments/697623260736651335/911381958553128960/questionmark.png
HIDDEN_ICON_URL
This is the URL of an image that will be used as the display icon for a player or NPC speaks in the room while being
inflicted with a status effect with the hidden behavior attribute.
This must end in .jpg, .jpeg, .png, .gif, .webp, or .avif.
Default: https://cdn.discordapp.com/attachments/697623260736651335/911381958553128960/questionmark.png
AUTO_DELETE_WHISPER_CHANNELS
This is a Boolean value that determines whether or not Whisper channels will
be automatically deleted when all players have left the room. If this is true, they will be deleted. If this is
false, they will be renamed archived-(Room ID). Because Discord only allows a single category
to have up to 50 channels, this should be true unless you plan on manually deleting Whisper channels when you no
longer need to see them.
Default: true
READ_MESSAGE_HISTORY
This is a Boolean value that determines whether or not the Read Message History permission will be granted to the
@everyone role in the server. If this is true, then players will be able to read the message history for every channel
they enter, unless that channel has manual permission overwrites to disable it. This can grant them knowledge that their
character wouldn’t and couldn’t possibly know—a practice referred to as
metagaming.
Alter Ego was designed to make metagaming impossible, which is why this permission is disabled by default. It is strongly recommended that this setting be left alone, but it can be enabled, if this is not a concern. When this setting is changed, Alter Ego will update the Read Message History permission of the @everyone role to synchronize it with this setting the next time it is rebooted.
Default: false
Accent colors
EMBED_ACCENT_COLOR
This is a string that determines the accent color of
embeds sent by Alter Ego. String should be in the
format of a 24-bit hexadecimal number without a hash symbol, e.g. 1F8B4C.
Default: 1F8B4C
STANDARD_MESSAGE_DISPLAY_ACCENT_COLOR
This is a string that determines the accent color of messages sent by Alter Ego that use its
STANDARD message display type.
String should be in the format of a 24-bit hexadecimal number without a hash symbol, e.g. 1F8B4C.
Default: 1F8B4C
WARNING_MESSAGE_DISPLAY_ACCENT_COLOR
This is a string that determines the accent color of messages sent by Alter Ego that use its
WARNING message display type.
String should be in the format of a 24-bit hexadecimal number without a hash symbol, e.g. FFC107.
The default color was chosen to be attention-grabbing, with a clear meaning. It is recommended to leave this alone.
Default: FFC107
ALERT_MESSAGE_DISPLAY_ACCENT_COLOR
This is a string that determines the accent color of messages sent by Alter Ego that use its
ALERT message display type.
String should be in the format of a 24-bit hexadecimal number without a hash symbol, e.g. FF0E0E.
The default color was chosen to be attention-grabbing, with a clear meaning. It is recommended to leave this alone.
Default: FF0E0E
Bot status message
SHOW_ONLINE_PLAYER_COUNT
This is a Boolean value that determines whether or not the bot shows the number of online players (that is, players who are not asleep and are active) in its status.
Default: true
Bot activity
These are Discord user activities that Alter Ego will set for itself at certain times. They each have two options:
- type: This is the verb that will be used. This is
a Discord ActivityType,
so valid strings are:
- PLAYING
- STREAMING
- LISTENING
- WATCHING
- CUSTOM
- COMPETING
- string: This is the name of the activity that will be used after the verb.
ONLINE_ACTIVITY_TYPE, ONLINE_ACTIVITY_STRING
This is the activity that Alter Ego will set for itself when it comes online. Alter Ego will set its status to Online.
Type Default: CUSTOM
String Default: Waiting for commands...
DEBUG_MODE_ACTIVITY_TYPE, DEBUG_MODE_ACTIVITY_STRING
This is the activity that Alter Ego will set for itself when it comes online in debug mode. Alter Ego will set its status to Do Not Disturb.
Type Default: PLAYING
String Default: Debug Mode
GAME_IN_PROGRESS_ACTIVITY_TYPE, GAME_IN_PROGRESS_ACTIVITY_STRING, GAME_IN_PROGRESS_ACTIVITY_URL
This is the activity that Alter Ego will set for itself when a game has begun.
Alter Ego’s status will be set to Online, however if a valid Twitch or YouTube URL is set, it will appear
to be streaming. The number of players online will be appended and updated periodically if SHOW_ONLINE_PLAYER_COUNT
is set to true.
Type Default: STREAMING
String Default: NWP
Url Default: https://www.twitch.tv/twitch
Default player data
All of the settings in this section will be uploaded to the Players sheet when the startgame timer ends. They can be changed to suit each individual player on the spreadsheet itself before all game data is loaded for the first time.
DEFAULT_PRONOUNS
This is the default pronoun string that each player will have. Once it is on the spreadsheet, it should be edited to suit each player.
Default: neutral
DEFAULT_VOICE
This is the default original voice string that each player will have. Once it is on the spreadsheet, it should be edited to suit each player.
Default: a neutral voice
Default Stats
These are the default stats a player will have. These should generally be changed on the spreadsheet to suit each individual player before the game is officially started. These must be a whole number between 1 and 10.
DEFAULT_STR
This is the strength stat that each player will have by default. For more information, read the strength section of the Player article.
Default: 5
DEFAULT_PER
This is the perception stat that each player will have by default. For more information, read the perception section of the Player article.
Default: 5
DEFAULT_DEX
This is the dexterity stat that each player will have by default. For more information, read the dexterity section of the Player article.
Default: 5
DEFAULT_SPD
This is the speed stat that each player will have by default. For more information, read the speed section of the Player article.
Default: 5
DEFAULT_STA
This is the stamina stat that each player will have by default. For more information, read the stamina section of the Player article.
Default: 5
DEFAULT_LOCATION
This is the ID of the Room that all players will start in at the beginning of the game.
Default: Dorm 1
DEFAULT_STATUS_EFFECTS
This is a comma-separated list of Status Effects that will be inflicted on all players at the beginning of the game.
Default: satisfied, well rested, clean, normal
DEFAULT_INVENTORY
This is an array of arrays that creates the default player
inventory on the spreadsheet. This is used to initialize the Inventory Items sheet when the startgame timer ends. If you
wish to change the default inventory that players start with, you can do so here. Note that if the # character is
found in the container identifier slot, Alter Ego will replace it with a unique number for each player.
The format for default player inventory corresponds to the sheet format for inventory items, with the exception that the
player name column is not present.
While the default is multiple lines, it is simpler to specify a compact, single-line array.
Default:
[
    ["NULL", "", "RIGHT HAND", "", "", "", ""],
    ["NULL", "", "LEFT HAND", "", "", "", ""],
    ["NULL", "", "HAT", "", "", "", ""],
    ["NULL", "", "GLASSES", "", "", "", ""],
    ["NULL", "", "FACE", "", "", "", ""],
    ["NULL", "", "NECK", "", "", "", ""],
    ["NULL", "", "ACCESSORY", "", "", "", ""],
    ["NULL", "", "CHEST", "", "", "", ""],
    ["DEFAULT SHIRT", "", "SHIRT", "", "1", "", "<desc><s>It's a plain, <procedural name=\"clothing color\"><poss name=\"white\">white</poss></procedural> T-shirt.</s></desc>"],
    ["NULL", "", "JACKET", "", "", "", ""],
    ["NULL", "", "BAG", "", "", "", ""],
    ["NULL", "", "GLOVES", "", "", "", ""],
    ["DEFAULT PANTS", "DEFAULT PANTS #", "PANTS", "", "1", "", "<desc><s>It's a plain pair of <procedural name=\"clothing color\"><poss name=\"light blue\">light blue</poss></procedural> jeans.</s> <s>It has two pockets on the front.</s> <s>In the right pocket, you find <il name=\"RIGHT POCKET\"></il>.</s> <s>In the left pocket, you find <il name=\"LEFT POCKET\"></il>.</s></desc>"],
    ["DEFAULT UNDERWEAR", "", "UNDERWEAR", "", "1", "", "<desc><s>It's a plain, <procedural name=\"clothing color\"><poss name=\"white\">white</poss></procedural> pair of underwear.</s></desc>"],
    ["DEFAULT SOCKS", "", "SOCKS", "", "1", "", "<desc><s>It's a pair of plain, <procedural name=\"clothing color\"><poss name=\"white\">white</poss></procedural> ankle socks.</s></desc>"],
    ["DEFAULT SHOES", "", "SHOES", "", "1", "", "<desc><s>It's a pair of plain, <procedural name=\"clothing color\"><poss name=\"white\">white</poss></procedural> tennis shoes.</s></desc>"]
]
DEFAULT_DESCRIPTION
This is the default description that will be applied to each player’s Description cell on the Players sheet when the startgame timer ends. Once it is on the spreadsheet, it should be edited to describe each player’s appearance.
Default:
<desc><s>You examine <var v="this.displayName"/>.</s> <if cond="this.hasBehaviorAttribute('concealed')"><s><var v="this.pronouns.Sbj" /> <if cond="this.pronouns.plural">are</if><if cond="!this.pronouns.plural">is</if> [HEIGHT], but <var v="this.pronouns.dpos" /> face is concealed.</s></if><if cond="!this.hasBehaviorAttribute('concealed')"><s><var v="this.pronouns.Sbj" /><if cond="this.pronouns.plural">'re</if><if cond="!this.pronouns.plural">'s</if> [HEIGHT] with [SKIN TONE], [HAIR], and [EYES].</s> <if cond="this.hasStatus('tired')"><s><var v="this.pronouns.Sbj"/> <if cond="this.pronouns.plural">have</if><if cond="!this.pronouns.plural">has</if> bags under <var v="this.pronouns.dpos"/> eyes.</s></if><if cond="this.hasStatus('exhausted')"><s><var v="this.pronouns.Sbj"/> <if cond="this.pronouns.plural">have</if><if cond="!this.pronouns.plural">has</if> dark bags under <var v="this.pronouns.dpos"/> eyes.</s> <s><var v="this.pronouns.Sbj"/> look<if cond="!this.pronouns.plural">s</if> absolutely **exhausted**.</s></if><if cond="this.hasStatus('delirious')"><s><var v="this.pronouns.Sbj"/> look<if cond="!this.pronouns.plural">s</if> completely **delirious**, like <var v="this.pronouns.sbj"/> <if cond="this.pronouns.plural">have</if><if cond="!this.pronouns.plural">has</if>n't slept in days.</s></if></if><br /><br /><s><var v="this.pronouns.Sbj" /> wear<if cond="!this.pronouns.plural">s</if> <il name="equipment"></il>.</s><if cond="this.getContainedItemsForItemList('equipment').length === 0"><s><var v="this.pronouns.Sbj" /> <if cond="!this.pronouns.plural">is</if><if cond="this.pronouns.plural">are</if> completely naked.</s></if> <s>You see <var v="this.pronouns.obj"/> carrying <il name="hands"></il>.</s> <if cond="this.hasStatus('stinky')"><s><var v="this.pronouns.Sbj"/>'<if cond="this.pronouns.plural">re</if><if cond="!this.pronouns.plural">s</if> a little stinky.</s></if><if cond="this.hasStatus('rancid')"><s><var v="this.pronouns.Sbj"/> smell<if cond="!this.pronouns.plural">s</if> absolutely **rancid**.</s></if> <if cond="this.hasStatus('soaking wet')"><s>Also, <var v="this.pronouns.sbj"/> <if cond="!this.pronouns.plural">is</if><if cond="this.pronouns.plural">are</if> soaking wet.</s></if><if cond="this.hasStatus('wet')"><s>Also, <var v="this.pronouns.sbj"/> <if cond="!this.pronouns.plural">is</if><if cond="this.pronouns.plural">are</if> a bit wet.</s></if></desc>
Role IDs
In general, these should not need be changed, as they are now autopopulated by Alter Ego. However, if you created your own roles instead of using a template, or if Alter Ego cannot find the correct role names, you can manually change the IDs here.
In order to copy a role ID, make sure your Discord account
has Developer Mode enabled. Mention a role by typing
@(Role name) on Discord, but place a \ before the @ symbol. When you send the message, the role will display its
ID, which is a string of numbers.
TESTER_ROLE
The Tester role is the role that members must have in order to use Eligible commands when debug mode is enabled. This should be the ID of the role in single quotes.
ELIGIBLE_ROLE
The Eligible role is the role that members must have in order to use Eligible commands when debug mode is disabled. This should be the ID of the role in single quotes.
PLAYER_ROLE
The Player role is the role that members must have in order to use Player commands. This should be the ID of the role in single quotes.
FREE_MOVEMENT_ROLE
The Free Movement role allows players (who must also have the Player role) to move to any room they wish, adjacent or not. This should generally not be given out freely. This should be the ID of the role in single quotes.
MODERATOR_ROLE
The Moderator role is the role that members must have in order to use Moderator commands. This should be the ID of the role in single quotes.
DEAD_ROLE
The Dead role is given to players when the reveal command is used. This should be the ID of the role in single quotes.
SPECTATOR_ROLE
The Spectator role is given to all players (living or dead) when the endgame command is used. This should be the ID of the role in single quotes.
Category and channel IDs
In general, these should not need be changed, as they are now autopopulated by Alter Ego. However, if you created your own channels instead of using a template, or if Alter Ego cannot find the correct channels, you can manually change the IDs here.
In order to copy a category or channel ID, right click on it in the channel list and click Copy ID.
ROOM_CATEGORIES
Warning
You can now use the
.createroomcategorycommand to set these, so it is very unlikely that you will need to change this. If this is set, changes to the server config made by the.createroomcategorycommand will not persist across bot reboots.
This is a list of IDs of all of the category channels which contain Rooms. Any channel contained within one of these categories will be considered a Room channel. Players and Moderators can send commands and speak in these channels, and Alter Ego will recognize that messages in these channels are part of the game. It will also attempt to create channels in these categories for any Rooms that don’t already have channels in the server.
This can be multiple categories because Discord only allows a single category to have 50 channels. Since this is too restrictive for the game, Alter Ego allows you to divide the room channels amongst several categories, in whatever way you like. The IDs for all room category channels should be separated by commas in a single string.
WHISPER_CATEGORY
This is the category where Alter Ego will create Whisper channels. This should be the ID of the category in single quotes.
SPECTATE_CATEGORY
This is the category where Alter Ego will create spectate channels for each player. This should be the ID of the category in single quotes.
TESTING_CHANNEL
This channel is only necessary if you use debug mode. If you do, the startgame and endgame announcements will be made in this channel instead of in the General channel, and members must have the Tester role to use Eligible commands. This should be the ID of the channel in single quotes.
GENERAL_CHANNEL
This channel is where the startgame and endgame announcements will be made. Members with the Eligible role can send Eligible commands in this channel. This should be the ID of the channel in single quotes.
ANNOUNCEMENT_CHANNEL
This channel is used in very limited circumstances. If a message is sent in this channel by a player with the Free Movement role, it will be sent to the spectate channels of all players. This should be the ID of the channel in single quotes.
COMMAND_CHANNEL
This channel is where Alter Ego will accept commands from a moderator. This should be the ID of the channel in single quotes.
LOG_CHANNEL
This channel is where Alter Ego will post the time and location of almost every in-game action. This keeps every in-game occurrence in one place, in a linear order, which is useful for moderator reference. This should be the ID of the channel in single quotes.
Due to the sheer number of messages that will be posted in this channel, it is strongly recommended you mute it.
Manual Installation
Installing Alter Ego without Docker is not recommended. Doing so is more complicated and Alter Ego may run differently depending on the OS you run on your system and the dependencies installed there.
Node Installation
Note
These instructions are for installing Alter Ego for use with Node.js. Unless you are planning to work on the source code as a developer, doing this is not recommended. It is much easier to install and run Alter Ego using Docker. For the Docker installation instructions, see this page.
Installation of Alter Ego is rather complicated. In order to create an environment in which Alter Ego can facilitate a game, many steps need to be taken. This page will explain them in detail.
Caution
Do not host Alter Ego for anyone you don’t trust. For more information on why you shouldn’t, see the warning for Flag value scripts.
Step 1: Download Alter Ego
First, you need to download Alter Ego itself. If you already have Git, you can clone the repository by entering
git clone https://github.com/MsVBLANK/Alter-Ego.git in Git. If not, you can simply download the ZIP file to your
computer.
Downloading Alter Ego as a ZIP file is not recommended however, as that makes it harder to keep your copy of Alter Ego up to date. If you do not already have Git, install the official GitHub Desktop app, and then click File > Clone Repository, then navigate to the URL tab and paste the Alter Ego repository link into the URL input dialog.
If you’ve done it this way, then you can update Alter Ego by clicking the Pull origin button in the GitHub Desktop app.
Switch to a numbered version
If you do not wish to use the latest changes on on the master branch,
you have to run additional commands to sync to a numbered version.
With Git
Alter Ego versions are organized in “tags”, therefore you must switch to a tag in git to stay on a numbered version. In a terminal, run.
git fetch --all --tags
git checkout [VERSION]
Where VERSION is the version of Alter Ego you wish to use (e.g. 2.0.0).
Without Git
Go to the Alter Ego GitHub page and download open the Assets menu for the
latest release. Then, download either Source code (zip) or
Source code (tar.gz), whichever you prefer. Then, use your favorite archive utility to open the archive
(e.g. 7zip, GNOME Archive Manager, PeaZip), and extract the contents into your folder of choice.
Step 2: Install Node.js with nvm
Alter Ego runs on Node.js, a JavaScript runtime environment. Without installing it to your computer, you won’t be able to run Alter Ego.
To make installing Node.js simpler, we recommend using nvm (Node Version Manager). Nvm helps you match your node version with the project’s version and allows you to use different versions of Node.js on different projects.
To install nvm, follow the instructions on the nvm GitHub page.
After installing nvm, open a terminal set to the project directory and run:
nvm install
This will install the Node.js version used by Alter Ego.
Step 3: Install dependencies
Alter Ego requires a few dependencies in order to run properly. These are things like the Discord and the Google Sheets API which allow it to facilitate a game.
First, open a terminal, and navigate to your Alter Ego folder, like so:
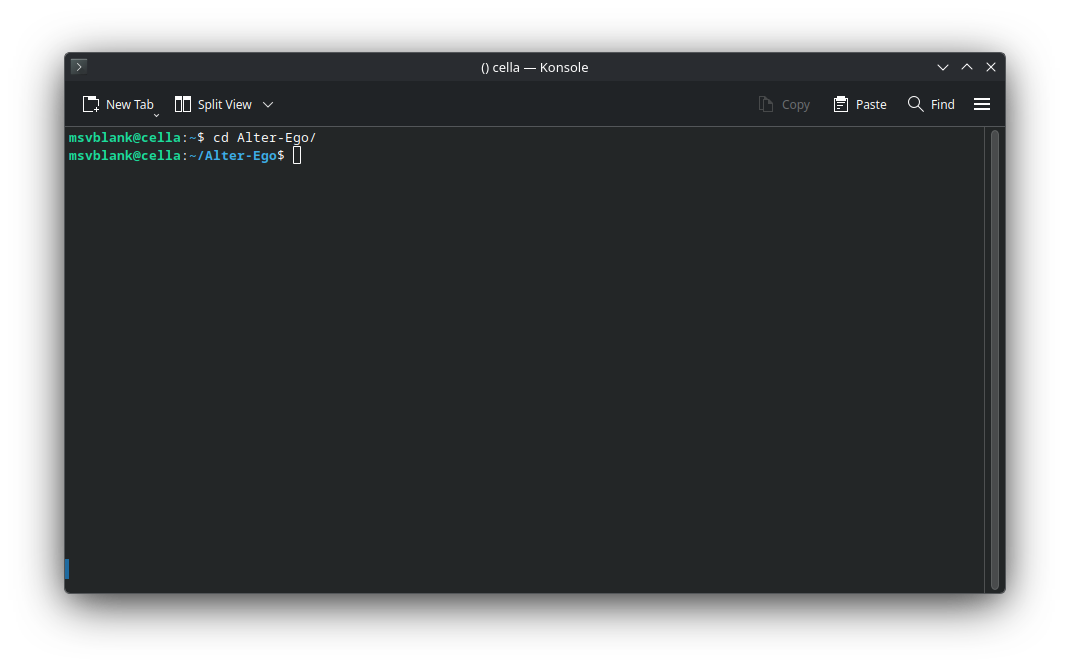
Now that you’re in the directory of Alter Ego, run this command: npm ci. This will automatically install all of
the required dependencies.
Step 4: Create a Discord bot
Now that you have Alter Ego installed, you’ll need to create a new Discord bot to bind its functionality to. Navigate to the Discord Developer Portal, and once you log in to your Discord account, create a new application. This example will use an application called “Alter Ego”, but you can call it whatever you like. Once you create the application, you’ll be taken to a page that looks like this:
You can ignore this for now. Navigate to the Installation tab on the left-hand side. This will bring you to this page:
Under “Installation Contexts”, uncheck “User Install”, and make sure “Guild Install” is checked. In the dropdown under “Install Link”, select “None”. You don’t want other people to be able to install your bot to their servers, so there’s no need to create a public installation URL.
Now navigate over to the Bot tab on the left-hand side. This will bring you to this page:
On this page, you can change the bot’s name, set its profile picture, upload its banner image, and a few other things. Take note of the “Reset Token” button; you’ll need to press it later, but you can ignore it for now.
Scroll down a bit, and you’ll find some settings. First, under “Authorization Flow”:
- Disable the “Public Bot” setting.
- Alter Ego can only be in one server, so this will prevent other people from inviting it to their servers.
- Disable the “Requires OAuth2 Code Grant” setting.
Next, you’ll find more settings under “Privileged Gateway Intents”:
- Enable the “Presence Intent” setting.
- Enable the “Server Members Intent” setting.
- Enable the “Message Content Intent” setting.
Without all of these set according to these instructions, Alter Ego will not function properly. If you’ve done everything right, your settings will look like this:
Step 5: Create a Discord server
Before you can get Alter Ego up and running, you’ll have to create a Discord server. You can call it whatever you like, but once it’s made, you’ll have to set a number of things up.
The easiest way to create a server is using this template, which will add all of the requisite roles and channels for you. If you want to set those up manually, refer to this page.
Enable Developer Mode
You’ll have to enable Developer Mode for your account for the next few steps. To do this, navigate to your User Settings in Discord. Open the Developer tab near the very bottom. You’ll see a switch labeled Developer Mode. Turn it on if it’s not already enabled.
Step 6: Invite your bot to the server
Back on the Discord Developer Portal, click on the OAuth2 tab on the left-hand side. Scroll down to the “OAuth2 URL Generator” section:
Under “Scopes”, Check bot, then in the “Bot Permissions” section that appears below it, check Administrator. You should have something that looks like this:
Finally, there will be two text boxes underneath the “Permissions” section:
Under the “Integration Type”, dropdown, select “Guild Install”. Then, copy the URL in the “Generated URL” box, send it to a Discord channel in the server you just made (ideally to a channel that only you have access to), and click on it. It should display a menu that looks like this:
Make sure the server you just made is the one that’s selected in the drop down, then click Continue. Make sure Administrator is checked, and confirm by clicking Authorize.
With that, your bot will join your server! However, it doesn’t do anything at the moment. You still need to do a few things.
Step 7: Create a spreadsheet
Next, you will need to create a spreadsheet for Alter Ego to use. For more information, see the article on spreadsheets.
Step 8: Enable the Google Sheets API
In order for Alter Ego to work properly, you will need to create a new Google APIs project. The easiest way to do that is to navigate to the Enable Google Workspace APIs page and click the Enable Sheets API button near the bottom.
That should bring you to a page that looks like this:
Create a project. You can call it anything you want. In the prompts that follow, confirm that you want to enable the Google Sheets API. If you did it right, you’ll be shown a message that says “You have successfully enabled Google Sheets API.”
Step 9: Create a service account
In order to allow Alter Ego to read and write to the spreadsheet, you’ll need to create a service account for it to use. To do that, open the navigation menu in the top left corner and navigate to the Credentials tab under APIs & Services, like so:
On the next page, click the link that says Manage service accounts:
On the next page, click Create service account. You should be brought to a page like this:
For the name, enter the bot’s name; in this case, it’s Alter Ego. You can set its ID if you want, or just accept the one it generates. For the description, enter whatever you like. Click Create and continue.
In the Permissions menu, grant it the “Owner” role. You can skip step 3. Once you’re done, you’ll be returned to the Service accounts page.
Once your service account is made, you should see it under the service accounts list. There will be a meatball menu under the Actions column for it. Click on that, and select Manage keys. You’ll be taken to this page:
Click the Add Key button and select Create new key. Make sure the key type is JSON, then click Create. This will download a file to your computer. Don’t touch that just yet - there’s one thing to do first. Return to the Service Accounts page.
Step 10: Share the spreadsheet
On the Service Accounts page, you should now see the service account you just created. Copy its email address, then head over to the spreadsheet you made earlier.
On the spreadsheet, press the Share button. Paste the service account’s email address into the dialog box and make sure to give it permission to edit the spreadsheet. You can also do the same with any other moderators you have, if you haven’t done so already. Once you’ve done that, you nearly have everything you need.
Caution
Do not grant write access to the spreadsheet to any users that you don’t fully trust.
Step 11: Edit .env file
The .env file is used to change all settings for Alter Ego. Before running Alter Ego, you must change several values
here.
First, open the Alter-Ego folder that you downloaded. Then, make a copy of .env.example and name it .env (note you
may have to set your file browser to show hidden files). On Linux, use these commands.
cd Alter-Ego
cp .env.example .env
Open the .env file in a text editor. You should see something like this:
# This is an example of an environment file for docker compose.
#
# '#' has been used to comment out any variables that do not need
# to be changed from default. Remove '#' to set them if you want
# to use something other than the default value.
#
# Environment variables should be enclosed in single quotes, and
# should follow the data type next to it (e.g. String).
# For instance: DEBUG_MODE='true'

# Time Zone
# See https://en.wikipedia.org/wiki/List_of_tz_database_time_zones
# for a complete list of timezones.
TZ='America/New_York'

# Credentials
DISCORD_TOKEN=                                # String. Token of discord bot
G_PROJECT_ID=                                 # String. Google project ID
G_PRIVATE_KEY_ID=                             # String. Google private key ID
G_PRIVATE_KEY=                                # String. Google private key
G_CLIENT_EMAIL=                               # String. Google client email
G_CLIENT_ID=                                  # String. Google client id
G_CLIENT_X509_CERT_URL=                       # String. Google cert url

# Settings
SPREADSHEET_ID=                               # String. ID of spreadsheet
...
(file continues on)
Setting Time Zone
Before running Alter Ego, you should set the time zone for your container, so that events in the game sync up to your location.
Edit the TZ line so that it matches the time zone where the game occurs in. For instance, if you want to set the
timezone to London, you would change the line to TZ='Europe/London'. For a complete list of timezones, refer to
this Wikipedia article.
Setting Credentials
Navigate back to the Discord Developer Portal once again and find the application you created earlier. Open the Bot
tab. Under Token, click Reset Token. You may be asked to authenticate with 2FA before proceeding. Once the token
has been created, click Copy. Paste it inside the single quotes after DISCORD_TOKEN= in your .env file.
Caution
This token must not be shared with anyone, as it grants full access to your bot’s account.
Next, open the file you downloaded after creating the service account in any text editor. The file should look something like this:
{
    "type": "service_account",
    "project_id": "(CONFIDENTIAL)",
    "private_key_id": "(CONFIDENTIAL)",
    "private_key": "(CONFIDENTIAL)",
    "client_email": "(CONFIDENTIAL)",
    "client_id": "(CONFIDENTIAL)",
    "auth_uri": "https://accounts.google.com/o/oauth2/auth",
    "token_uri": "https://oauth2.googleapis.com/token",
    "auth_provider_x509_cert_url": "https://www.googleapis.com/oauth2/v1/certs",
    "client_x509_cert_url": "(CONFIDENTIAL)",
    "universe_domain": "googleapis.com"
}
Caution
Almost all of the data in this file is confidential. Don’t share it with a single person, and make absolutely sure not to put it online somehow.
Next, add the Google service account credentials to your .env file. Copy each corresponding value in the Google
credentials file into your .env file. For instance, copy project_id into PROJECT_ID=. Replace the double quotes in
the original file with single quotes. Don’t worry about any values that aren’t in the .env file, you won’t need them.
If you did everything right, the credentials section should look like this:
...
# Credentials
DISCORD_TOKEN='(CONFIDENTIAL)'                      # String. Token of discord bot
G_PROJECT_ID='(CONFIDENTIAL)'                       # String. Google project ID
G_PRIVATE_KEY_ID='(CONFIDENTIAL)'                   # String. Google private key ID
G_PRIVATE_KEY='(CONFIDENTIAL)'                      # String. Google private key
G_CLIENT_EMAIL='(CONFIDENTIAL)'                     # String. Google client email
G_CLIENT_ID='(CONFIDENTIAL)'                        # String. Google client id
G_CLIENT_X509_CERT_URL='(CONFIDENTIAL)'             # String. Google cert url
...
Setting Spreadsheet ID
Finally, you must set the spreadsheet ID. A Google Sheets URL contains two IDs. The first is the ID of the entire spreadsheet itself. The second is the ID of the individual sheet currently open in the spreadsheet. You can retrieve the ID of either by copying them from the URL. The format is as follows:
https://docs.google.com/spreadsheets/d/(entire spreadsheet ID)/edit#gid=(individual sheet ID)
Copy the ID for the entire spreadsheet and paste it in single quotes after SPREADSHEET_ID=. For instance.
SPREADSHEET_ID='1234567890'
(Optional) Fill out other settings
If you wish to change other settings other than the ones outlined above, you can edit their entries in the .env file.
Remember to uncomment (i.e. remove the # before the line) for them to go into effect. For more information, see the
article on settings.
Step 12: Run Alter Ego
Finally, you can run Alter Ego. In your terminal, run the command npm start.
If you did everything right, this is what you’ll see:
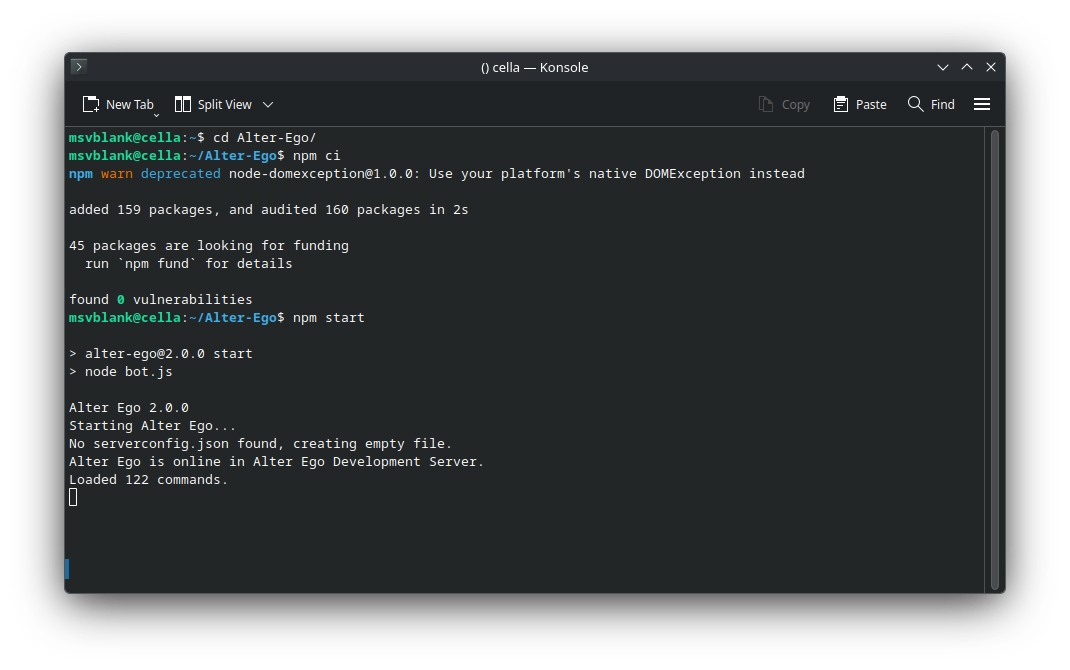
Congratulations! You can now use Alter Ego. Good luck!
Manual Channel and Role Creation
This article details the process of manually setting up a Discord server for Alter Ego. If you use the server template provided in the official tutorial, you can skip this process entirely.
Create roles
Note: Ensure that the role that was created when you invited Alter Ego to the server (which was automatically assigned to it) is the second highest role in the list.
Navigate to the Server Settings, then open the Roles tab. You’ll need to create several roles and set their permissions.
@everyone
This should be one of two roles in your server at the moment. Disable all permissions for it. There are some optional permissions you can enable for it, however. Doing this will enable them for every role:
- Embed Links (optional)
- Attach Files (optional)
- Add Reactions (optional)
- Use External Emoji (optional)
- Whether this permission is enabled or not, any external emoji that are sent in Room or Whisper channels, whether by a Player or a moderator, will not be sent in spectate channels. Instead, they will be replaced with the name of the emoji. This is because Discord does not allow bots to use emoji from servers they are not in, and Alter Ego can only be in one server.
- Use External Stickers (optional)
- Stickers will not show up in spectate channels under any circumstances.
[Bot name]
This will have been automatically created when you added your bot to the server and will be the name of your bot. You can change the role’s name if you wish, but be sure to enable the following setting:
- Display role members separately from online members
You can leave everything else as it is.
Hidden
This is a role not required by Alter Ego, but helpful to have. By giving it to certain server members, you can keep them in the server while hiding them from players. This is useful if you want to have secret NPCs in your game. Disable all permissions for it.
Dead
This is a new role you’ll have to create. You can call it whatever you want, but remember that it’s supposed to be the role for dead players. These are the settings you’ll need to enable:
- Display role members separately from online members
- Allow anyone to @mention this role
- Read Message History
Disable everything else.
Spectator
This is the role for spectators. Once again, you can call this (and all of the new roles) whatever you like, but the names given here are what’s recommended for clarity’s sake. Enable these settings:
- Display role members separately from online members
- Allow anyone to @mention this role
- Read Message History
Disable everything else.
Tester
This is the role for testers. This role is only necessary if you use debug mode. Enable these settings:
- Allow anyone to @mention this role
- Send Messages and Create Posts
Disable everything else.
Eligible
This is the role for users who allowed to play the game. If a user doesn’t have this role, they won’t be able to use the play command when you issue the startgame command. Enable these settings:
- Allow anyone to @mention this role
- Send Messages and Create Posts
Disable everything else.
Player
This is the role for players in an ongoing game. Users with the Eligible role will be given this role as soon as they use the play command, or when you use the addplayer command. Enable these settings:
- Display role members separately from online members
- Allow anyone to @mention this role
- Send Messages and Create Posts
Disable everything else.
Free Movement
This role allows a player to move to any room they wish, adjacent or not. This should generally not be given out freely. Enable these settings:
- Display role members separately from online members
- Allow anyone to @mention this role
- Send Messages and Create Posts
- Read Message History
Disable everything else.
Moderator
This is the last role you need to make. This should be given to your moderator(s), including yourself. Enable these settings:
- Display role members separately from online members
- Allow anyone to @mention this role
From here, you have two options: you can either give them the Administrator permission, which automatically gives them all permissions, or grant the following permissions:
- View Channels
- Manage Channels
- Manage Roles
- View Audit Log
- Change Nickname
- Manage Nicknames
- Send Messages and Create Posts
- Embed Links
- Attach Files
- Mention @everyone, @here, and All Roles
- Manage Messages
- Read Message History
Whether you give them Administrator privileges or not depends on whether or not you want any other moderators to be able to do things like change the server name or add emojis. All other permissions are optional.
Organize roles
A good thing to do is to organize your roles. You can give them special colors if you want, too. An order like this is ideal:
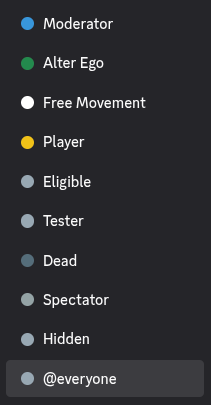
Ensure that the role that was created when you invited Alter Ego to the server (which was automatically assigned to it) is the second highest role in the list. If it’s not, it may have issues with permissions.
Create categories and channels
There are a number of channels you’ll have to create before you can get Alter Ego to work. You can name them all anything you want, but the ones listed here are recommended for clarity’s sake.
Category: Important
This category is where you should put all of the important channels that will be viewable to everyone. You can put all kinds of channels here such as rules for the role play, a list of players, maps, etc. Before anything else, though, you’ll have to set the permission overrides for this category. Be sure to assign the following roles the listed permission overrides for this category:
- @everyone
- View Channels: Enabled
- Send Messages and Create Posts: Disabled
- Read Message History: Enabled
- Hidden
- View Channels: Disabled
- Free Movement
- Send Messages and Create Posts: Enabled
- Moderator
- Send Messages and Create Posts: Enabled (only needed if Moderator doesn’t have Administrator permission)
Channel: announcements
This channel will be used by the bot in very limited circumstances. If a message is sent in this channel by a player with the Free Movement role, it will be sent to the spectate channels of all players. You can use this channel to post general announcements, announcements from the host of the role play (e.g. morning and night announcements, etc.), and anything else you want to inform everyone about. You don’t need to set any permission overrides for this channel.
Category: Out of Character
This category is for people to talk outside of the game. You should set the following permission overrides for this category:
- @everyone
- View Channels: Enabled
- Send Messages and Create Posts: Enabled
- Embed Links: Enabled
- Attach Files: Enabled
- Add Reactions: Enabled
- Use External Emojis: Enabled
- Read Message History: Enabled
- Any others that you want
- Hidden
- View Channels: Disabled
Channel: general
This channel is where everyone can talk about anything. The only restriction in this channel should be that no one can meta-game, or reveal information about the game that other players wouldn’t have access to (for example, mentioning that someone died even though their body hasn’t yet been discovered). You don’t need to set any permission overrides for this channel.
Channel: spectator-chat
This channel is where dead players and spectators can discuss the game. Meta-gaming here is completely fine, as living players won’t be able to see it. You should set the following permission overrides for this channel:
- @everyone
- View Channel: Disabled
- Hidden
- View Channel: Your choice
- Dead
- View Channel: Enabled
- Spectator
- View Channel: Enabled
- Moderator
- View Channel: Enabled
Channel: testing
This channel is only necessary if you use debug mode. If you do, the startgame and endgame announcements will be made in this channel instead of in general. You should set the following permission overrides for this channel:
- @everyone
- View Channel: Disabled
- Hidden
- View Channel: Your choice
- Tester
- View Channel: Enabled
- Moderator
- View Channel: Enabled
Category: Control Center
This category is for the moderator(s) only. You should set the following permission override for this category:
- Moderator
- View Channels: Enabled
Channel: bot-log
This channel is where Alter Ego will post the time and location of almost every in-game action. This keeps every in-game occurrence in one place, in a linear order, which is useful for moderator reference.
Due to the sheer number of messages that will be posted in this channel, it is strongly recommended you mute it.
Channel: bot-commands
This channel is where Alter Ego will accept commands from a moderator.
Category: Rooms
This doesn’t have to be a single category, but can in fact be several. A room category is where you’ll create all of the channels corresponding with the game’s Rooms. The reason you can create multiple categories for this is that Discord only allows a single category to have 50 channels. Since this is too restrictive for the game, Alter Ego allows you to divide the room channels amongst several categories, in whatever way you like. The overall role permissions you set up earlier are configured specifically for the game, so you don’t need to set any permission overrides for room categories or the channels that belong to them.
Category: Whispers
This category is where Alter Ego will create Whisper channels. There is only one permission override you should make, but it is optional:
- Player
- Read Message History: Enabled
Category: Spectate
This category is where Alter Ego will create and post to spectate channels for each player. These will allow spectators to view the game for any player they choose, seeing everything they see in real time. You should set the following permission override for this category:
- @everyone
- Send Messages: Disabled
- Read Message History: Enabled
- Dead
- View Channels: Enabled
- Spectator
- View Channels: Enabled
Other
Any other categories and channels are optional. One good idea is to have a music channel and use a music bot so you can play music in a voice channel that fits the mood of whatever is happening in-game, however this is not necessary.
Migration Guide
This document will explain the process of migrating your existing data when new versions of Alter Ego are released.
Upgrading to 2.0.0
Status Effect and Gesture Updates
Many Status Effects and Gestures have been updated. You can copy them from the demo environment.
If you don’t want to use the .setupdemo command, you can find a copy
here.
General Description Updates
While your spreadsheet should hopefully load just fine, the introduction of the script parser module means that many of your descriptions are likely to be broken now. If you relied on arbitrary code execution in descriptions in the past, some things may be impossible to do now.
Remember to use the parse command to find errors in your descriptions! It will help you find out what needs to be updated.
Item Lists
In version 2.0.0, il tags are now populated automatically whenever
the description they’re in is parsed. If there are item tags in your descriptions as they are loaded, Alter Ego will
try to remove them every time it parses the description. However, it may not be able to do so perfectly every time.
Important
You should remove all
itemtags from your descriptions. Mentions of Fixtures and infinite items can stay, but existingitemtags may cause item lists to be populated strangely.
Procedurals
Any existing Room Items or Inventory Items whose Prefabs have procedural tags in their descriptions will not be
considered to have any procedural
selections. As such, they will not be carried
over when those items are transformed. If you would like to give them the procedural selections they should have, you
will need to manually add the selected named procedural and poss tags to the descriptions of those items.
Puzzle Descriptions
The text of the already solved description should be moved to the new unsolved description column for the following Puzzle types:
togglemedia
New Default Player Description
With the release of version 2.0.0, a new default Player description has been included. It is as follows:
<desc><s>You examine <var v="this.displayName"/>.</s> <if cond="this.hasBehaviorAttribute('concealed')"><s><var v="this.pronouns.Sbj" /> <if cond="this.pronouns.plural">are</if><if cond="!this.pronouns.plural">is</if> [HEIGHT], but <var v="this.pronouns.dpos" /> face is concealed.</s></if><if cond="!this.hasBehaviorAttribute('concealed')"><s><var v="this.pronouns.Sbj" /><if cond="this.pronouns.plural">'re</if><if cond="!this.pronouns.plural">'s</if> [HEIGHT] with [SKIN TONE], [HAIR], and [EYES].</s> <if cond="this.hasStatus('tired')"><s><var v="this.pronouns.Sbj"/> <if cond="this.pronouns.plural">have</if><if cond="!this.pronouns.plural">has</if> bags under <var v="this.pronouns.dpos"/> eyes.</s></if><if cond="this.hasStatus('exhausted')"><s><var v="this.pronouns.Sbj"/> <if cond="this.pronouns.plural">have</if><if cond="!this.pronouns.plural">has</if> dark bags under <var v="this.pronouns.dpos"/> eyes.</s> <s><var v="this.pronouns.Sbj"/> look<if cond="!this.pronouns.plural">s</if> absolutely **exhausted**.</s></if><if cond="this.hasStatus('delirious')"><s><var v="this.pronouns.Sbj"/> look<if cond="!this.pronouns.plural">s</if> completely **delirious**, like <var v="this.pronouns.sbj"/> <if cond="this.pronouns.plural">have</if><if cond="!this.pronouns.plural">has</if>n't slept in days.</s></if></if><br /><br /><s><var v="this.pronouns.Sbj" /> wear<if cond="!this.pronouns.plural">s</if> <il name="equipment"></il>.</s><if cond="this.getContainedItemsForItemList('equipment').length === 0"><s><var v="this.pronouns.Sbj" /> <if cond="!this.pronouns.plural">is</if><if cond="this.pronouns.plural">are</if> completely naked.</s></if> <s>You see <var v="this.pronouns.obj"/> carrying <il name="hands"></il>.</s> <if cond="this.hasStatus('stinky')"><s><var v="this.pronouns.Sbj"/>'<if cond="this.pronouns.plural">re</if><if cond="!this.pronouns.plural">s</if> a little stinky.</s></if><if cond="this.hasStatus('rancid')"><s><var v="this.pronouns.Sbj"/> smell<if cond="!this.pronouns.plural">s</if> absolutely **rancid**.</s></if> <if cond="this.hasStatus('soaking wet')"><s>Also, <var v="this.pronouns.sbj"/> <if cond="!this.pronouns.plural">is</if><if cond="this.pronouns.plural">are</if> soaking wet.</s></if><if cond="this.hasStatus('wet')"><s>Also, <var v="this.pronouns.sbj"/> <if cond="!this.pronouns.plural">is</if><if cond="this.pronouns.plural">are</if> a bit wet.</s></if></desc>
What every section does is detailed here. It is recommended you update your Player descriptions to fit this template, but you are free to modify it as you see fit.
Important
Old Player descriptions used to use
containerin theirifandvartags to refer to the Player. Every instance ofcontainerin Player descriptions should be replaced withthis.
Inserting Descriptions into Descriptions
In the past, it was sufficient to insert descriptions into other descriptions by accessing the .description
(or similarly named) attribute. However, Descriptions are now objects.
As such, this is no longer possible. Now, you must use the
parseFor method.
The following list contains several strings on the left side of the arrow (->) and what you should replace them with
on the right side of the arrow.
.description->.description.parseFor(player).correctDescription->.correctDescription.parseFor(player).alreadySolvedDescription->.alreadySolvedDescription.parseFor(player)
New Mirror Styles
The way mirrors reflect Player descriptions has changed, too. It used to be something like this:
<desc><s>You look at your reflection.</s> <var v="player.description.replace(/container./g, 'player.')" /></desc>
However, now it is recommended that you use something like this:
<desc><s>It's a mirror hung on the wall.</s> <s>You can see your reflection in it:</s><br /><s> >>> </s><var v="player.description.parseFor(player)" /></desc>
Finder Module Calls
The finder module has been a core part of descriptions, and that remains the case. However, a few finder functions have changed.
Renamed Data Types
With the release of 2.0.0, Objects have been renamed to Fixtures, and Items have been renamed to Room Items. As such, you should make the following replacements:
findObject->findFixturefindItem->findRoomItem
Updated Function Signatures
findRoomItem has had its function signature changed. It is now:
findRoomItem('ITEM IDENTIFIER OR PREFAB ID', ('location-name'), (Type of Container: 'Fixture' || 'Puzzle' || 'RoomItem'), ('CONTAINER NAME(/INVENTORY SLOT ID)'))
See the following example for how to update calls:
findItem('COMFORTER', this.location.name, 'Object: BED')->findRoomItem('COMFORTER', this.location.id, 'Fixture', 'BED')
Deprecated Attributes
The following properties have been deprecated. They will be listed here along with their replacements:
EquipmentSlot.name->EquipmentSlot.idEvent.name->Event.idGesture.name->Gesture.idInventorySlot.name->InventorySlot.idInventorySlot.item->InventorySlot.itemsPlayer.talent->Player.titlePlayer.defaultIntelligence->Player.defaultPerceptionPlayer.intelligence->Player.perceptionPlayer.statusString->Player.hasStatusPlayer.hasAttribute->Player.hasBehaviorAttributePrefab.verb->Prefab.thirdPersonVerborPrefab.secondPersonVerbPuzzle.parentObjectName->Puzzle.parentFixtureNamePuzzle.parentObject->Puzzle.parentFixtureRecipe.objectTag->Recipe.fixtureTagPuzzle.parentObject->Puzzle.parentFixtureRoom.name->Room.idorRoom.displayNameRoom.exit->Room.exitsStatus.name->Status.idStatus.attributes->Status.behaviorAttributes
Common Code Patterns
It is impossible to list all examples of code execution that were used in descriptions prior to 2.0.0. Here are some common patterns, along with their suggested replacements.
let prob = 8; const x = Math.floor(Math.random() * prob); x === 0
Should become:
doWithChance(8) === true
let prob = 500; if (player.statusString.includes('exhausted')) prob /= 50; if (player.statusString.includes('delirious')) prob /= 500; const x = Math.floor(Math.random() * prob); x === 0
Should become:
player.hasStatus('delirious') || doWithChanceModifiedByPlayerStatus(500, player, 'exhausted', 50) === true
game.items.filter(item => item.location.name === container.location.name && item.containerName === `Puzzle: ${container.name}` && !isNaN(item.quantity) && item.quantity > 0).reduce((total, item) => total + item.quantity * item.weight, 0)
Should become:
this.childPuzzle.getContainedItemsWeight()
this.exit[3].unlocked === true
Should become:
this.getExit('FLOOR 2').unlocked === true
const words = ['about','above','across']; words[Math.floor(Math.random() * words.length)]
Should become:
getRandomString(['about','above','across'])
Flags
With the introduction of Flags, many common code patterns
in descriptions can be replaced with calls to the finder module’s
findFlag function.
Edge Cases
When in doubt, check the writing descriptions tutorial to see if there’s a way to fix your descriptions while retaining the same functionality. All of the articles on data structures also detail their useful methods.